Appearance
Configure an on-site standard operation (SOP) template
Overview
On-site standard operations (SOPs) divide an engineer's on-site service into procedures and actions. You can configure their sequence, assignees, conditions, required checks, recurring tasks, and procedure check-ins. This page covers work order SOPs for internal engineers. For other subjects, see Configure equipment on-site standard operations and Configure service provider on-site standard operations.
Before you begin
- Use an administrator account with on-site standard operation and work order process configuration permissions.
- Personnel fields such as service engineers and collaborative engineers on the work order and their object permissions have been determined.
- Sort out the processes, actions, required requirements, repetition frequency and completion conditions of on-site services.
- If you need to punch in the process, first configure the punching scene and rules such as distance, positioning, and photography.
Create a new standard job template
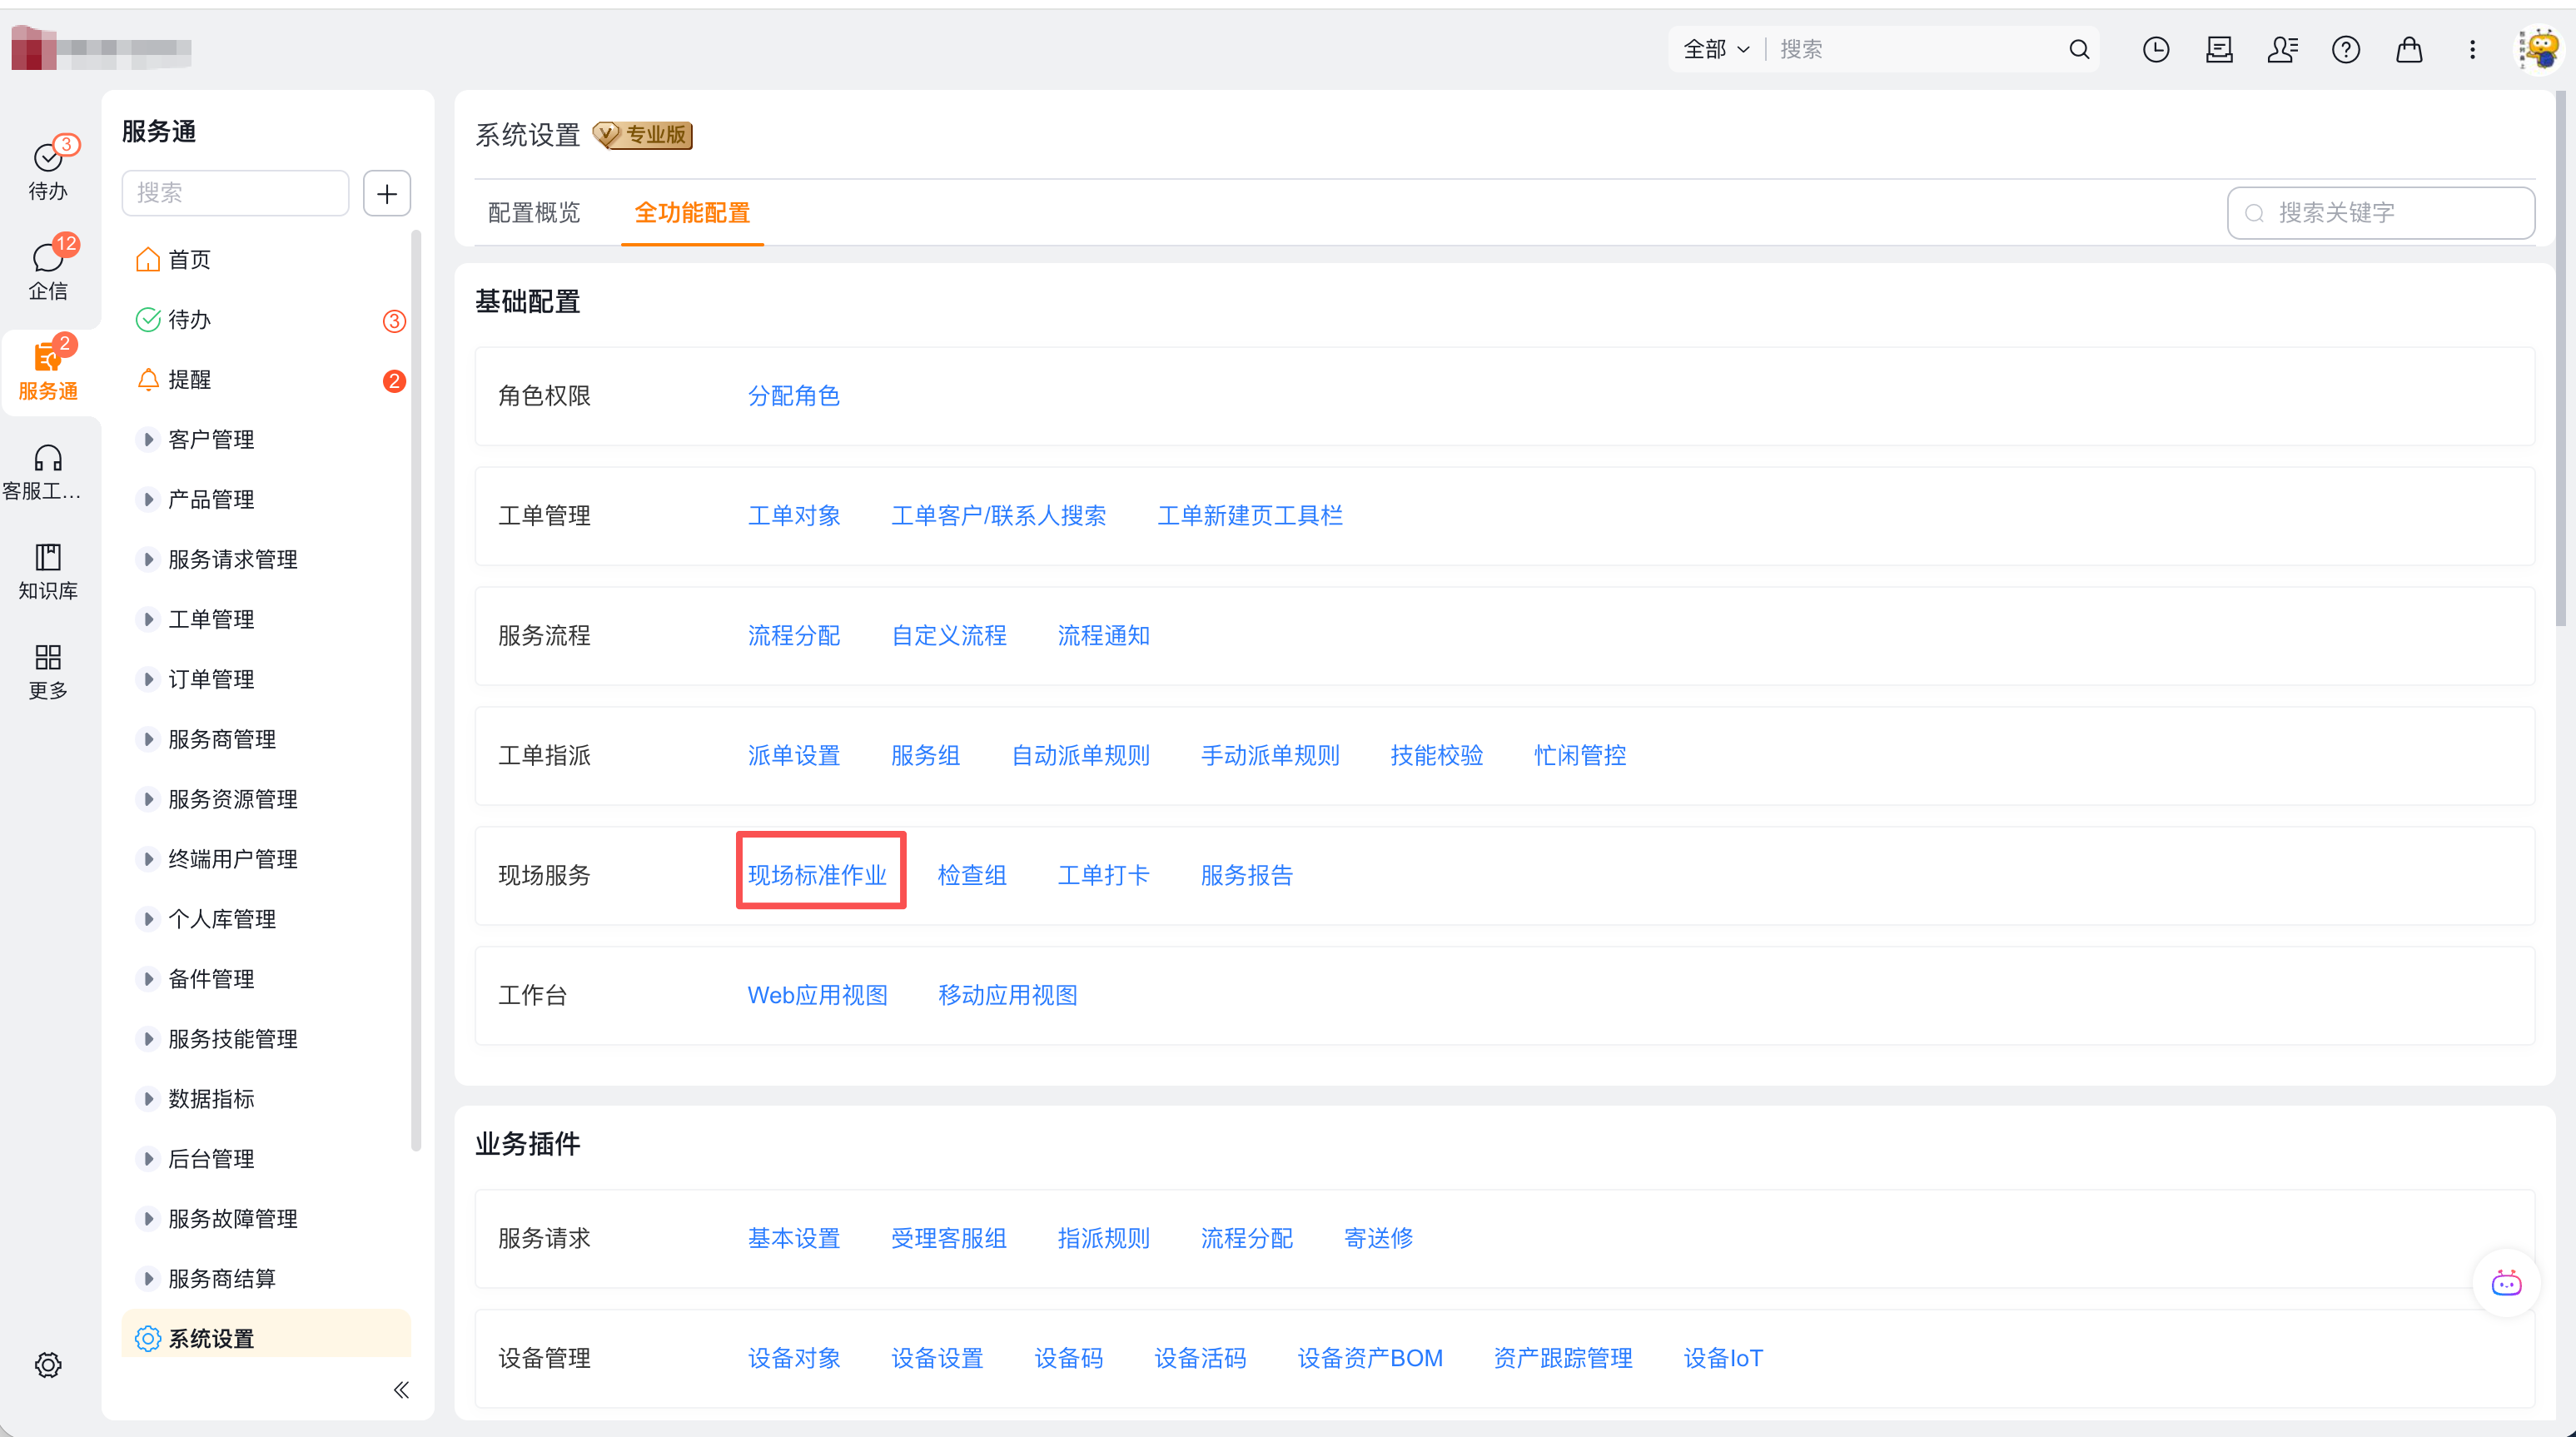
Go to Service > System Settings > On-site Standard Operation.
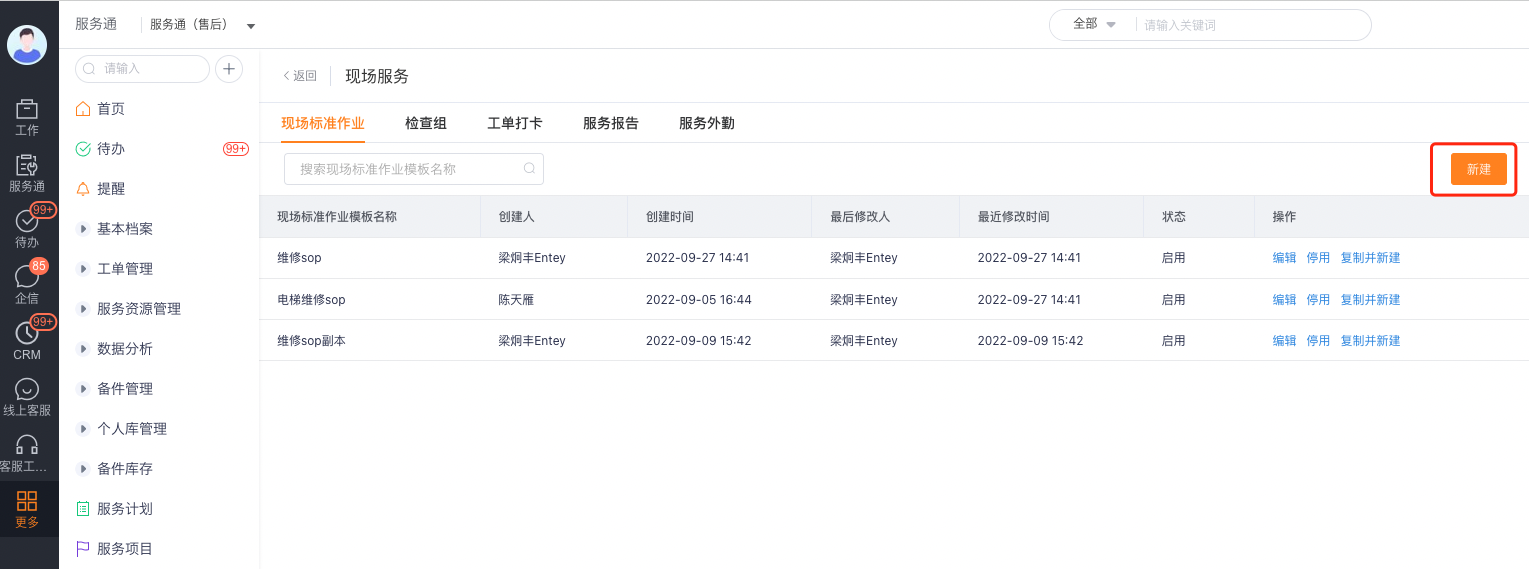
Click New.
Enter the template's basic information:
Configuration item Description Name Standard job name, used for process node selection and engineer identification Description Record the business purpose and usage instructions of the template Type Select the template for internal use of the enterprise or for service providers; this article configures the internal template of the enterprise Scope of application For process nodes to match templates according to rules Process layout Select single process or multi-process layout 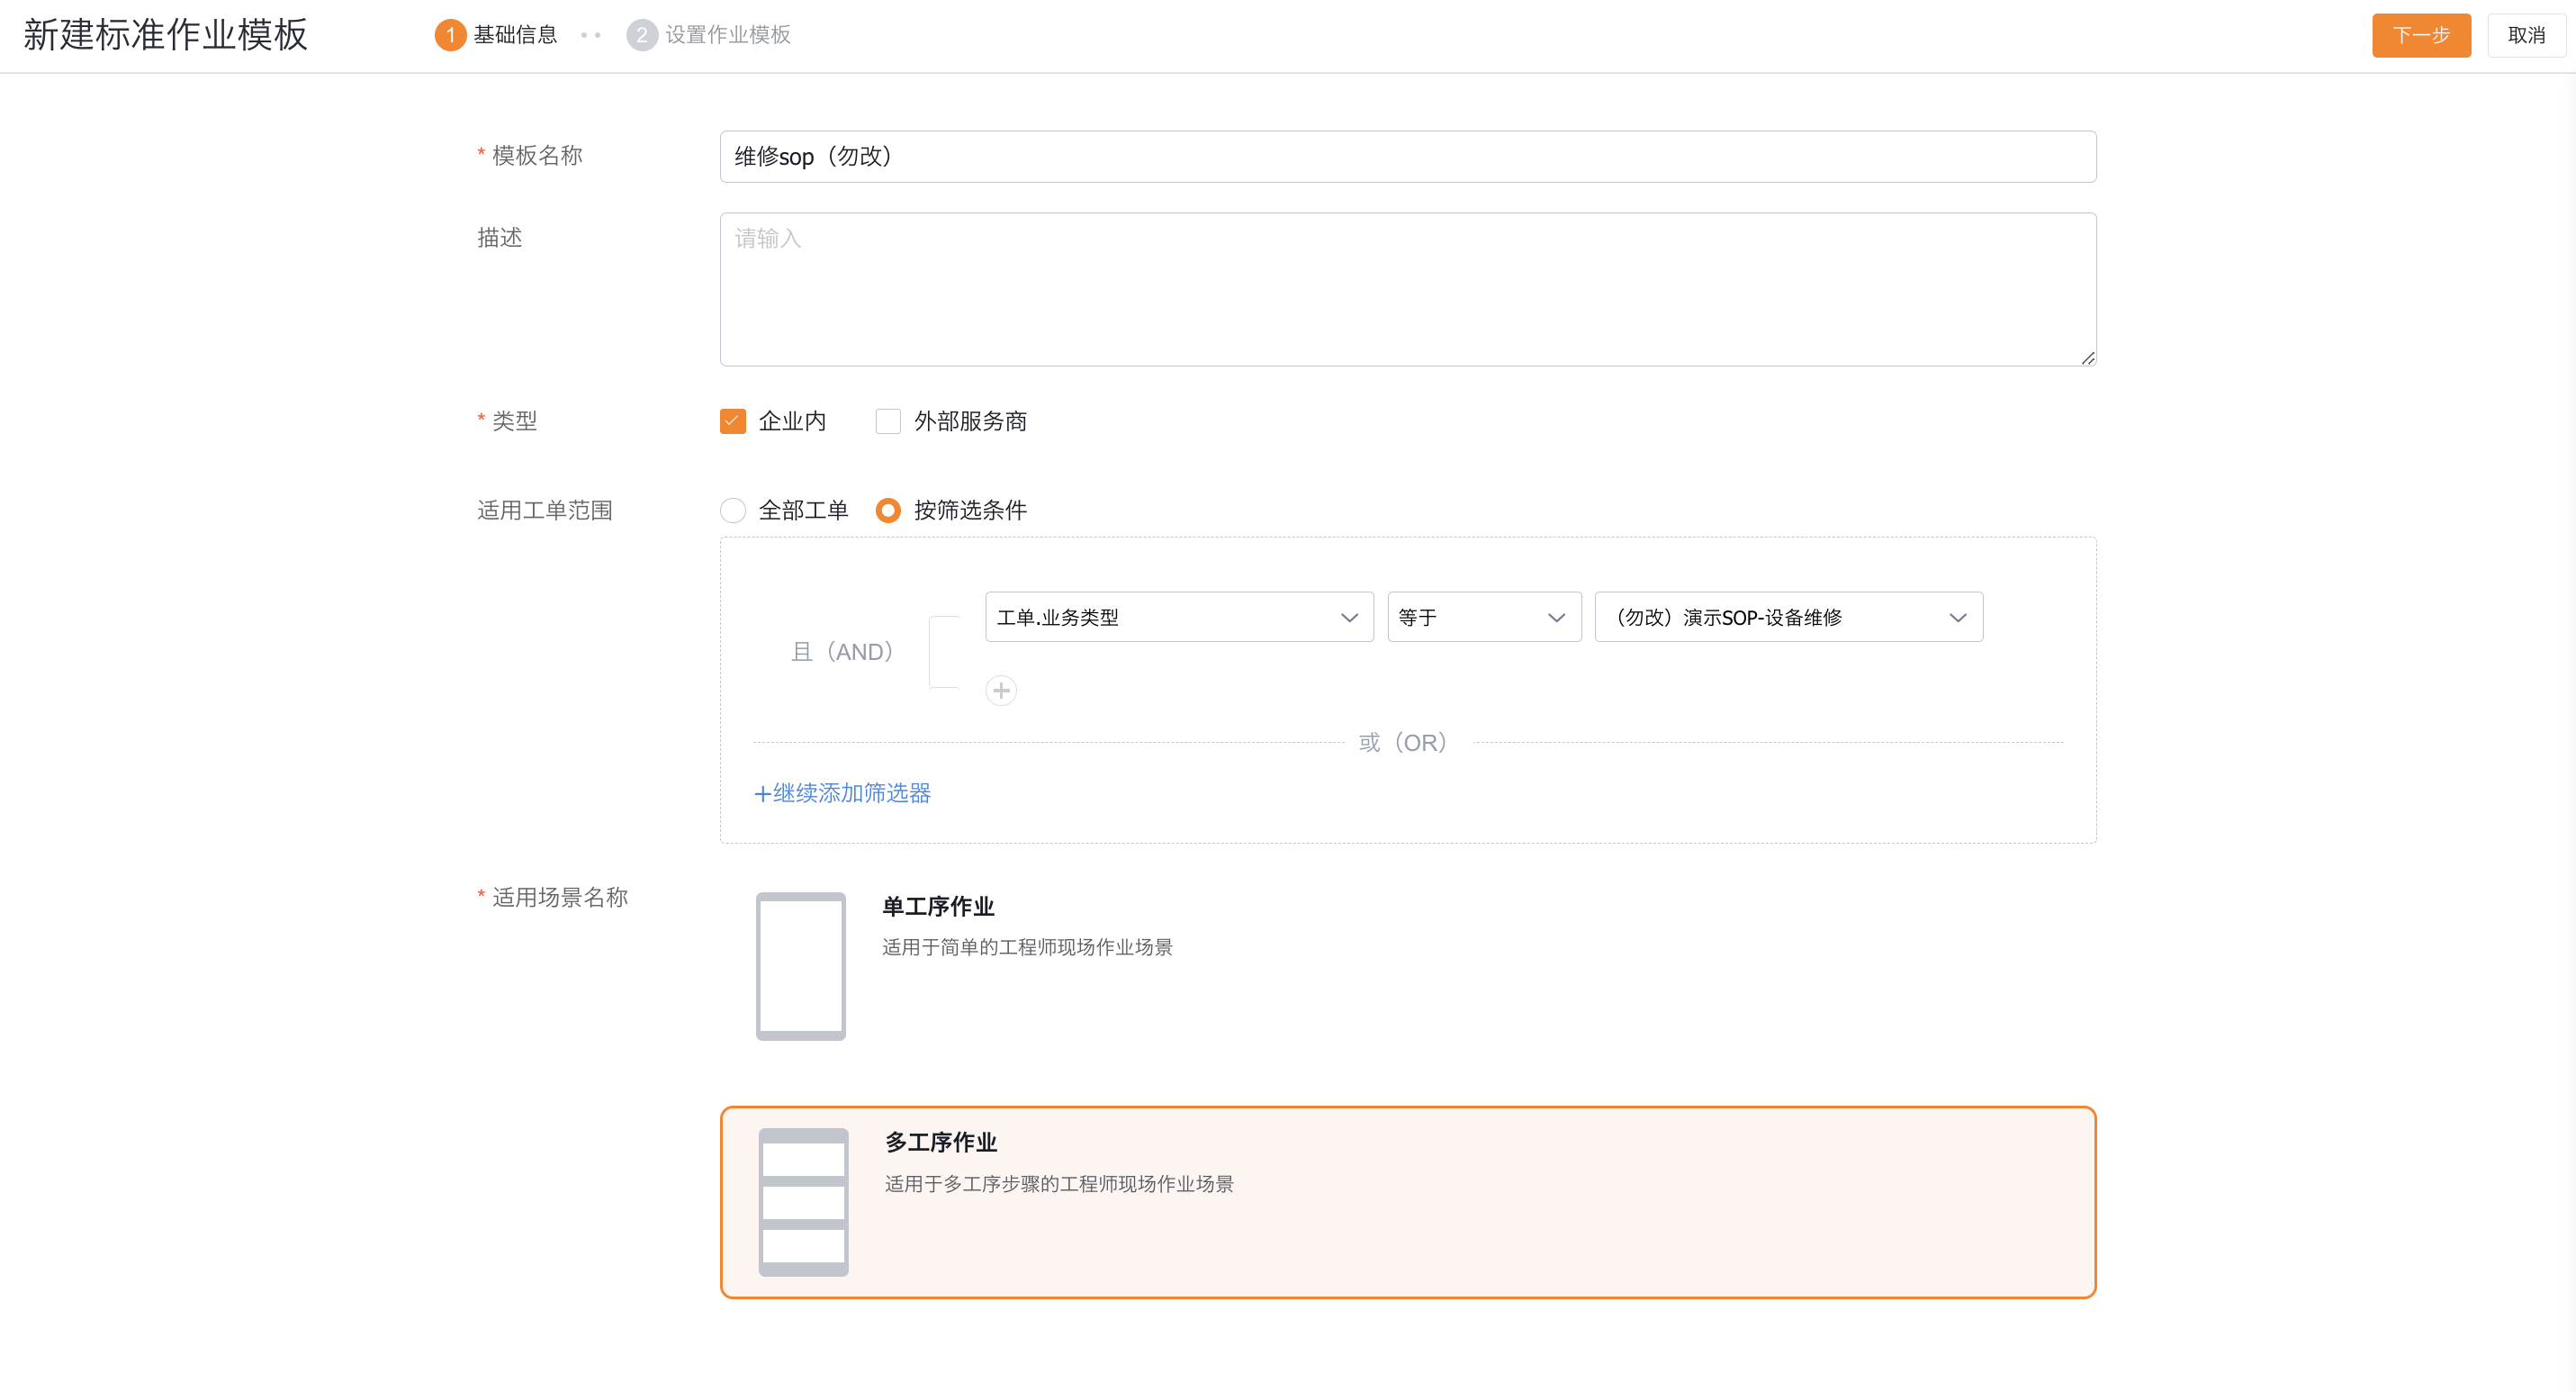
When the same work order business type needs to use different operation steps, you can create templates separately and set their respective scopes of application and priorities, and then select matching by rules in the process node. The scope of application and priority of the template jointly determine the final matching result.
Configuration process
Processes are used to divide stages such as preliminary preparation, maintenance tasks, and result inspection.
- When selecting a multi-process layout, click "+" to add a process; the single-process layout does not display the add button.
- Select the process panel and fill in the process name and description.
- Organize the processes according to the actual execution sequence; unnecessary processes can be removed through the Delete button on the process.
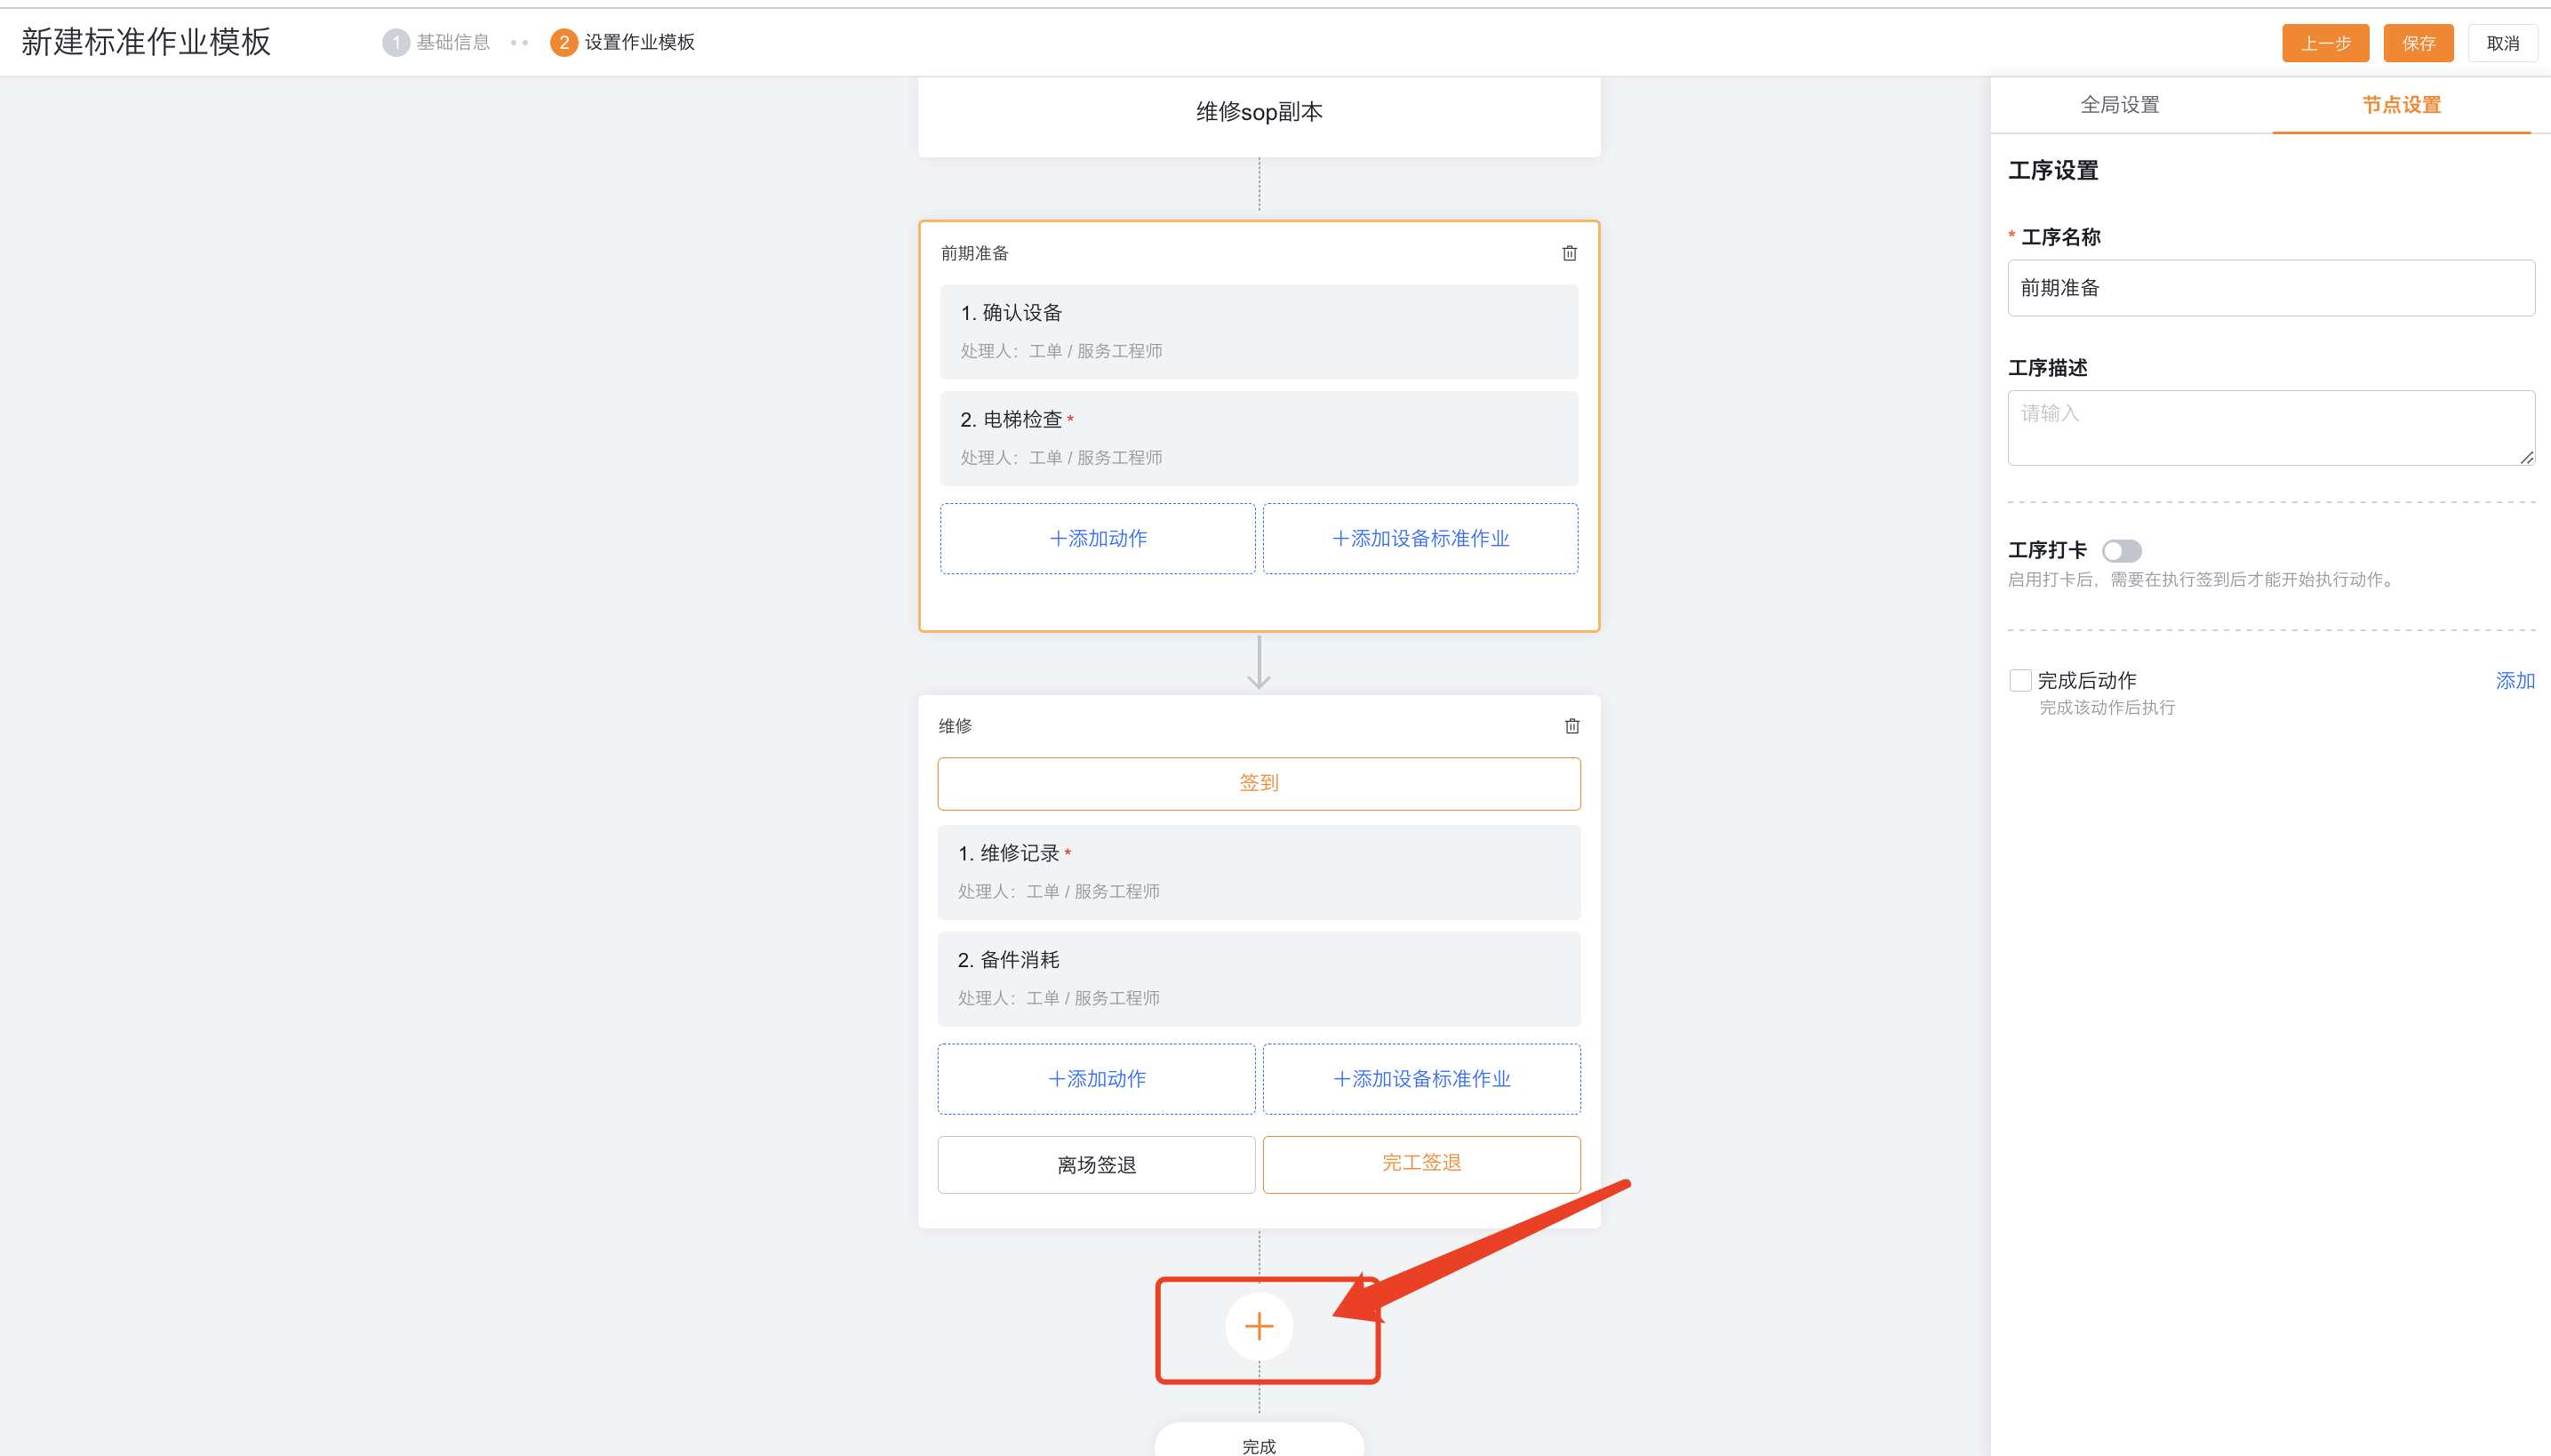
Configure process check-in
Procedure check-in is optional. When enabled, the assignee checks in before starting the procedure. The SOP can finish only after every procedure is checked out. The system stores this data in Work Order Check-in Record.
When there are multiple action handlers in the same process, the clock-in of each handler is independent of each other and invisible to each other. For example, when engineers A and B are both process action handlers, A and B must sign in separately to perform their actions; when they complete and sign out separately, the system will verify all required actions for the process.
Single procedure check-in
Suitable for on-site service completed in one session or within one day.
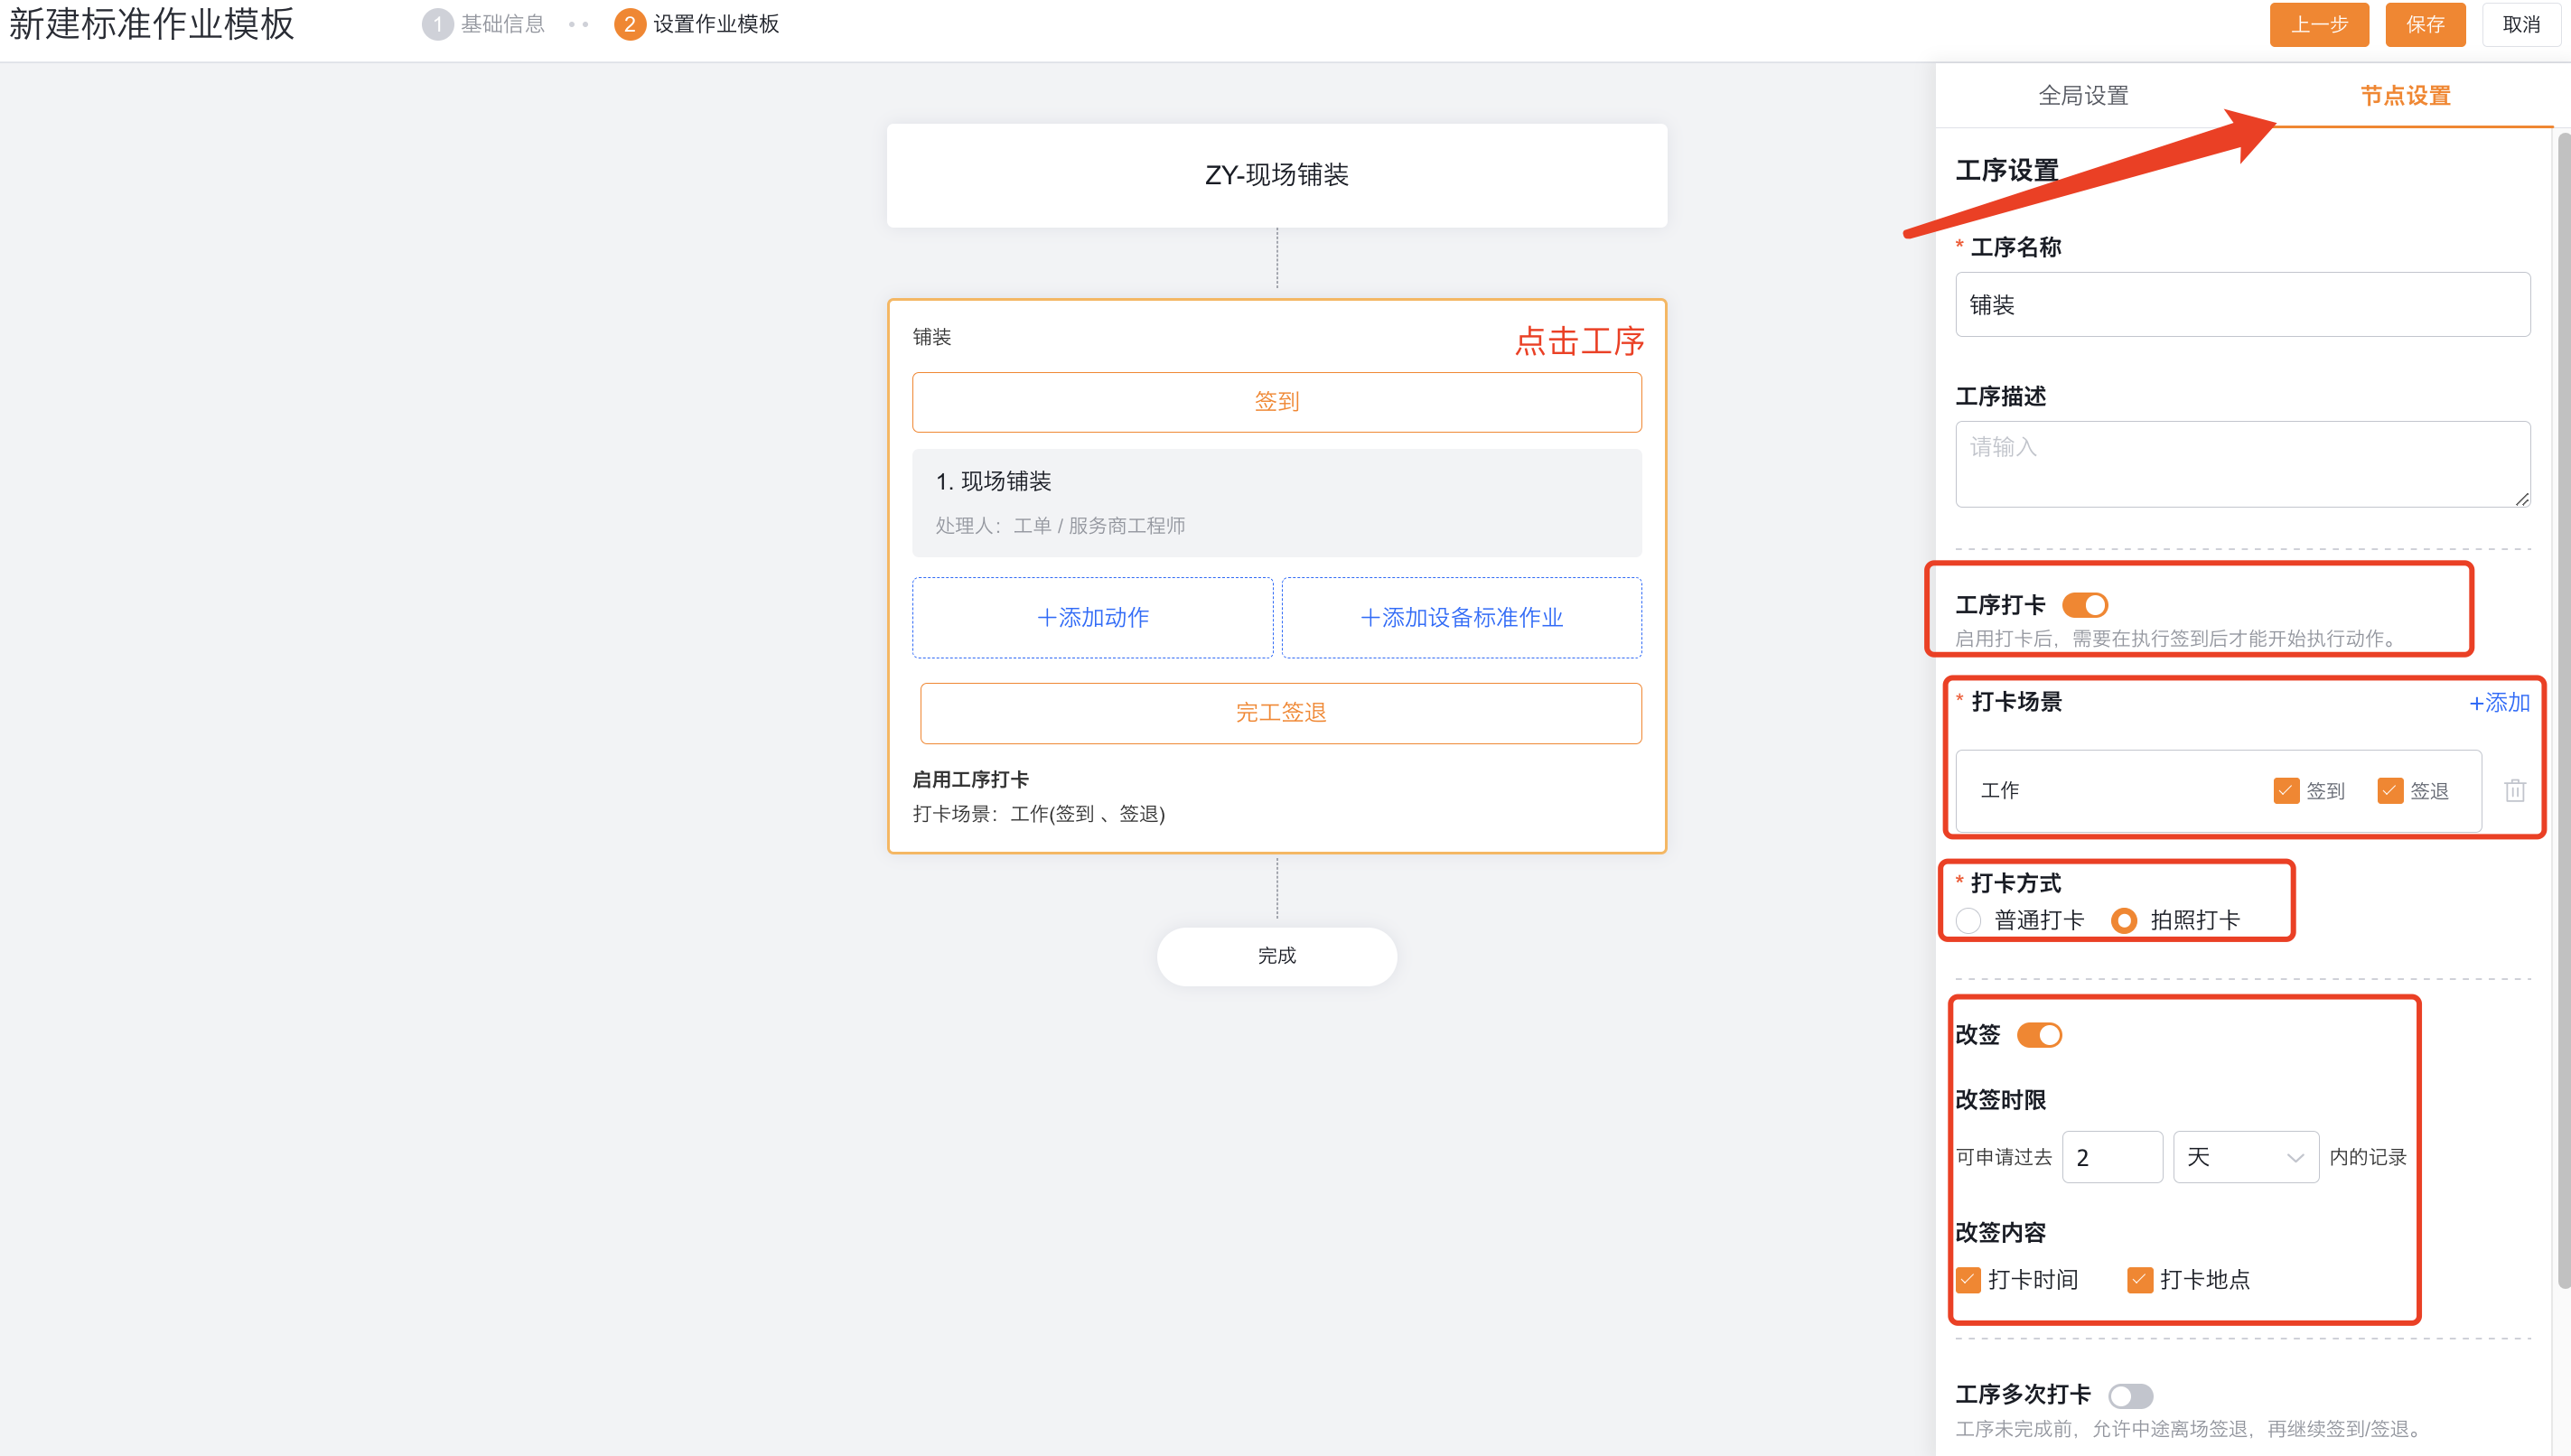
- Select a process and enable process punch.
- Select the configured check-in scene. Rules such as distance verification, location fine-tuning, photo watermarks, and international maps are determined by the check-in scenario and the work order check-in management configuration.
- Choose normal check-in or photo check-in.
- Configure the time limit for rebooking and the content that can be changed as needed.
Check in multiple times for the process
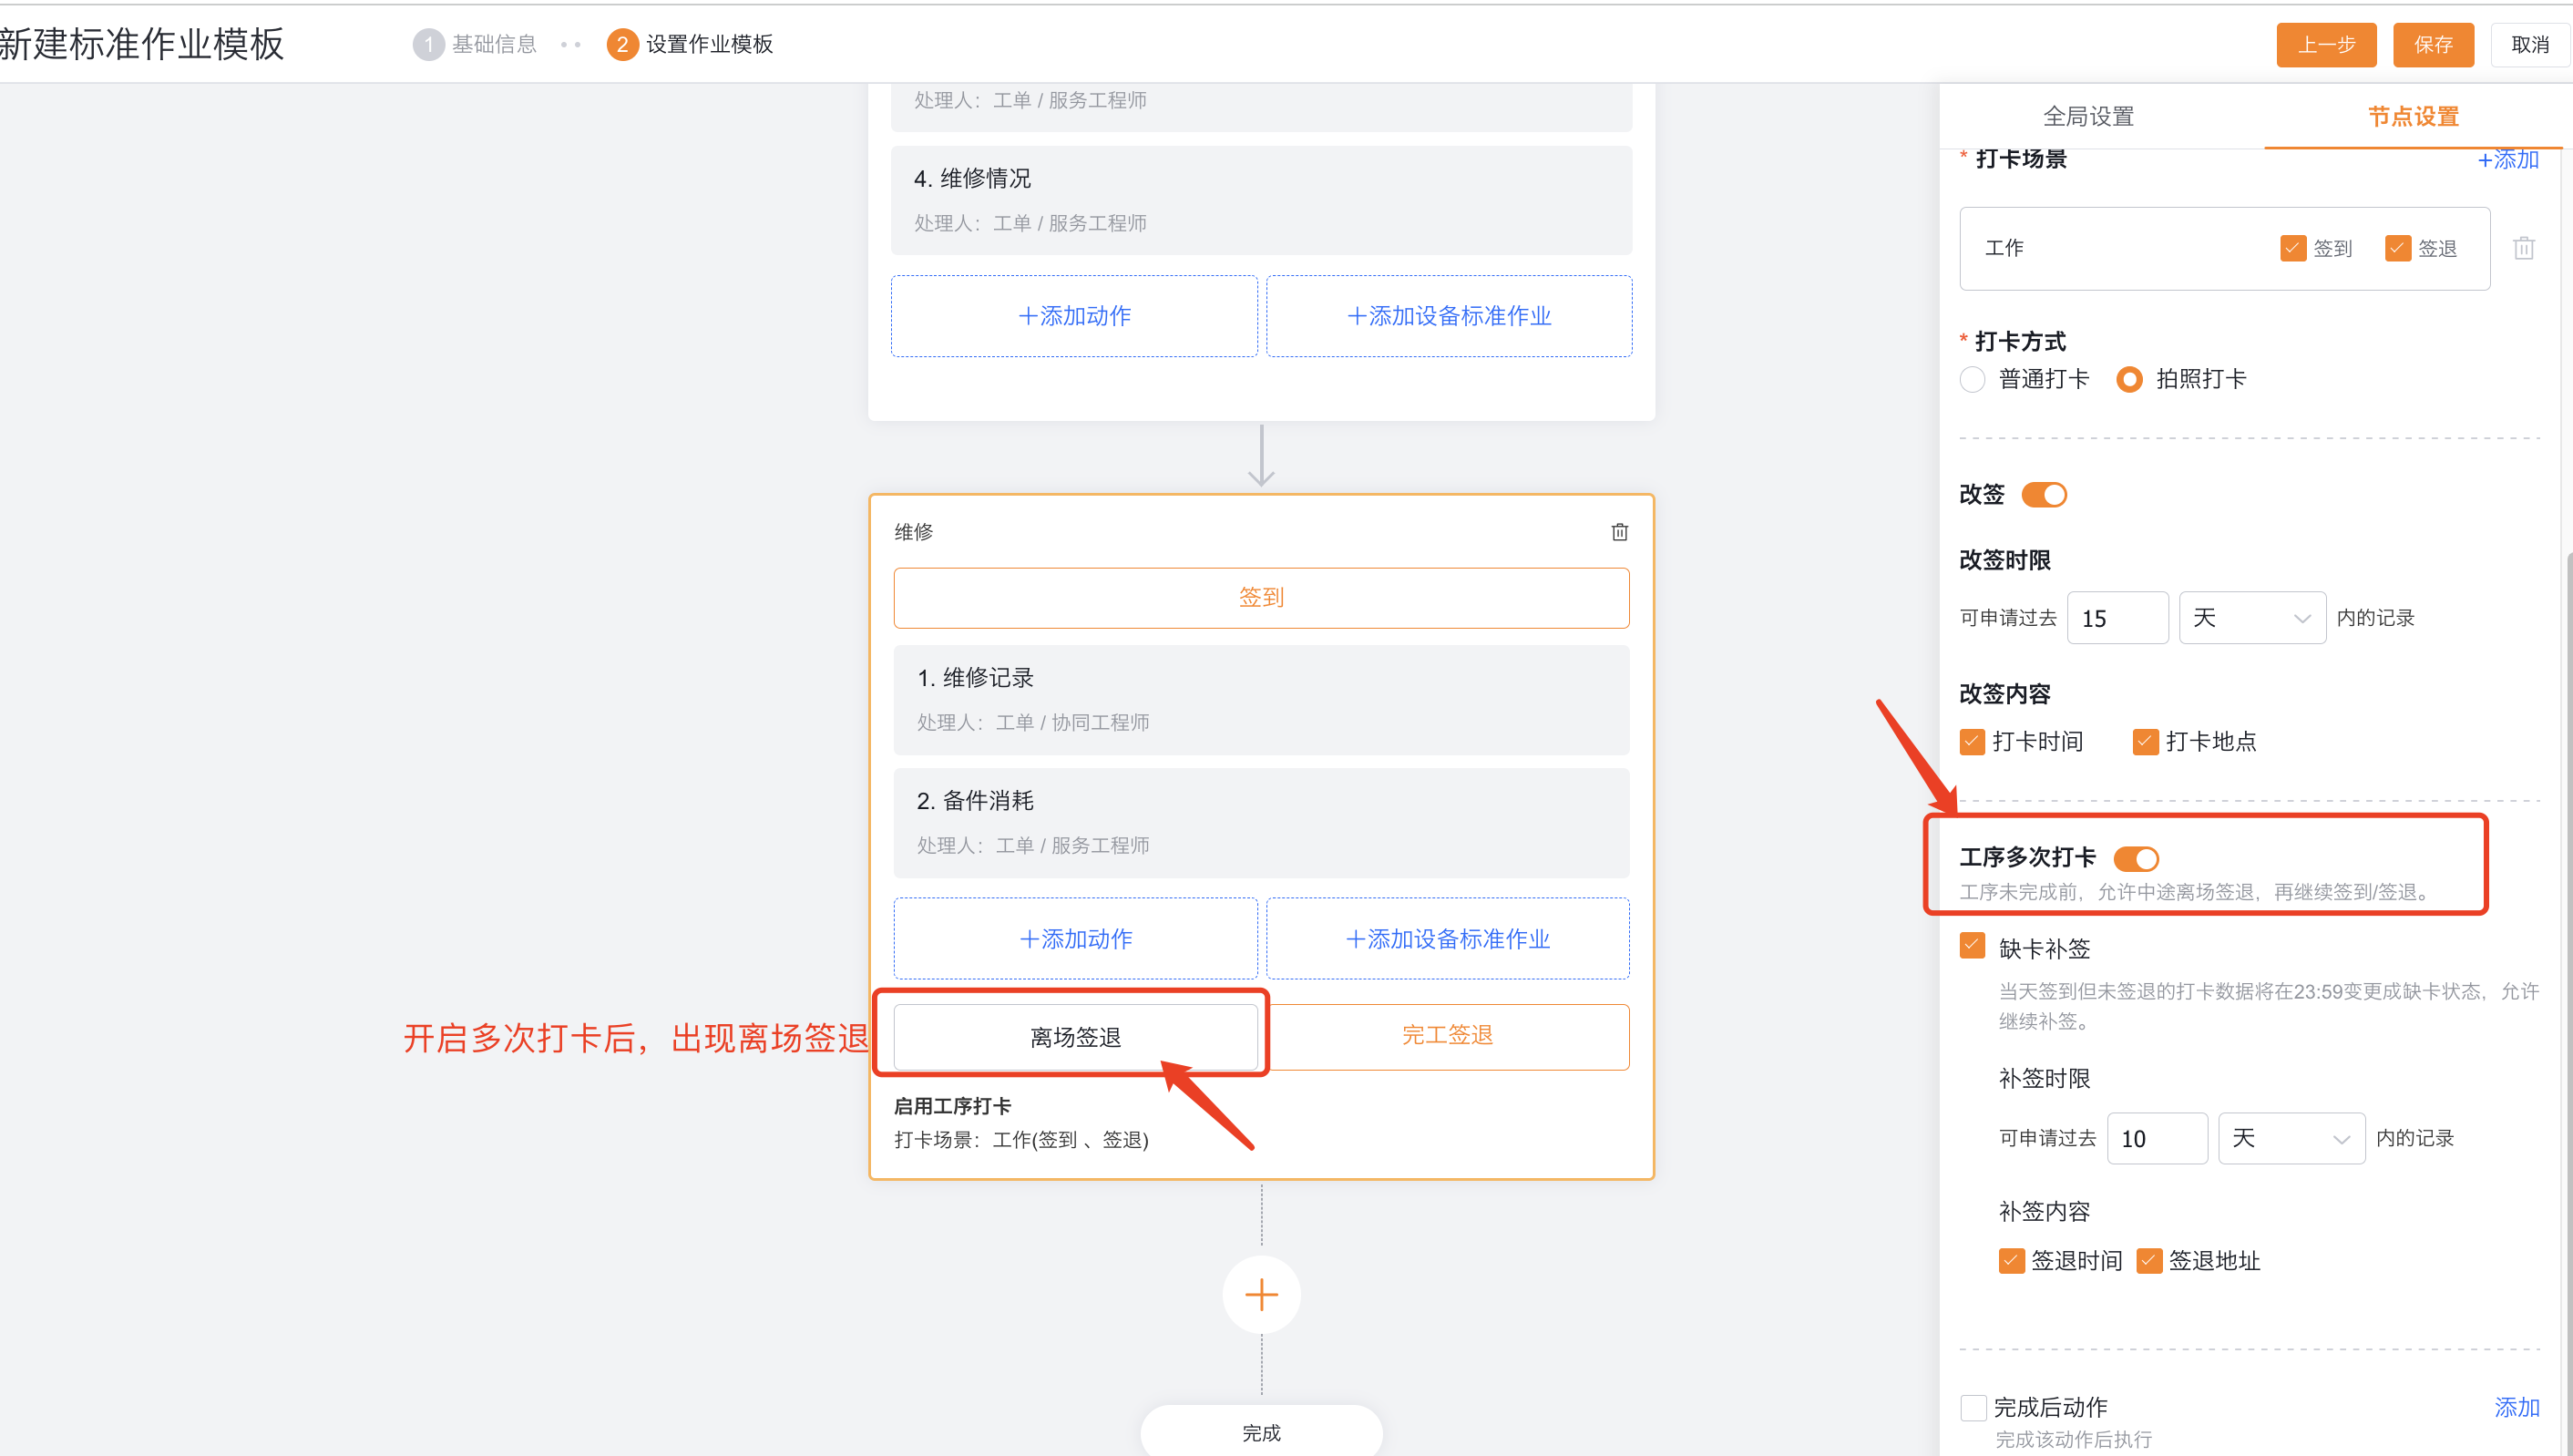
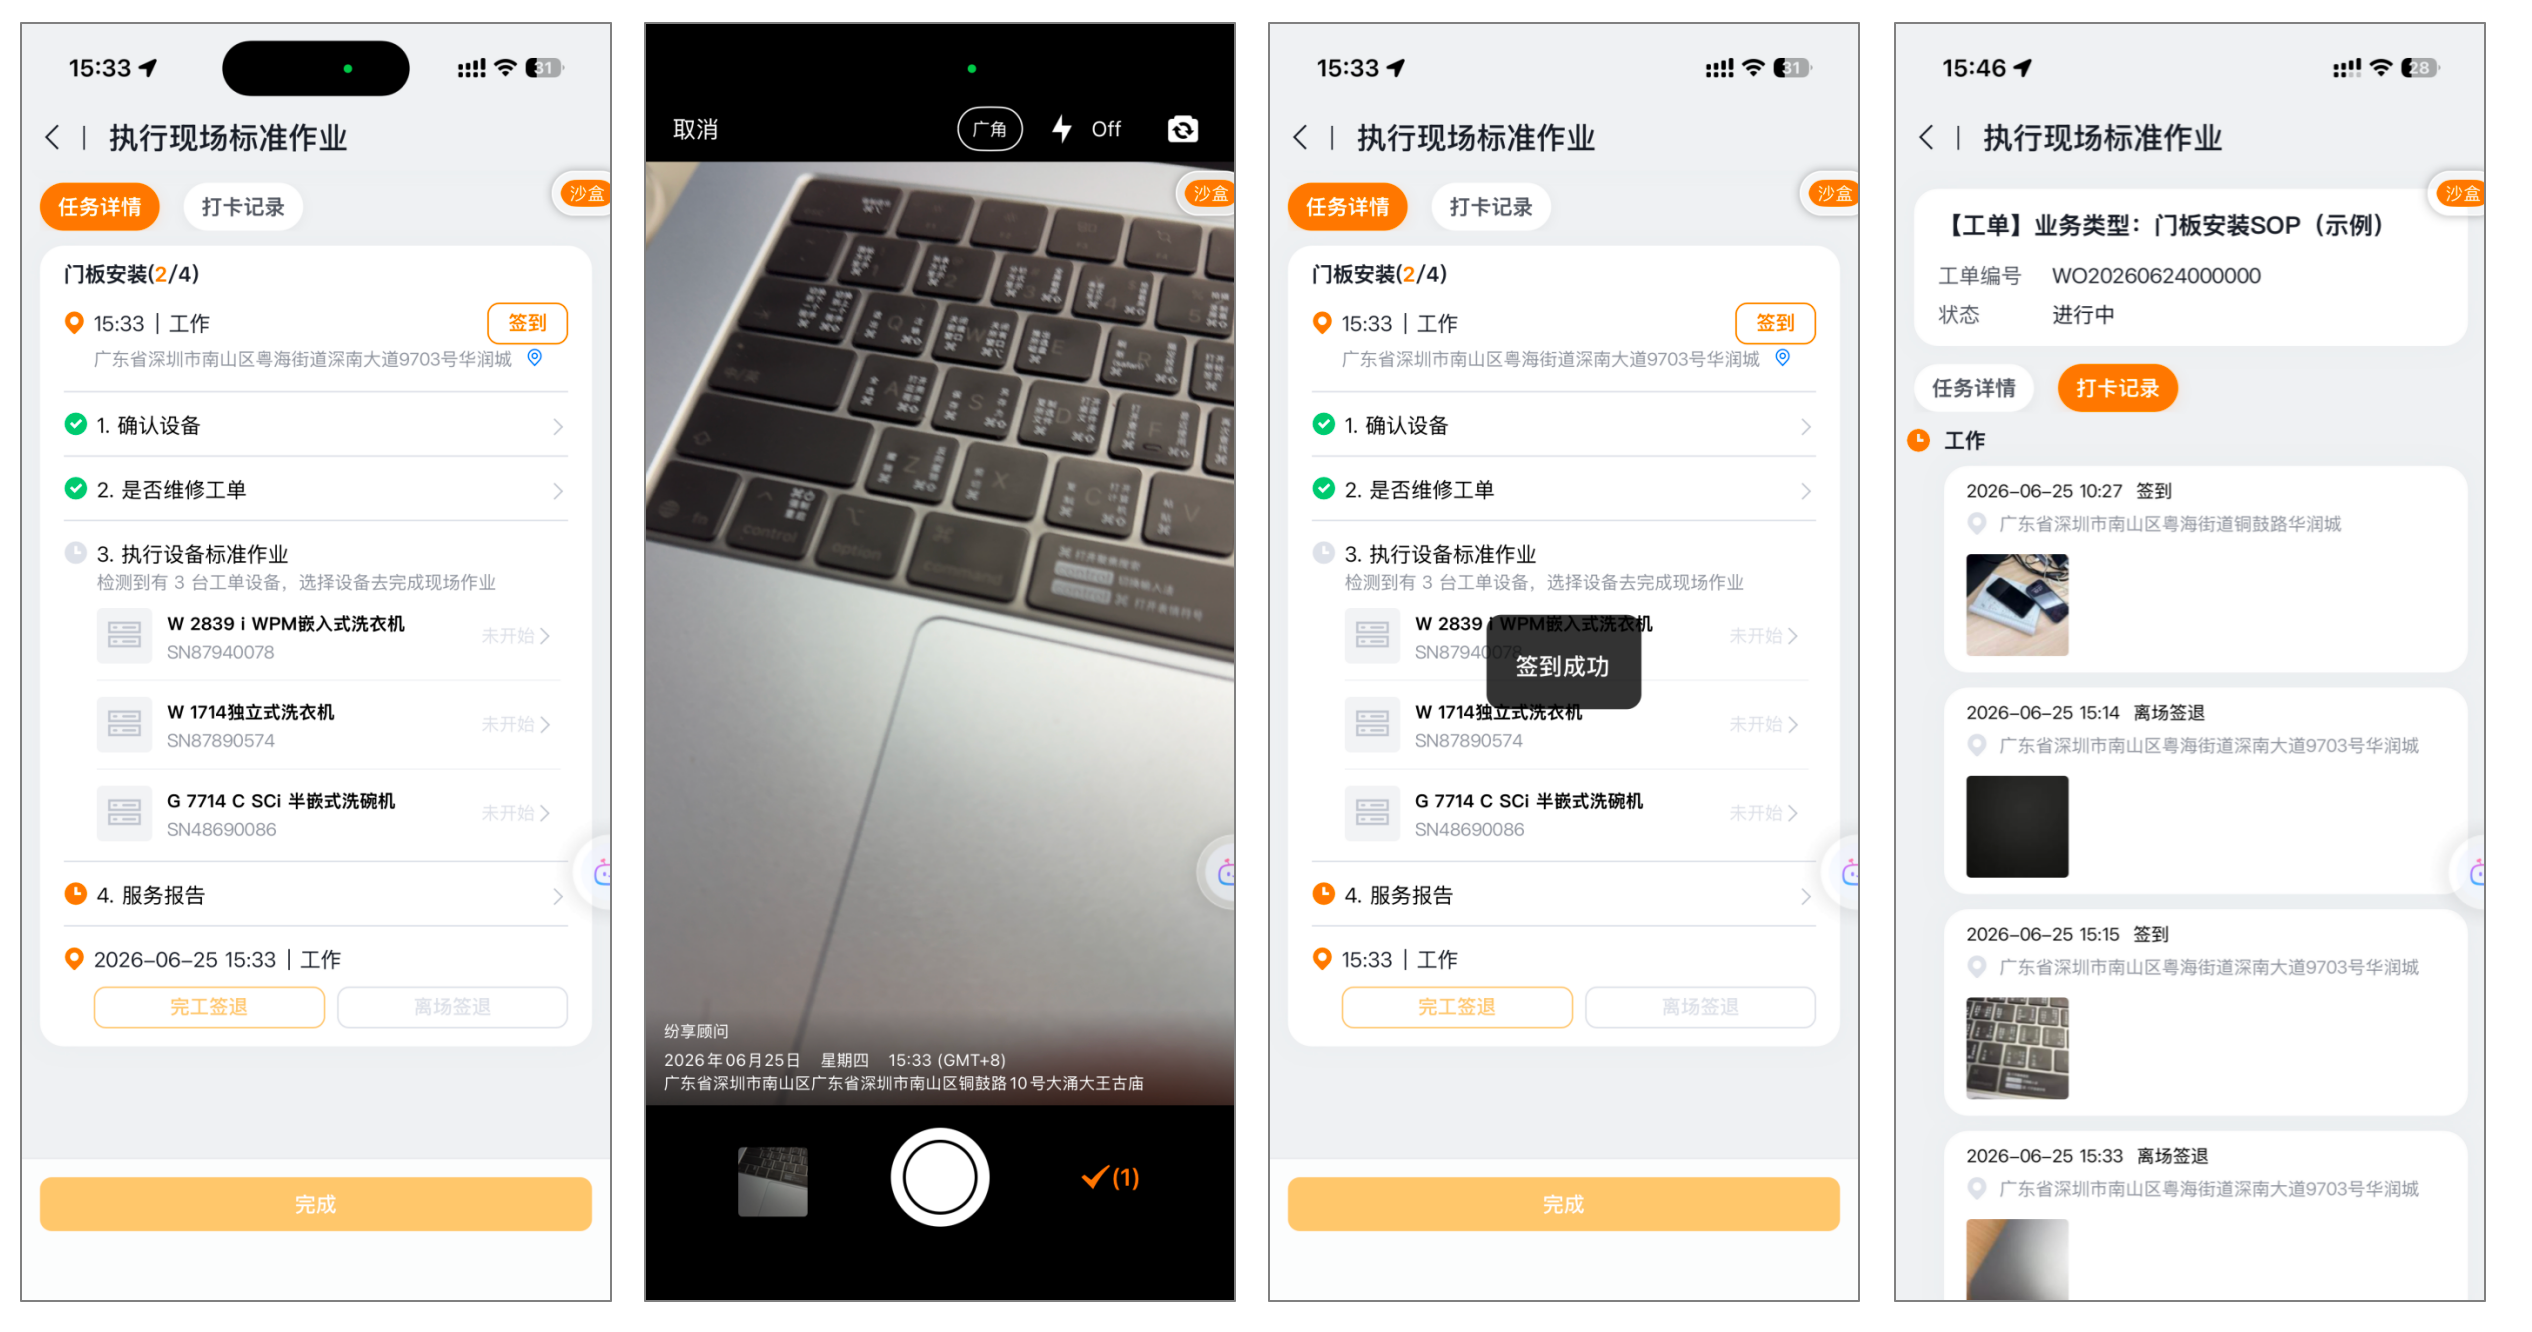
Multiple check-ins are suitable for services that require multiple entries and exits before the process is completed. After enabling, the check-in page displays Check-out:
- The handler clicks Check out to end this check-in, but the process is not completed. He can check in again and continue to perform the action.
- After the processor clicks Complete Sign Out, the system verifies the required actions and completes the process for the current processor.
- Records of people who signed in but did not sign out on the same day become missing cards at 23:59, and can be re-signed within the time limit allowed by the configuration.
Actions before and after the process
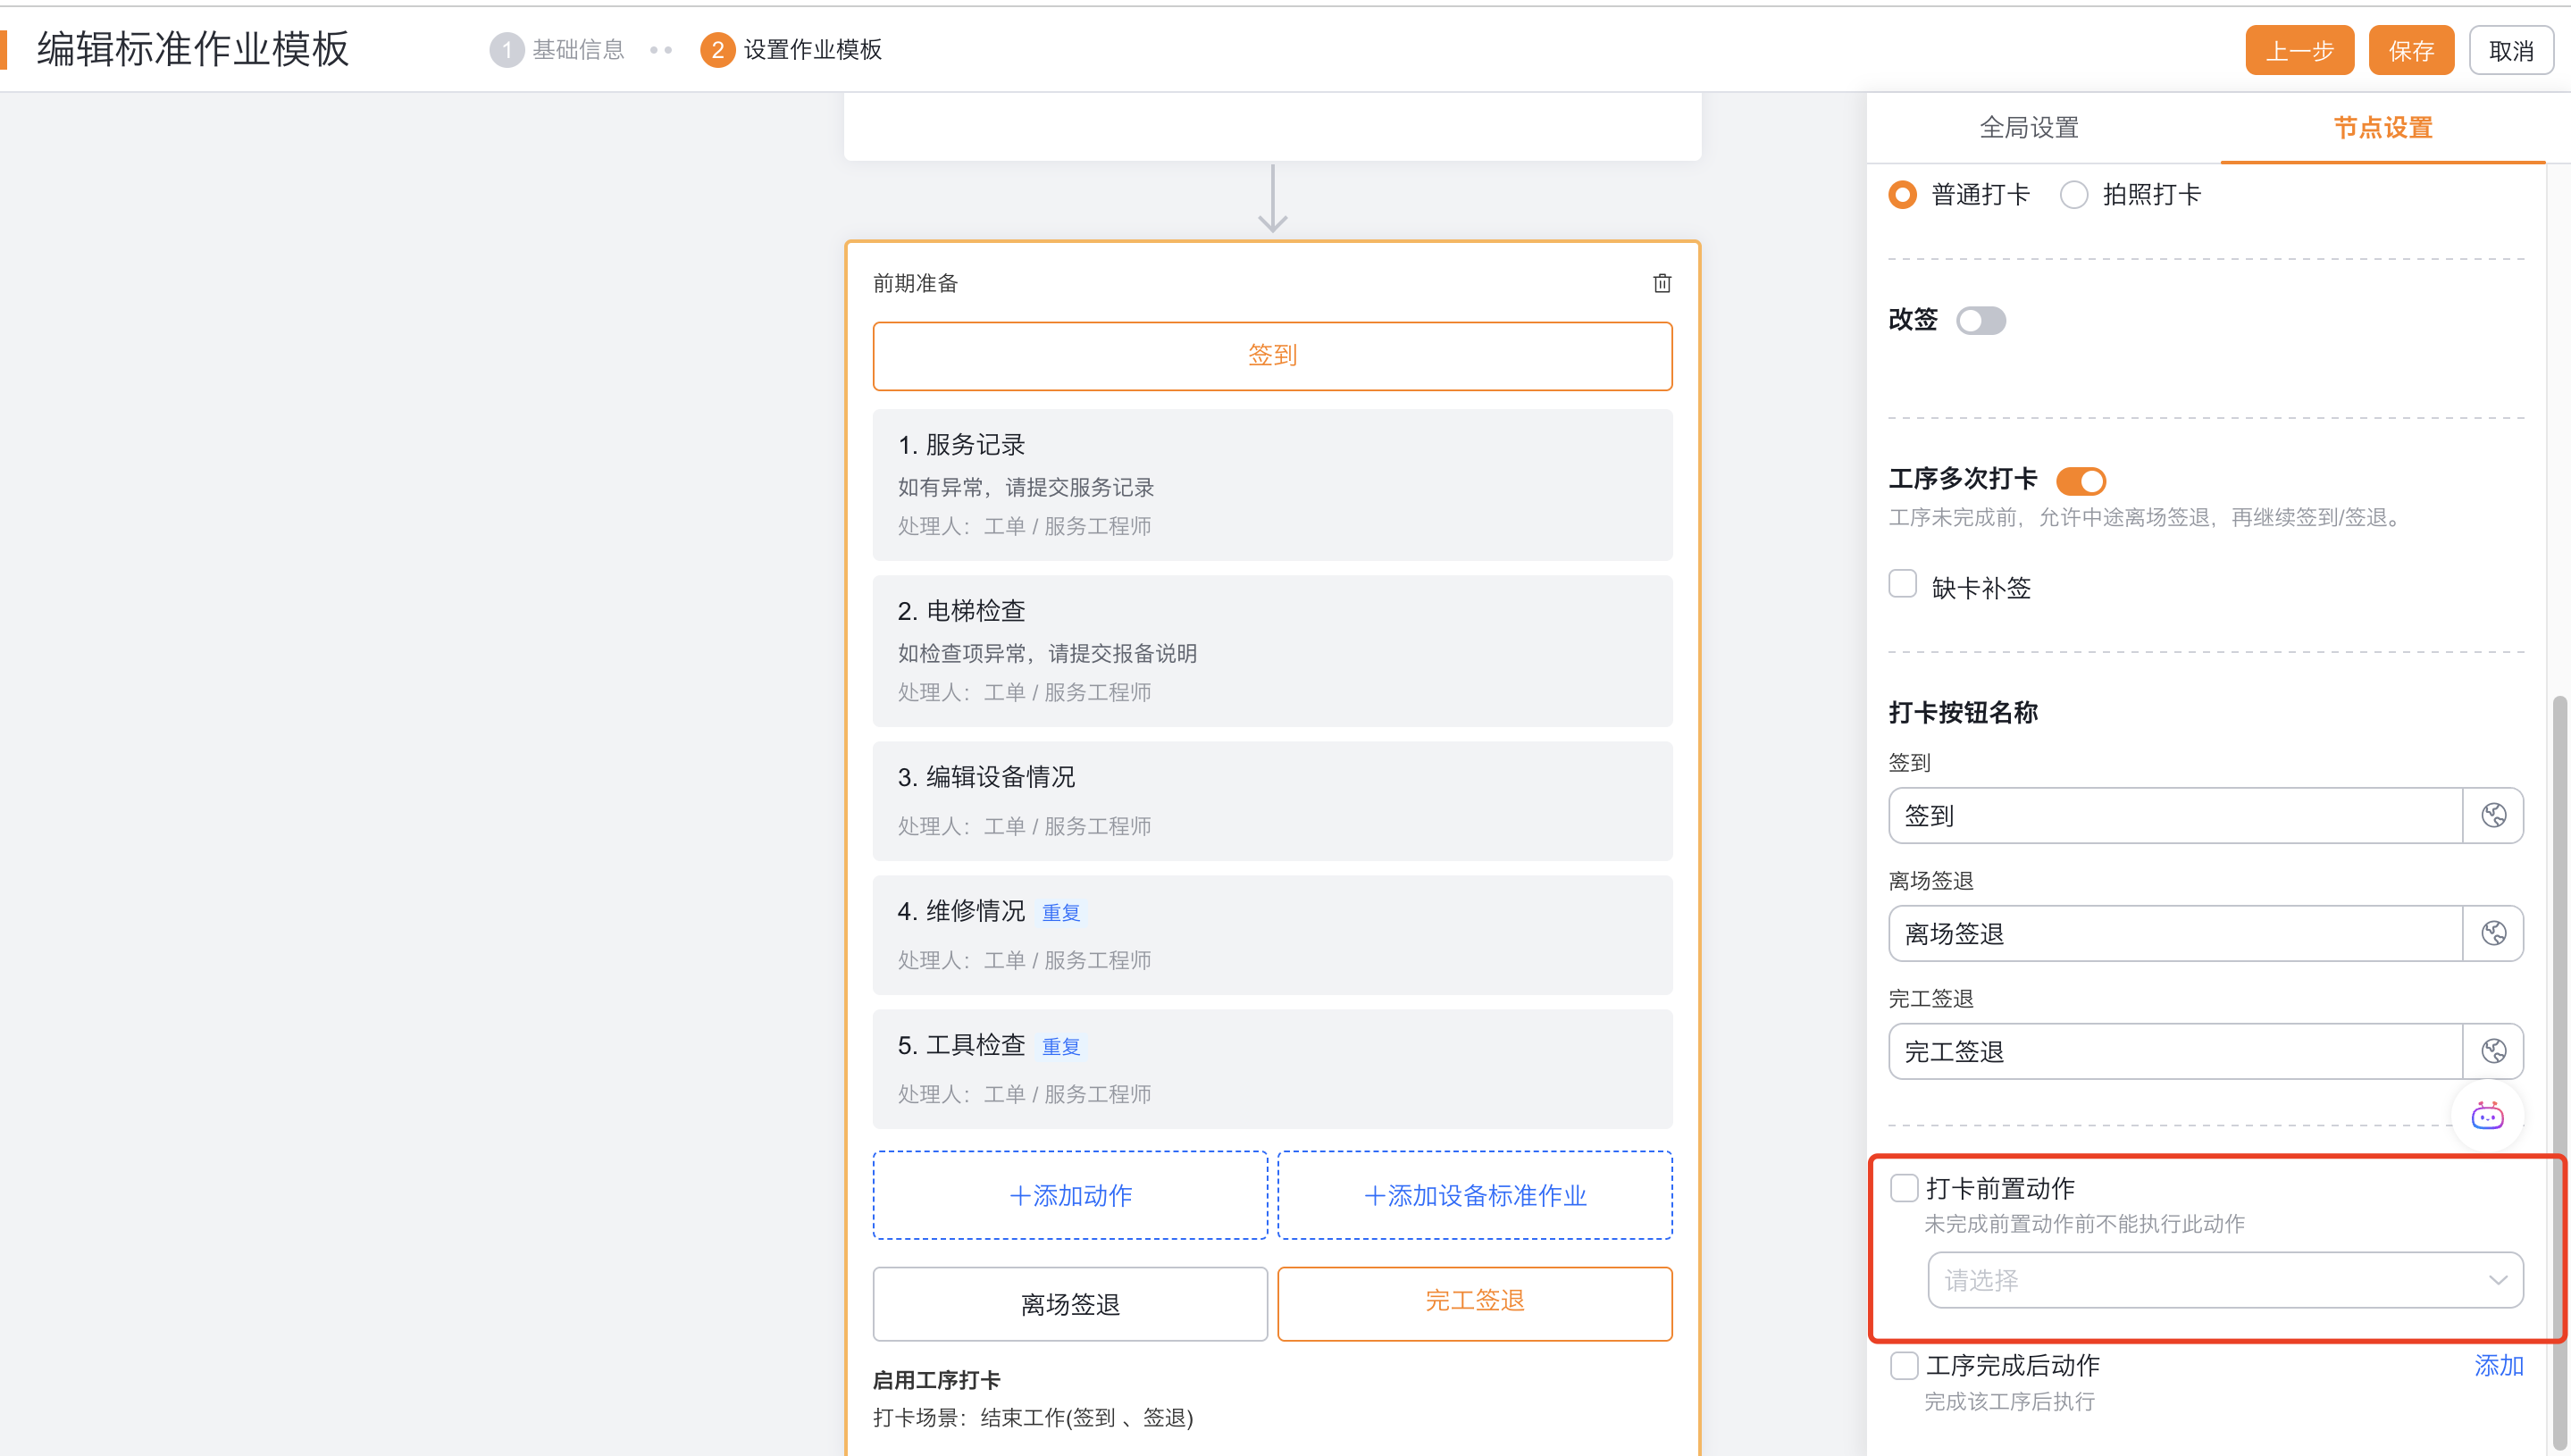
- In multi-process scenarios, pre-actions for sign-in can be set, and sign-in for this process cannot be started until the previous actions are completed.
- After the process is completed and signed out, the post-action function can be executed.
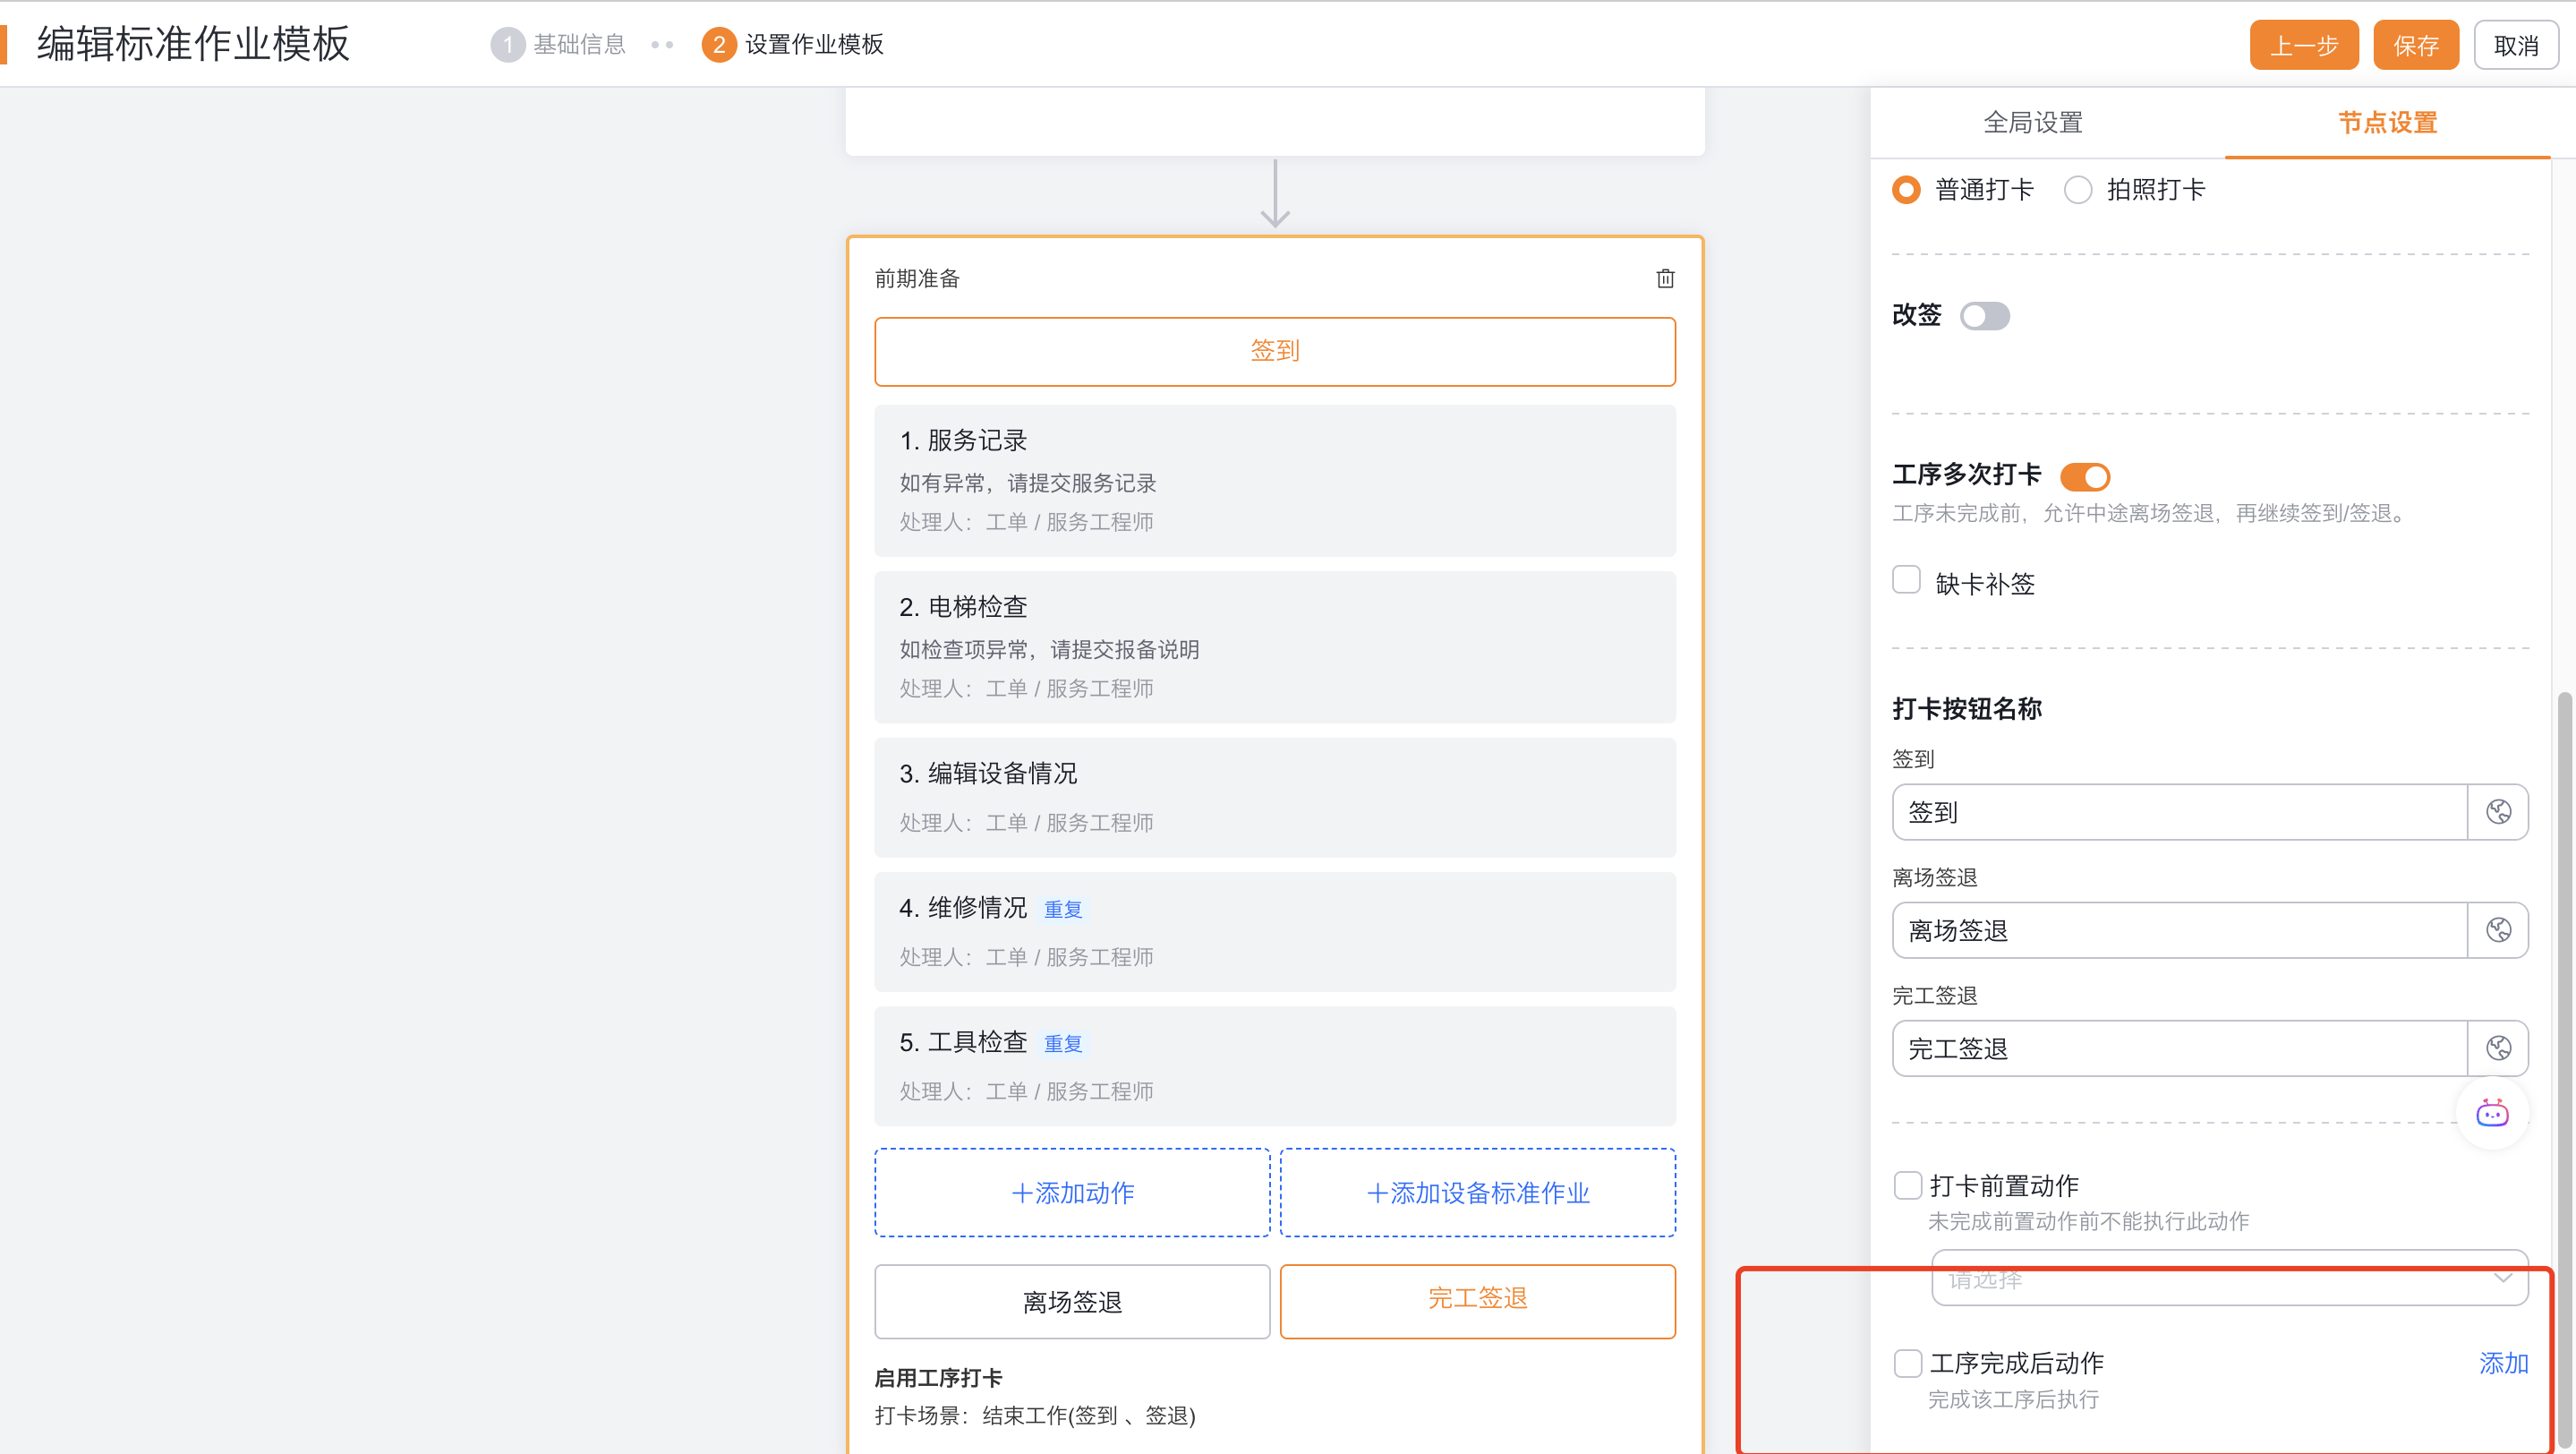
For shared rules such as check-in scenarios, distance, location, and corrections, see Configure work order check-in.
Select action mode
After clicking Add Action, configure the action name, description and mode in Node Settings on the right.
| Modes | Instances and Frequencies | Main Limitations |
|---|---|---|
| Single action | Each SOP instance generates only one action to be processed; even if there are multiple handlers, there is only one action instance | Configurable pre-actions, required fields, completion conditions and post-completion actions |
| Repeating actions | Continuously generated by unlimited times, once a day or once per check-in | Unlimited actions cannot be set as required |
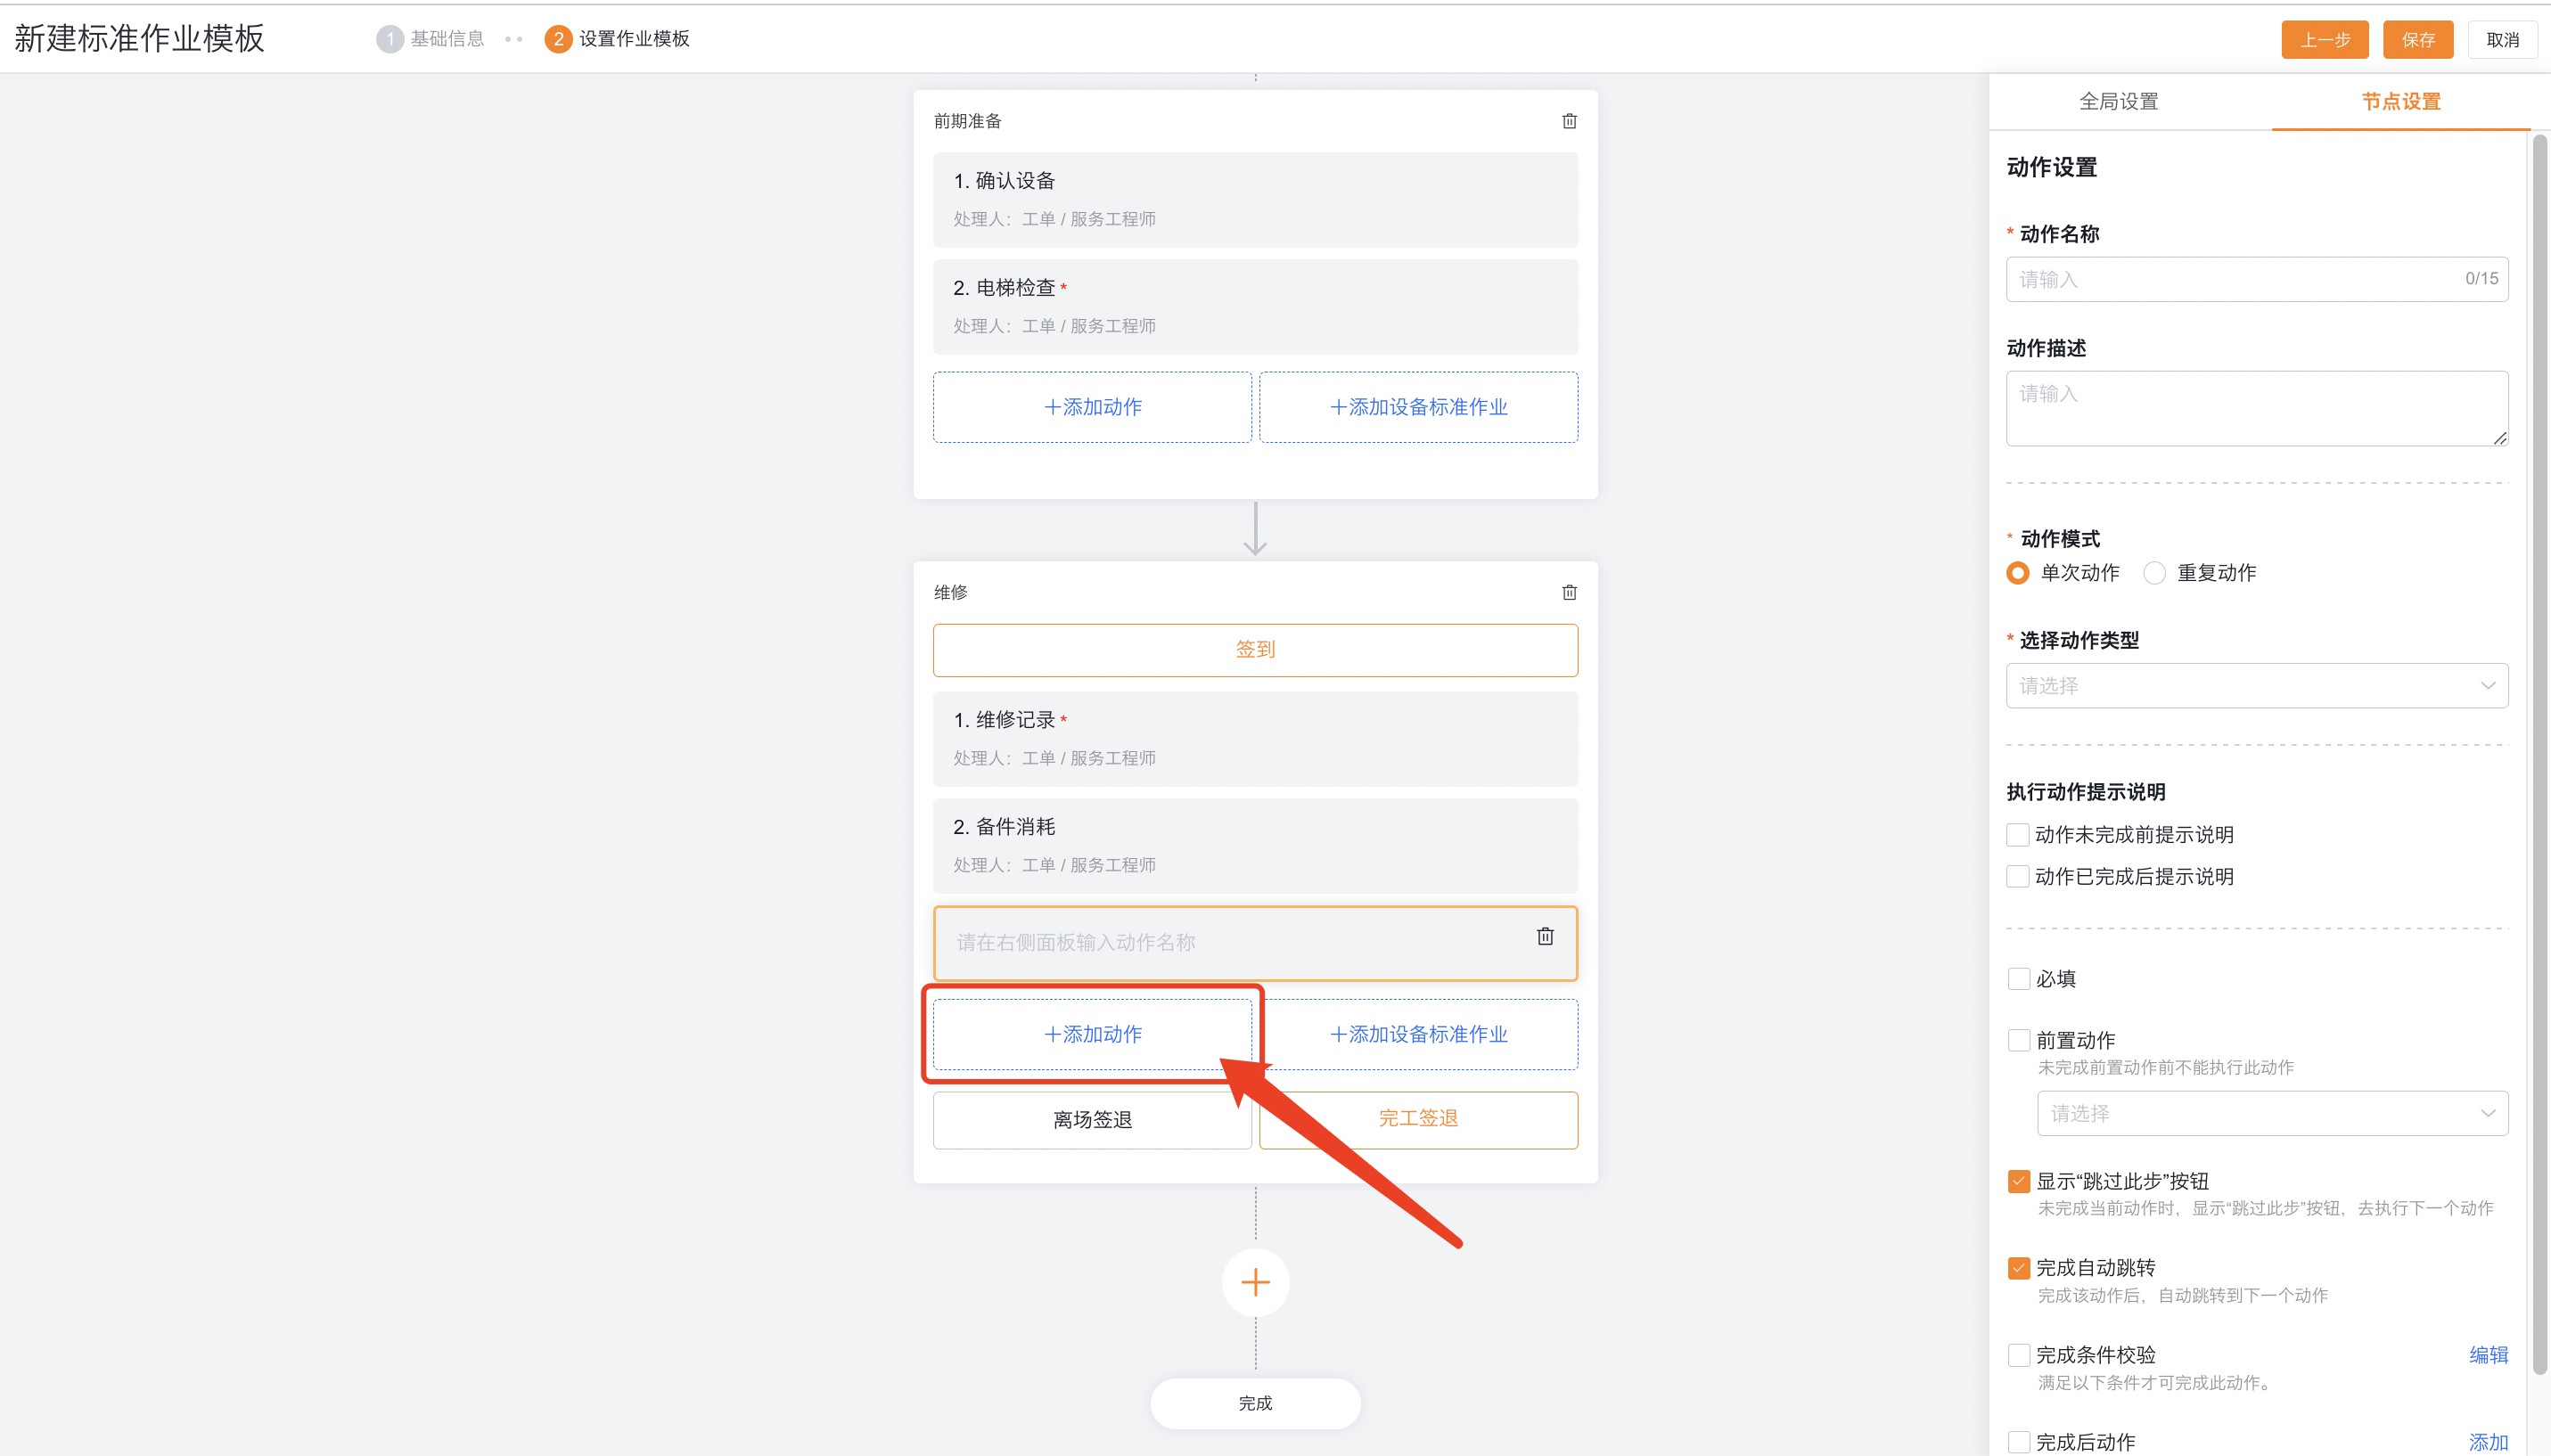
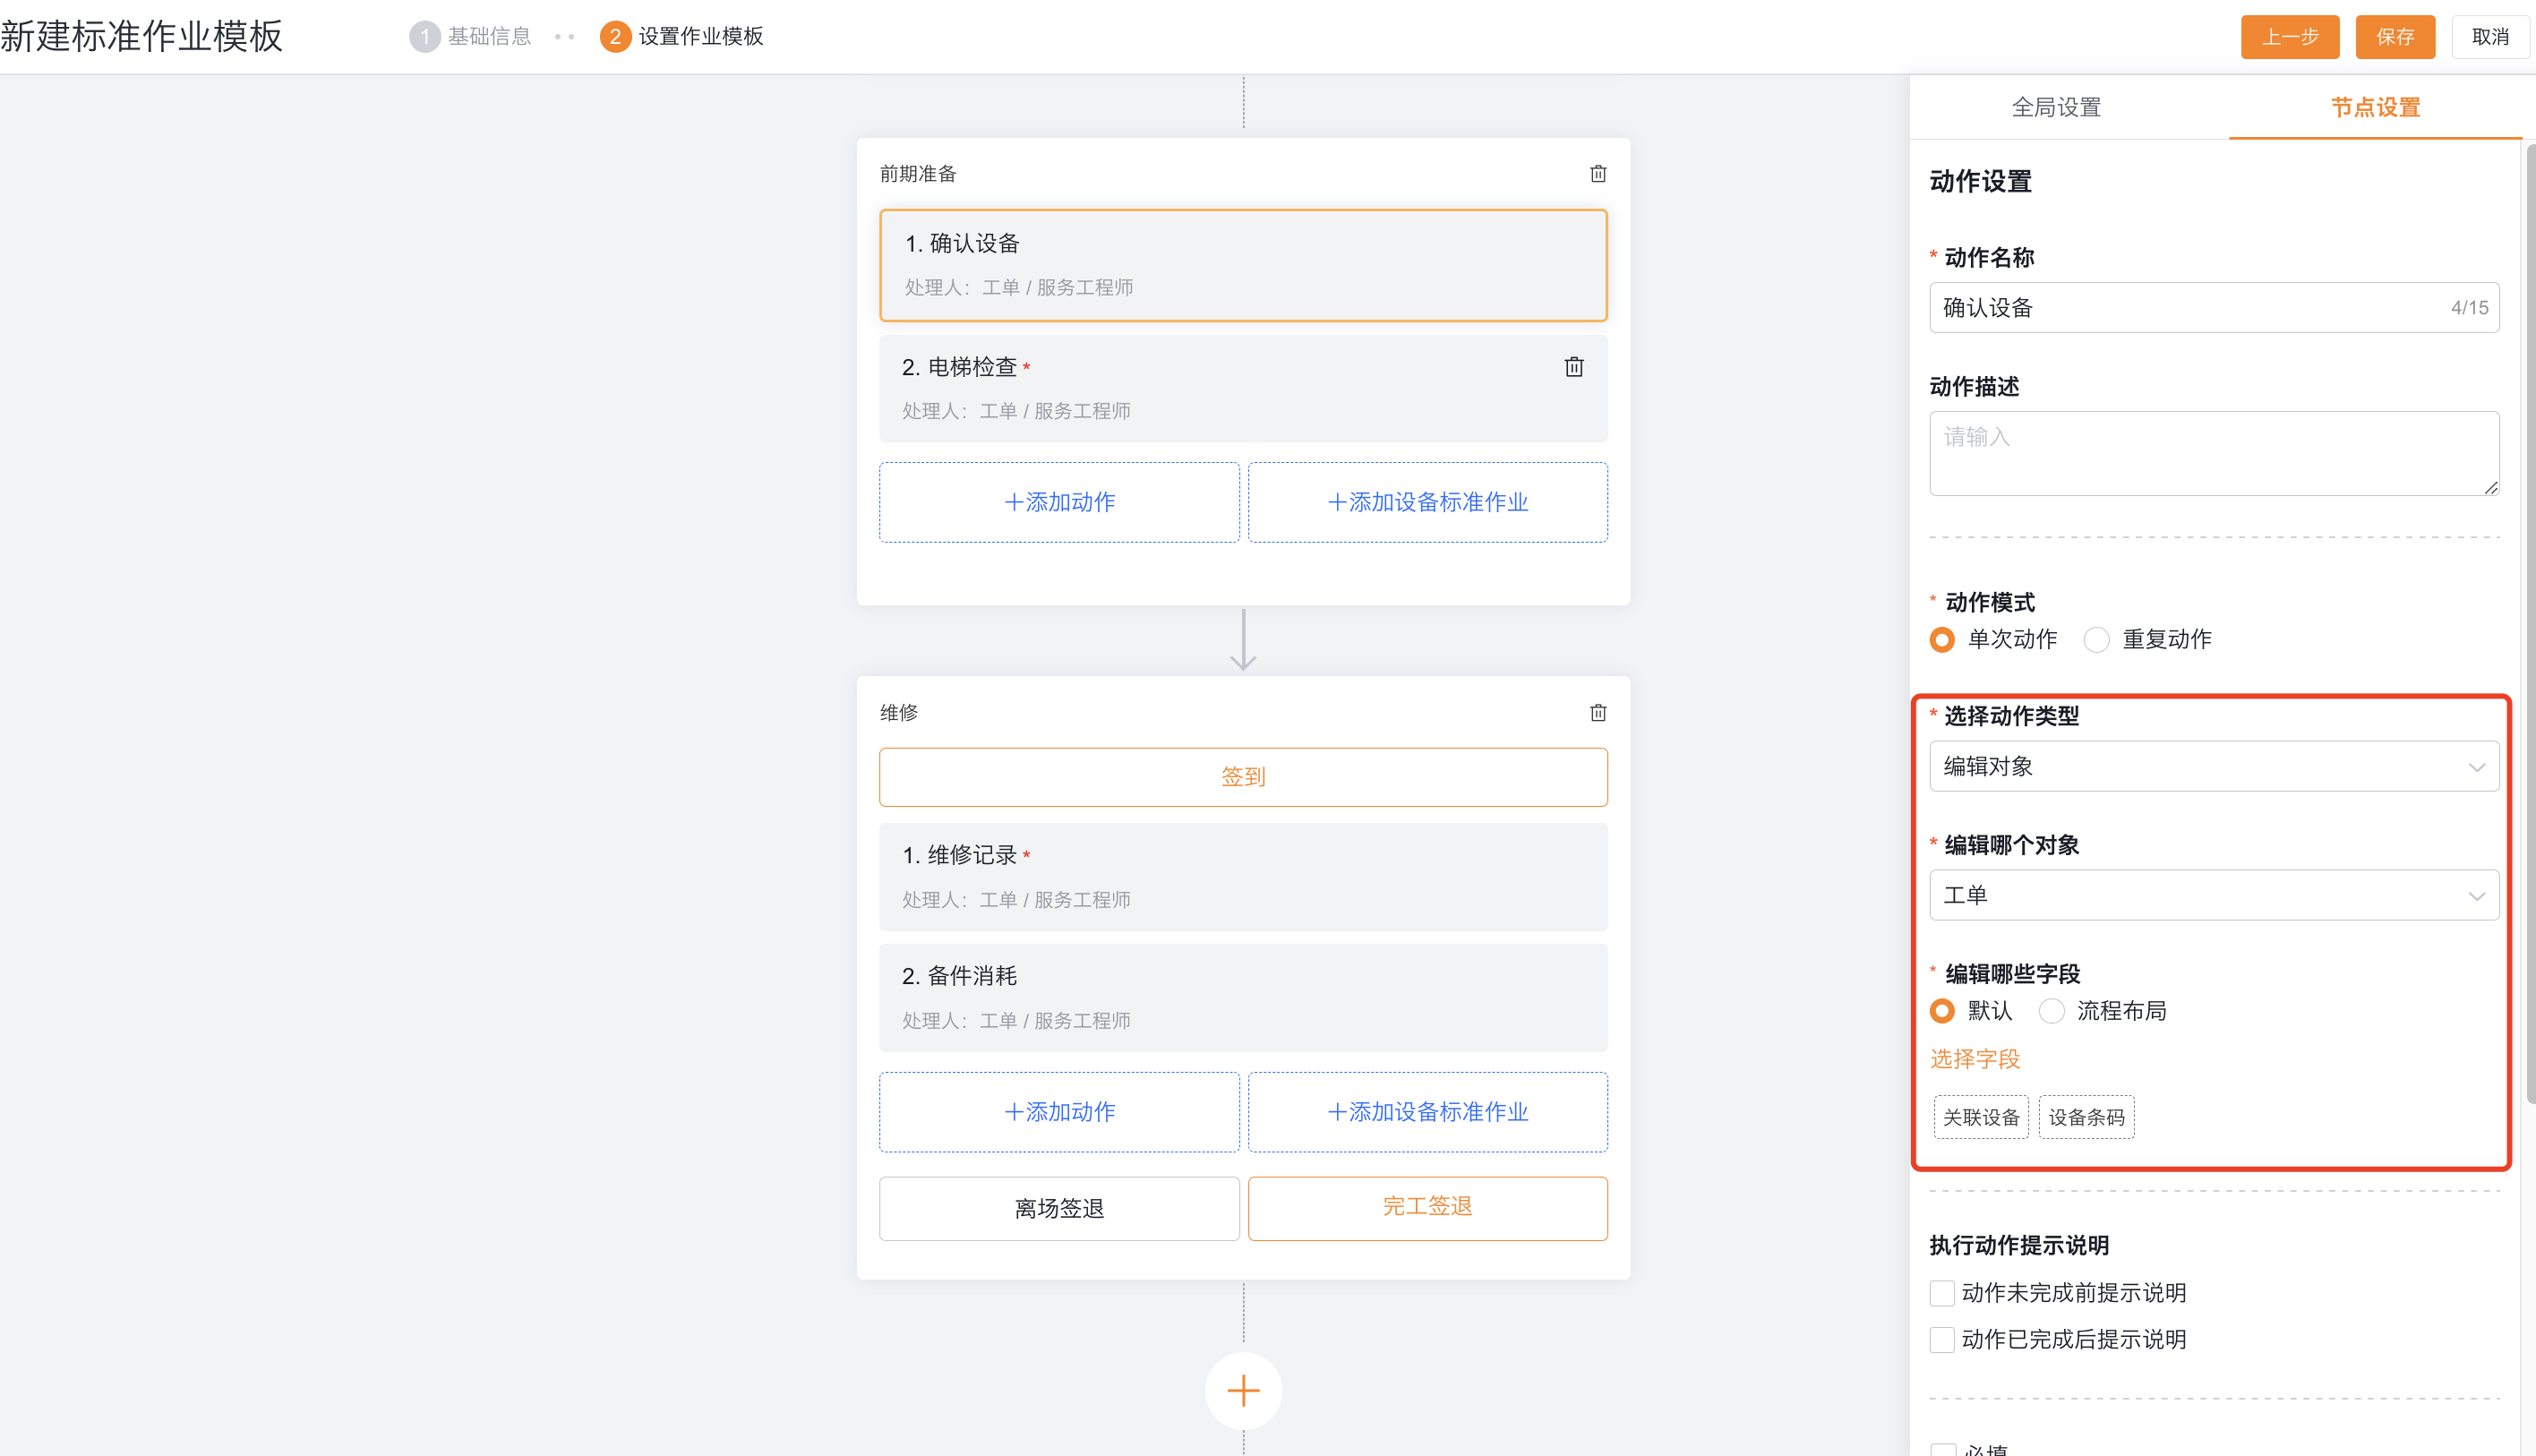
Configure single action### Select action type
| Action type | Applicable scenarios | Restrictions |
|---|---|---|
| Edit objects | Edit work orders, associated objects, or master-detail object fields | Execute by page and object permissions |
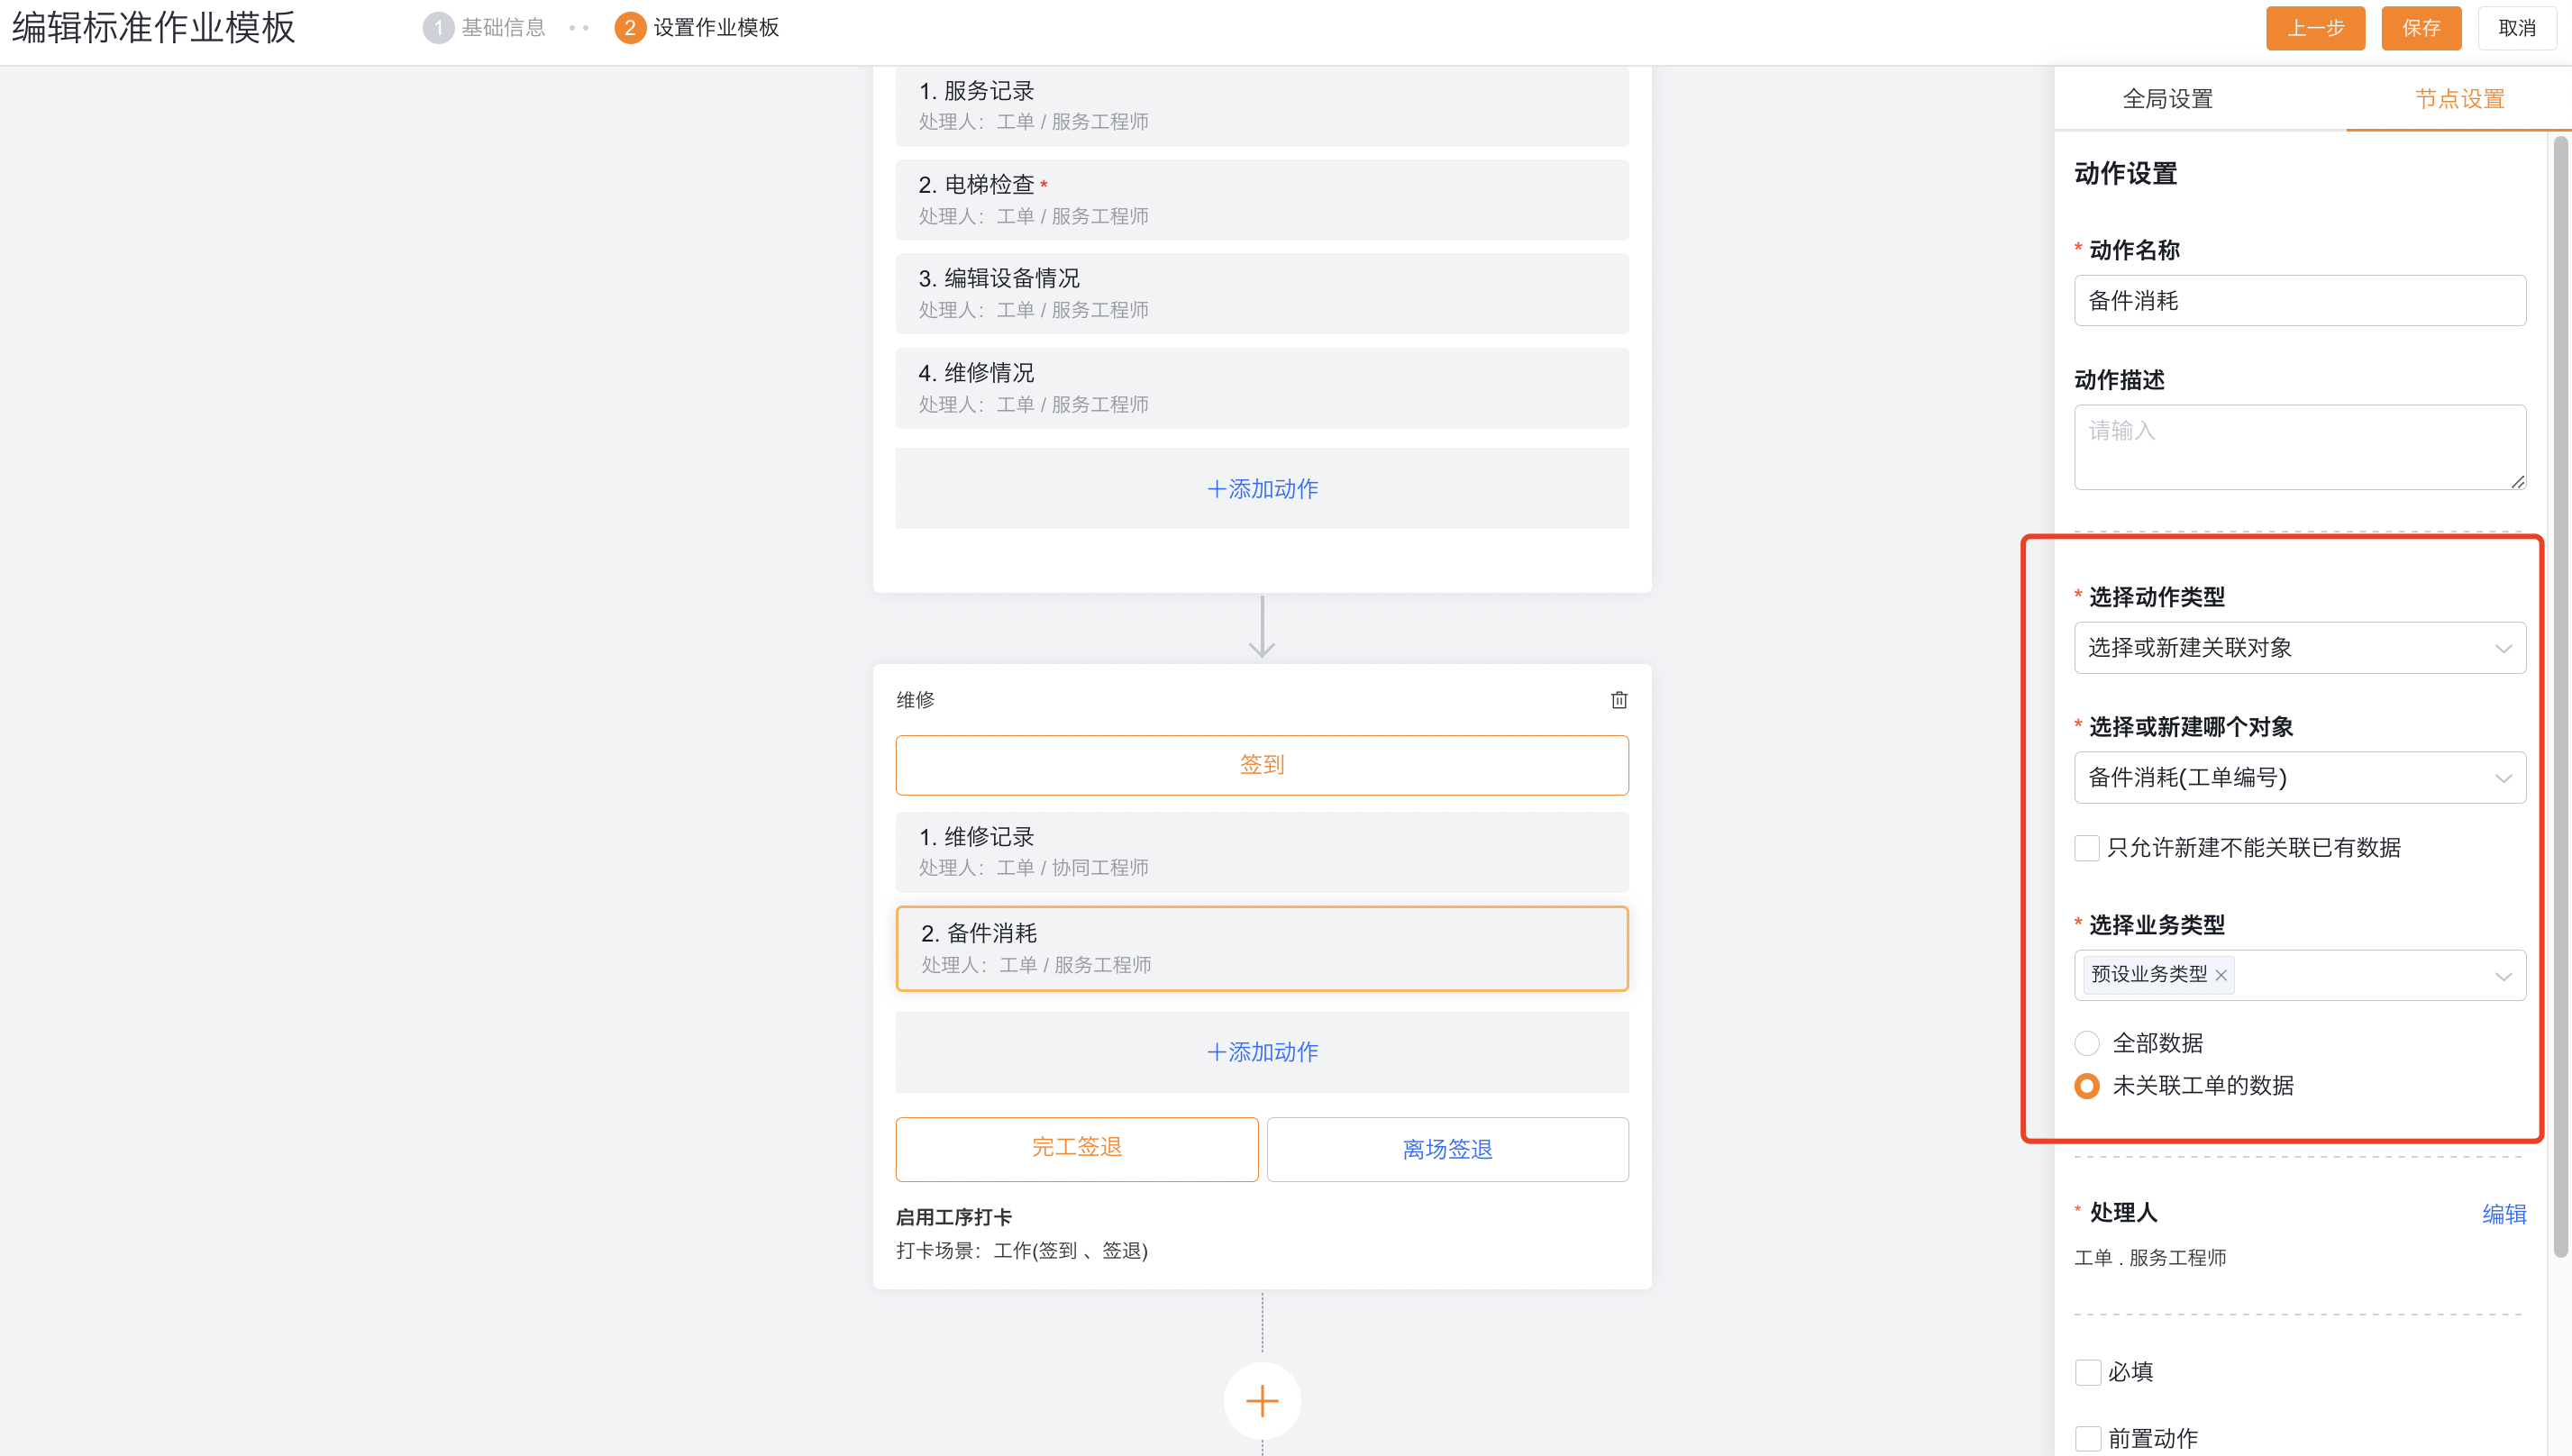
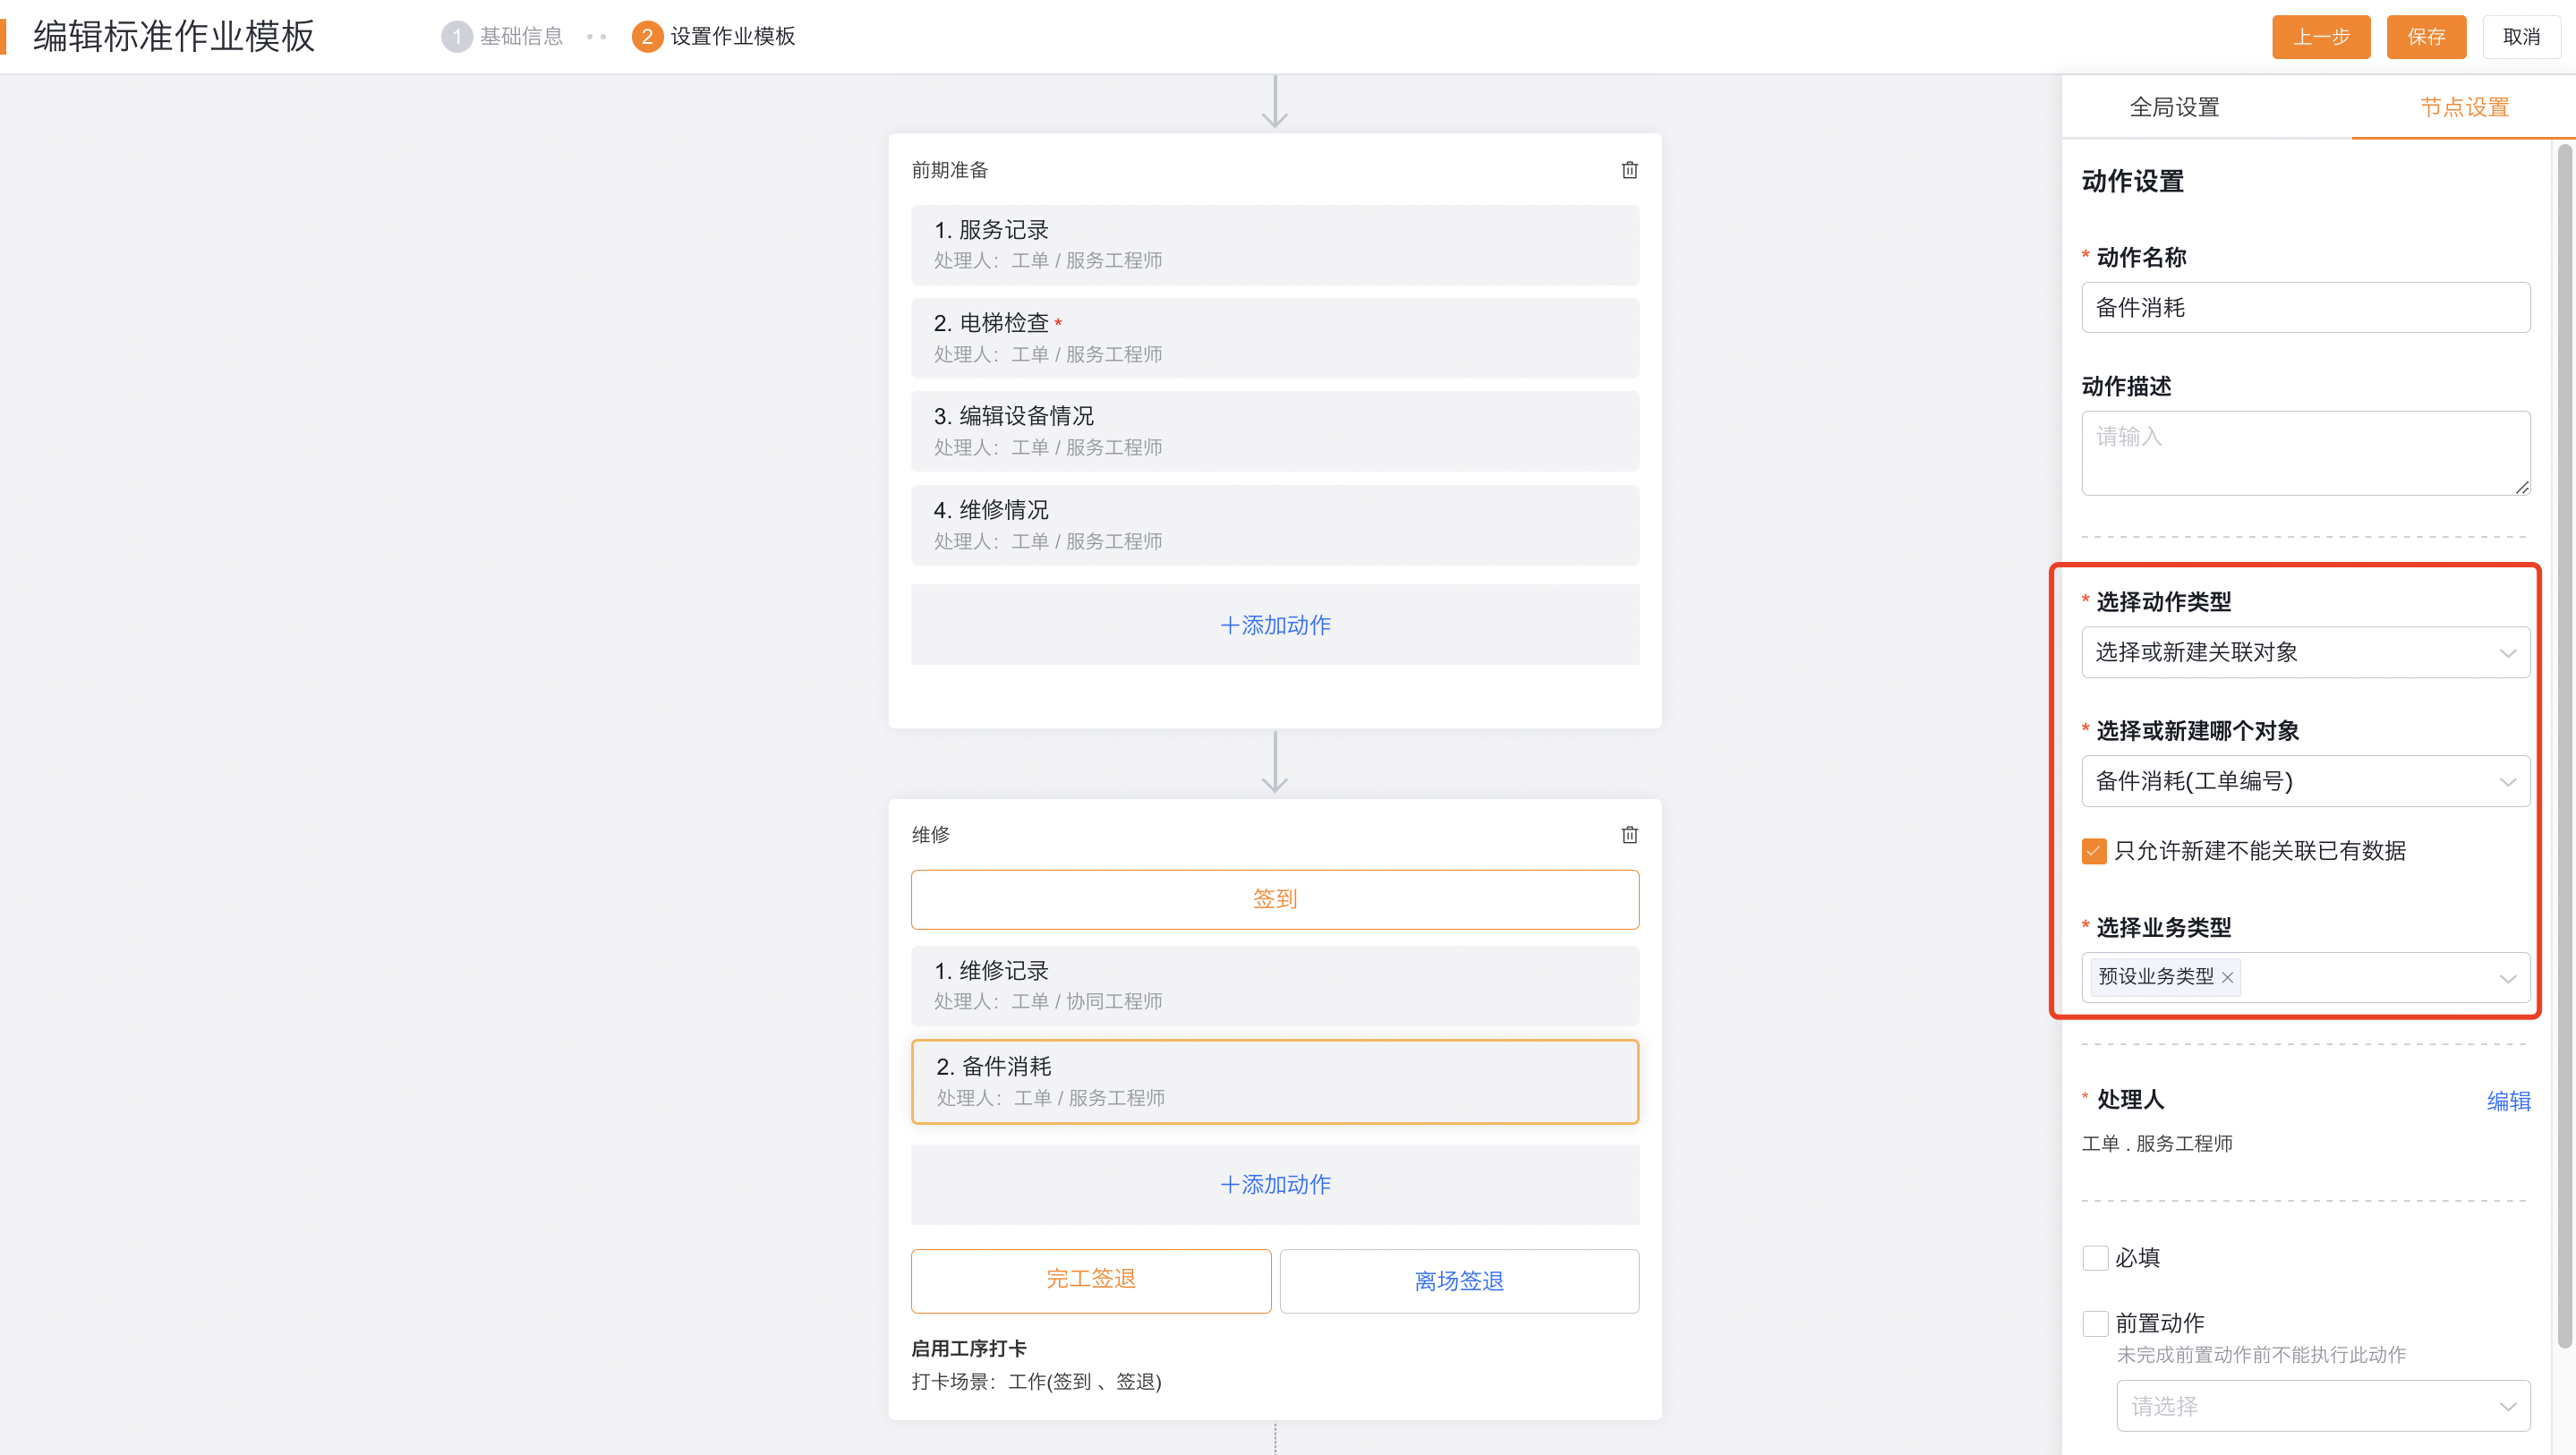
| Select or create a new associated object | Associate an existing piece of data, or create a new associated data | Existing data cannot be selected after enabling "Only allow new creation but not association with existing data" |
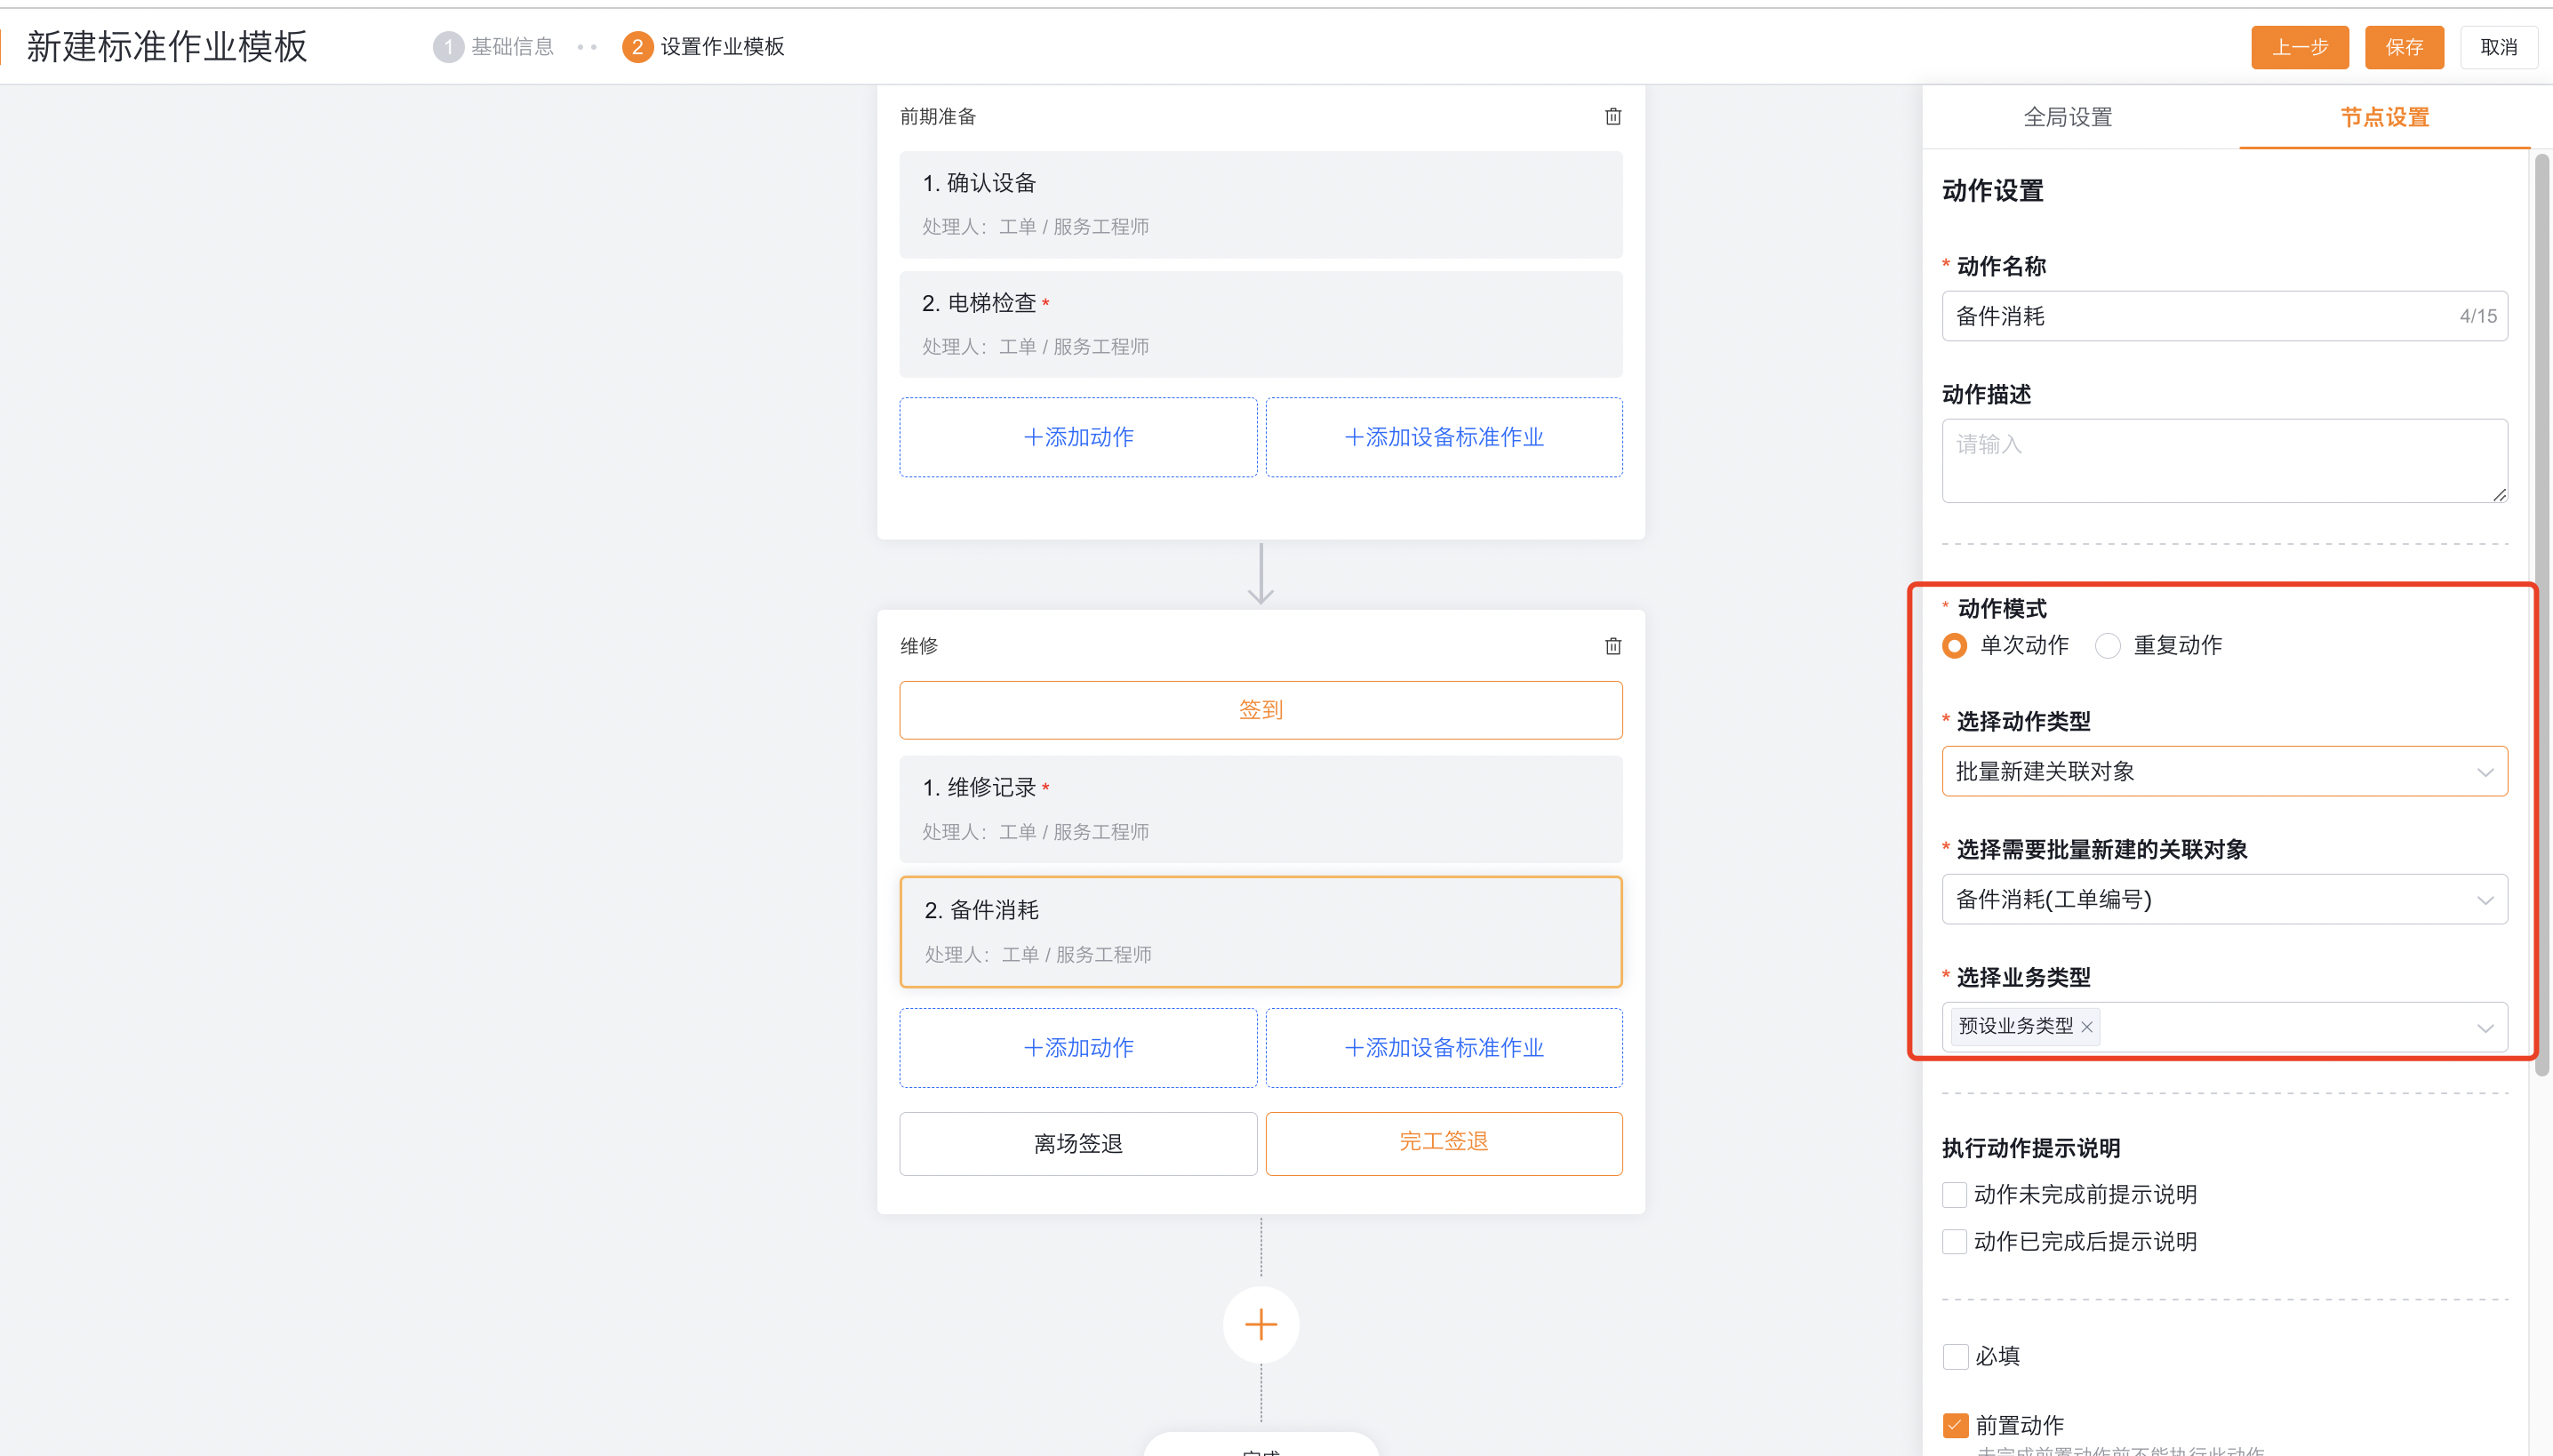
| Create new related objects in batches | Create work order related data such as spare parts consumption in batches | Only used to create new related records |
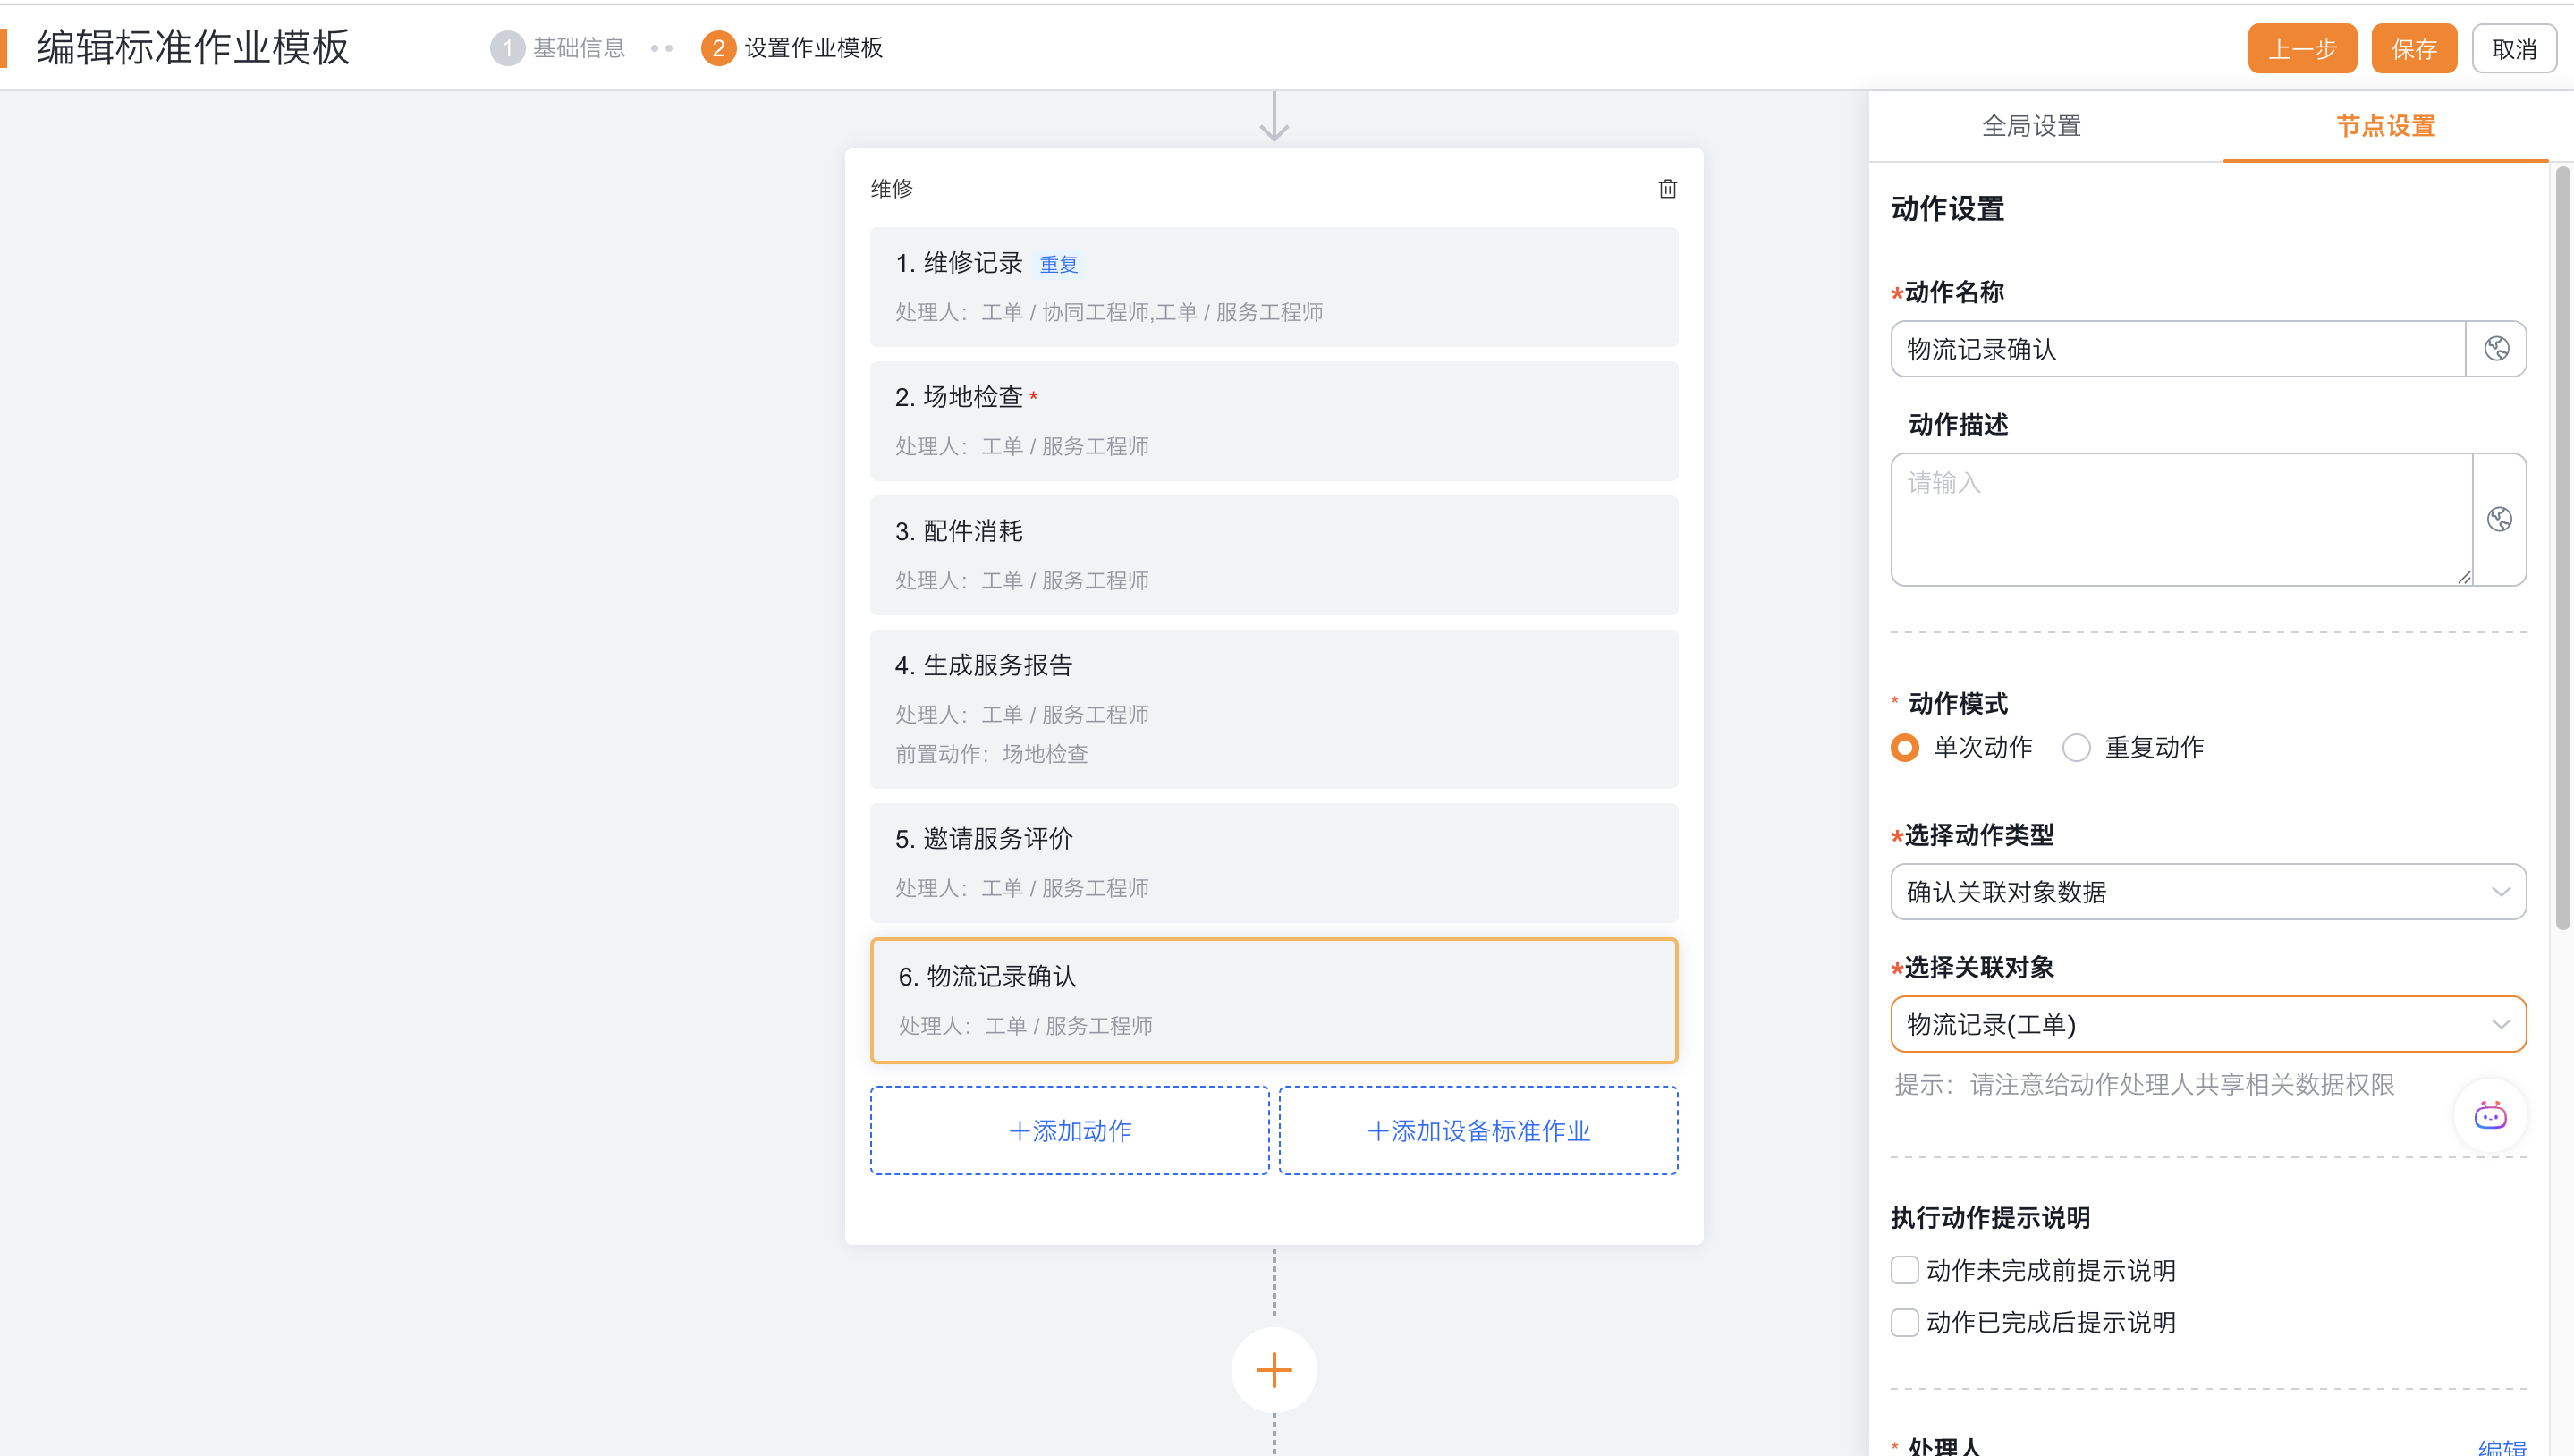
| Confirm associated object data | View, confirm, modify or delete associated data | Strictly comply with the handler's object function permissions and shared data permissions |
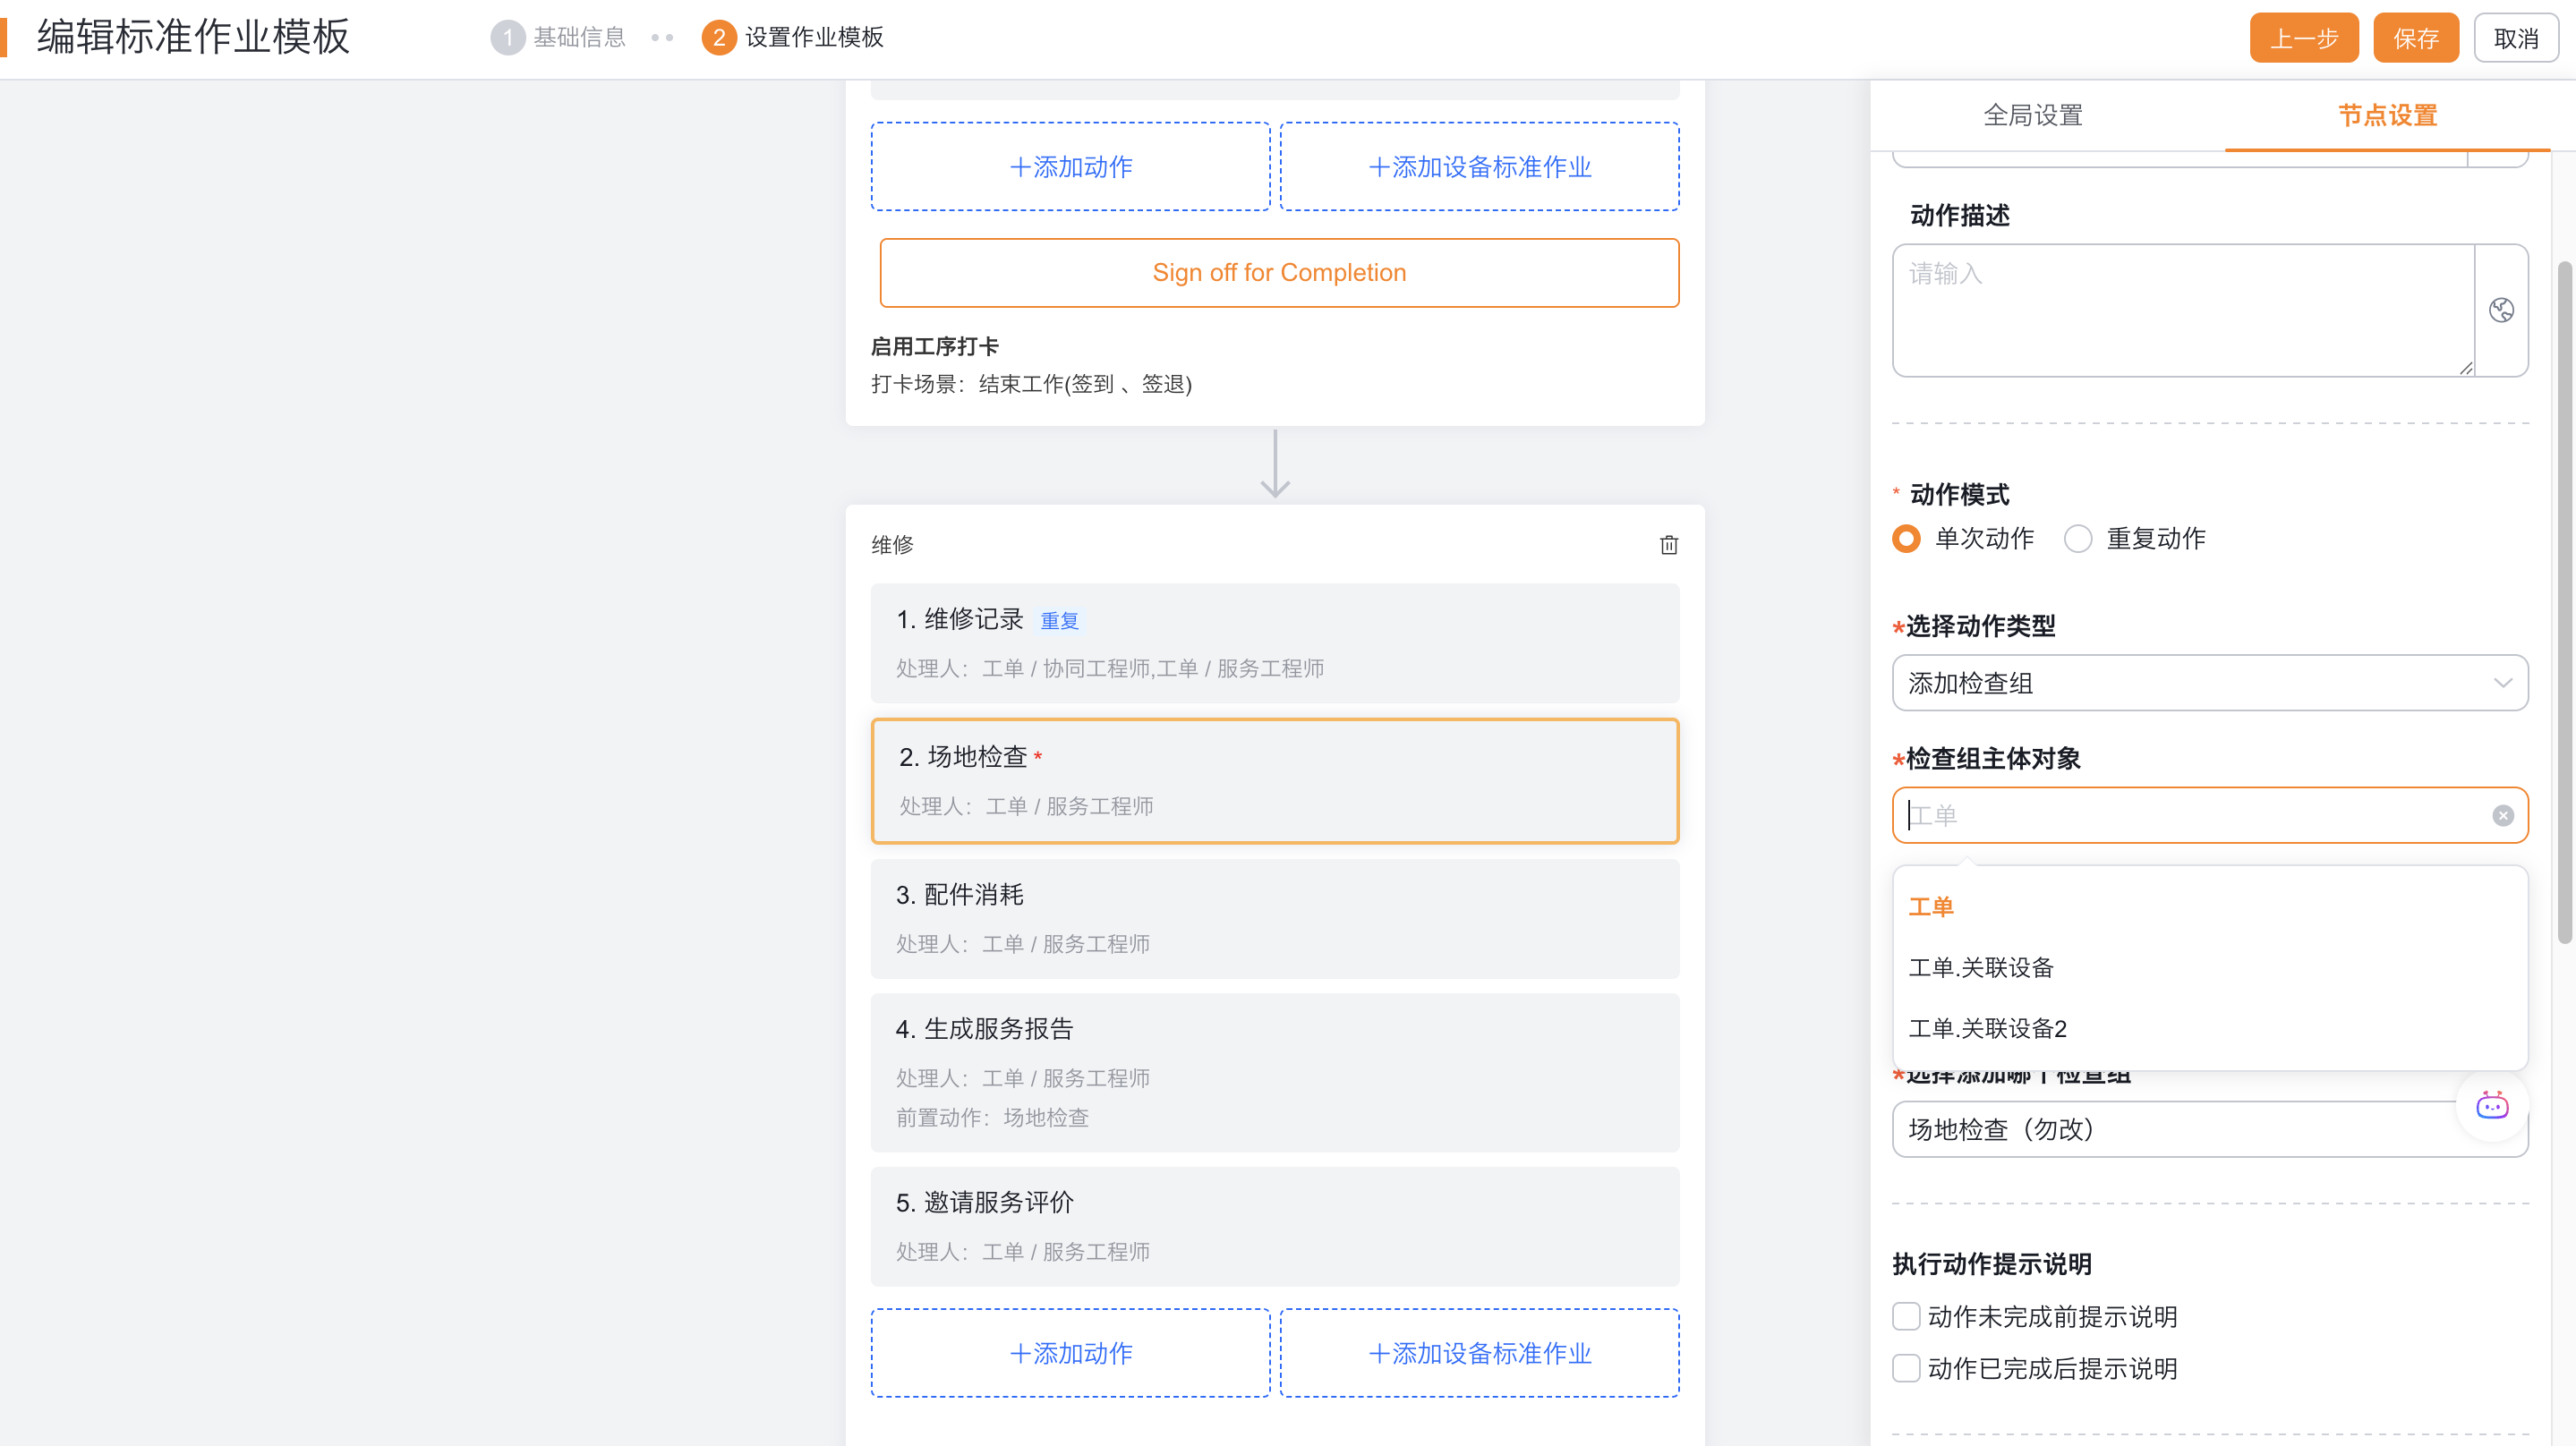
| Add inspection group | Perform inspection on the work order or the equipment associated with the work order | You can specify the inspection group or match according to rules |
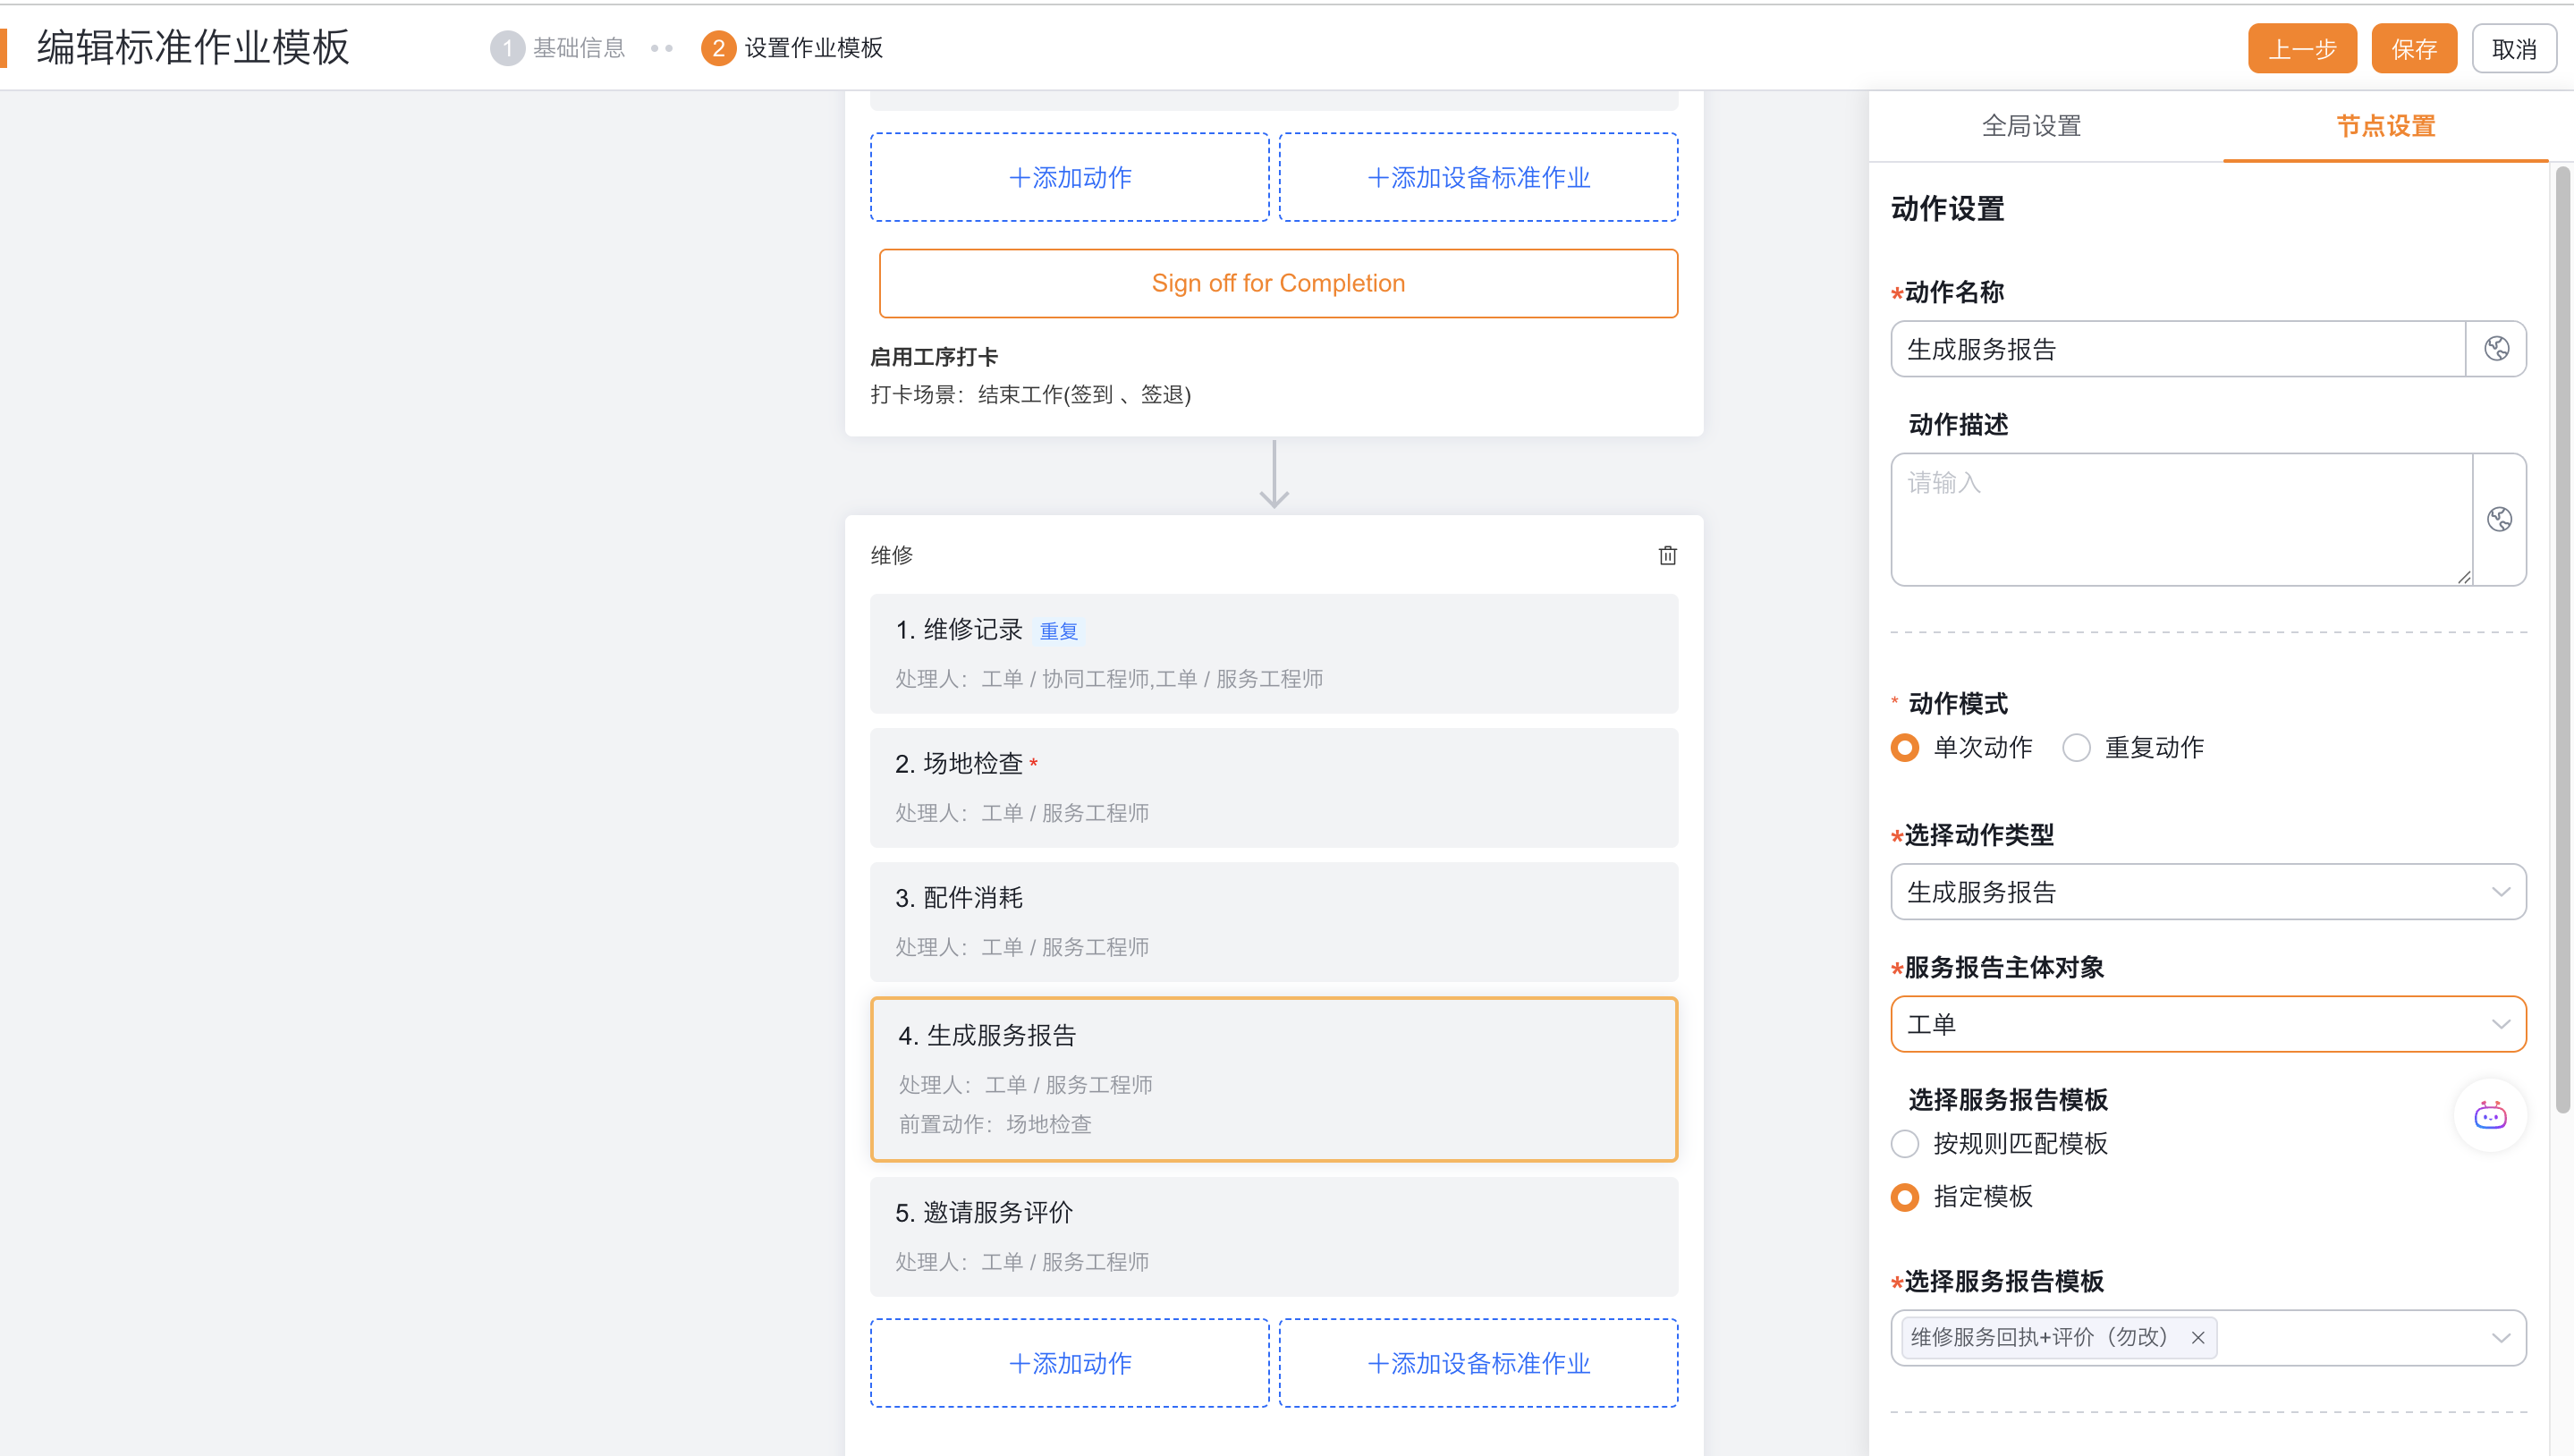
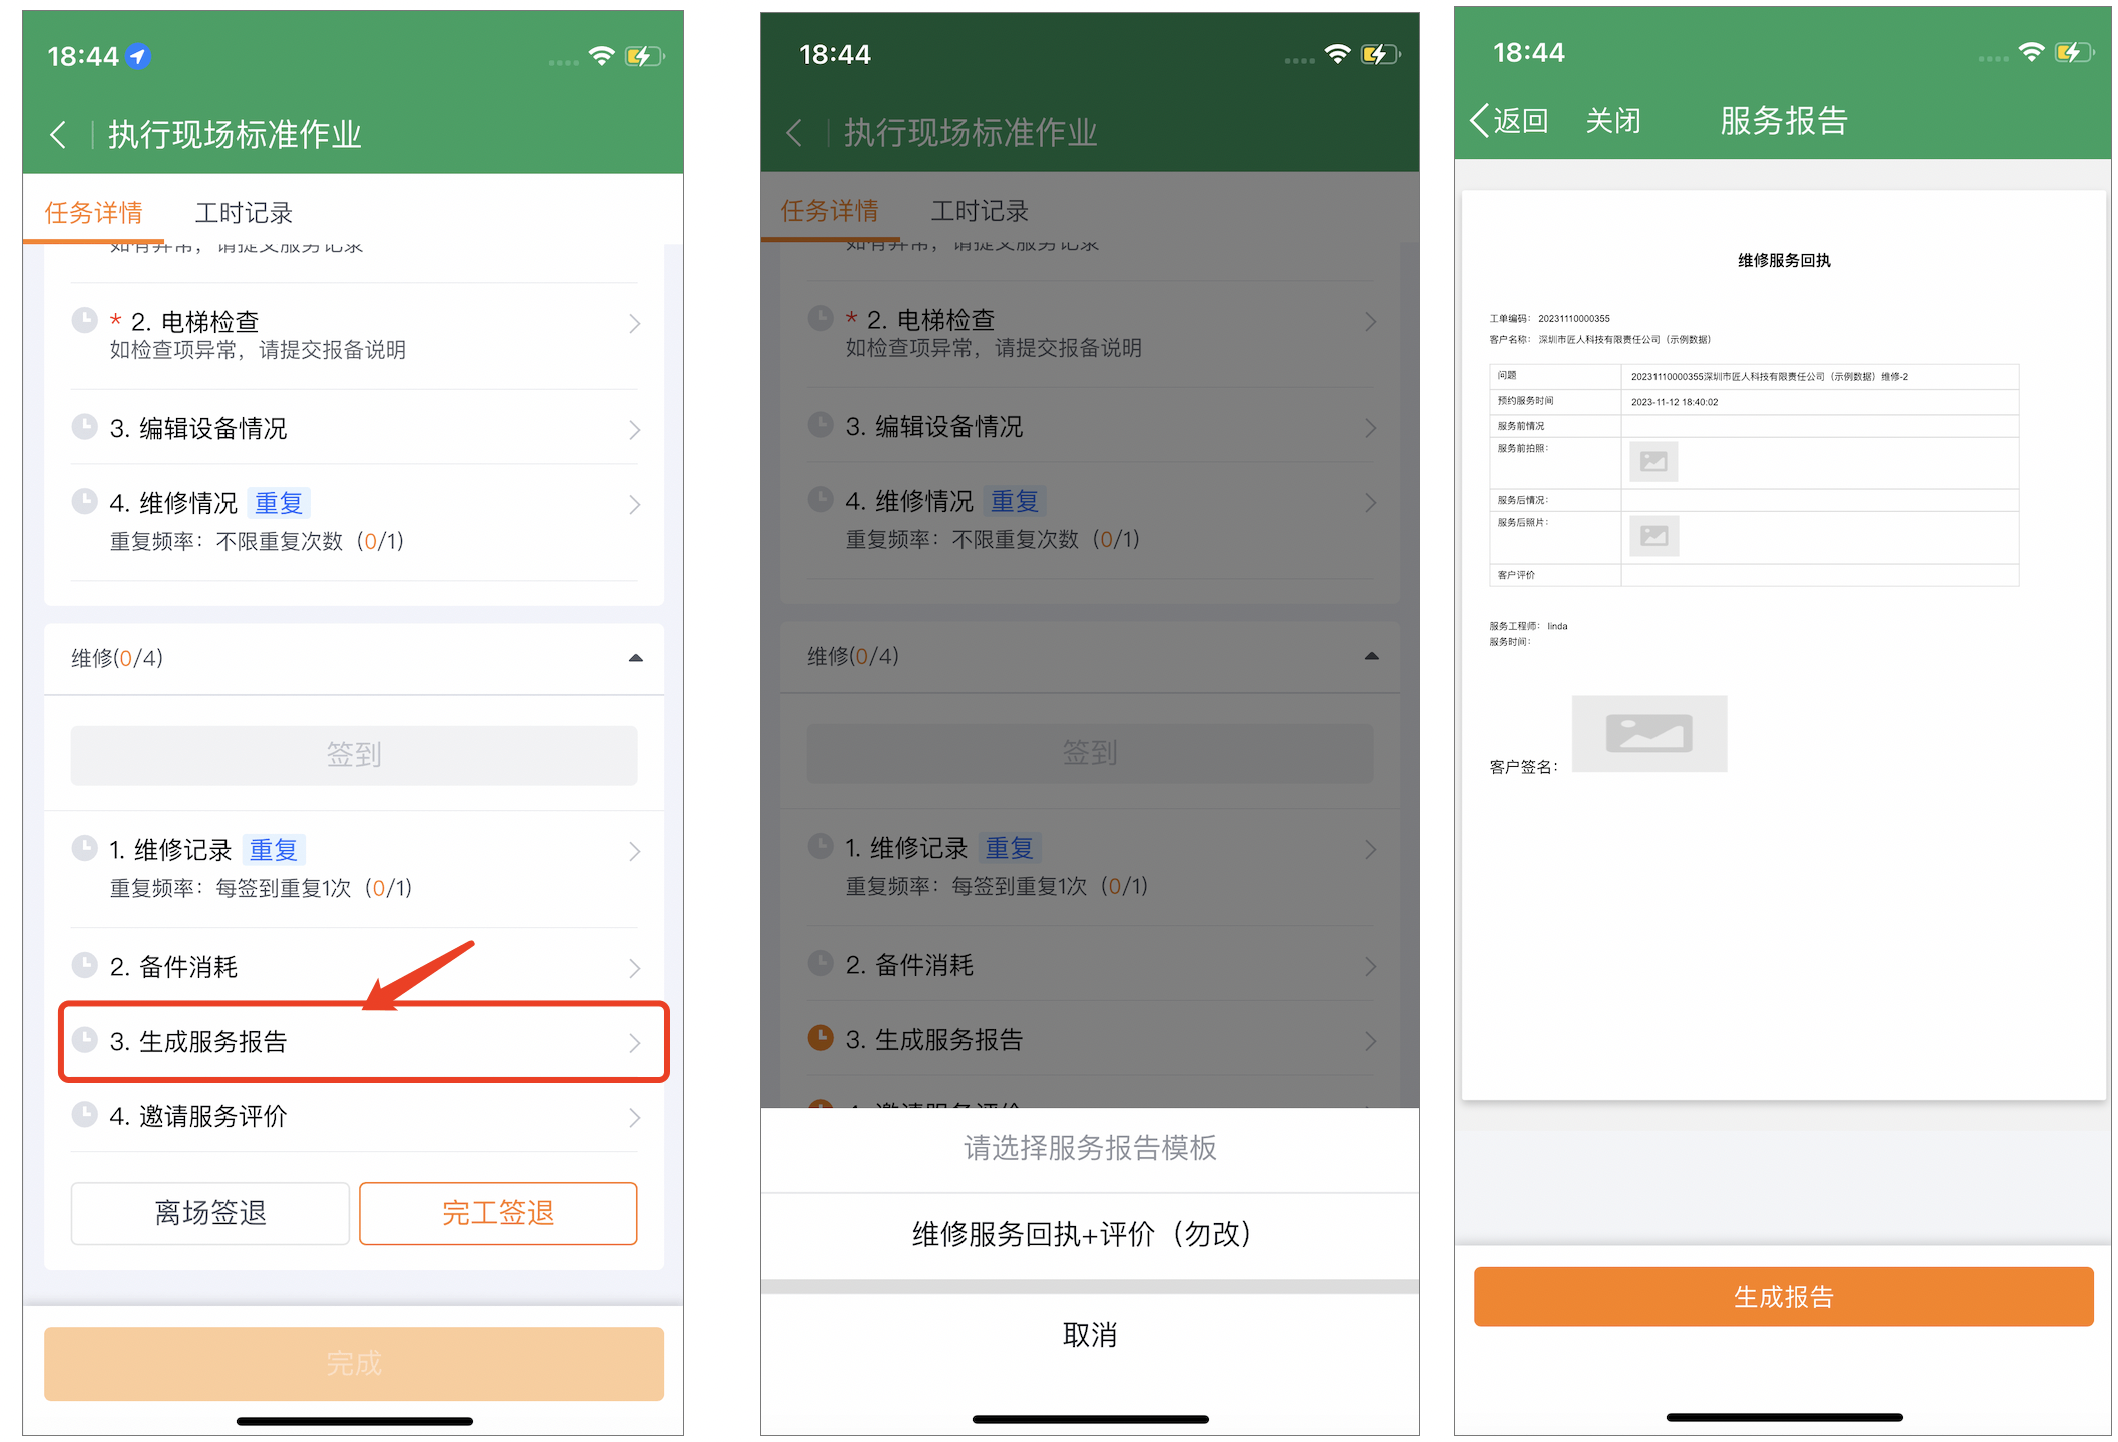
| Generate service reports | Generate work order completion reports or equipment status reports | Does not support completion condition verification or post-completion actions |
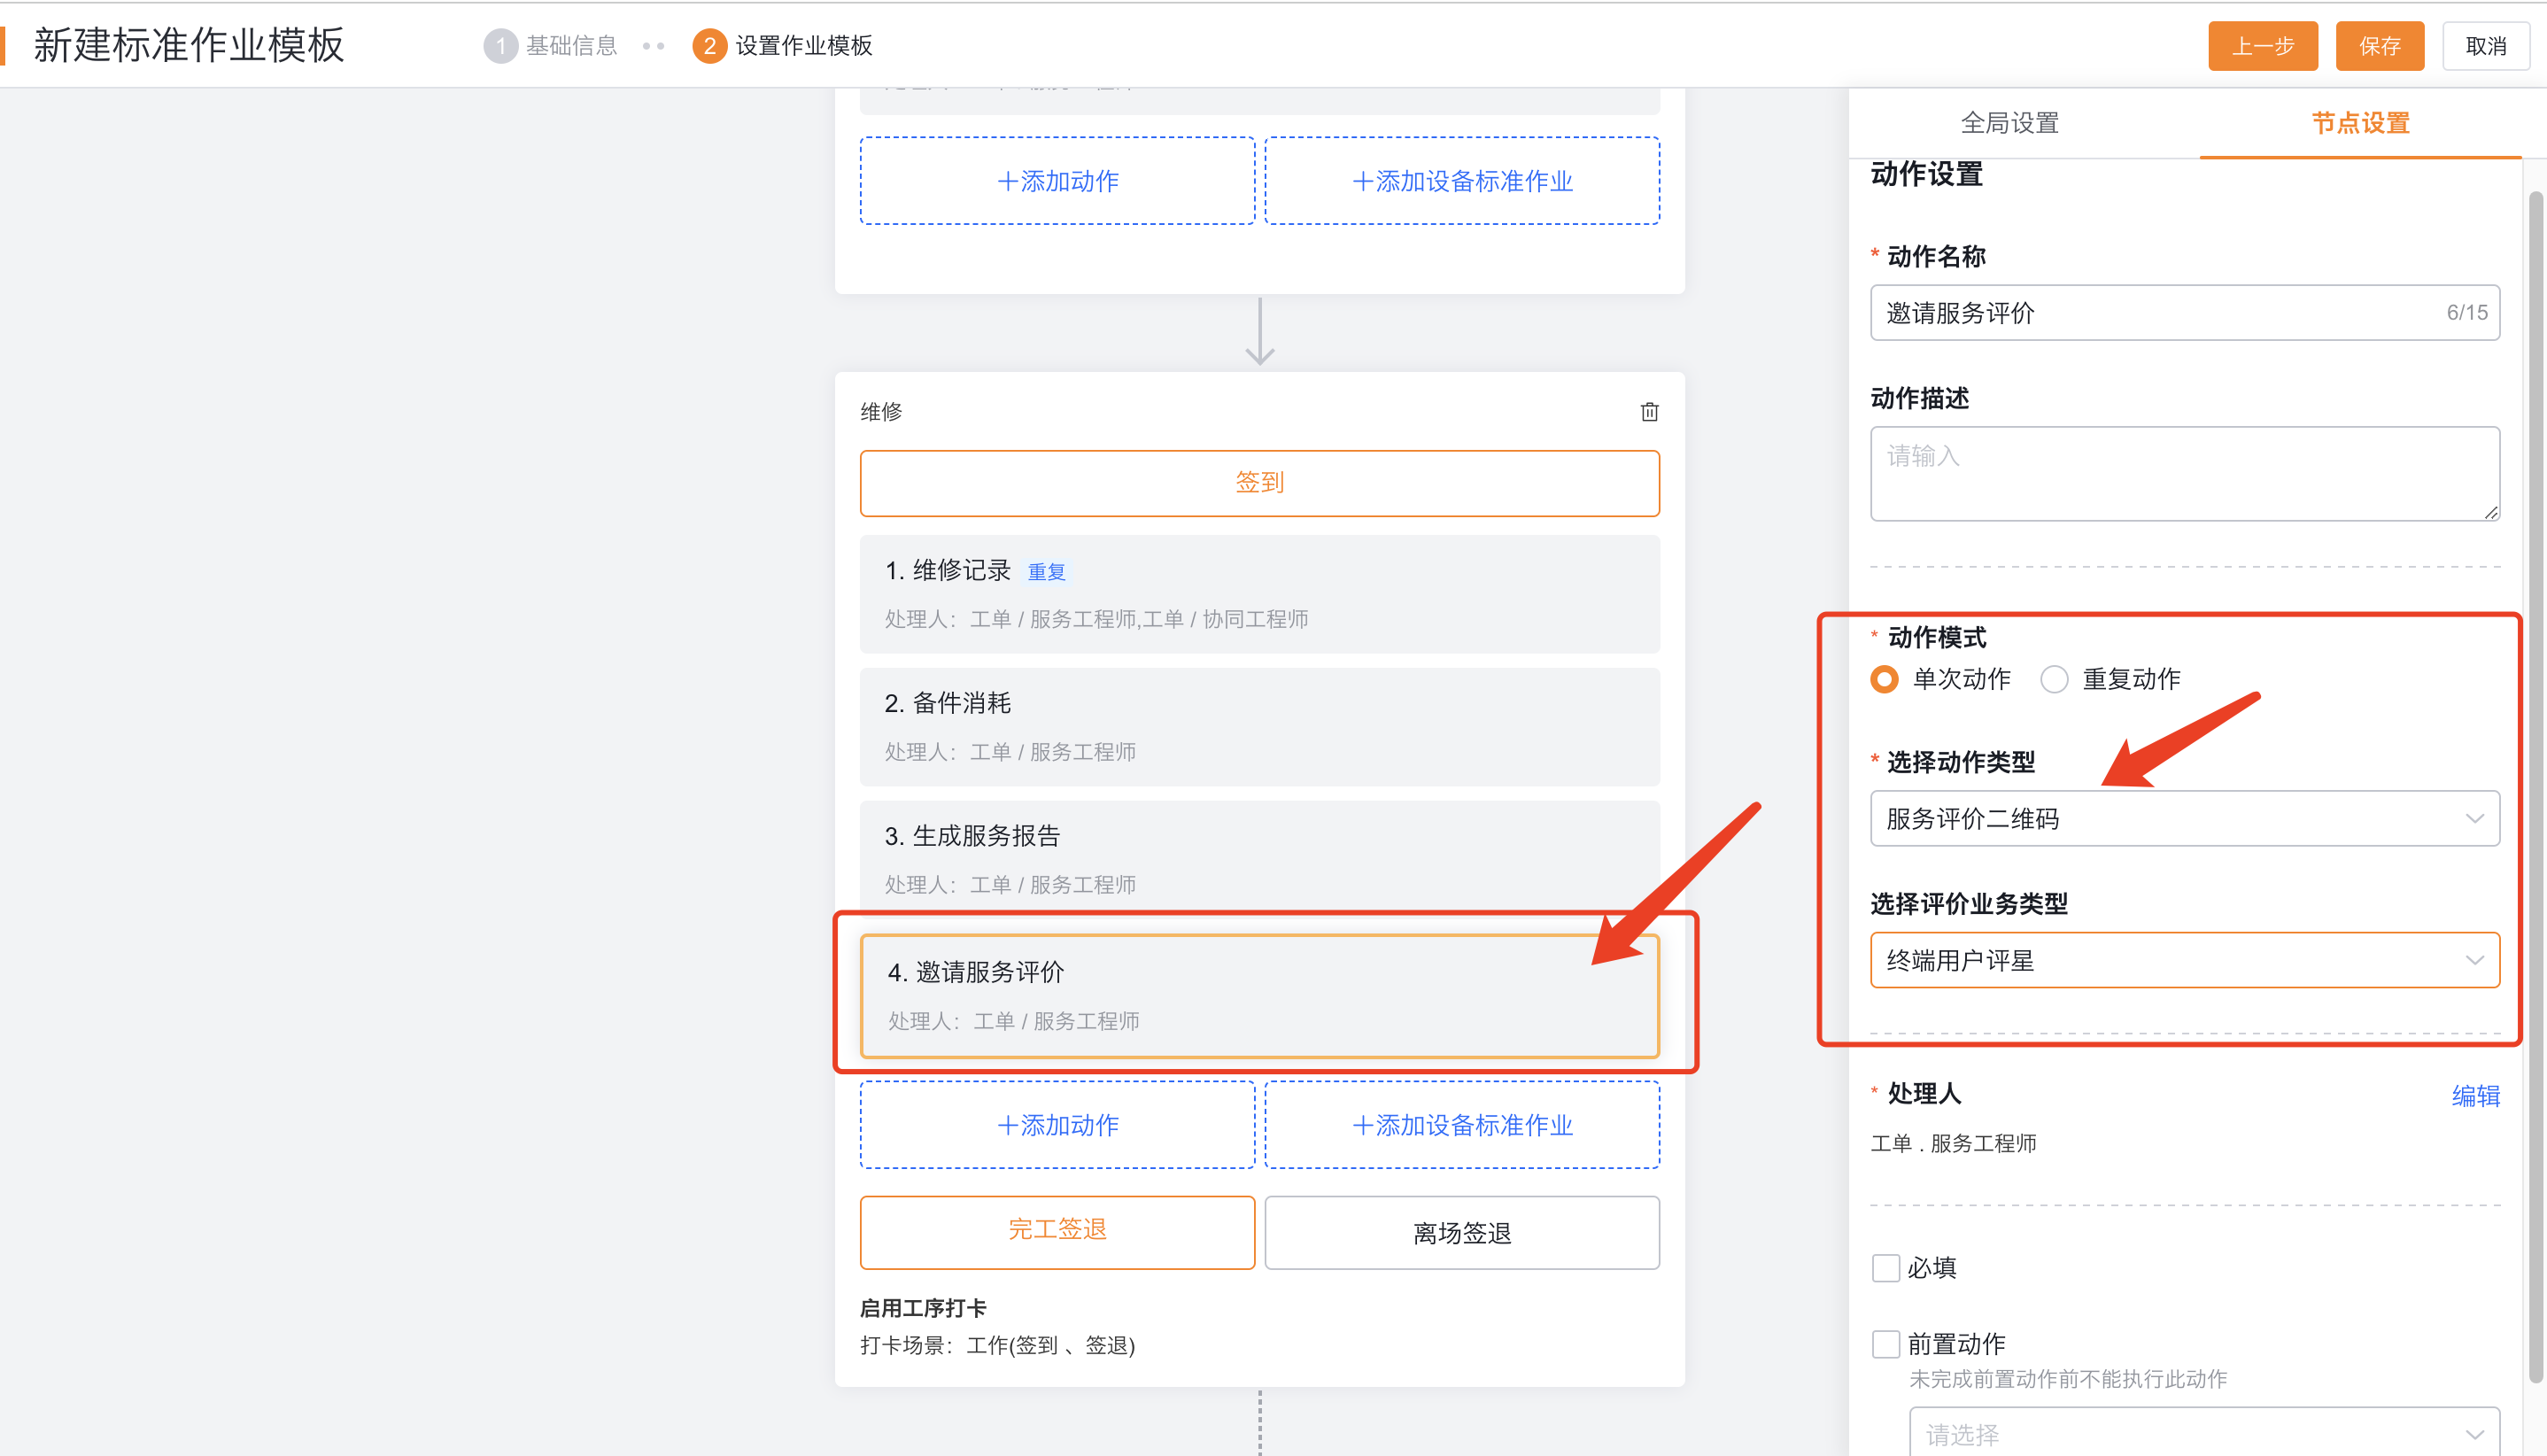
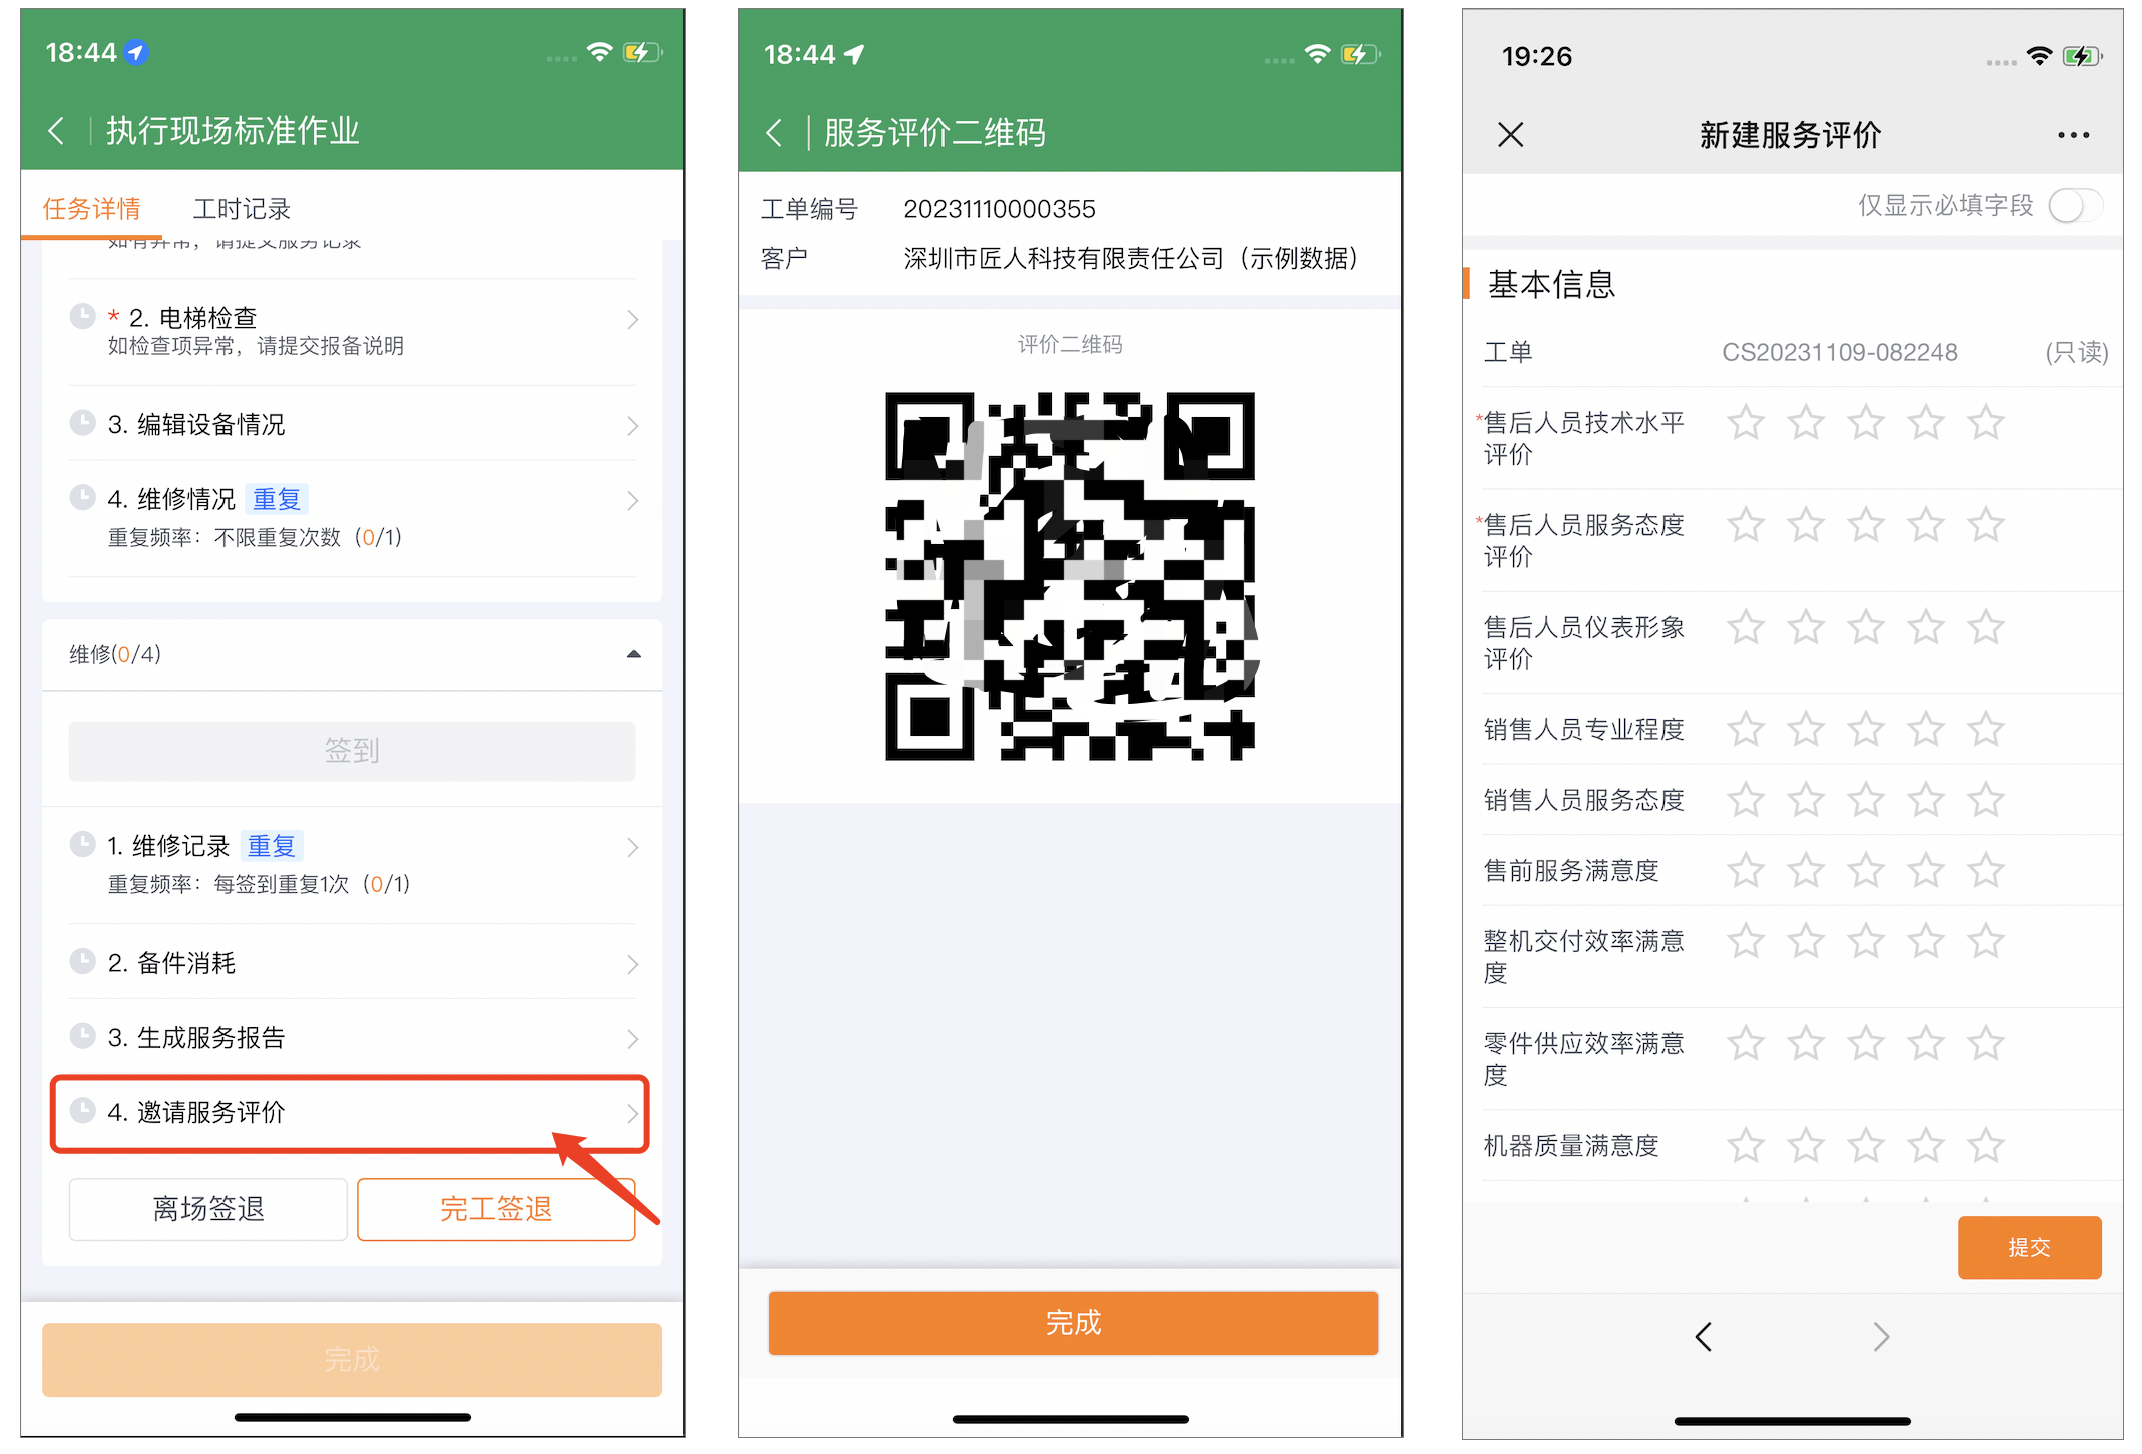
| Service evaluation QR code | Display fixed evaluation template QR code in SOP | Does not support matching evaluation templates based on work order conditions |
The object scope and results of each action type are as follows:
- Edit object: You can edit the work order fields, such as service location and problem description; you can also edit the work order related object fields, such as the latest address of the device. When using process editing, master objects and slave objects, such as work order equipment and equipment fault information, can be maintained at the same time.
- Select or create a related object: Select an existing record or create a record related to the work order. With Allow new records only enabled, the assignee cannot select existing records.
- Create related objects in bulk: Create multiple work-order-related records, such as spare part consumption records, at once.
- Confirm associated object data: Select the object that has been associated with the work order, let the handler view and confirm the data, and modify or delete the erroneous data when permissions allow. This action strictly follows the object function permissions and shared data permissions, and can be combined with the completion condition function to verify the confirmation result.
- Add inspection group: First select the inspection subject as the work order or the equipment associated with the work order, and then choose to specify the inspection group, or match according to the scope of application and priority of the inspection group.
- Generate service report: First select the report subject as the work order or the equipment associated with the work order. The report is generated after the engineer completes all required actions; this action does not support action-level completion conditions and post-completion actions.
- Service Evaluation QR Code: Put the evaluation entry and other engineer actions in the same SOP node. This action can only select fixed evaluation templates; when the evaluation template needs to be matched according to work order conditions, an independent user evaluation node should be used.
Set prompts and handlers
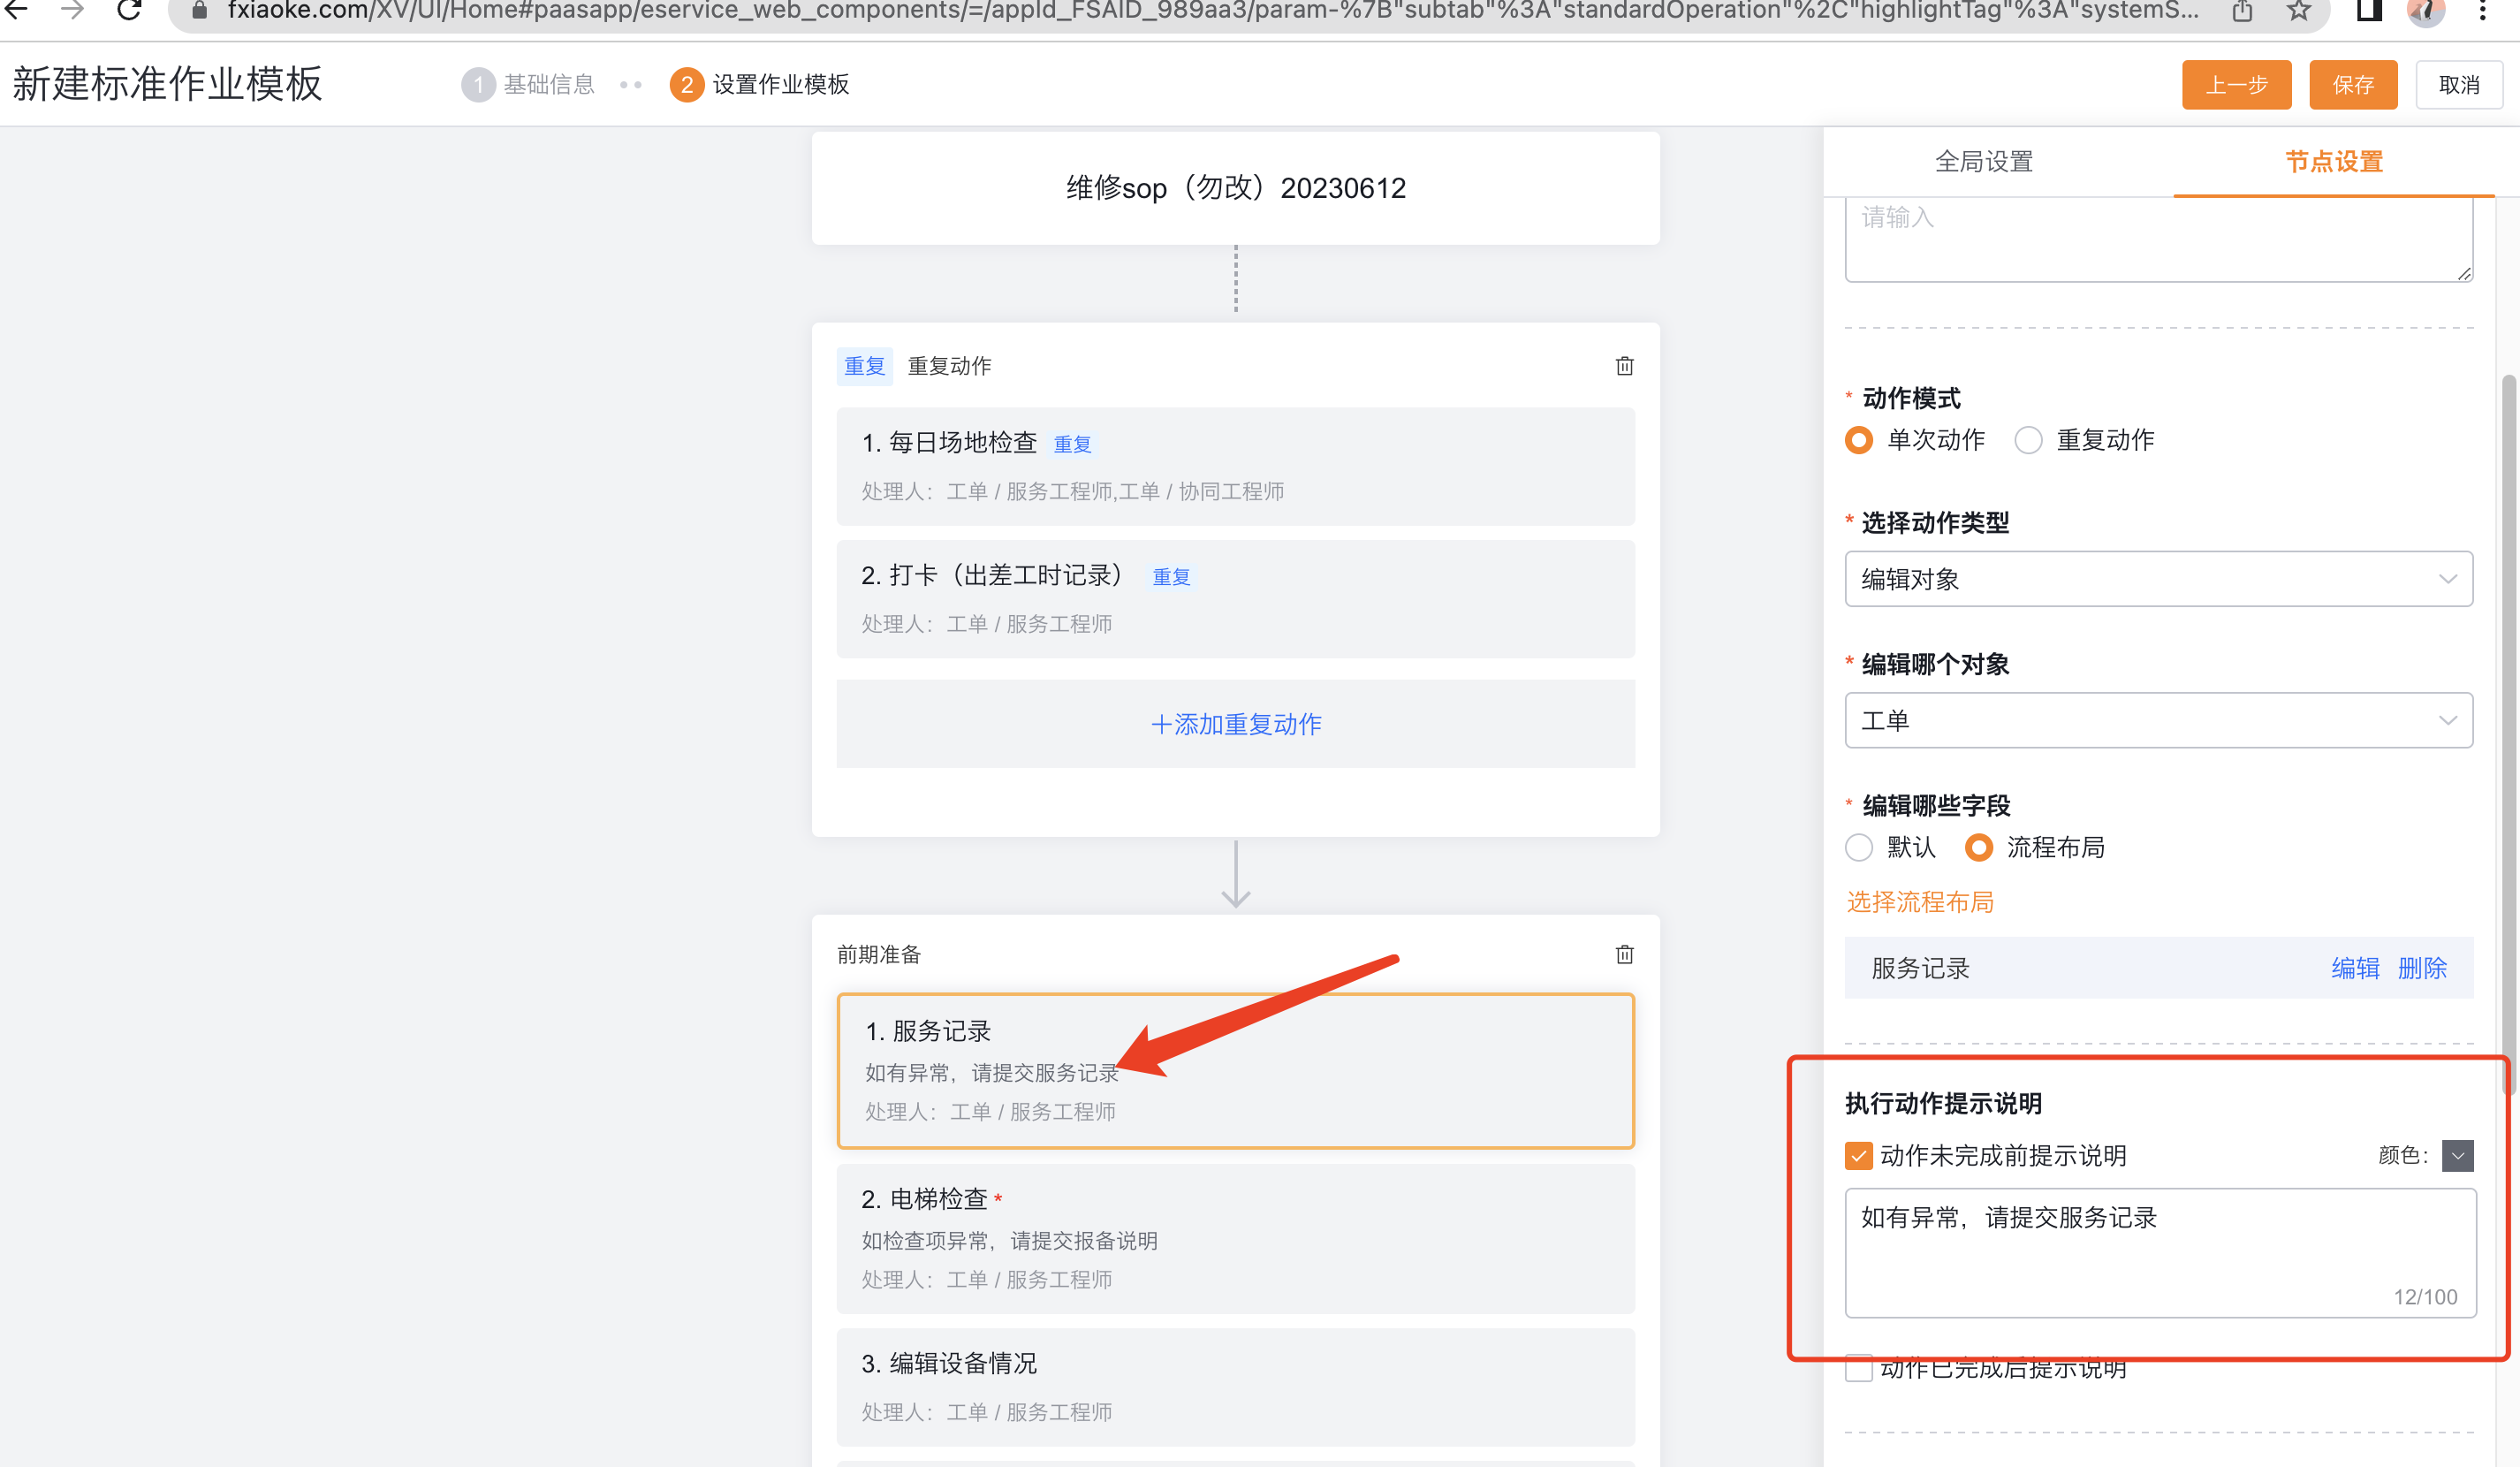
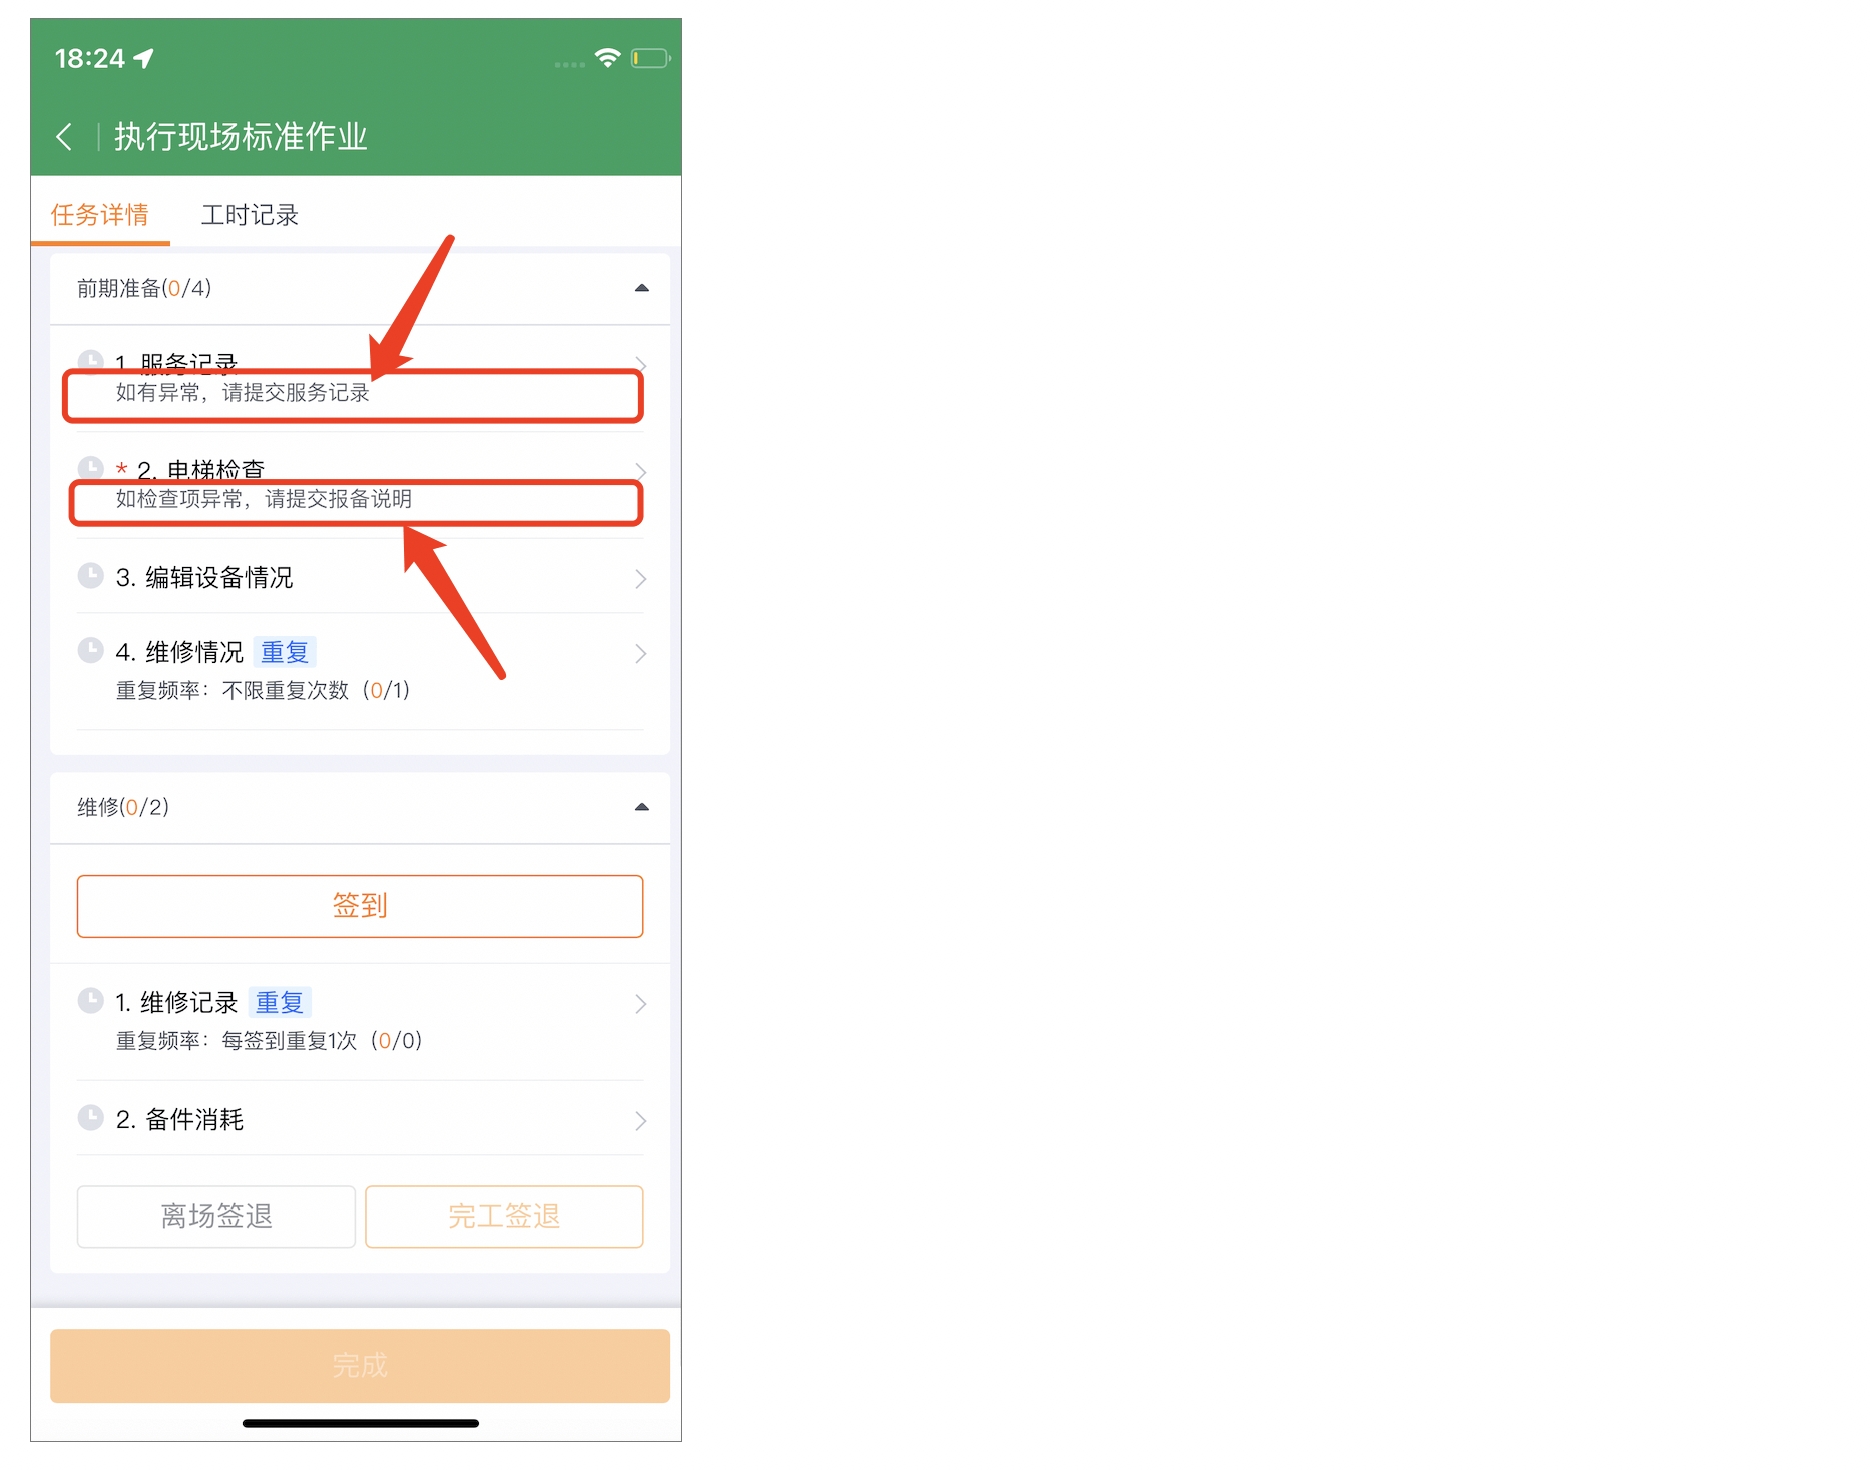
- Configure the prompt instructions before or after the action is completed in the action node settings, and display the inspection method, operation steps and other information to the engineer.
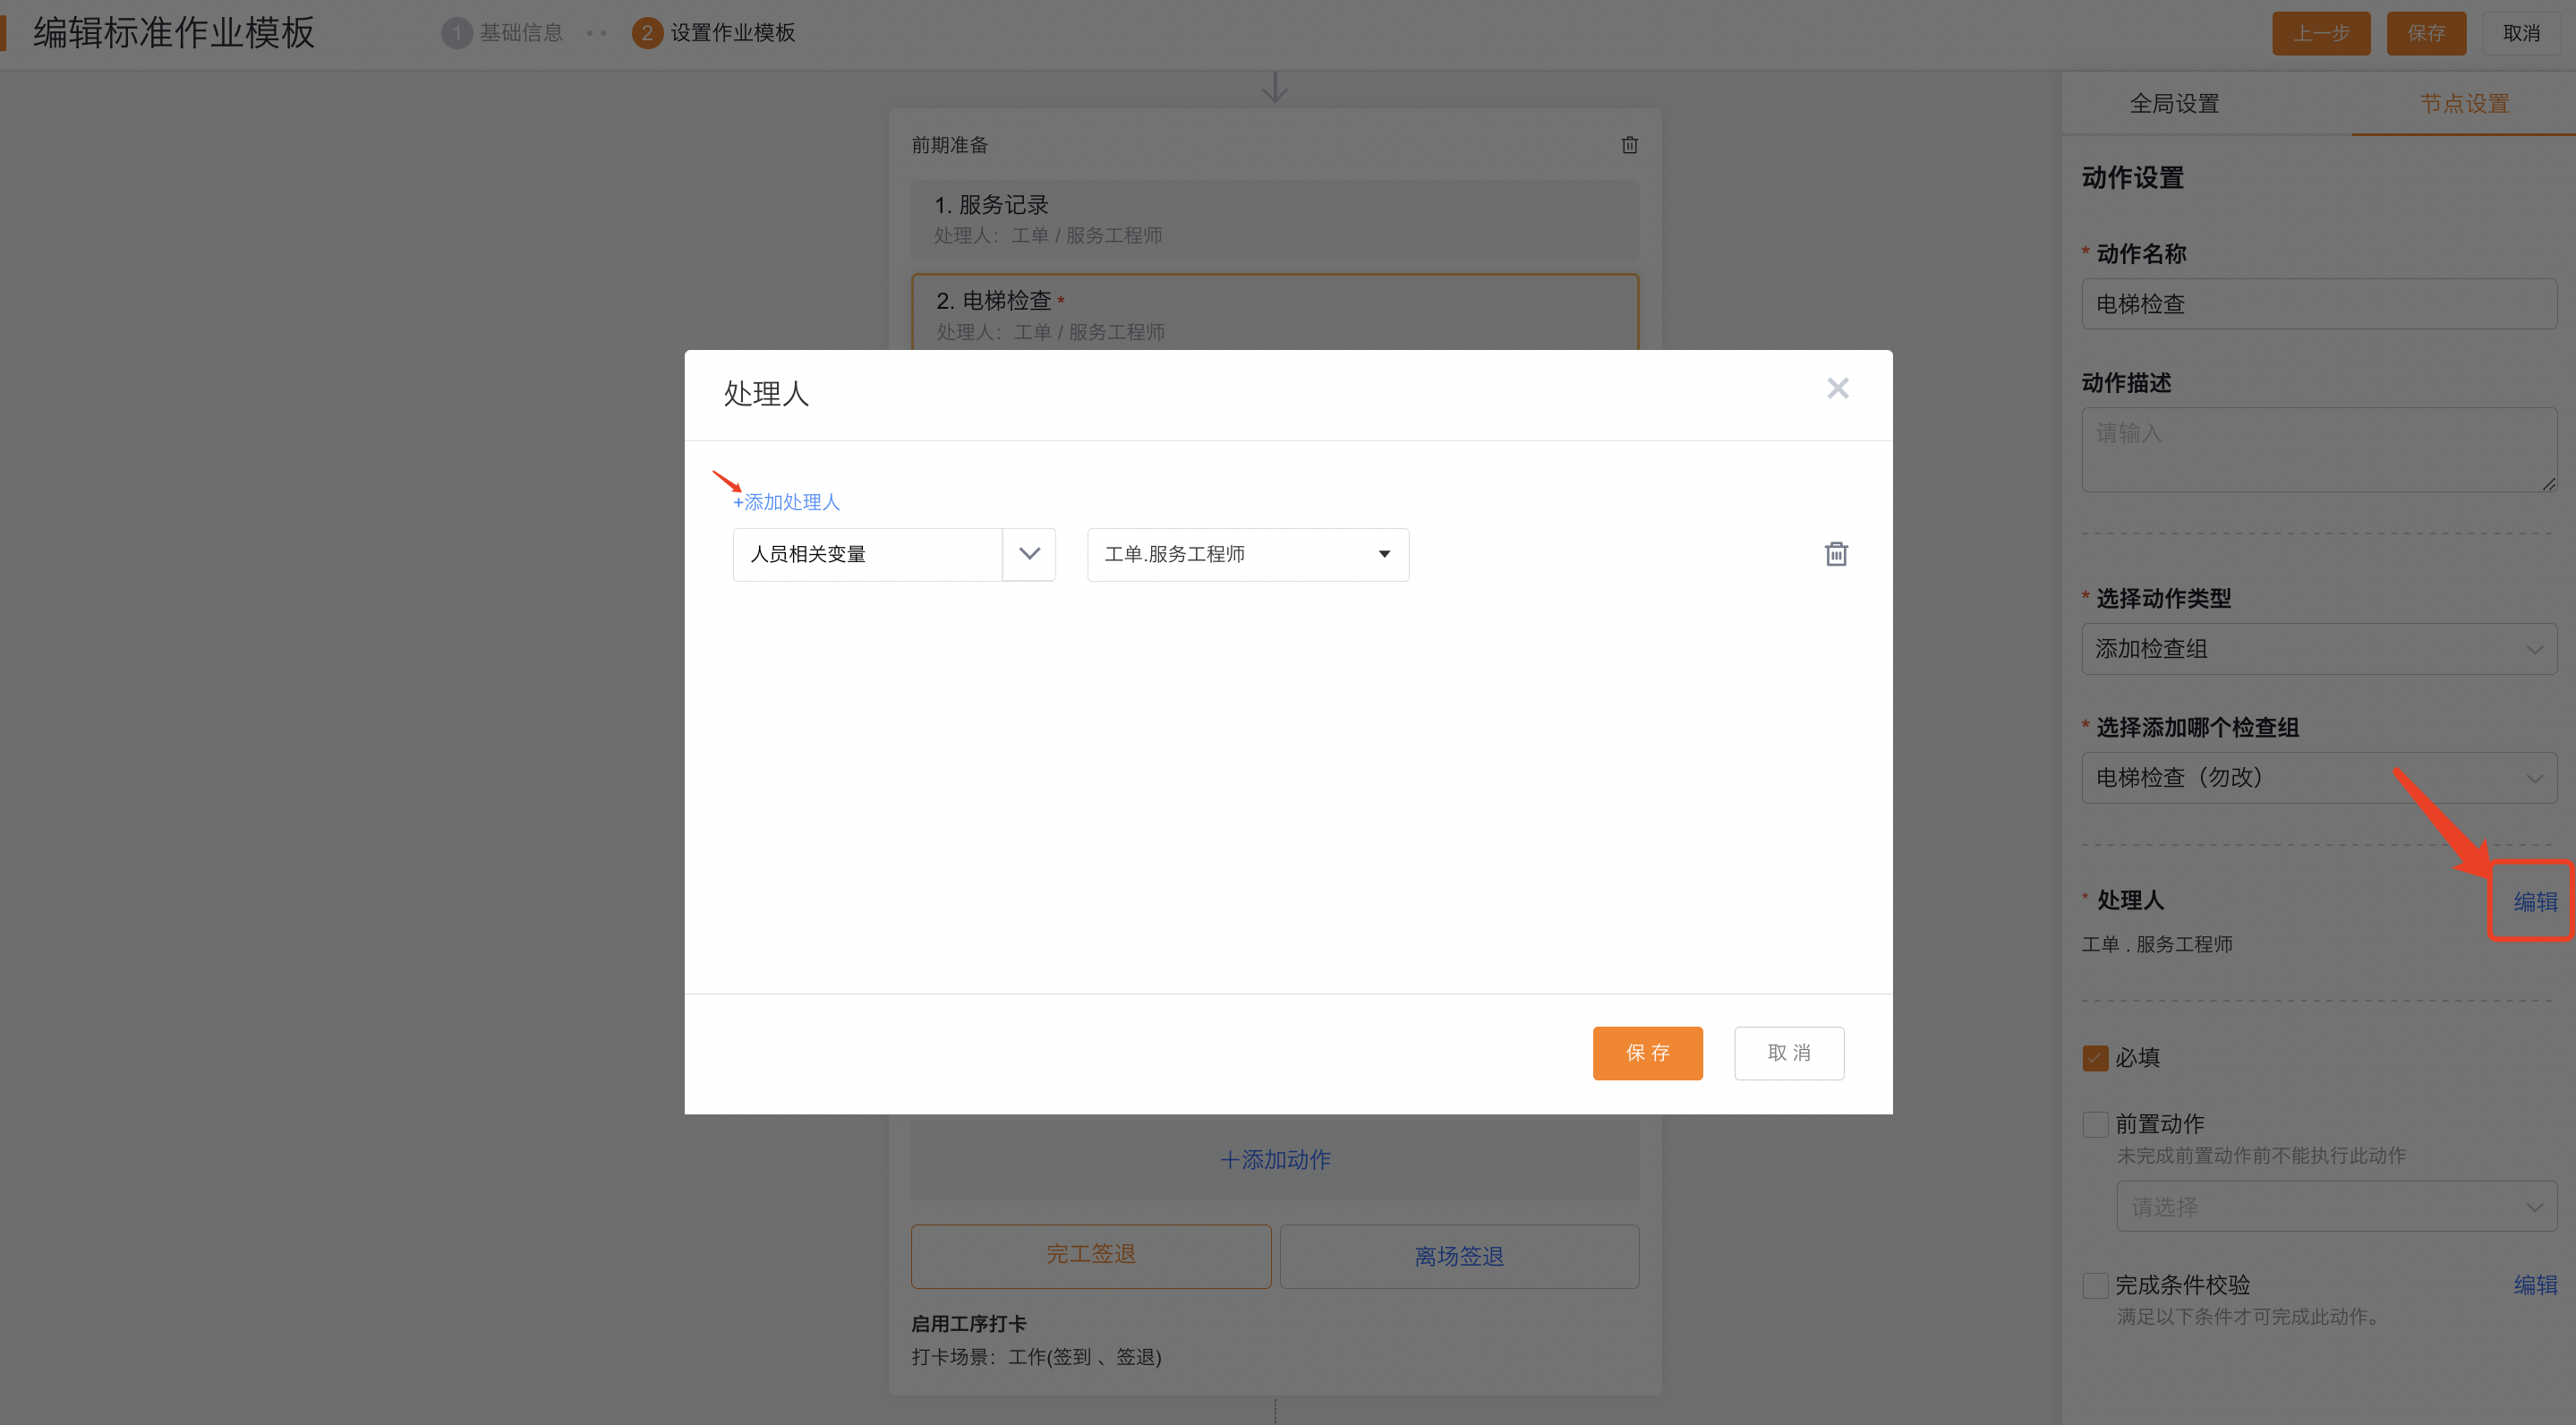
- In the assignee area, select Edit, and then select an assignee. The default is Work Order.Engineer. One action creates one instance, even with multiple assignees. The first assignee to submit completes the instance.
Set action triggering method
- Direct trigger: The process directly generates actions after entering the SOP node, without judging business conditions.
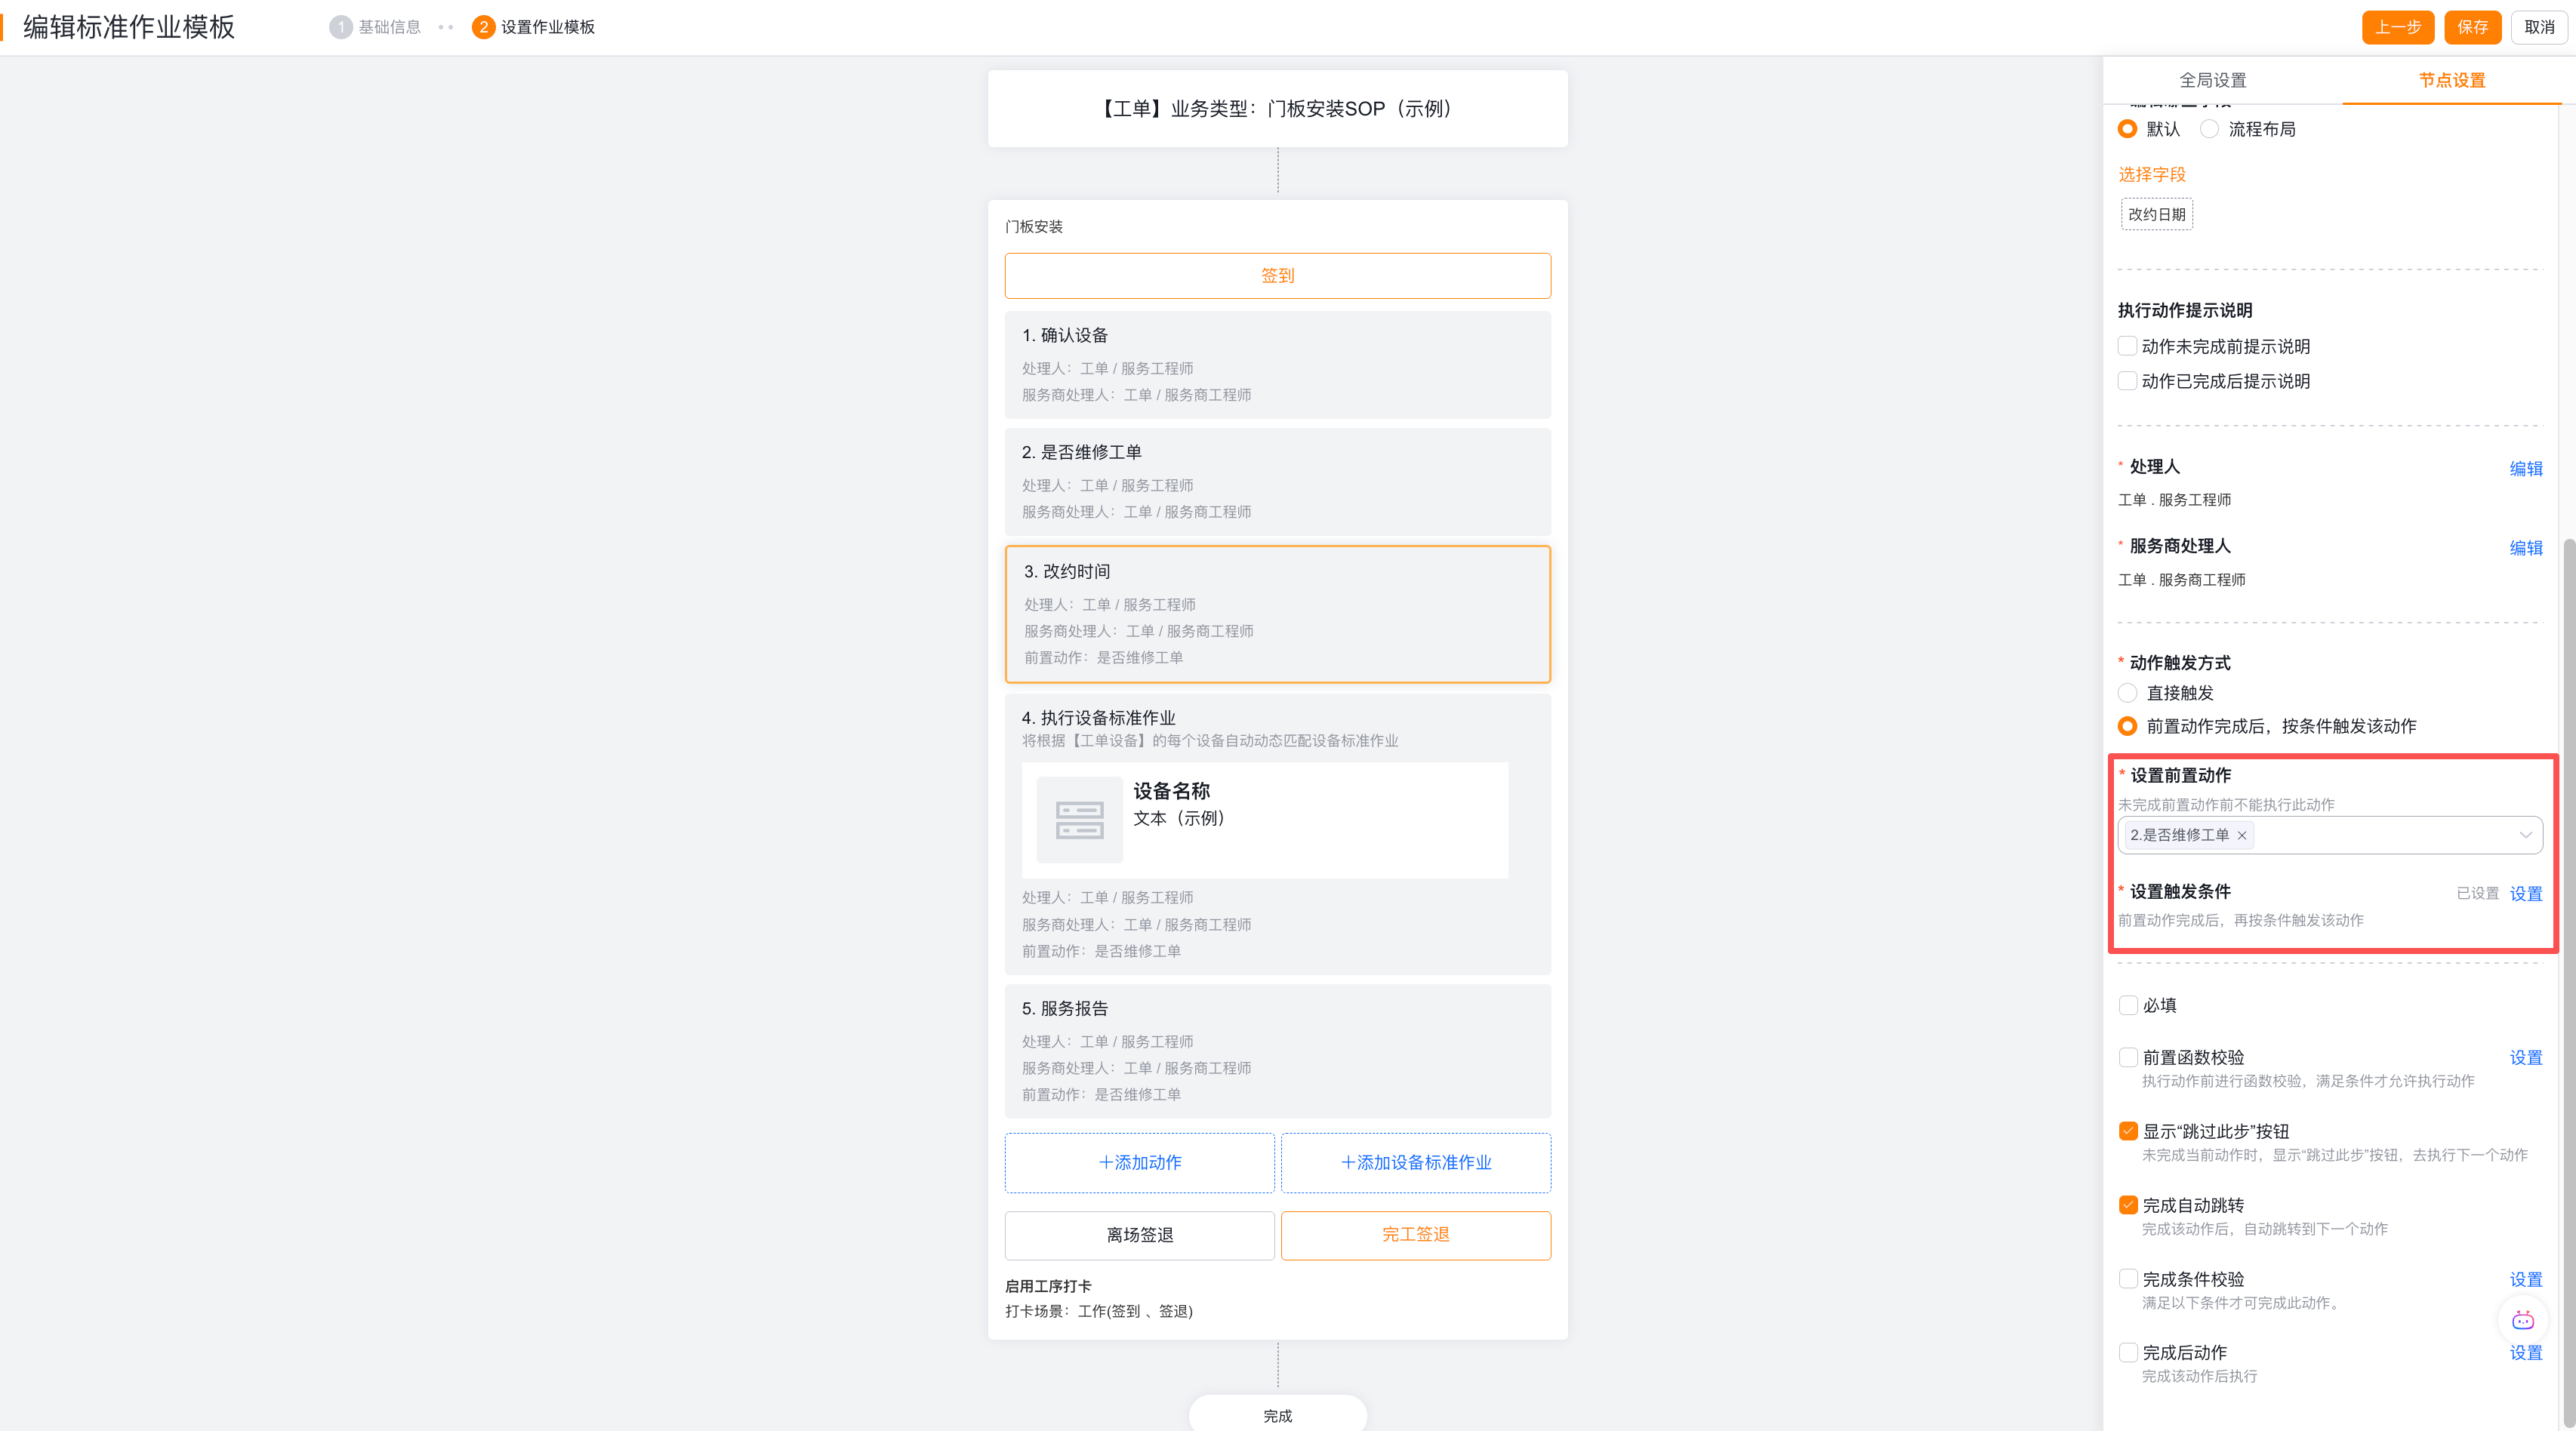
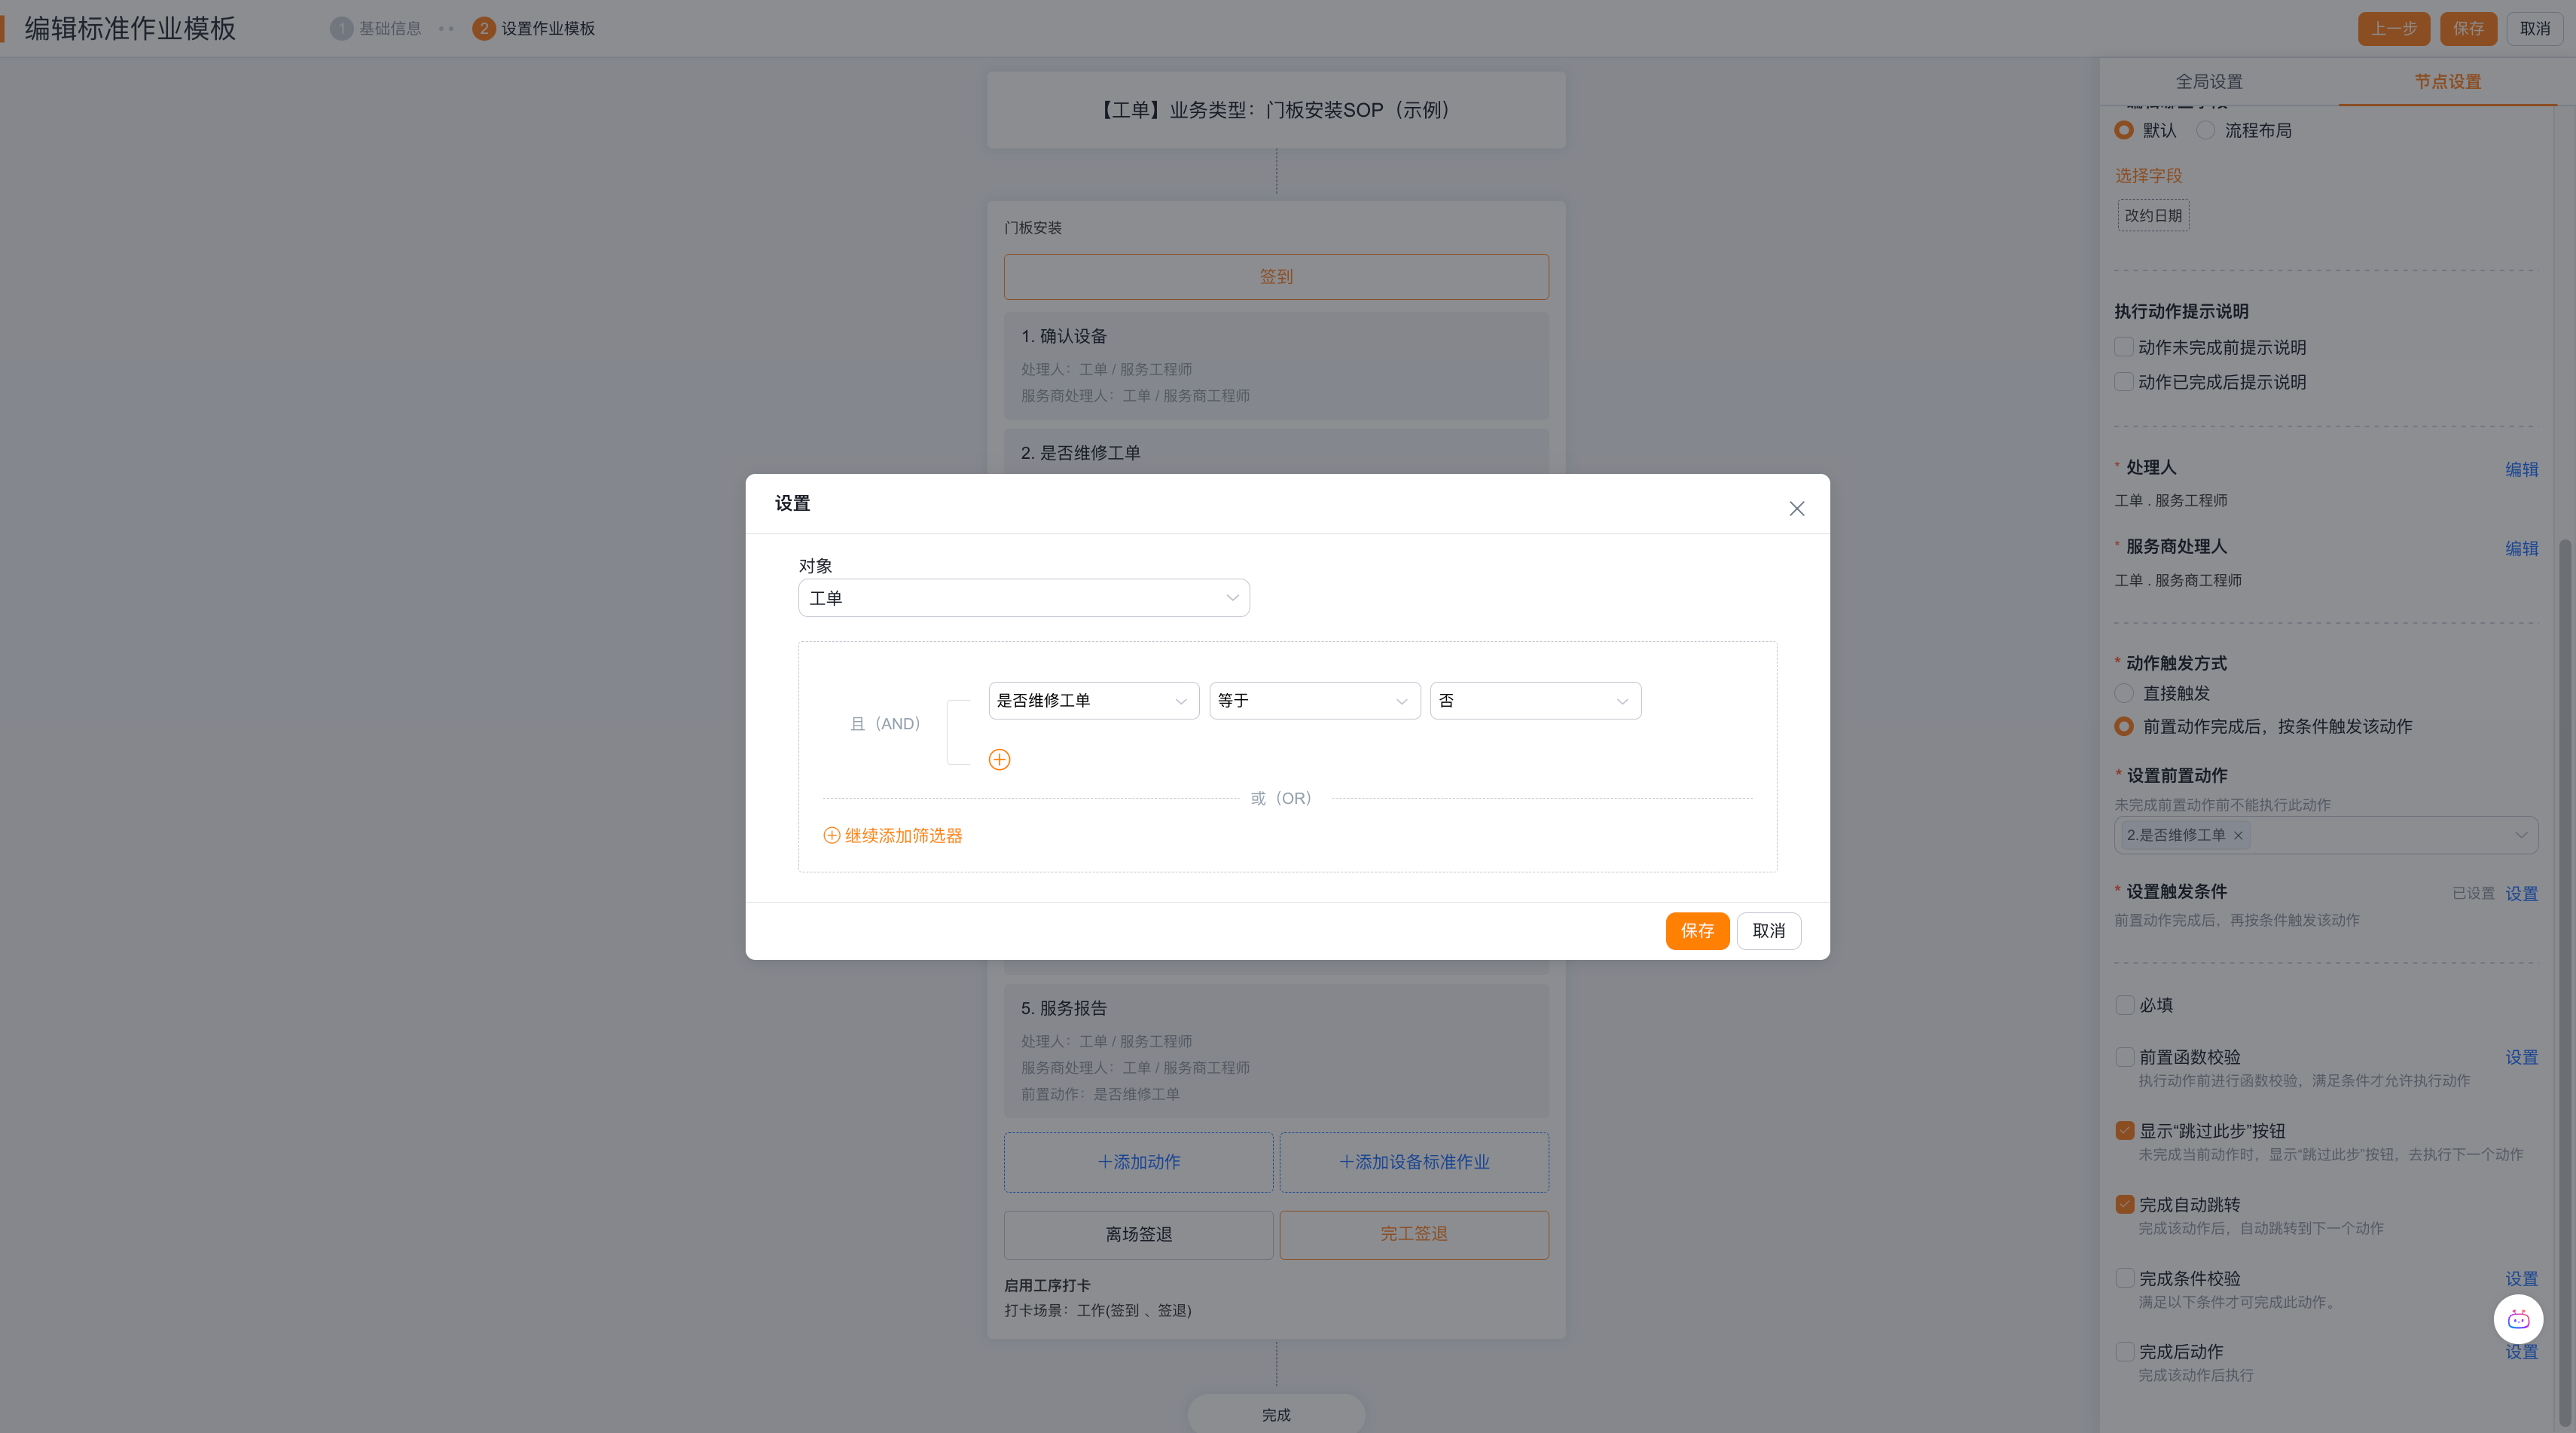
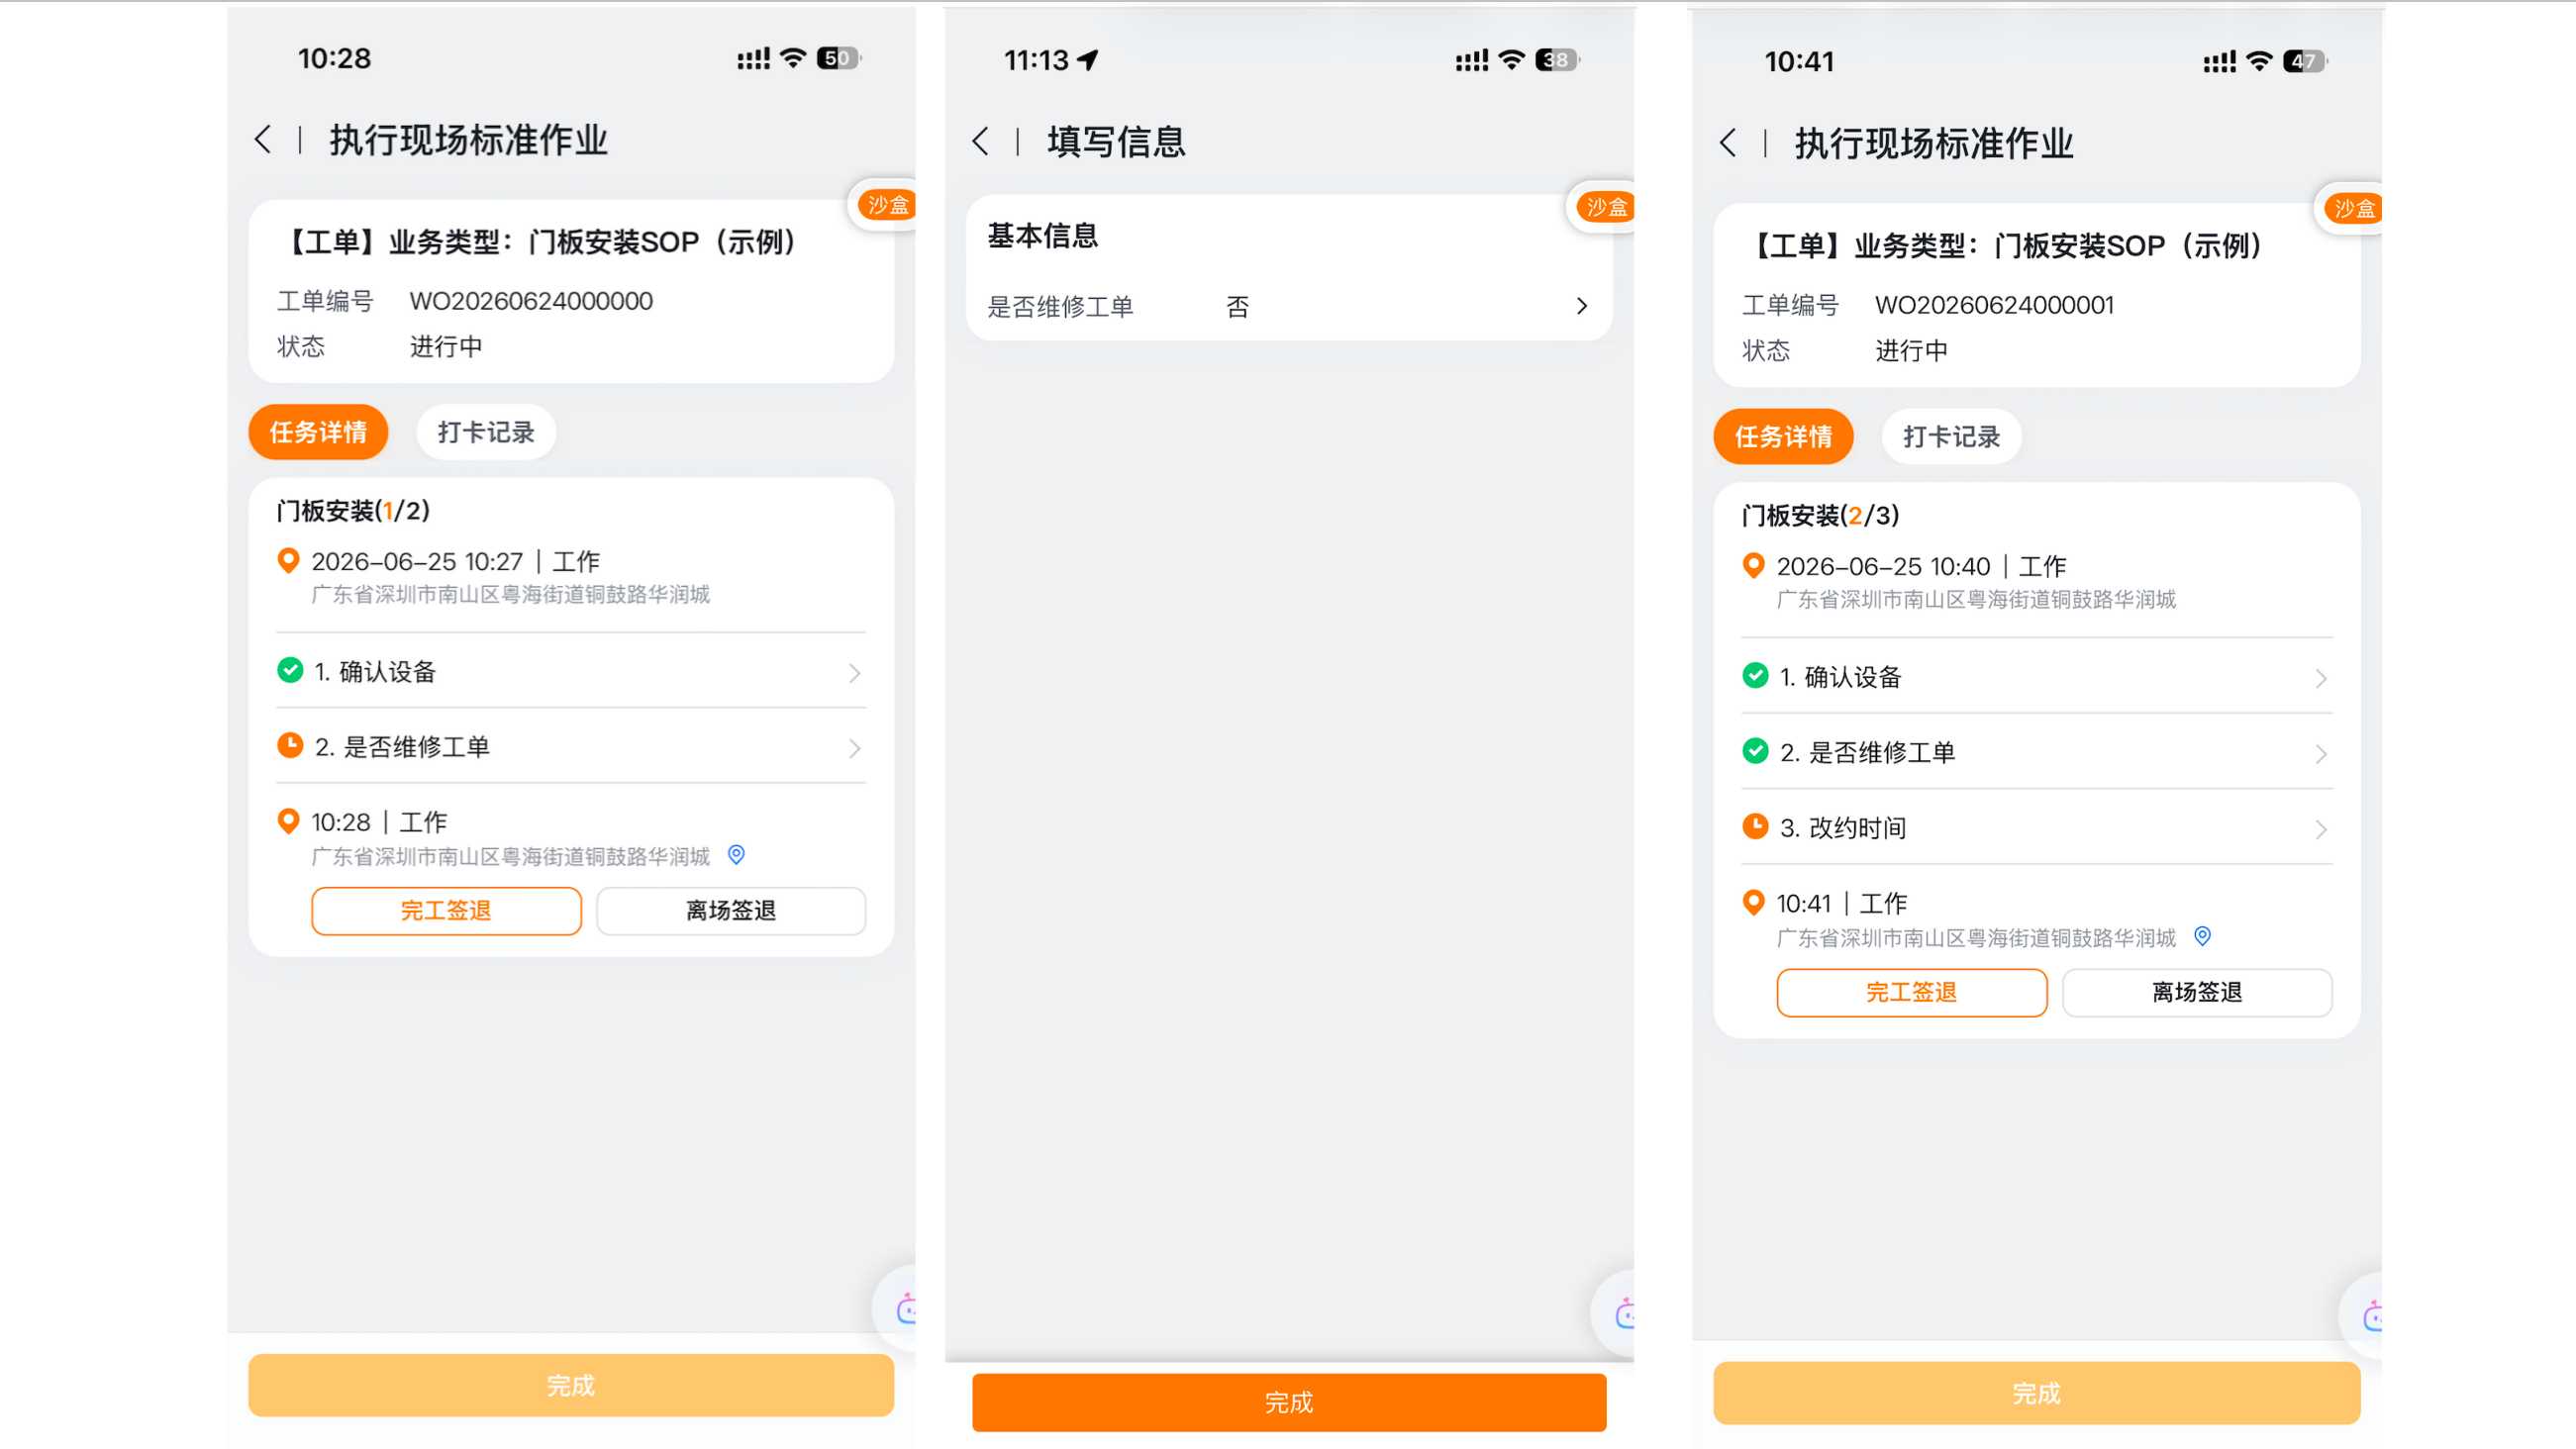
- After the pre-action is completed, the action is triggered according to the conditions: The business conditions are judged after the pre-action is completed. When the conditions are met, subsequent actions are displayed; when the conditions are not met, the actions are not displayed, do not require execution, and do not block the completion of the SOP.
When configuring conditions to trigger actions:
- Click Action triggering method and select After the pre-action is completed, trigger the action according to conditions.
- In Set pre-action, select the pre-action of the same process that the current action depends on.
- Click Set trigger conditions, select the condition judgment object, and set fields, operators, and condition values.
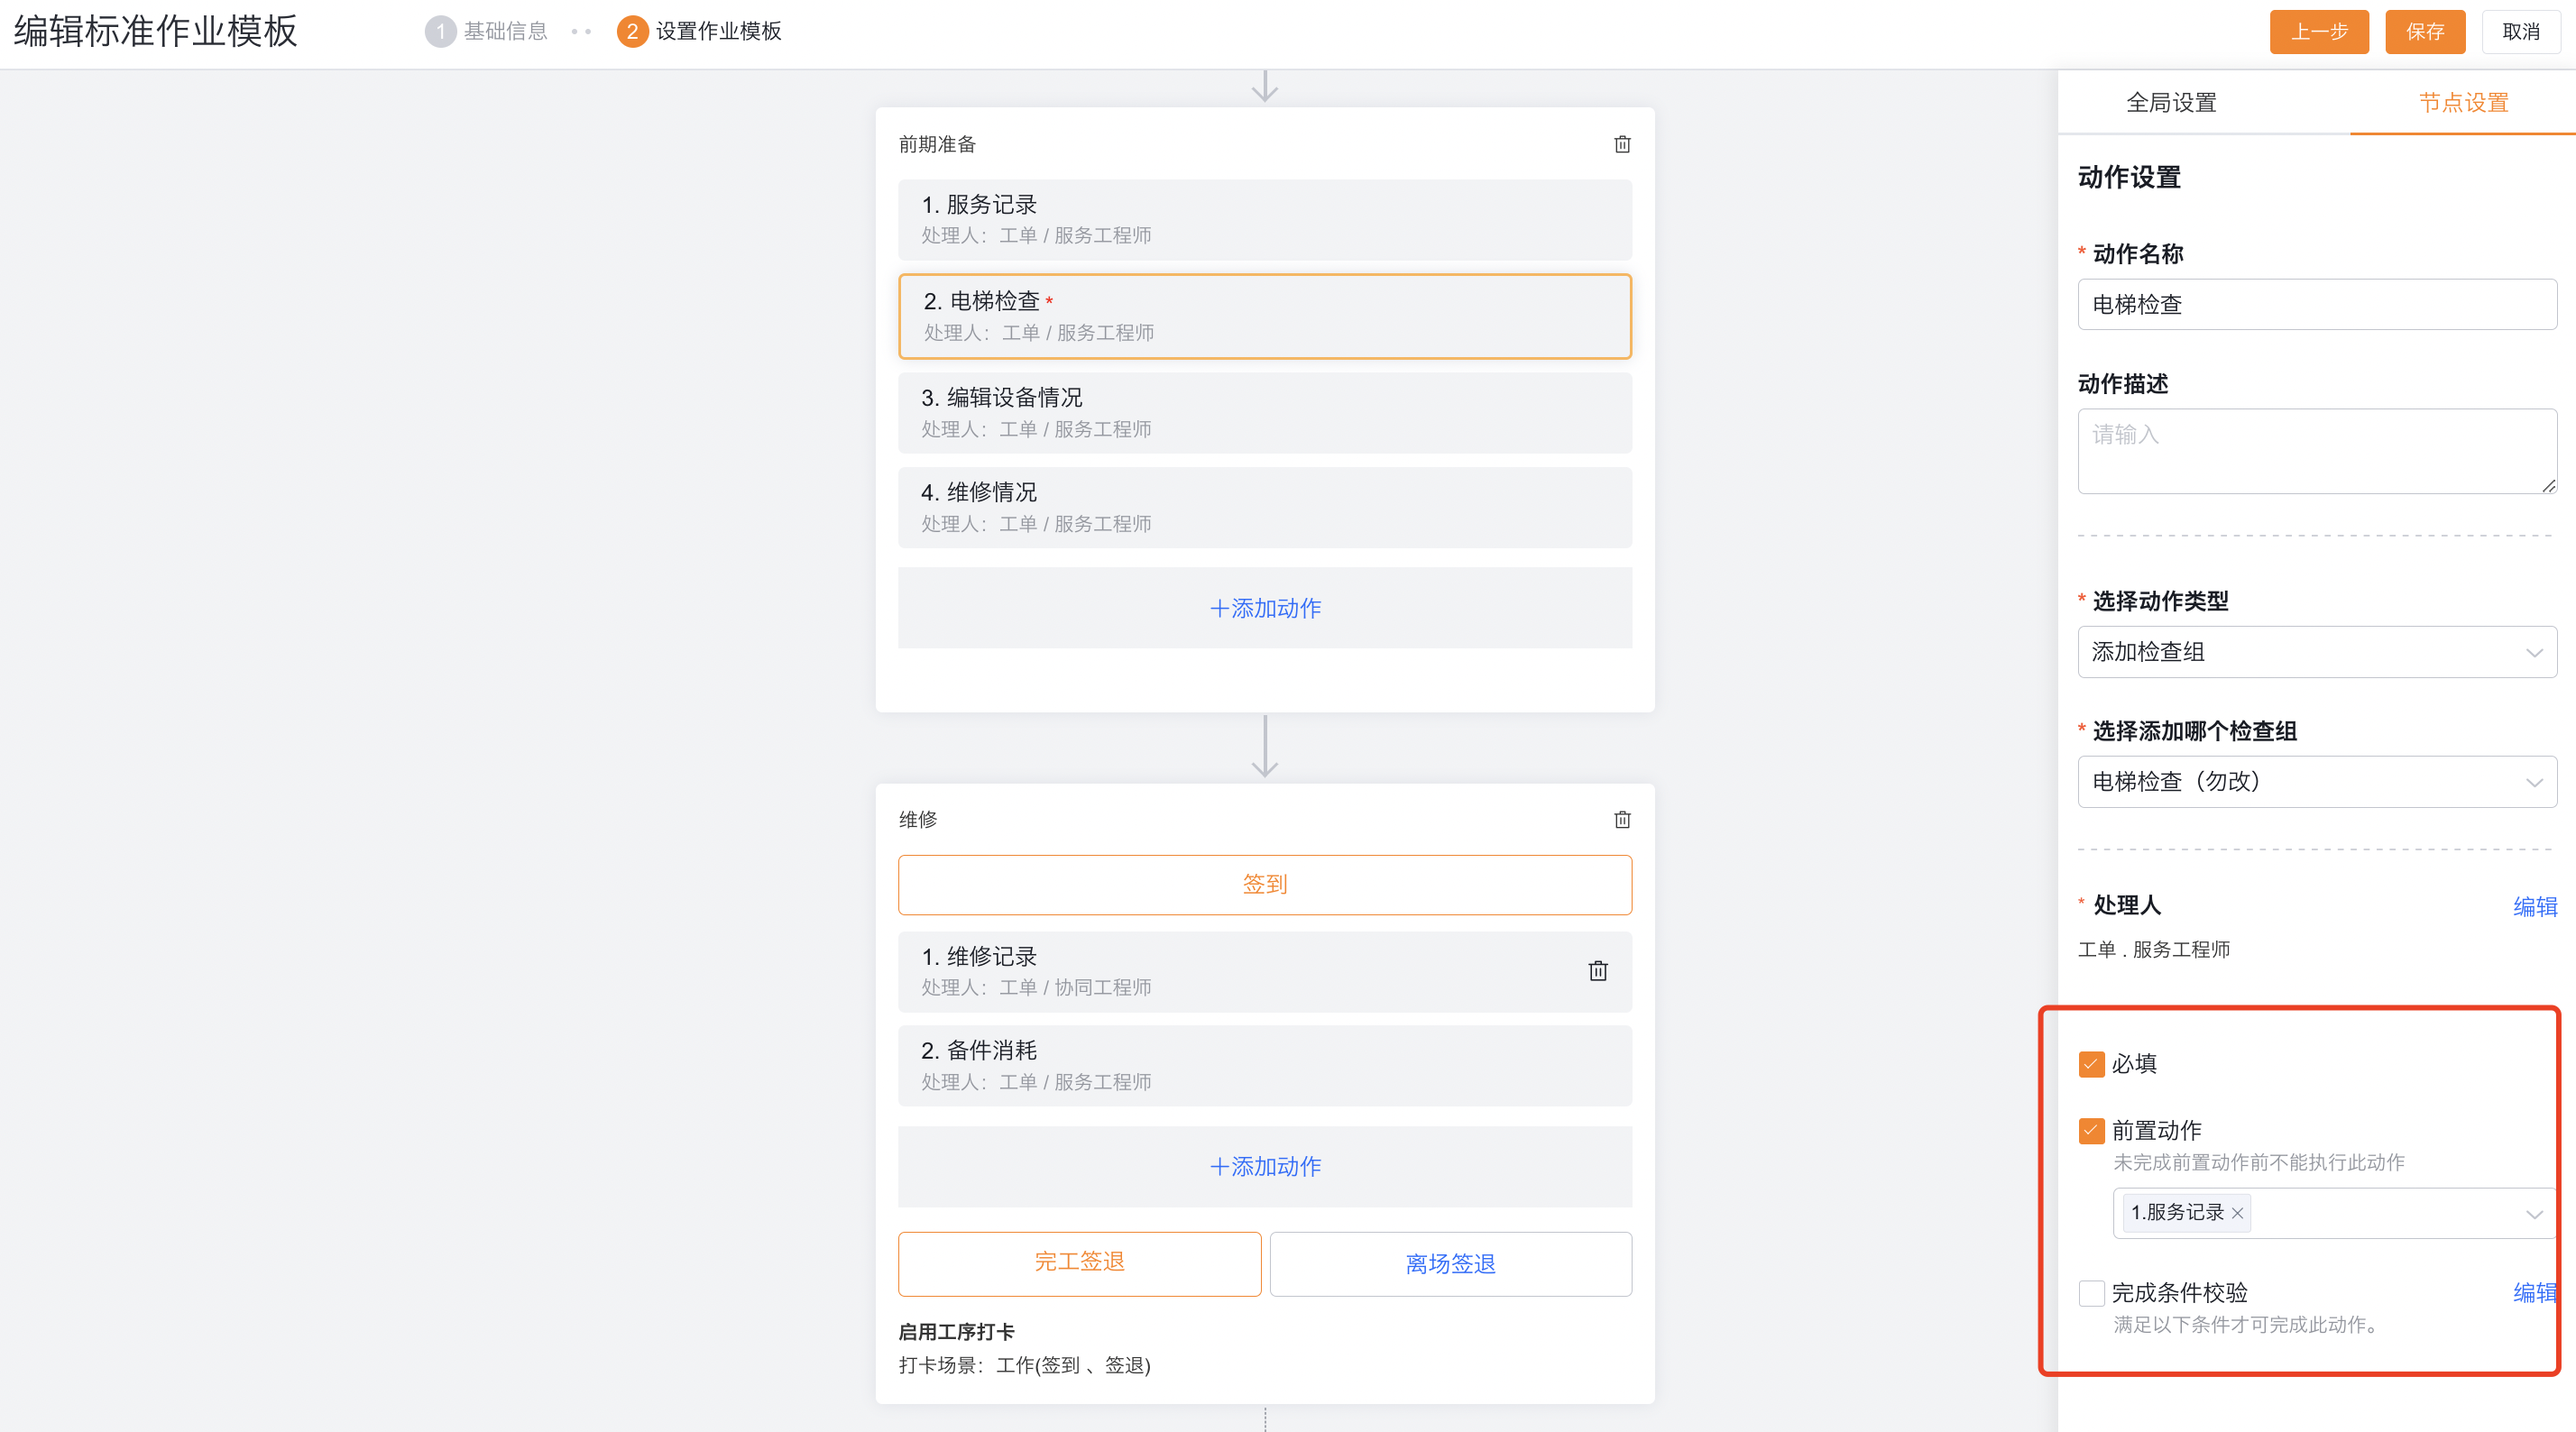
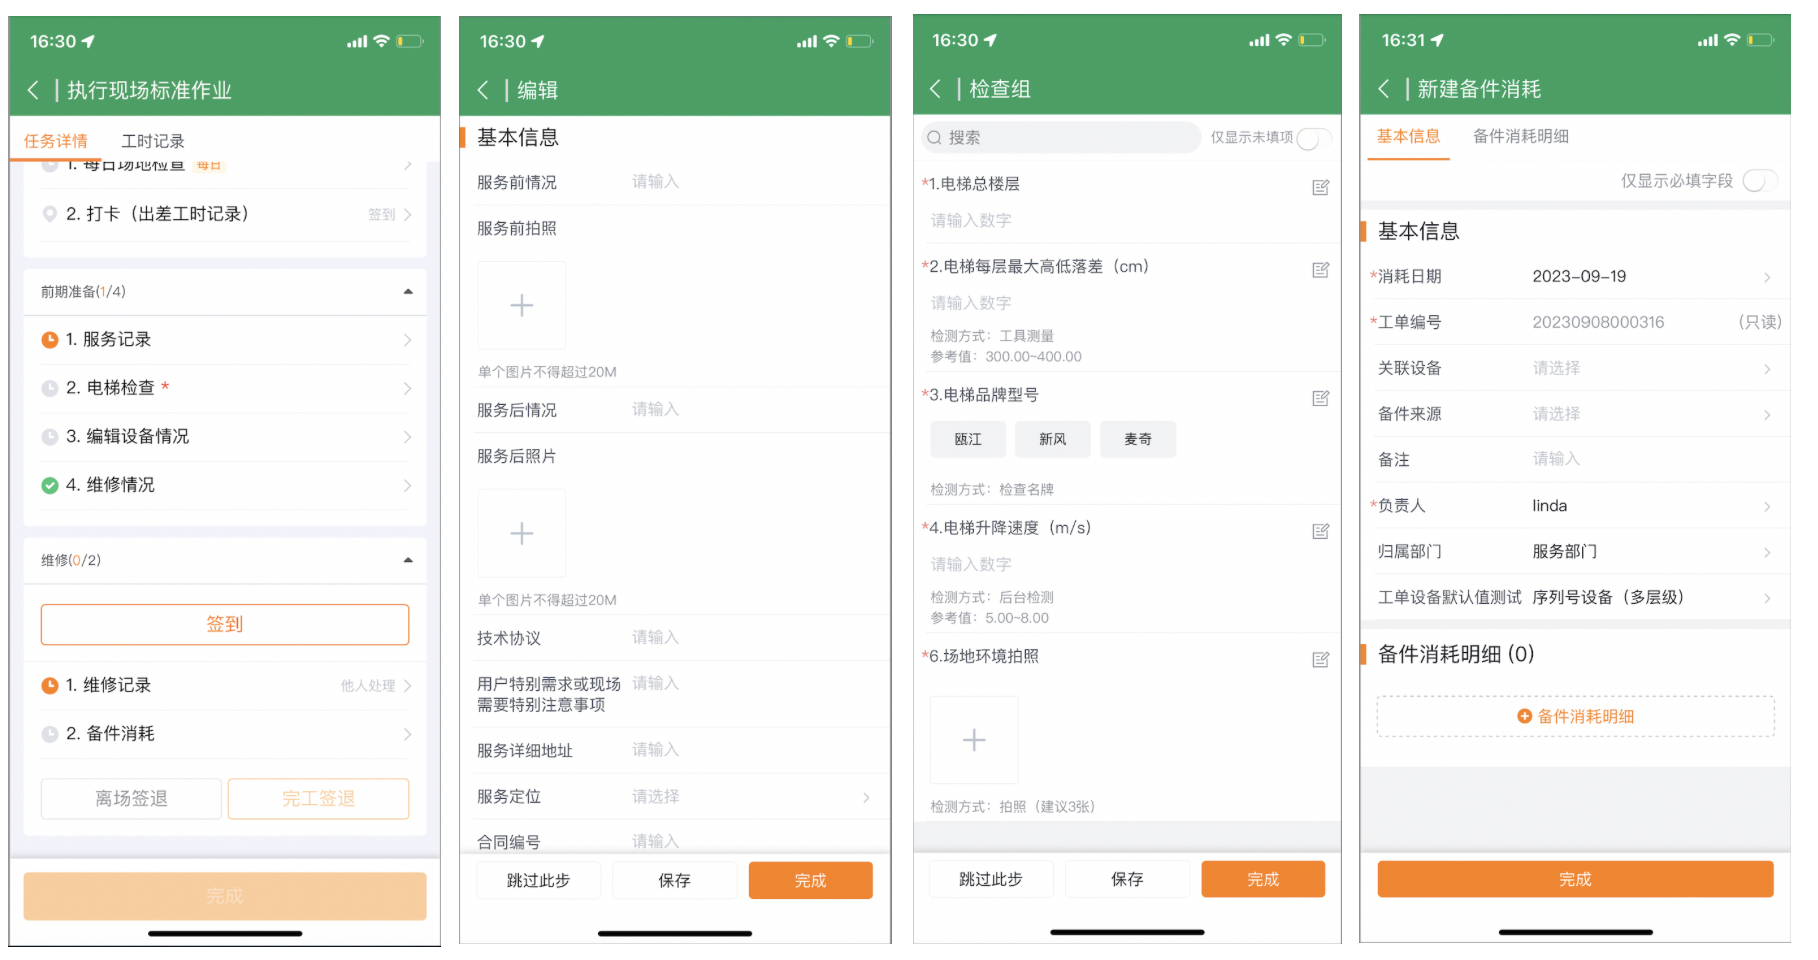
Set completion rules- Precursor Action: The current action cannot be executed when the preceding action is not completed. Only actions within the same process are supported. When selecting the conditional triggering method, the pre-action must be configured.
- Required: When the processor clicks the process Complete Sign Out or the entire SOP Complete, the system verifies whether the action has been completed.
- Display "Skip this step" button: When the current action has not been completed, the engineer can enter the next action first; this option is not equivalent to canceling the required verification.
- Auto Skip: Automatically enter the next action after completing an action; this interaction is only supported by the App.
- Completion Conditions: Click Edit to add a verification function; the action cannot be completed if the conditions are not met.
- Action after completion: Click Edit to add a function; the system automatically executes the function after the action is completed.
Configure repeated actions
Repeating actions support the following types:
- New associated object: Continuously create new work order associated data such as equipment operation records based on frequency.
- Add inspection group: Select the inspection subject as the work order or the equipment associated with the work order, and then specify the inspection group or match according to rules.
Recurring actions can include prompts for each operation. The default assignee is Work Order.Engineer. Supported personnel fields are Engineer (field_xcfwry__c) and Collaborative Engineer (related_service_personnel__c).
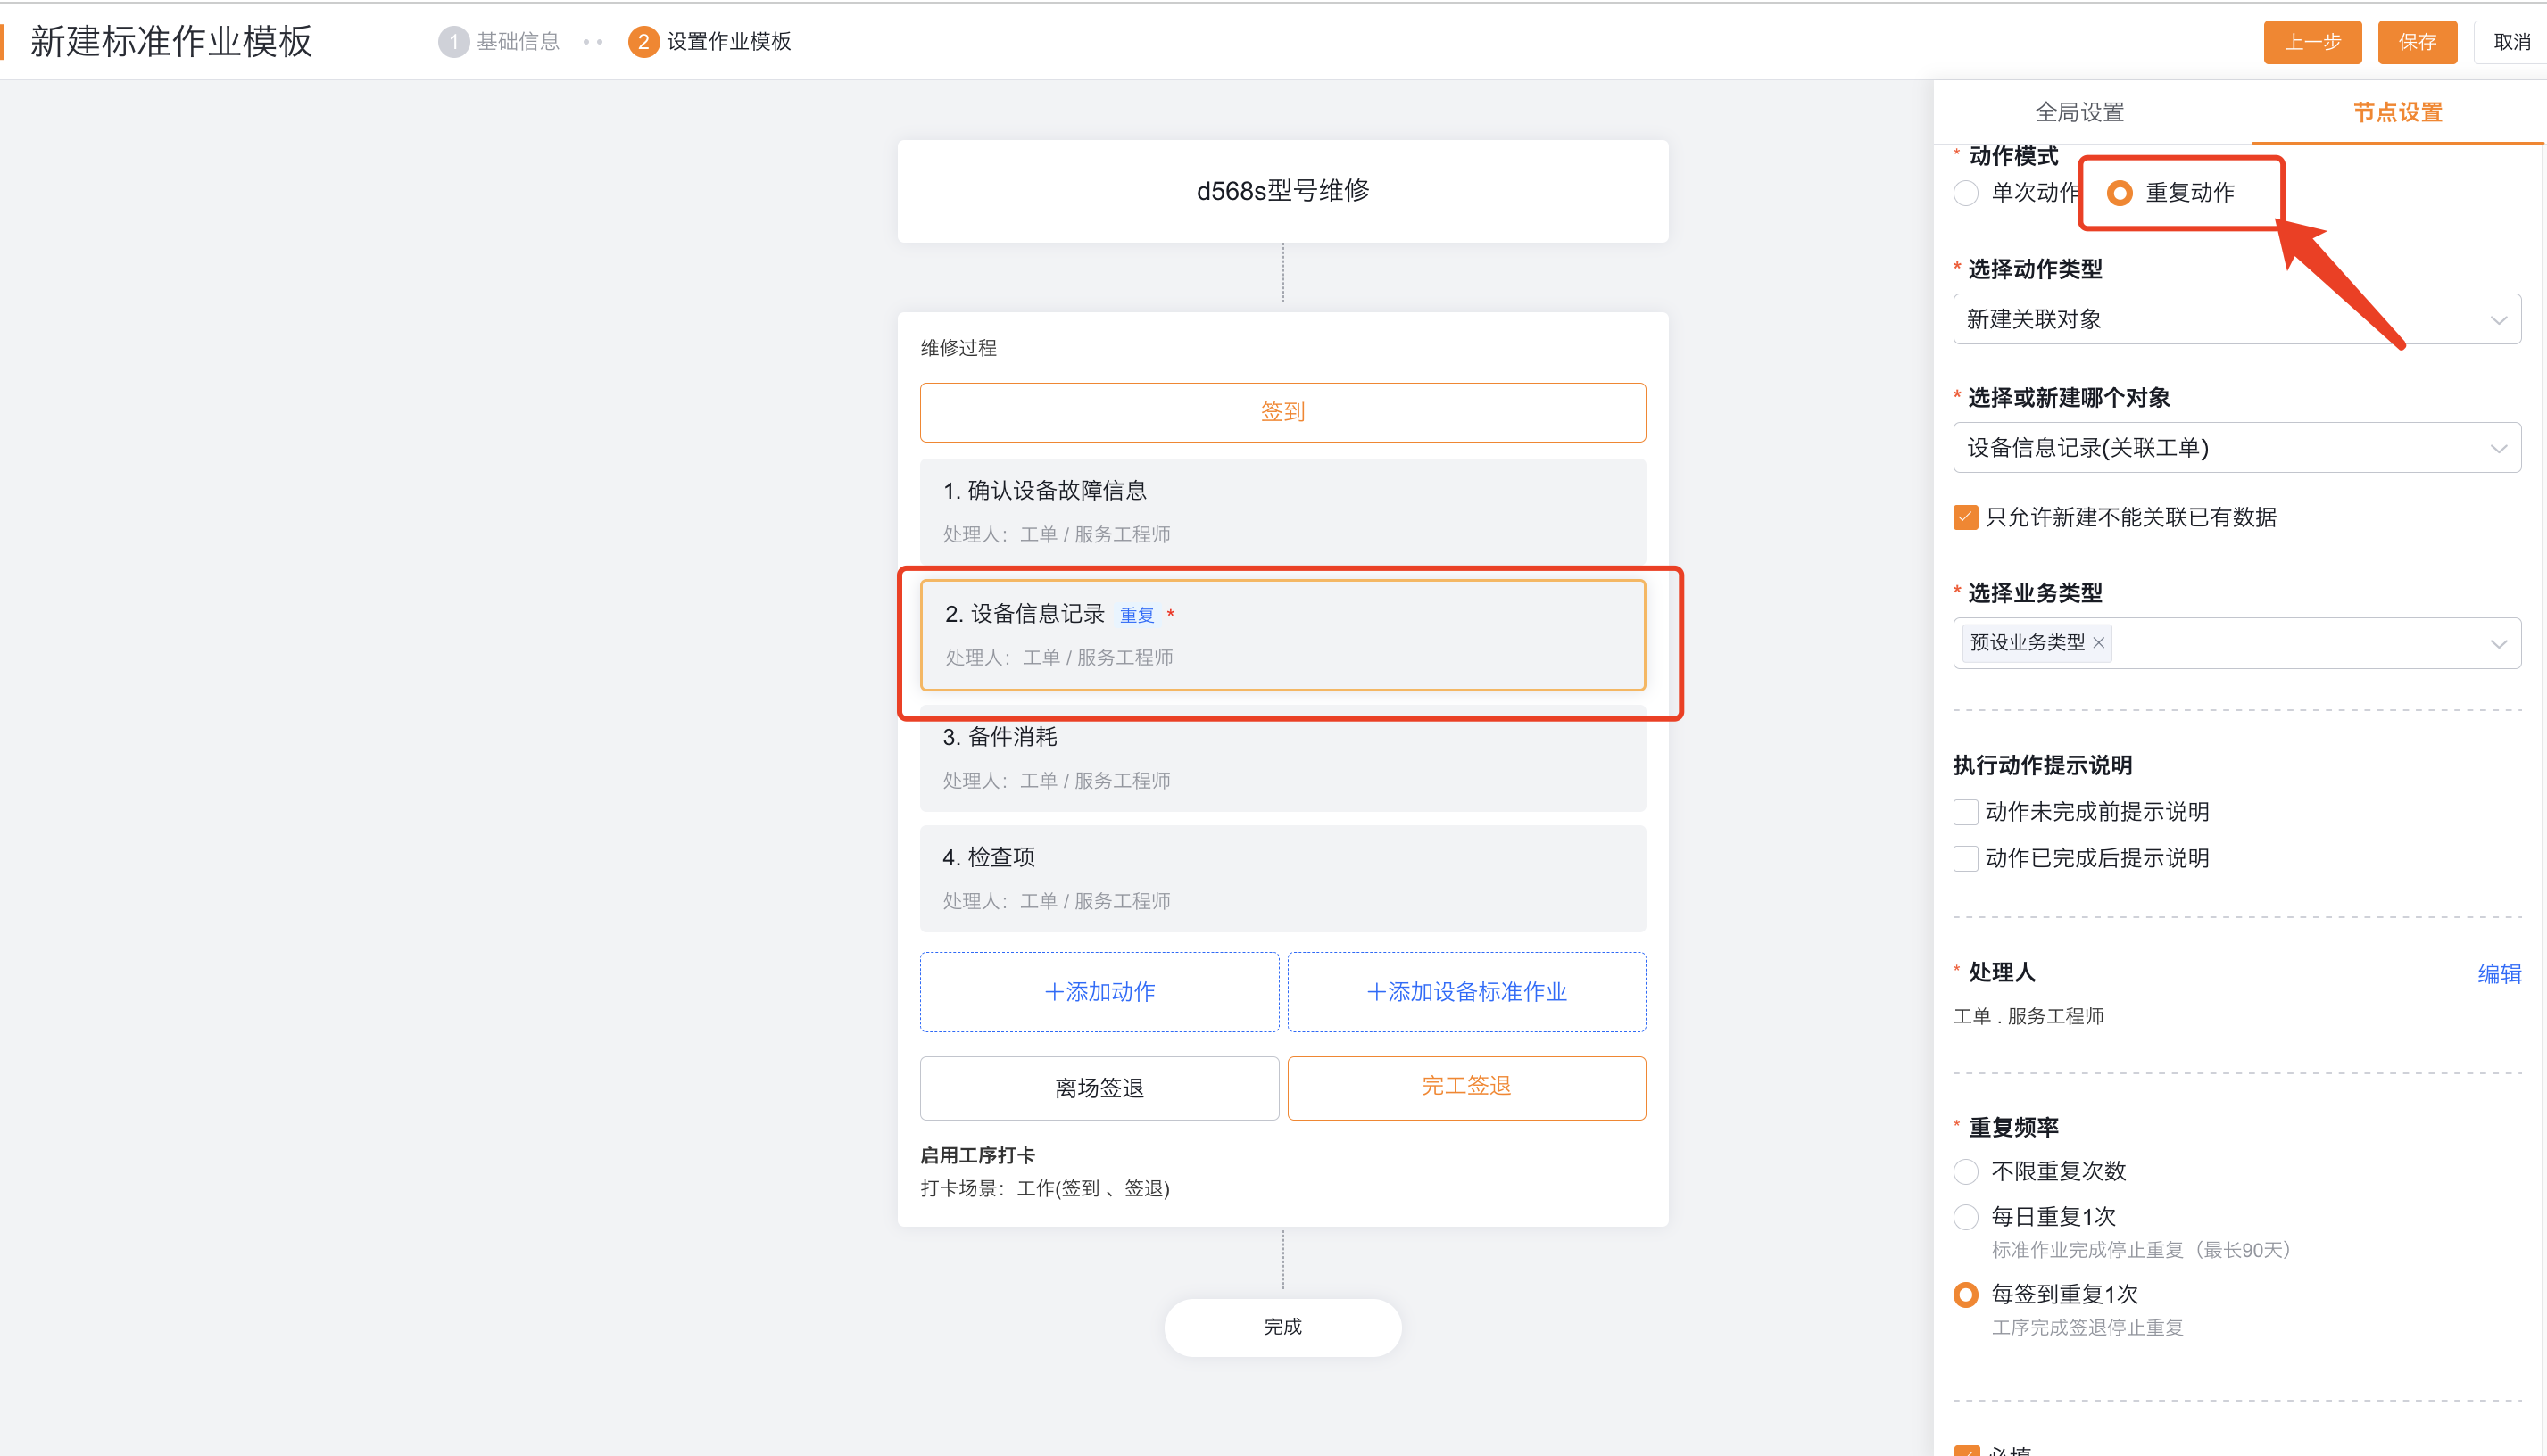
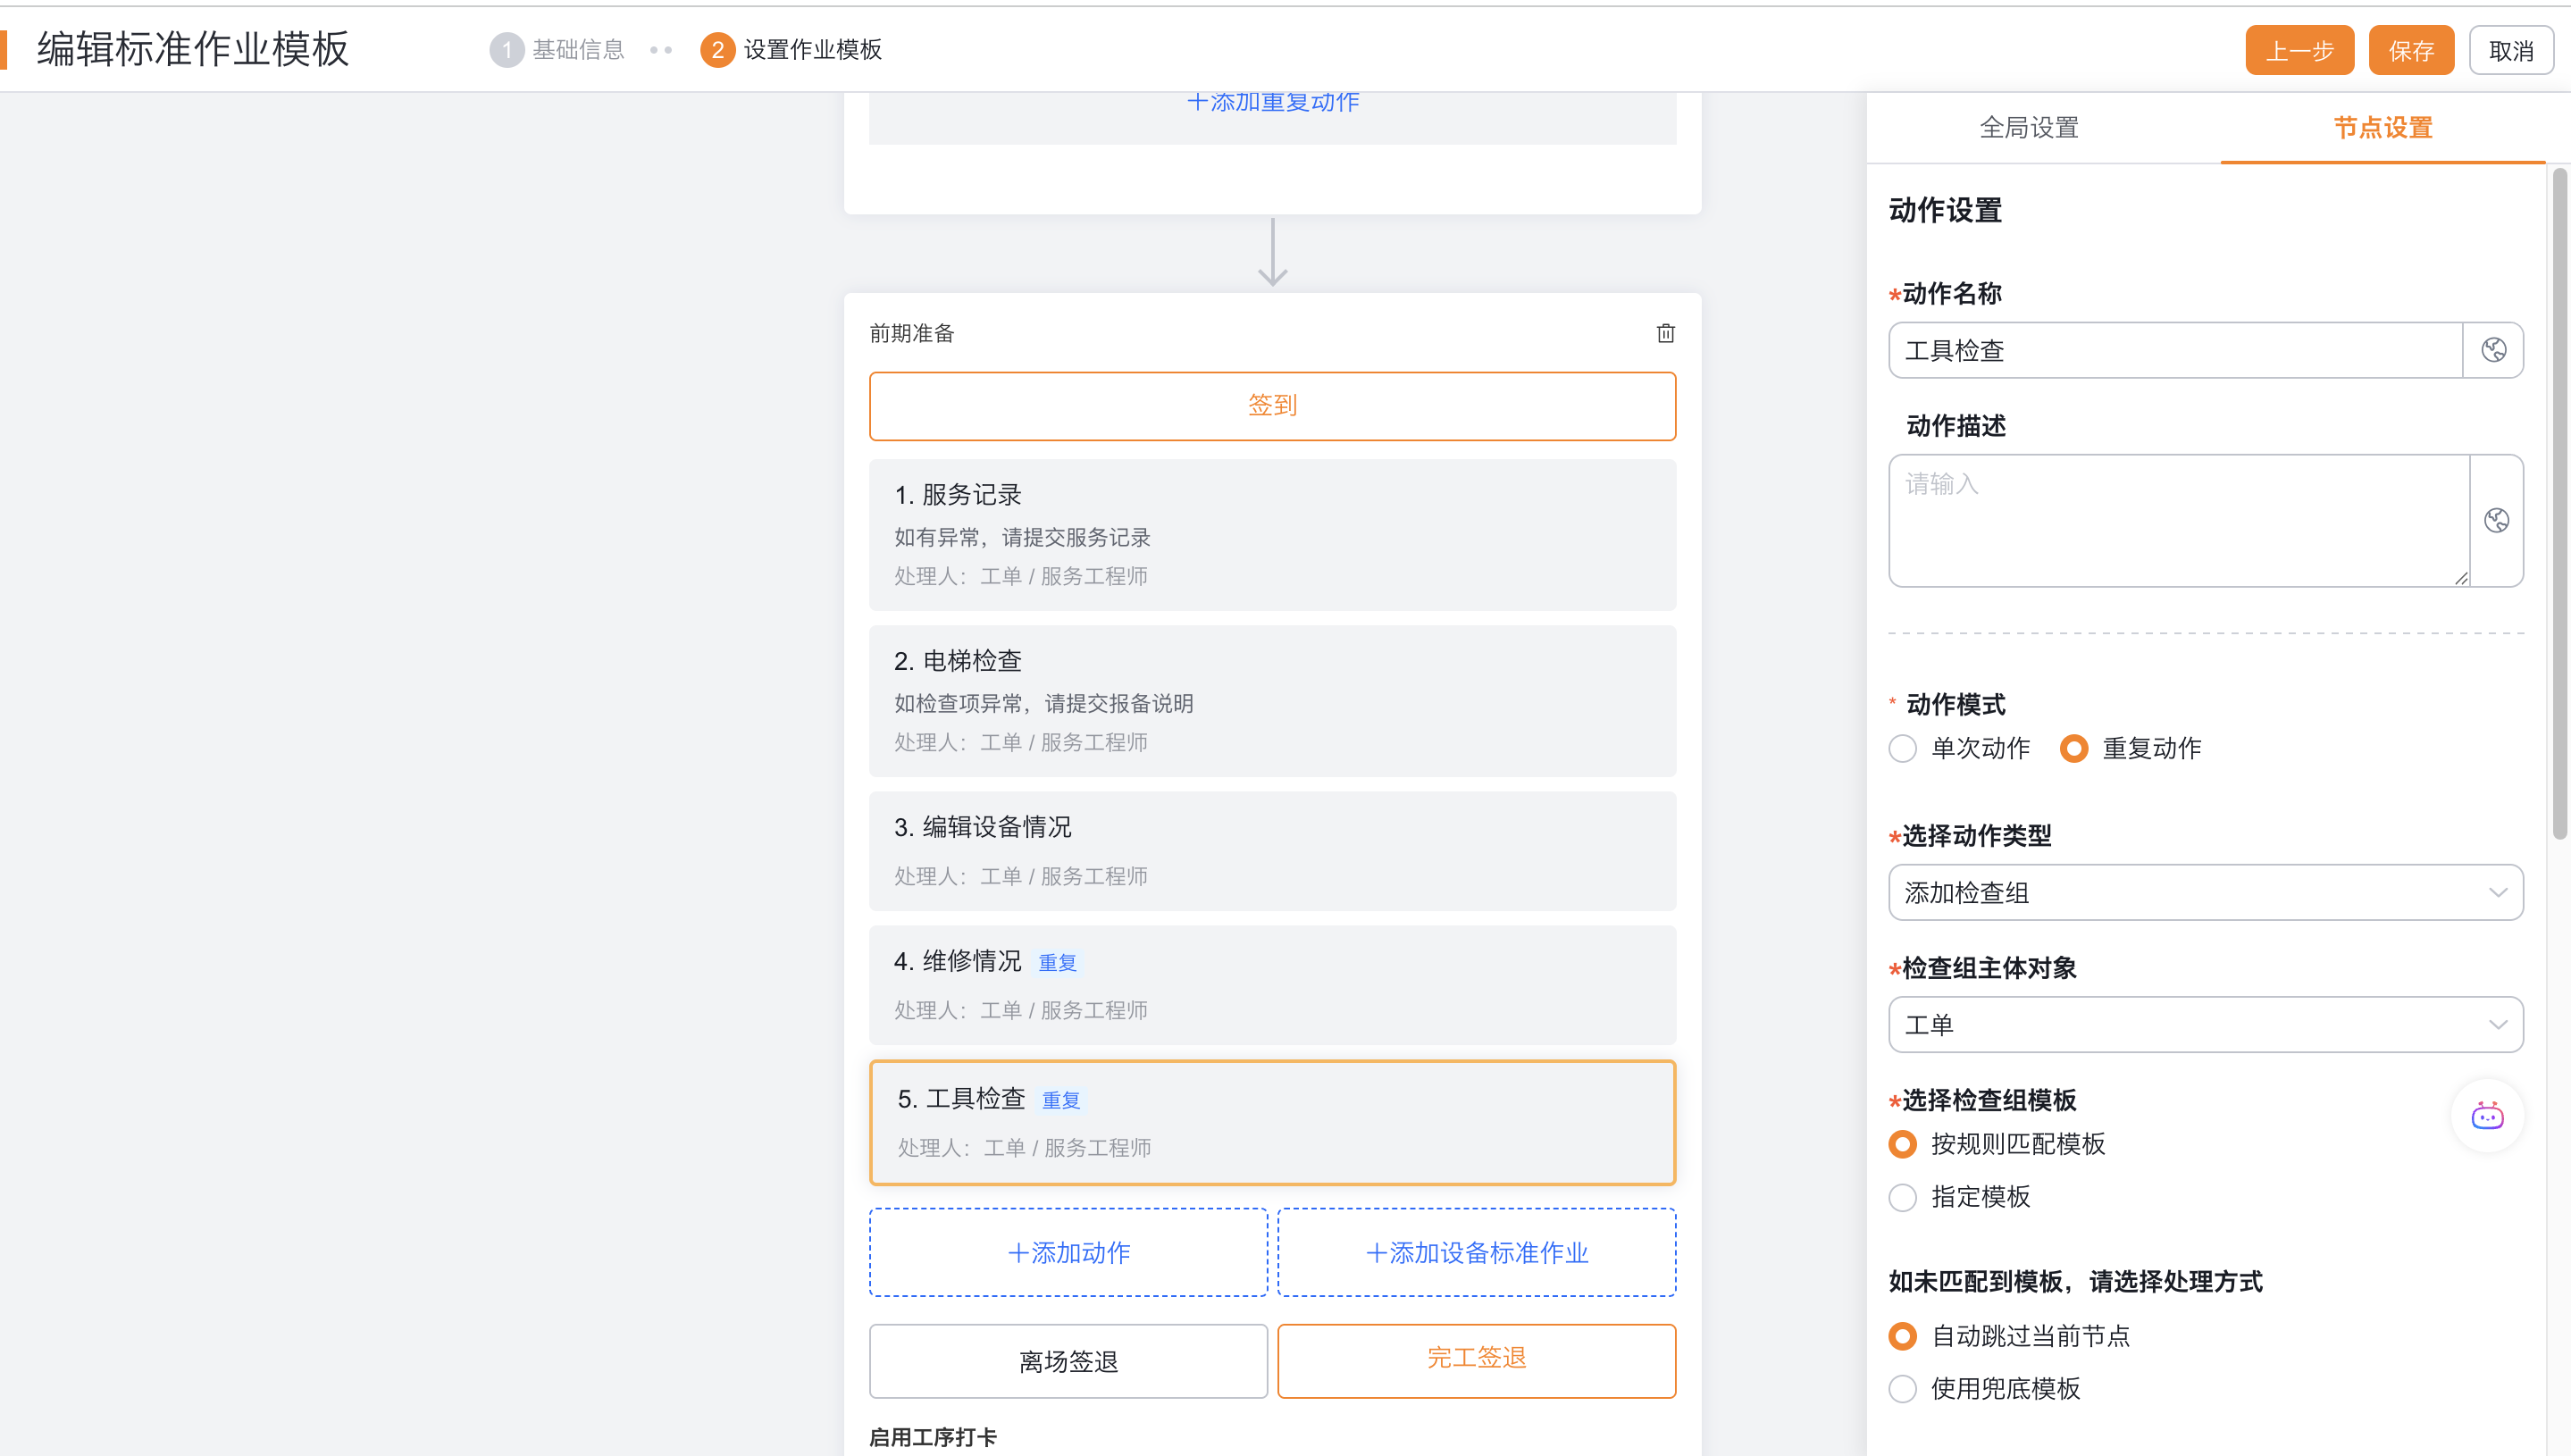
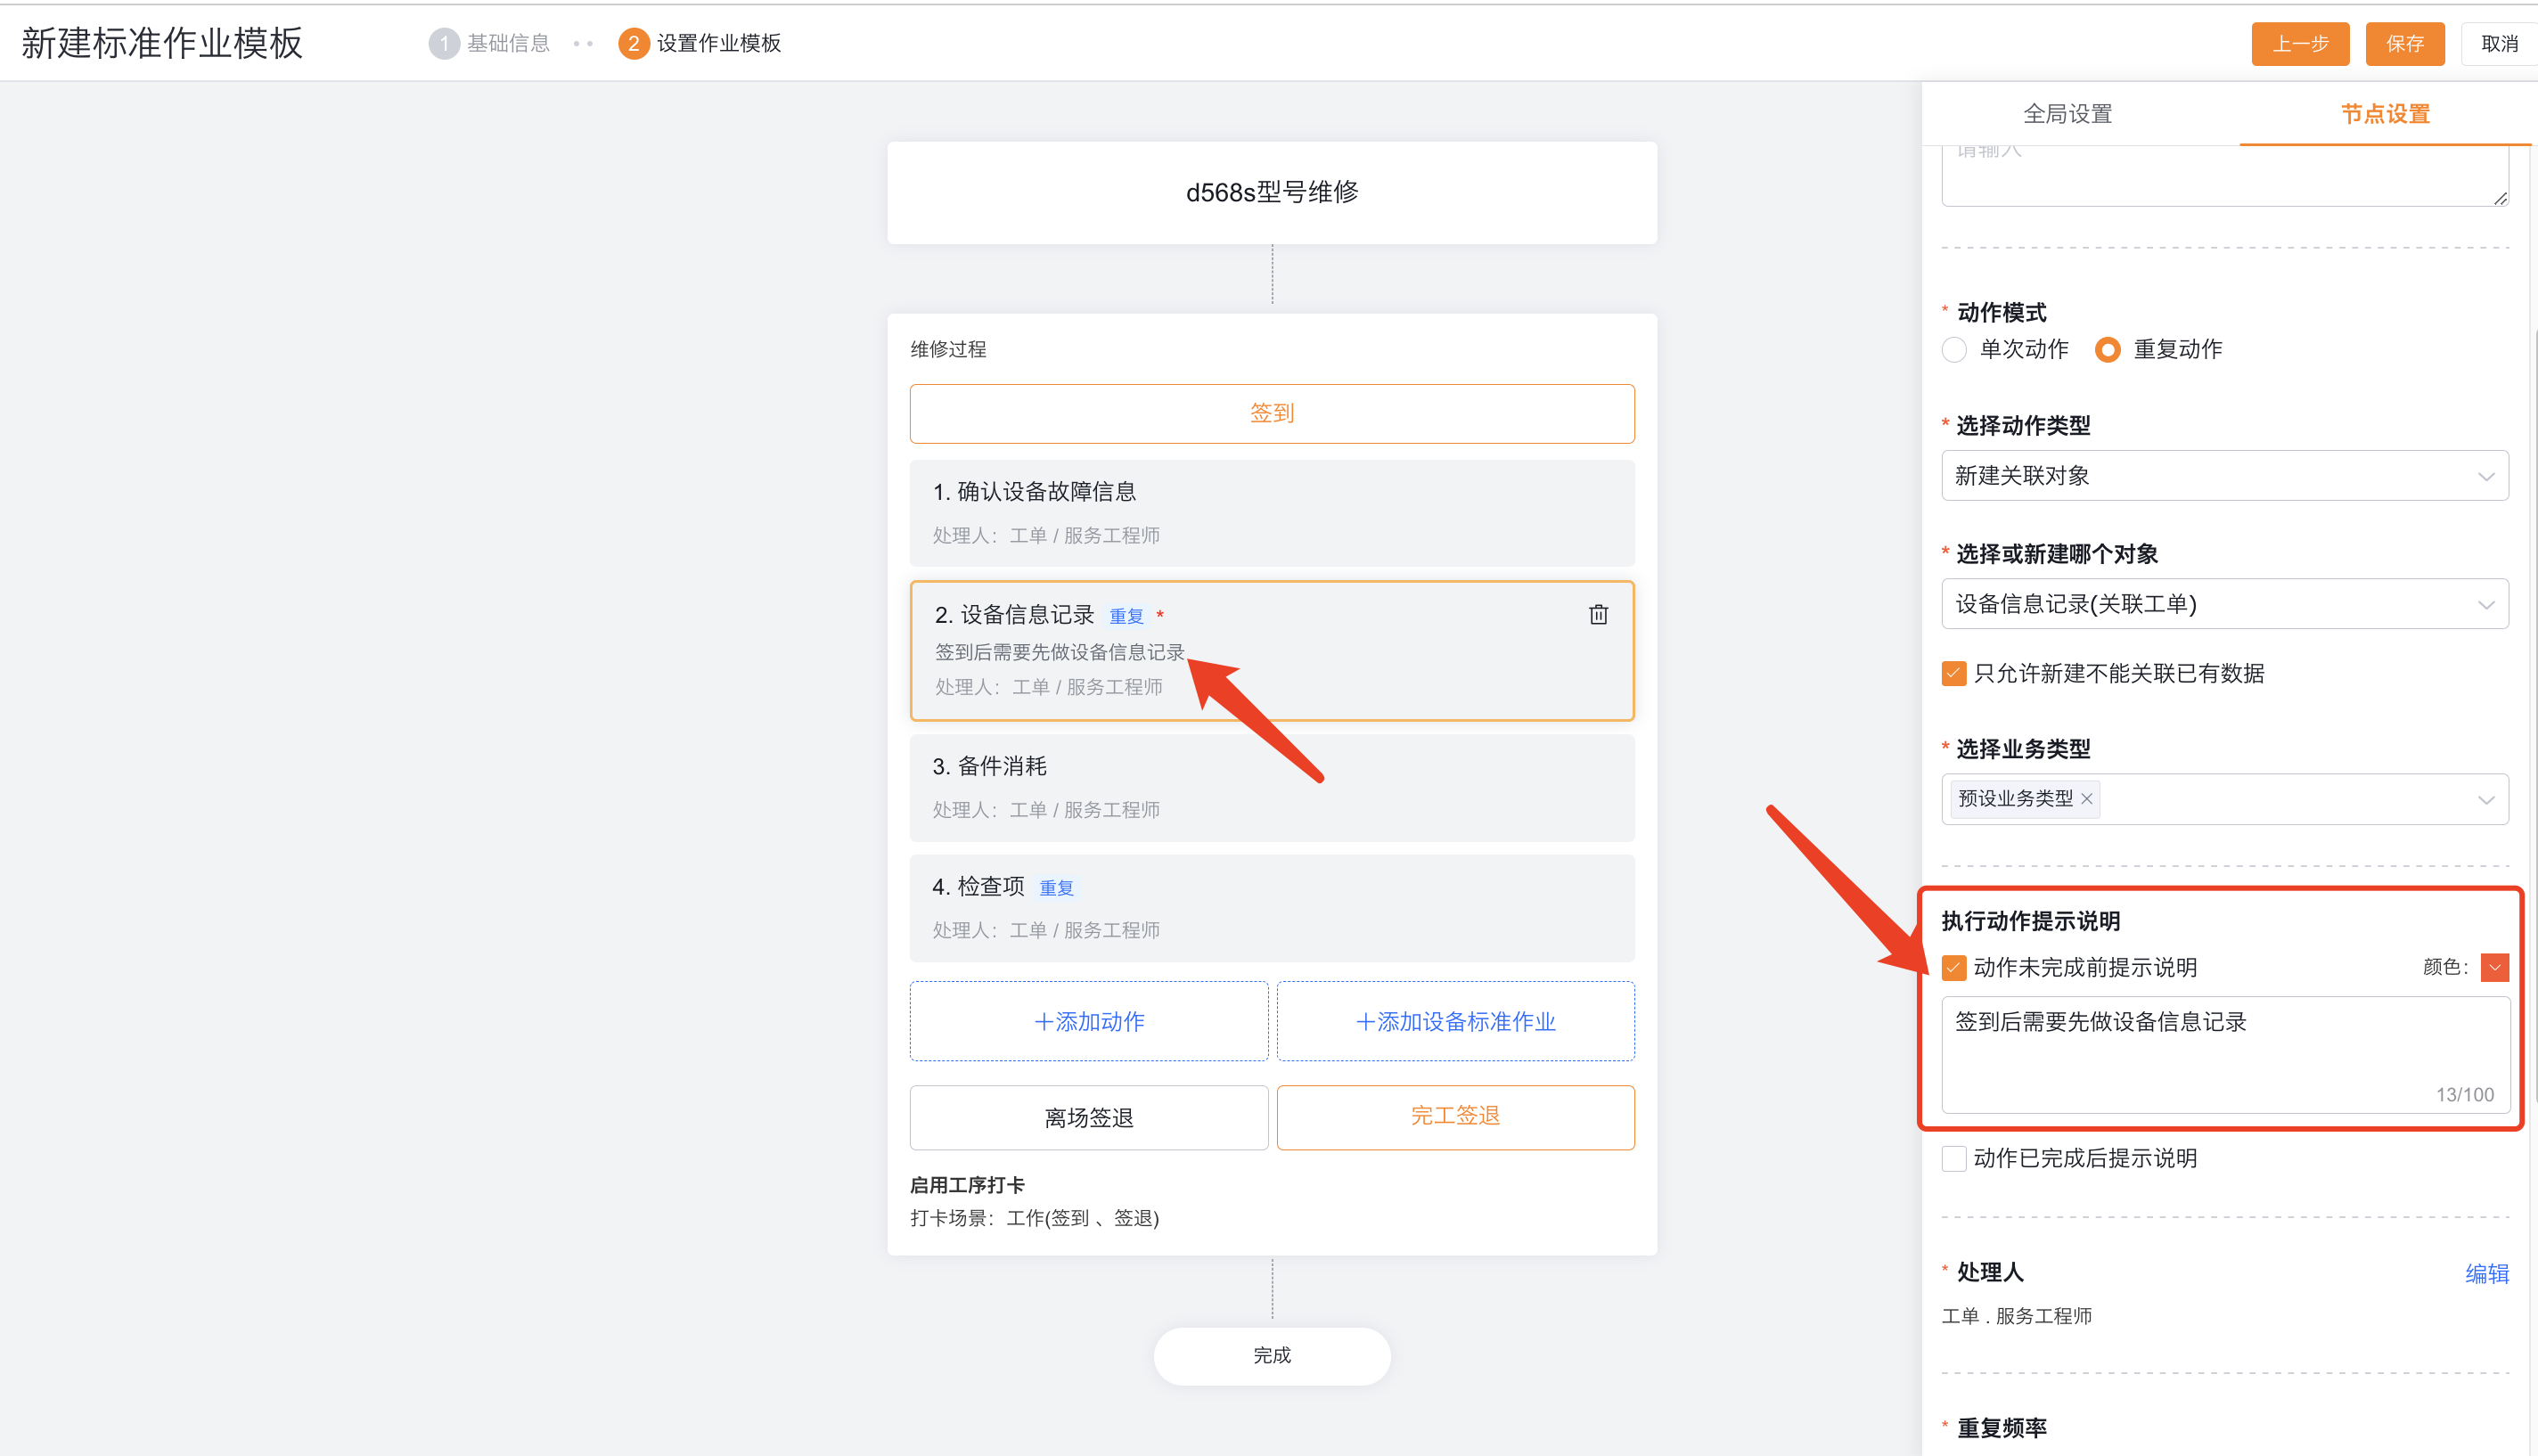
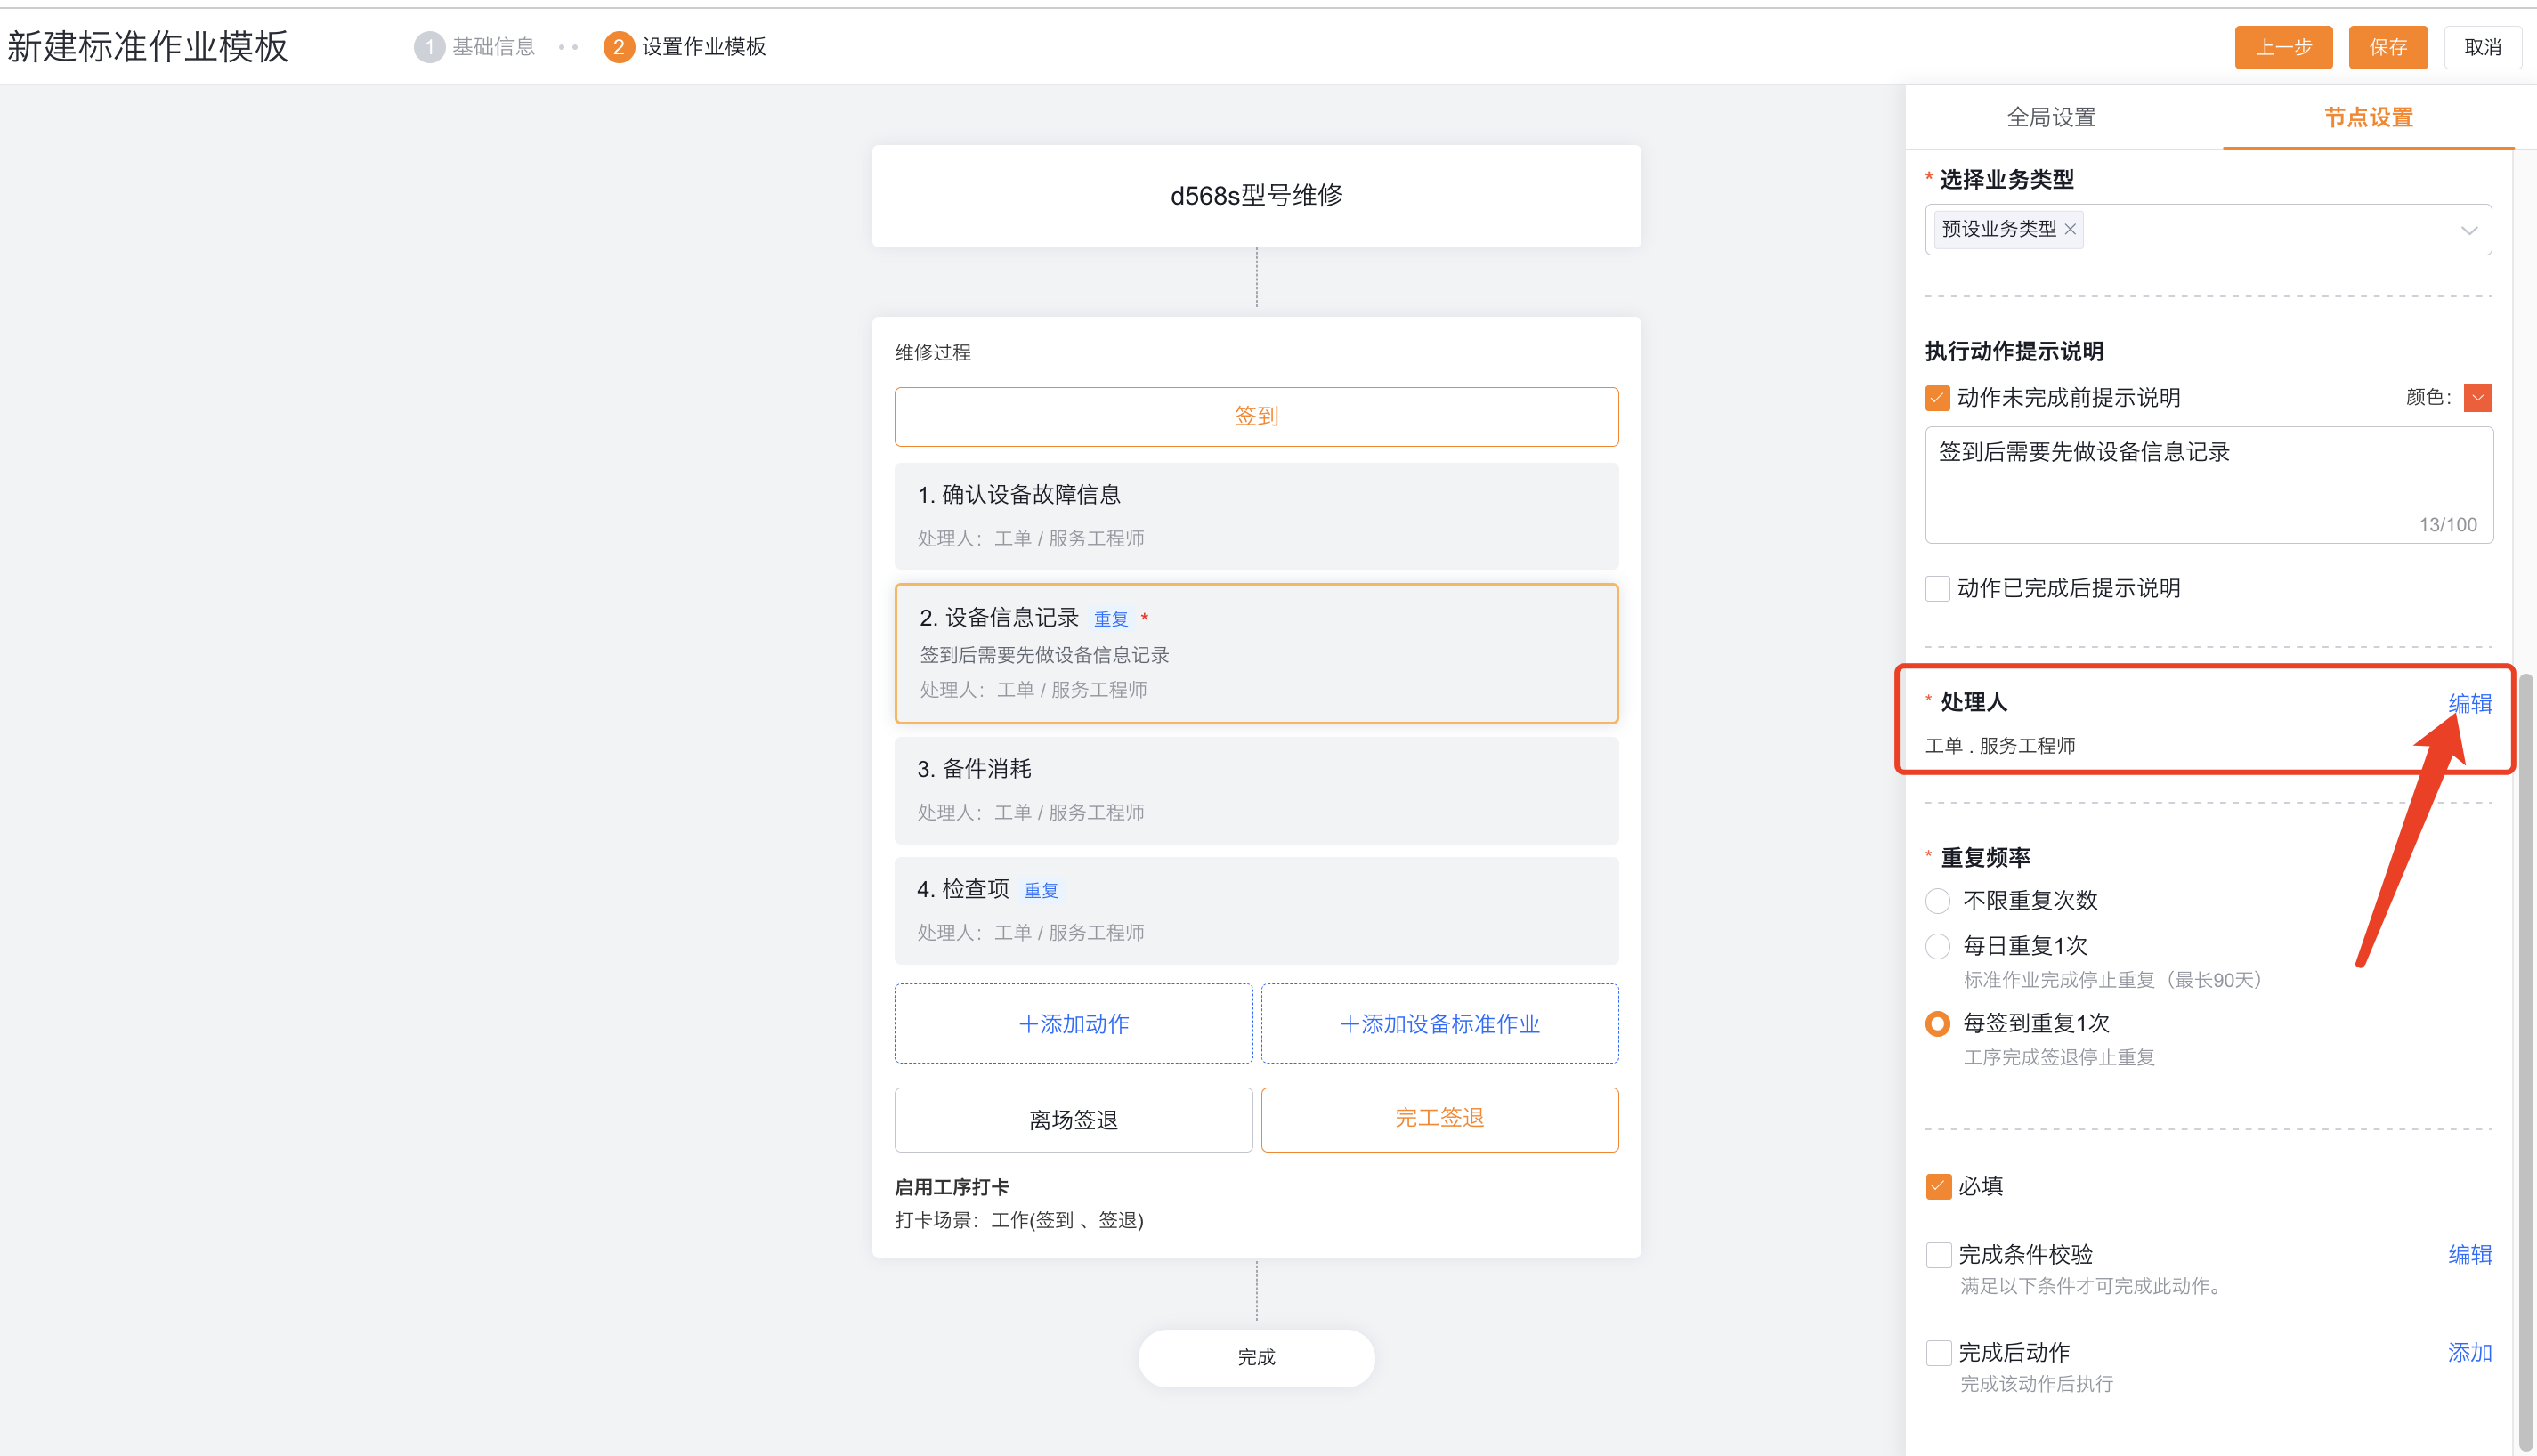
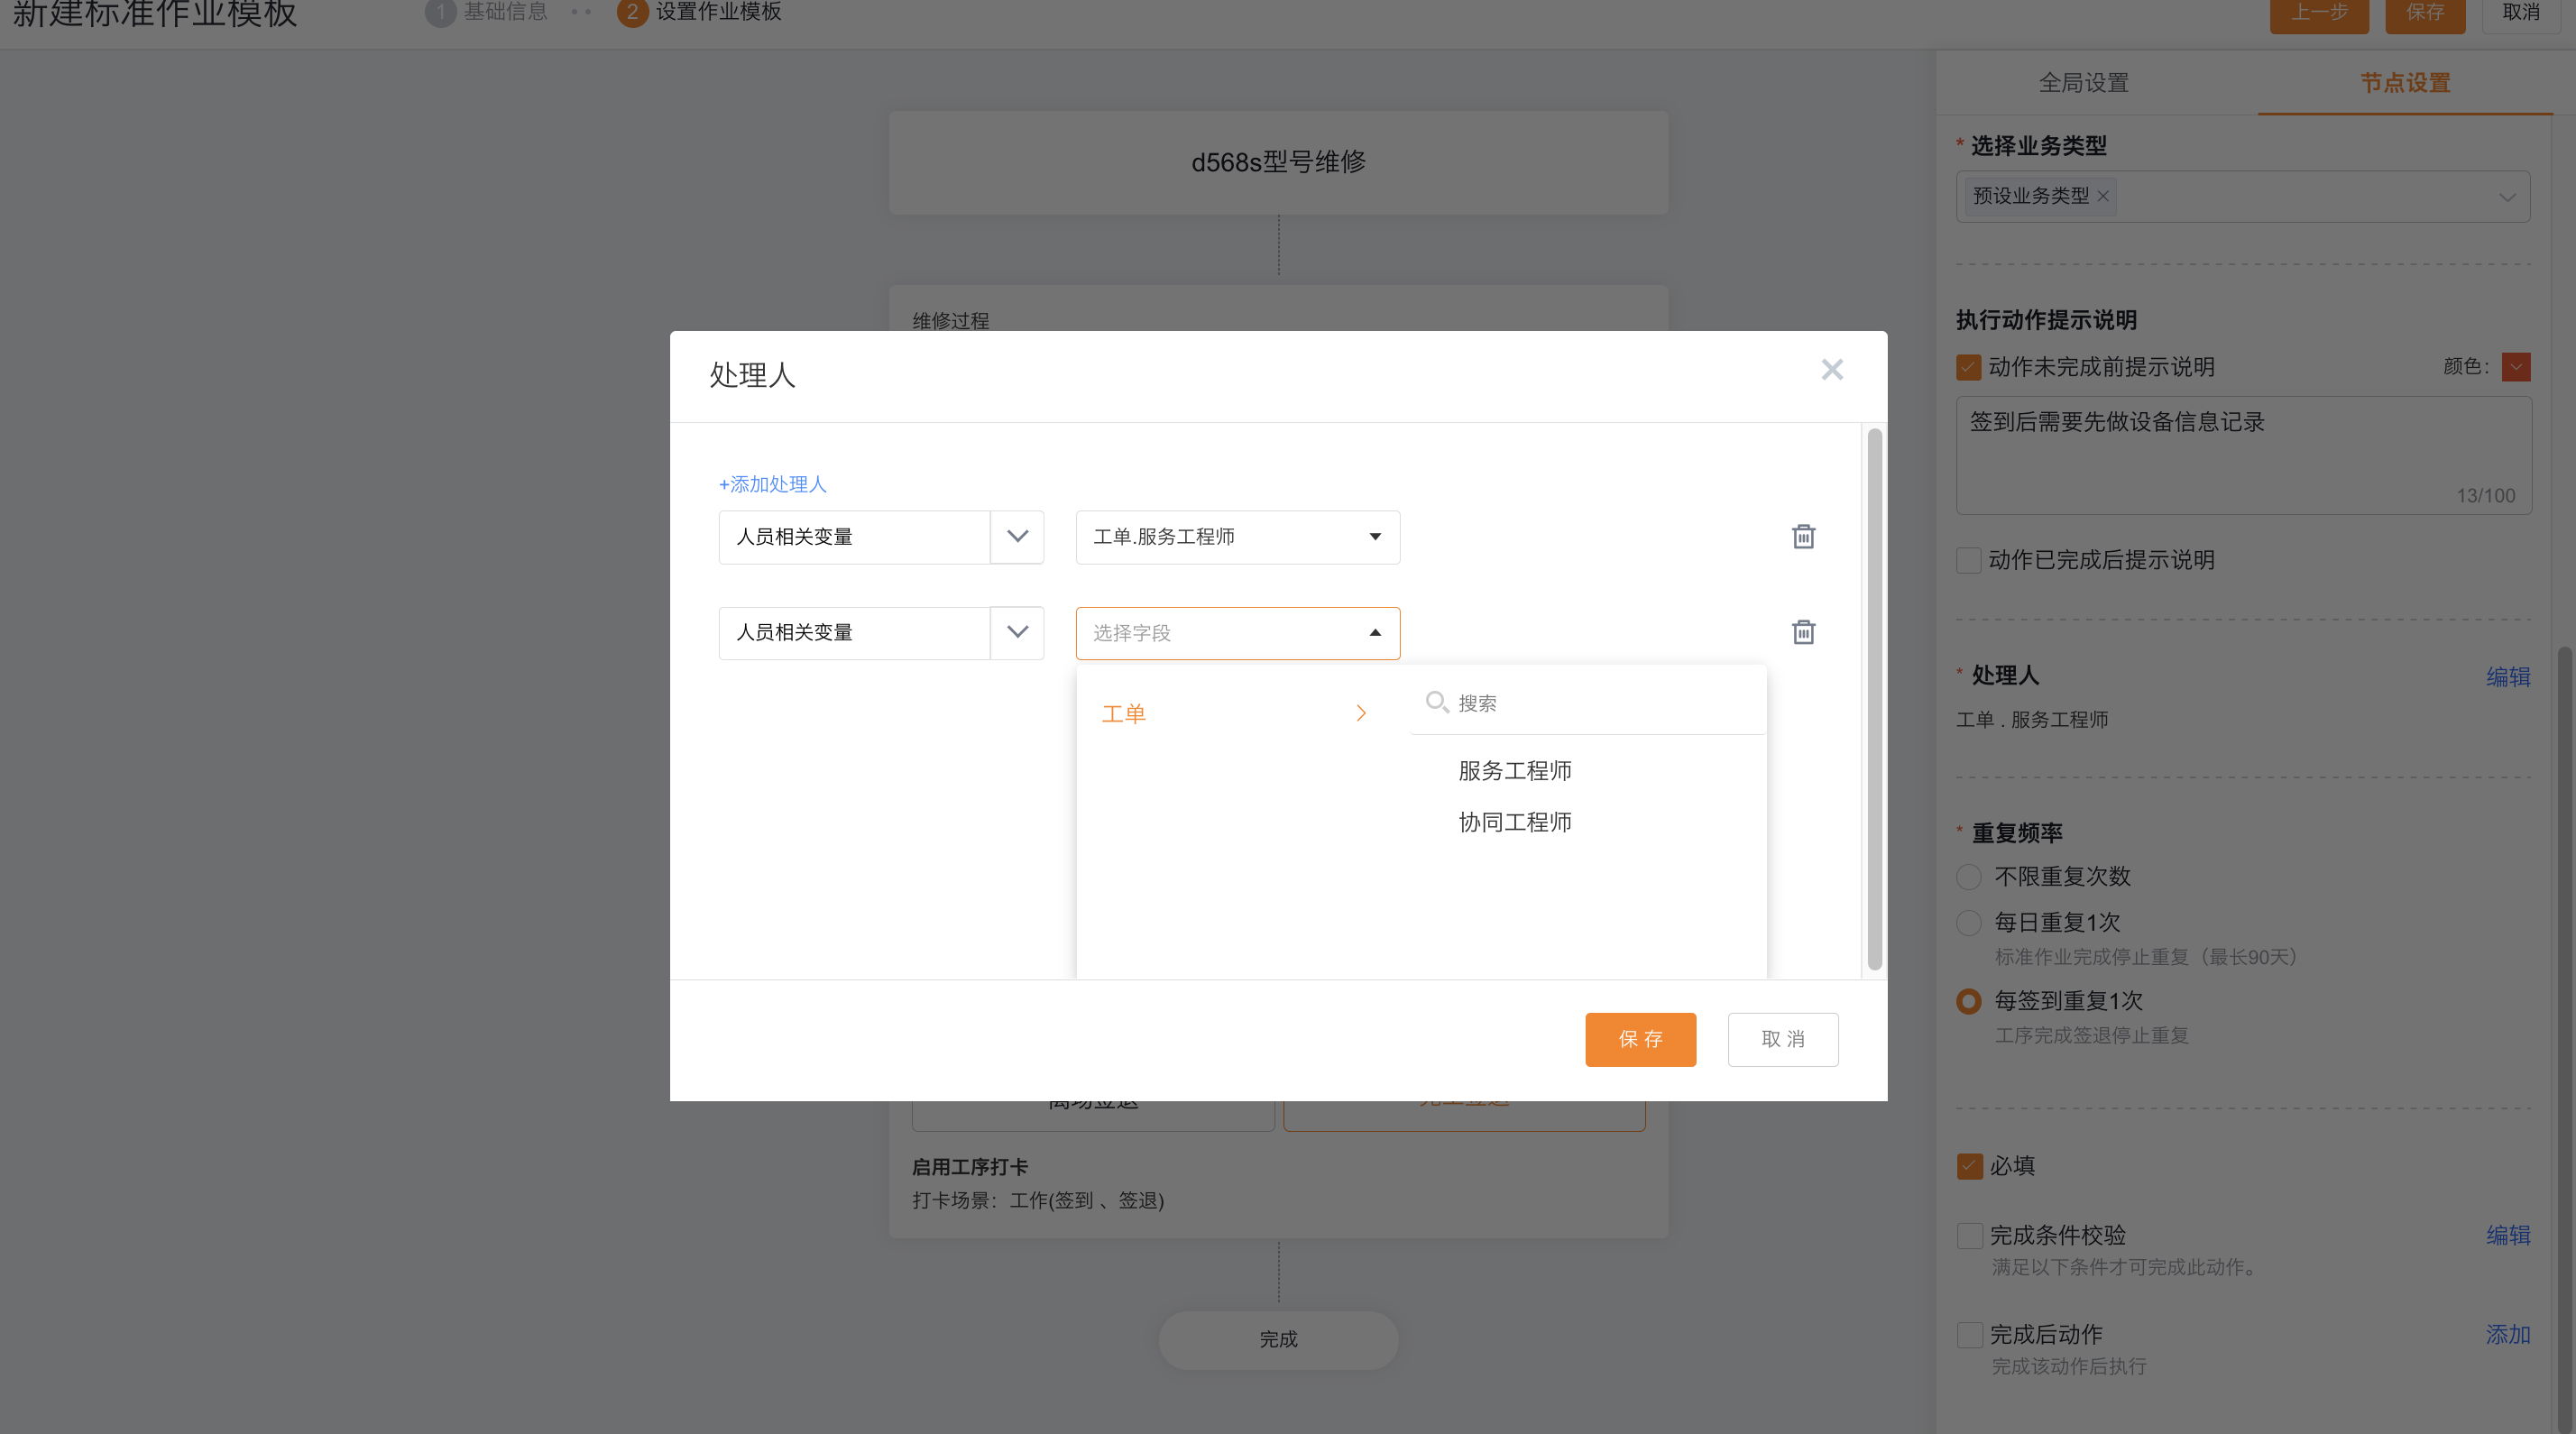
When the Processor is a collaborative engineer field that contains multiple people, recurring tasks are still generated by action frequency rather than by number of people. For example, daily actions only generate one action instance every day, not once for each collaborative engineer; this instance can be completed by processors within the configuration range.
Select repetition frequency
| Frequency | Generation Rules | Required Restrictions |
|---|---|---|
| Unlimited | Generate the next pending action automatically five minutes after completion, or let the assignee trigger it manually | Cannot be required |
| Once a day | The SOP node is generated once at the beginning, and then a pending instance is generated at 00:00 every day until the SOP node is completed | Multiple processors share the same day's instance; it can be set to be required and verified when the SOP is completed |
| Once per sign-in | Each handler generates one after each process sign-in, which can only be processed by the actual sign-in person this time, and lasts until the process is completed and signed out | Multiple check-ins must be enabled for ordinary processes; required actions are verified when leaving the site or completing the sign-out |
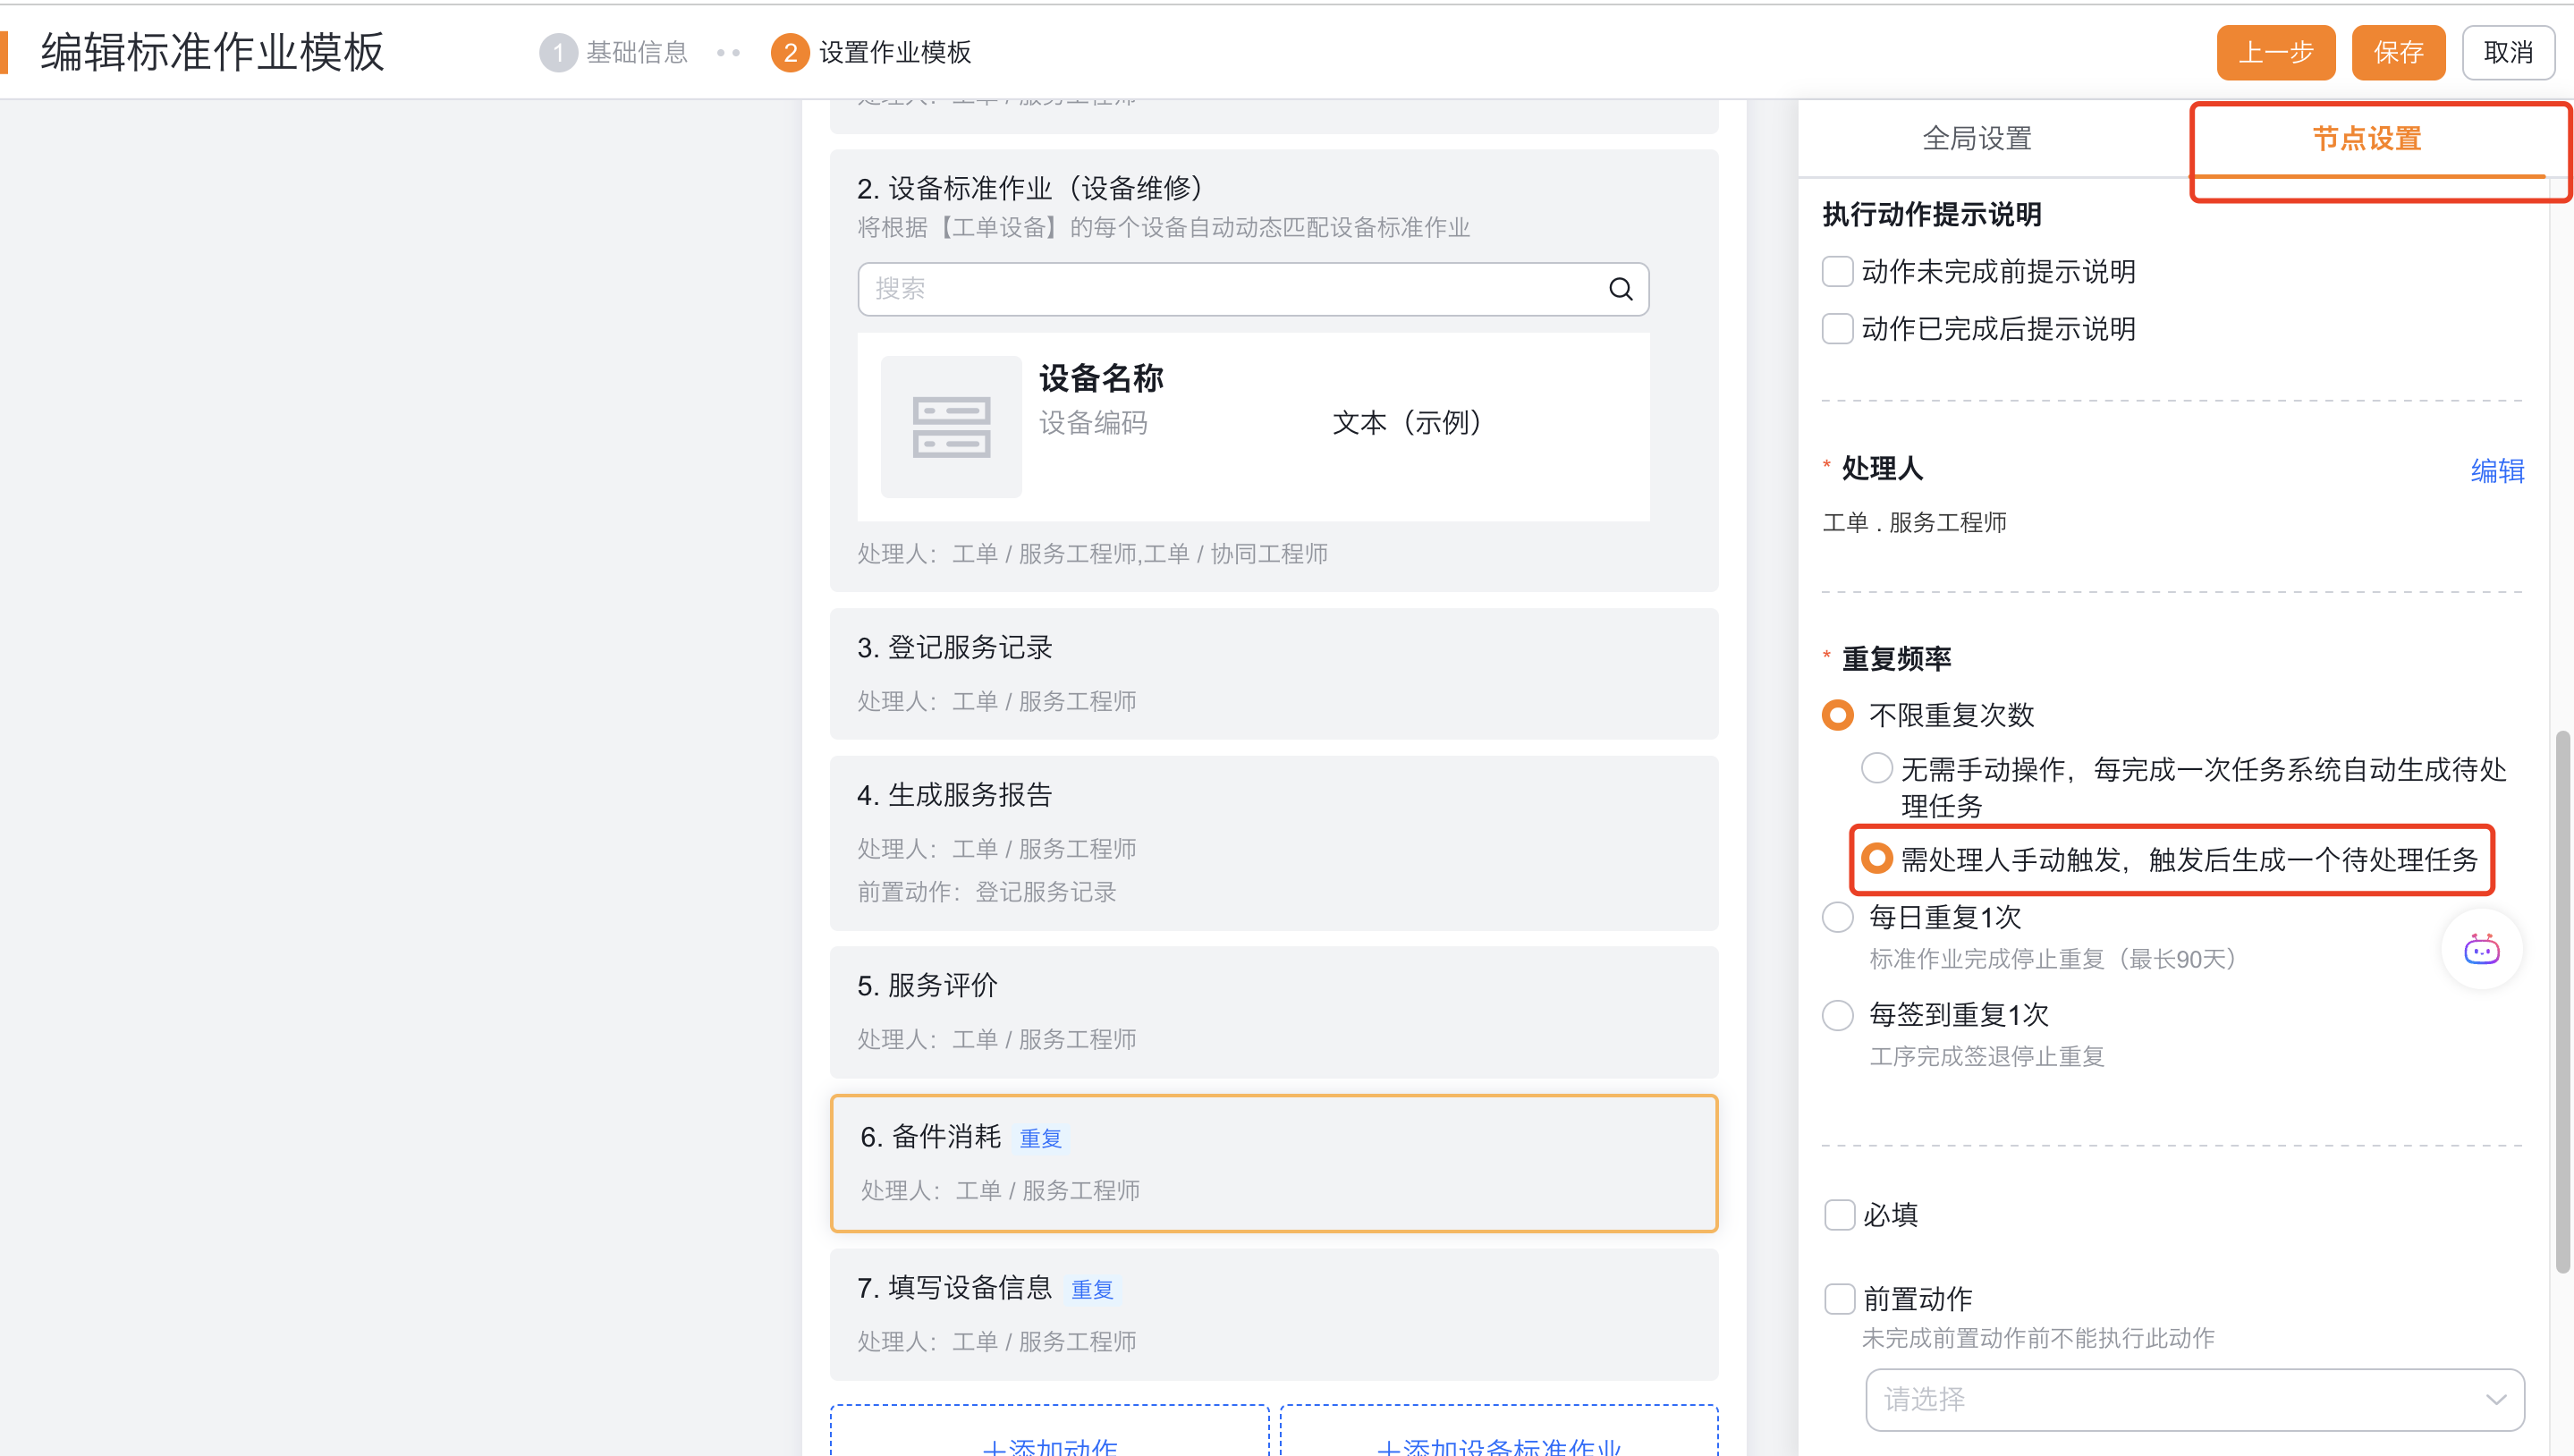
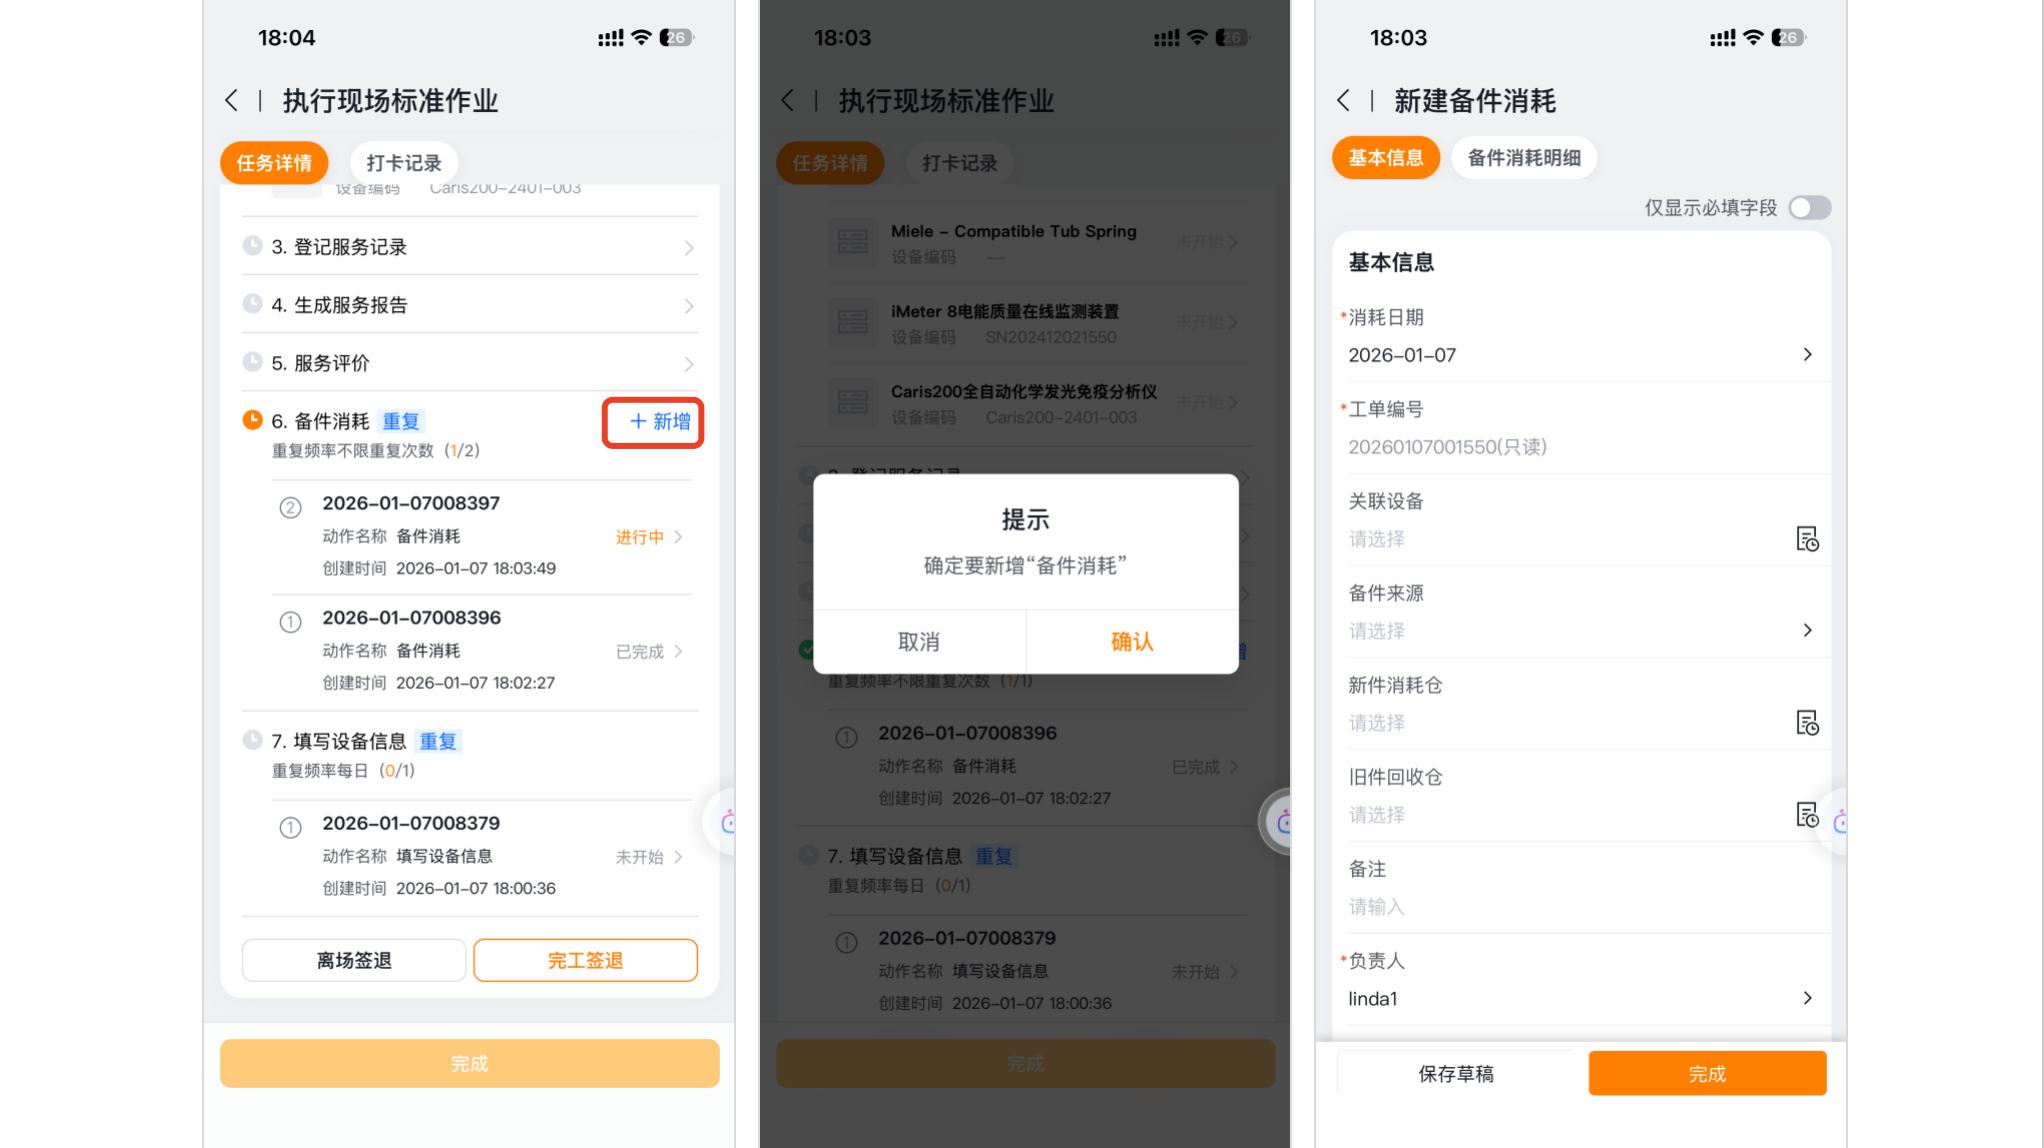
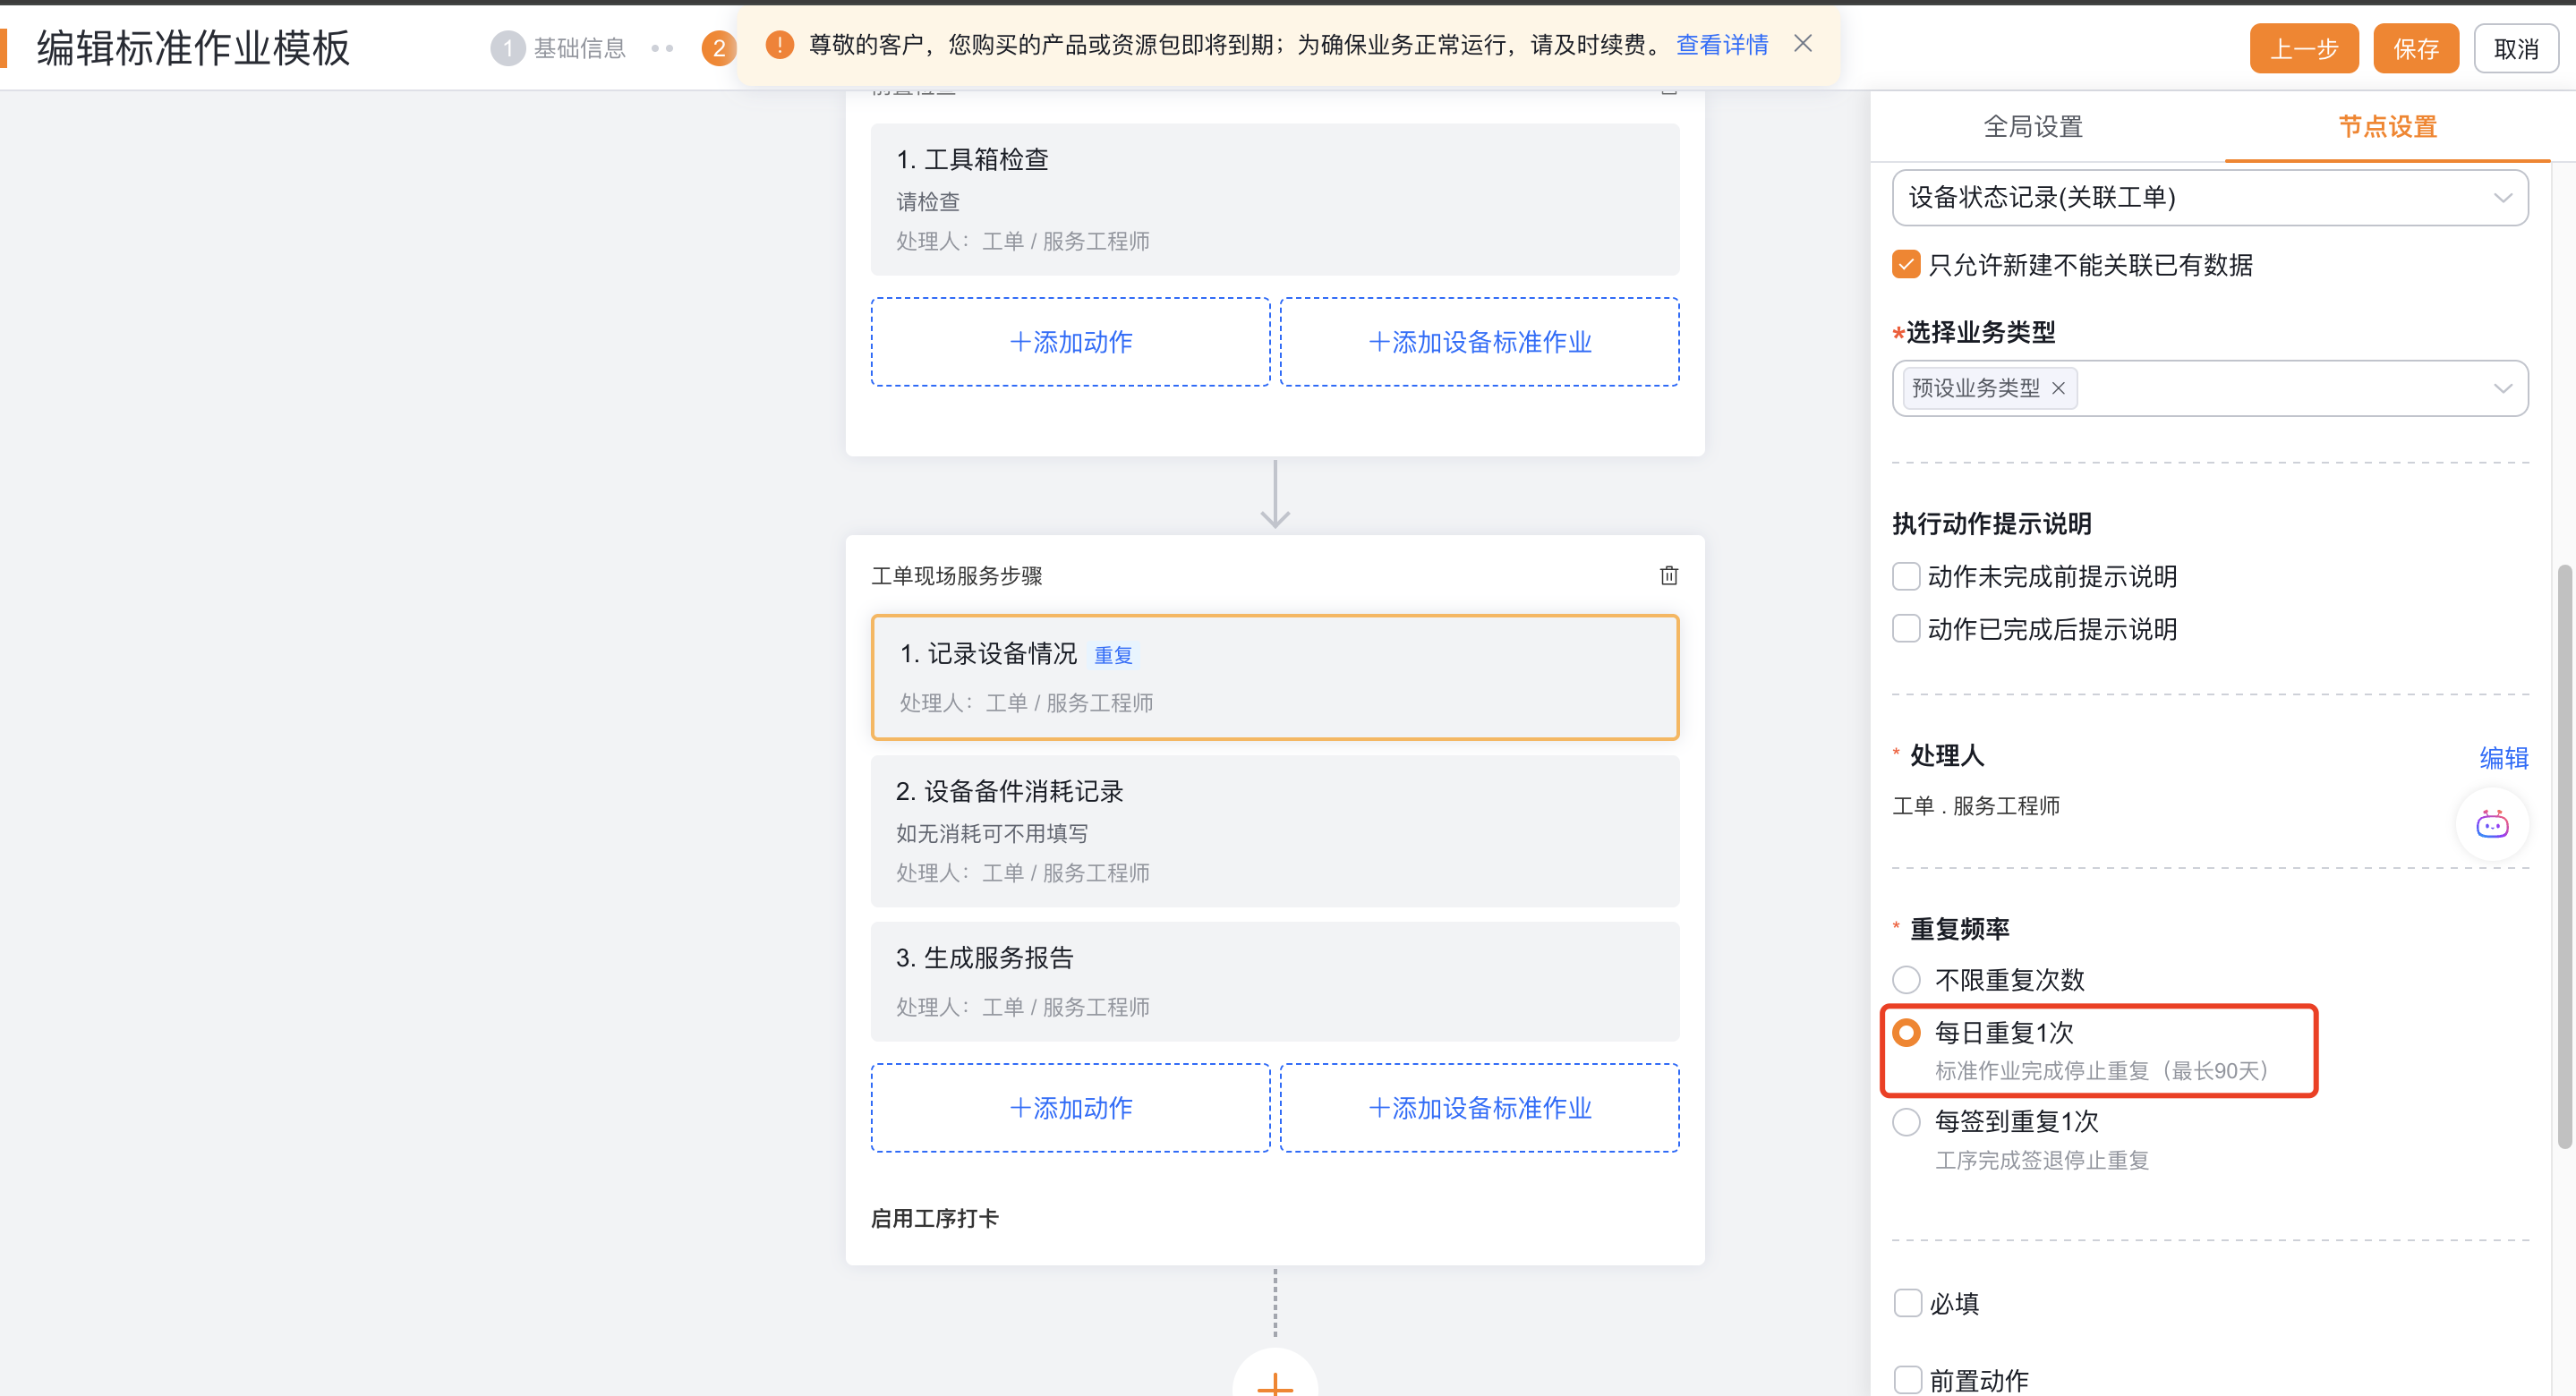
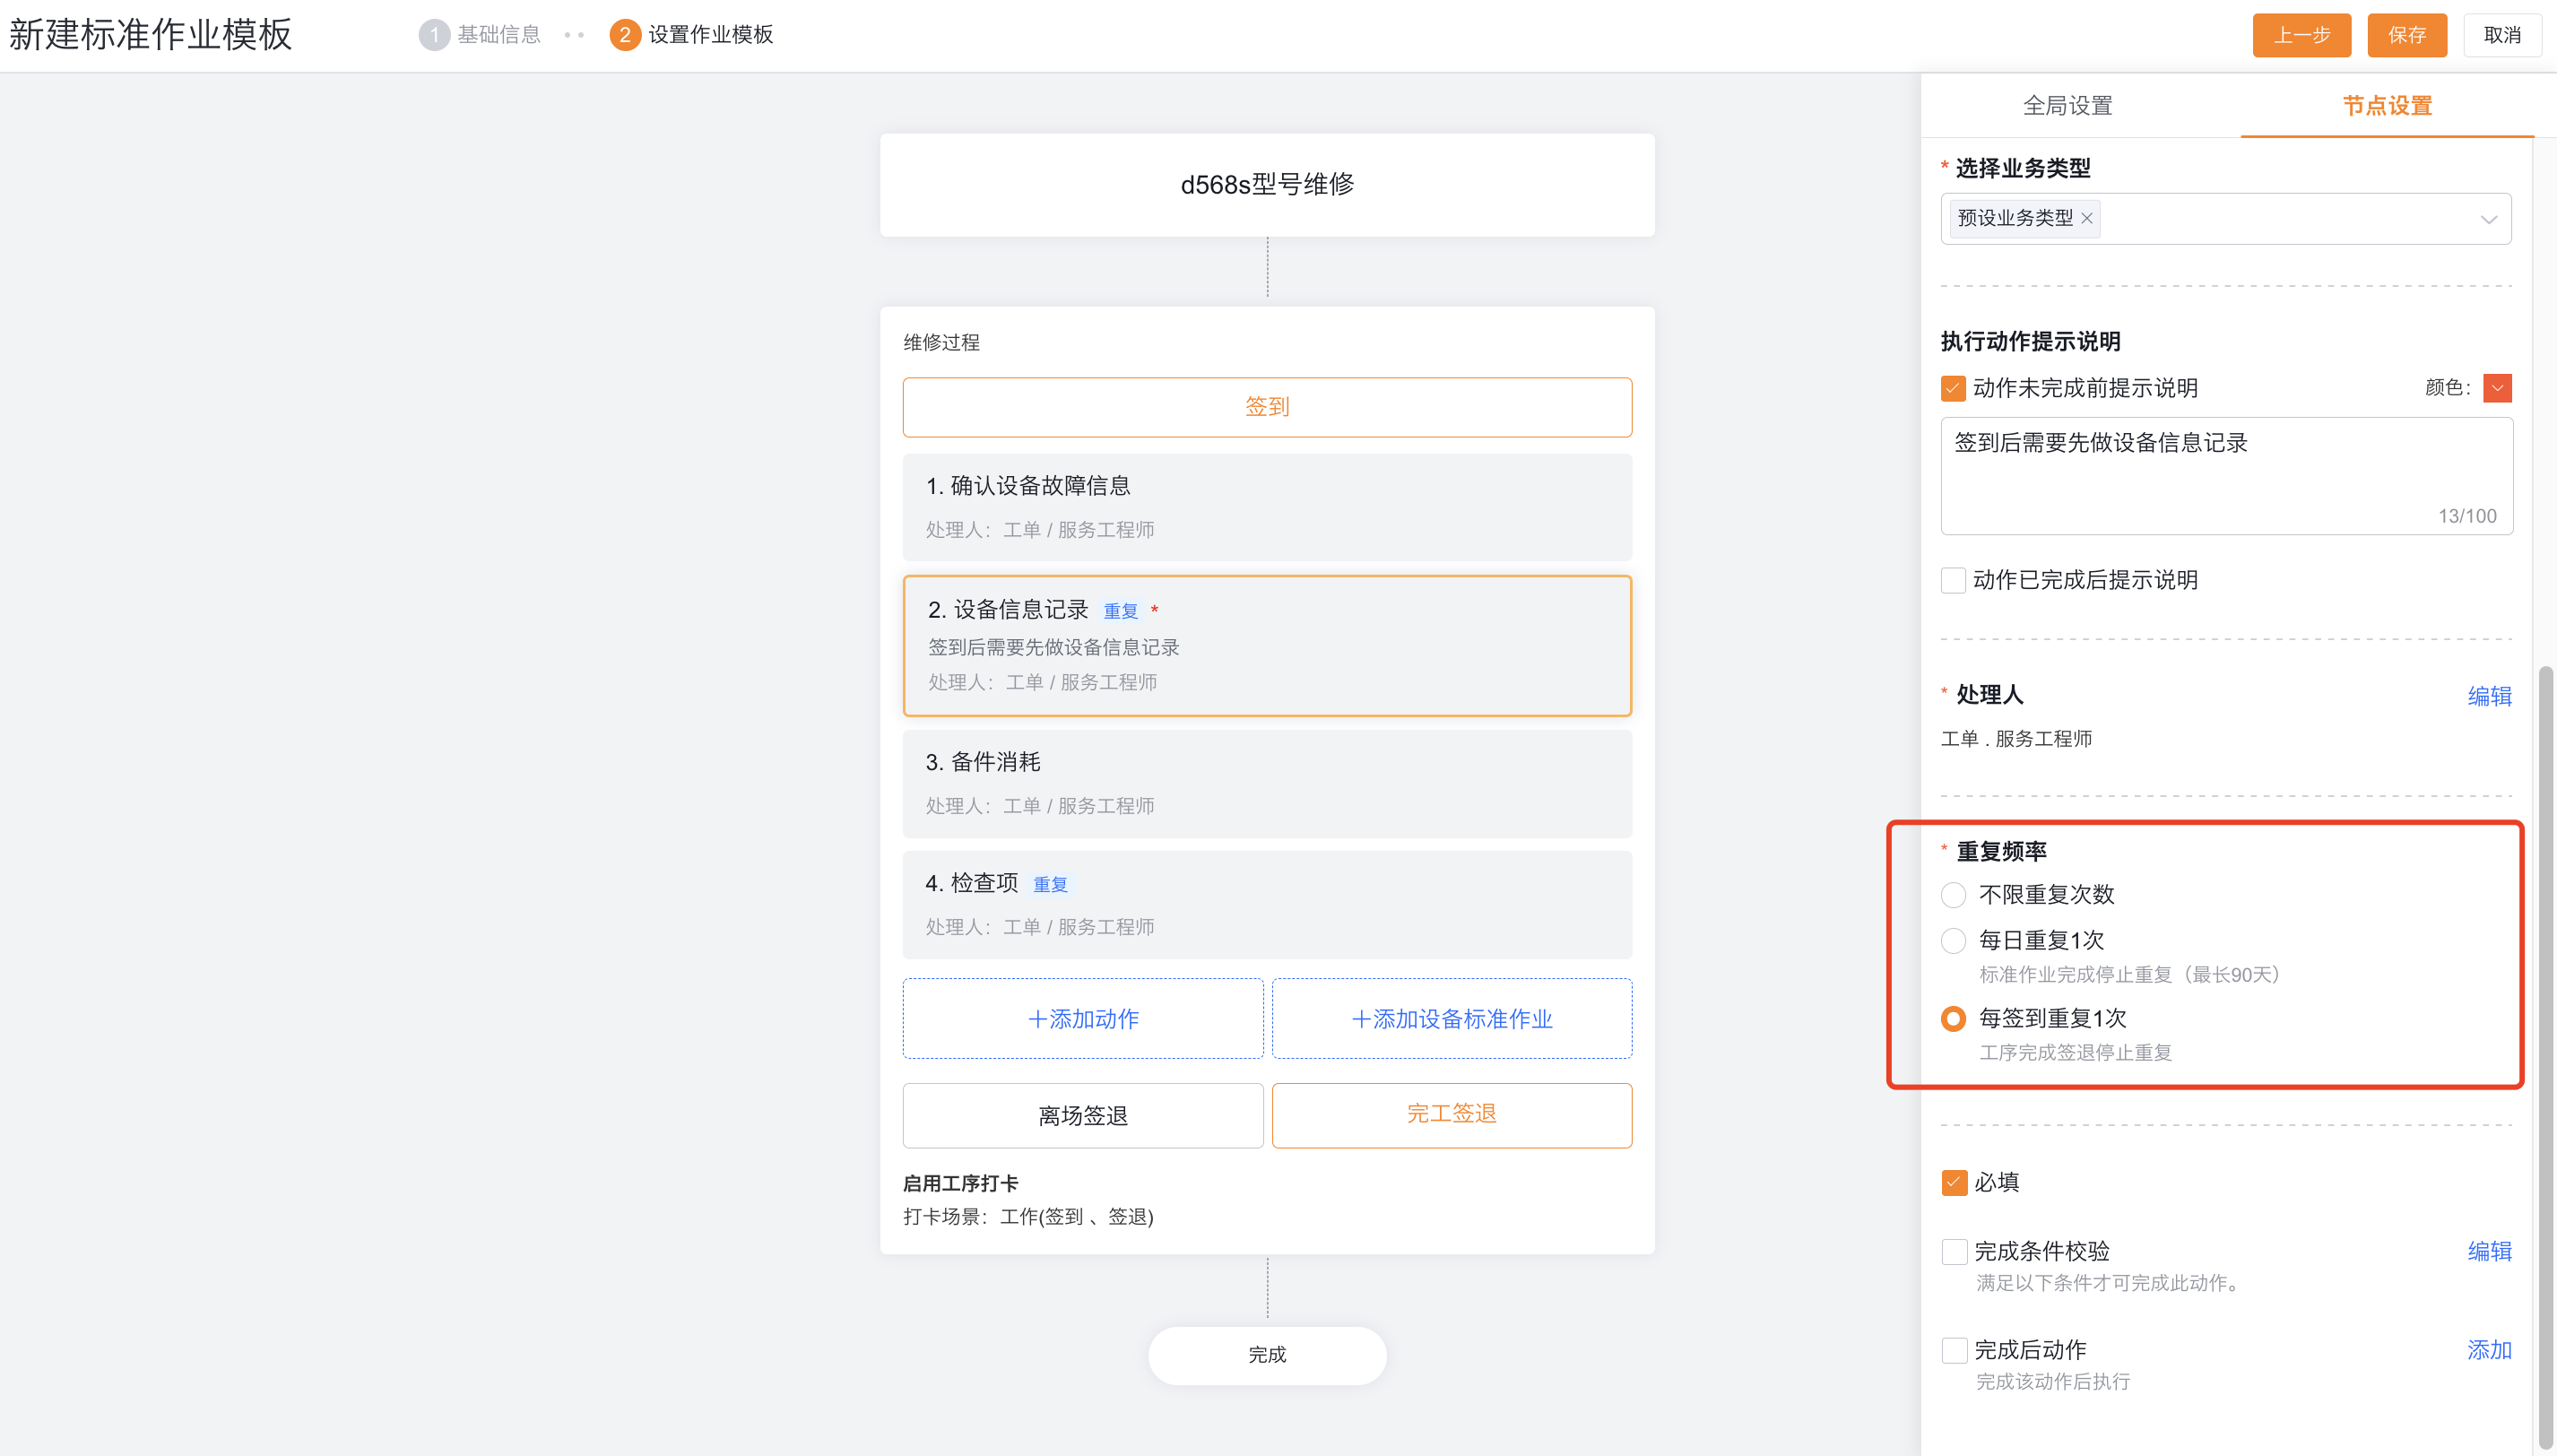
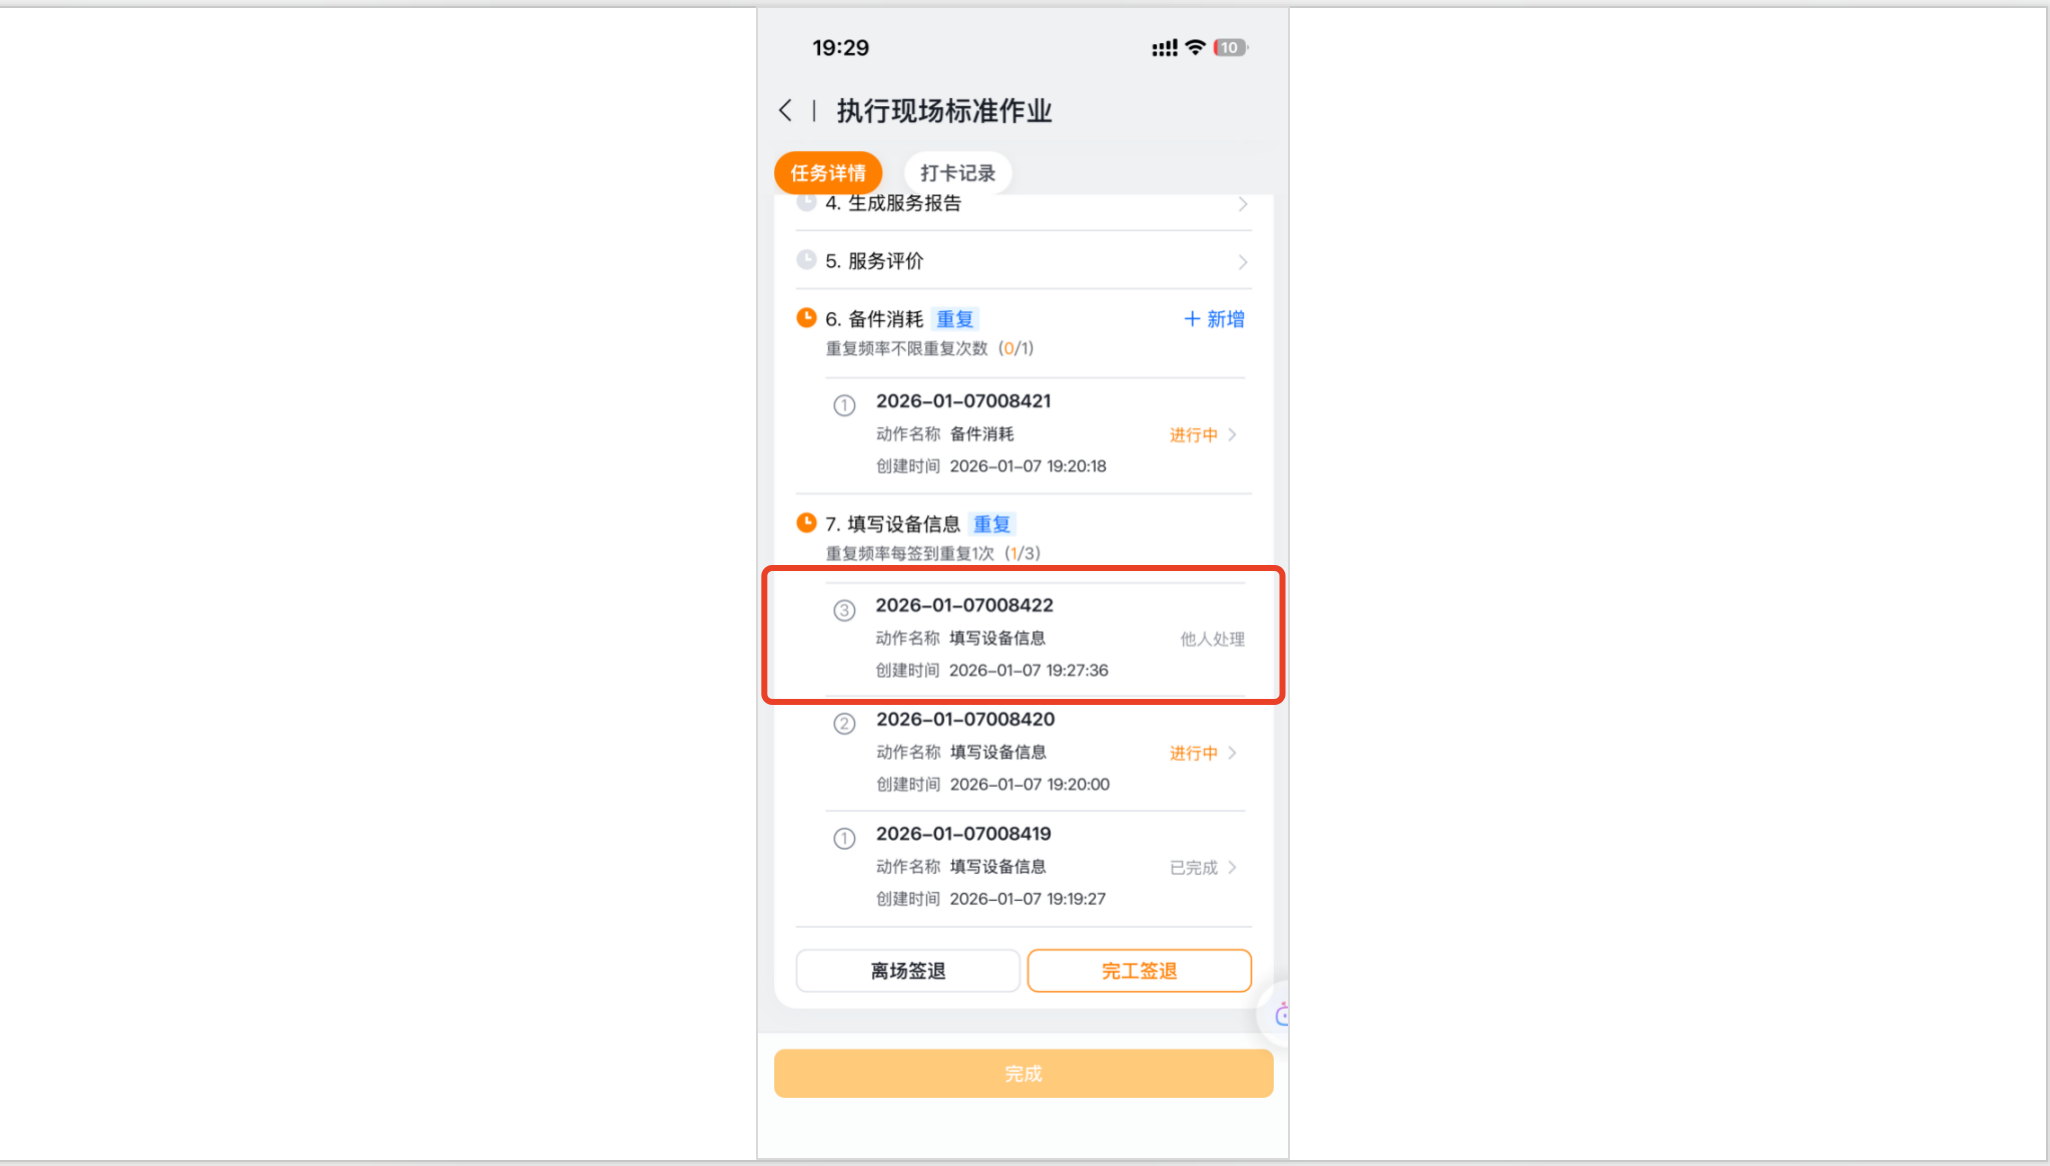
Repeat actions are also configurable:- Required: Verification when the process Complete Sign Out or the entire SOP Complete; Unlimited actions cannot be set to be required.
- Completion Condition: The verification function is executed when each repeated action instance is completed.
- Post-completion action: Execute the configured function after each repeated action instance is completed.
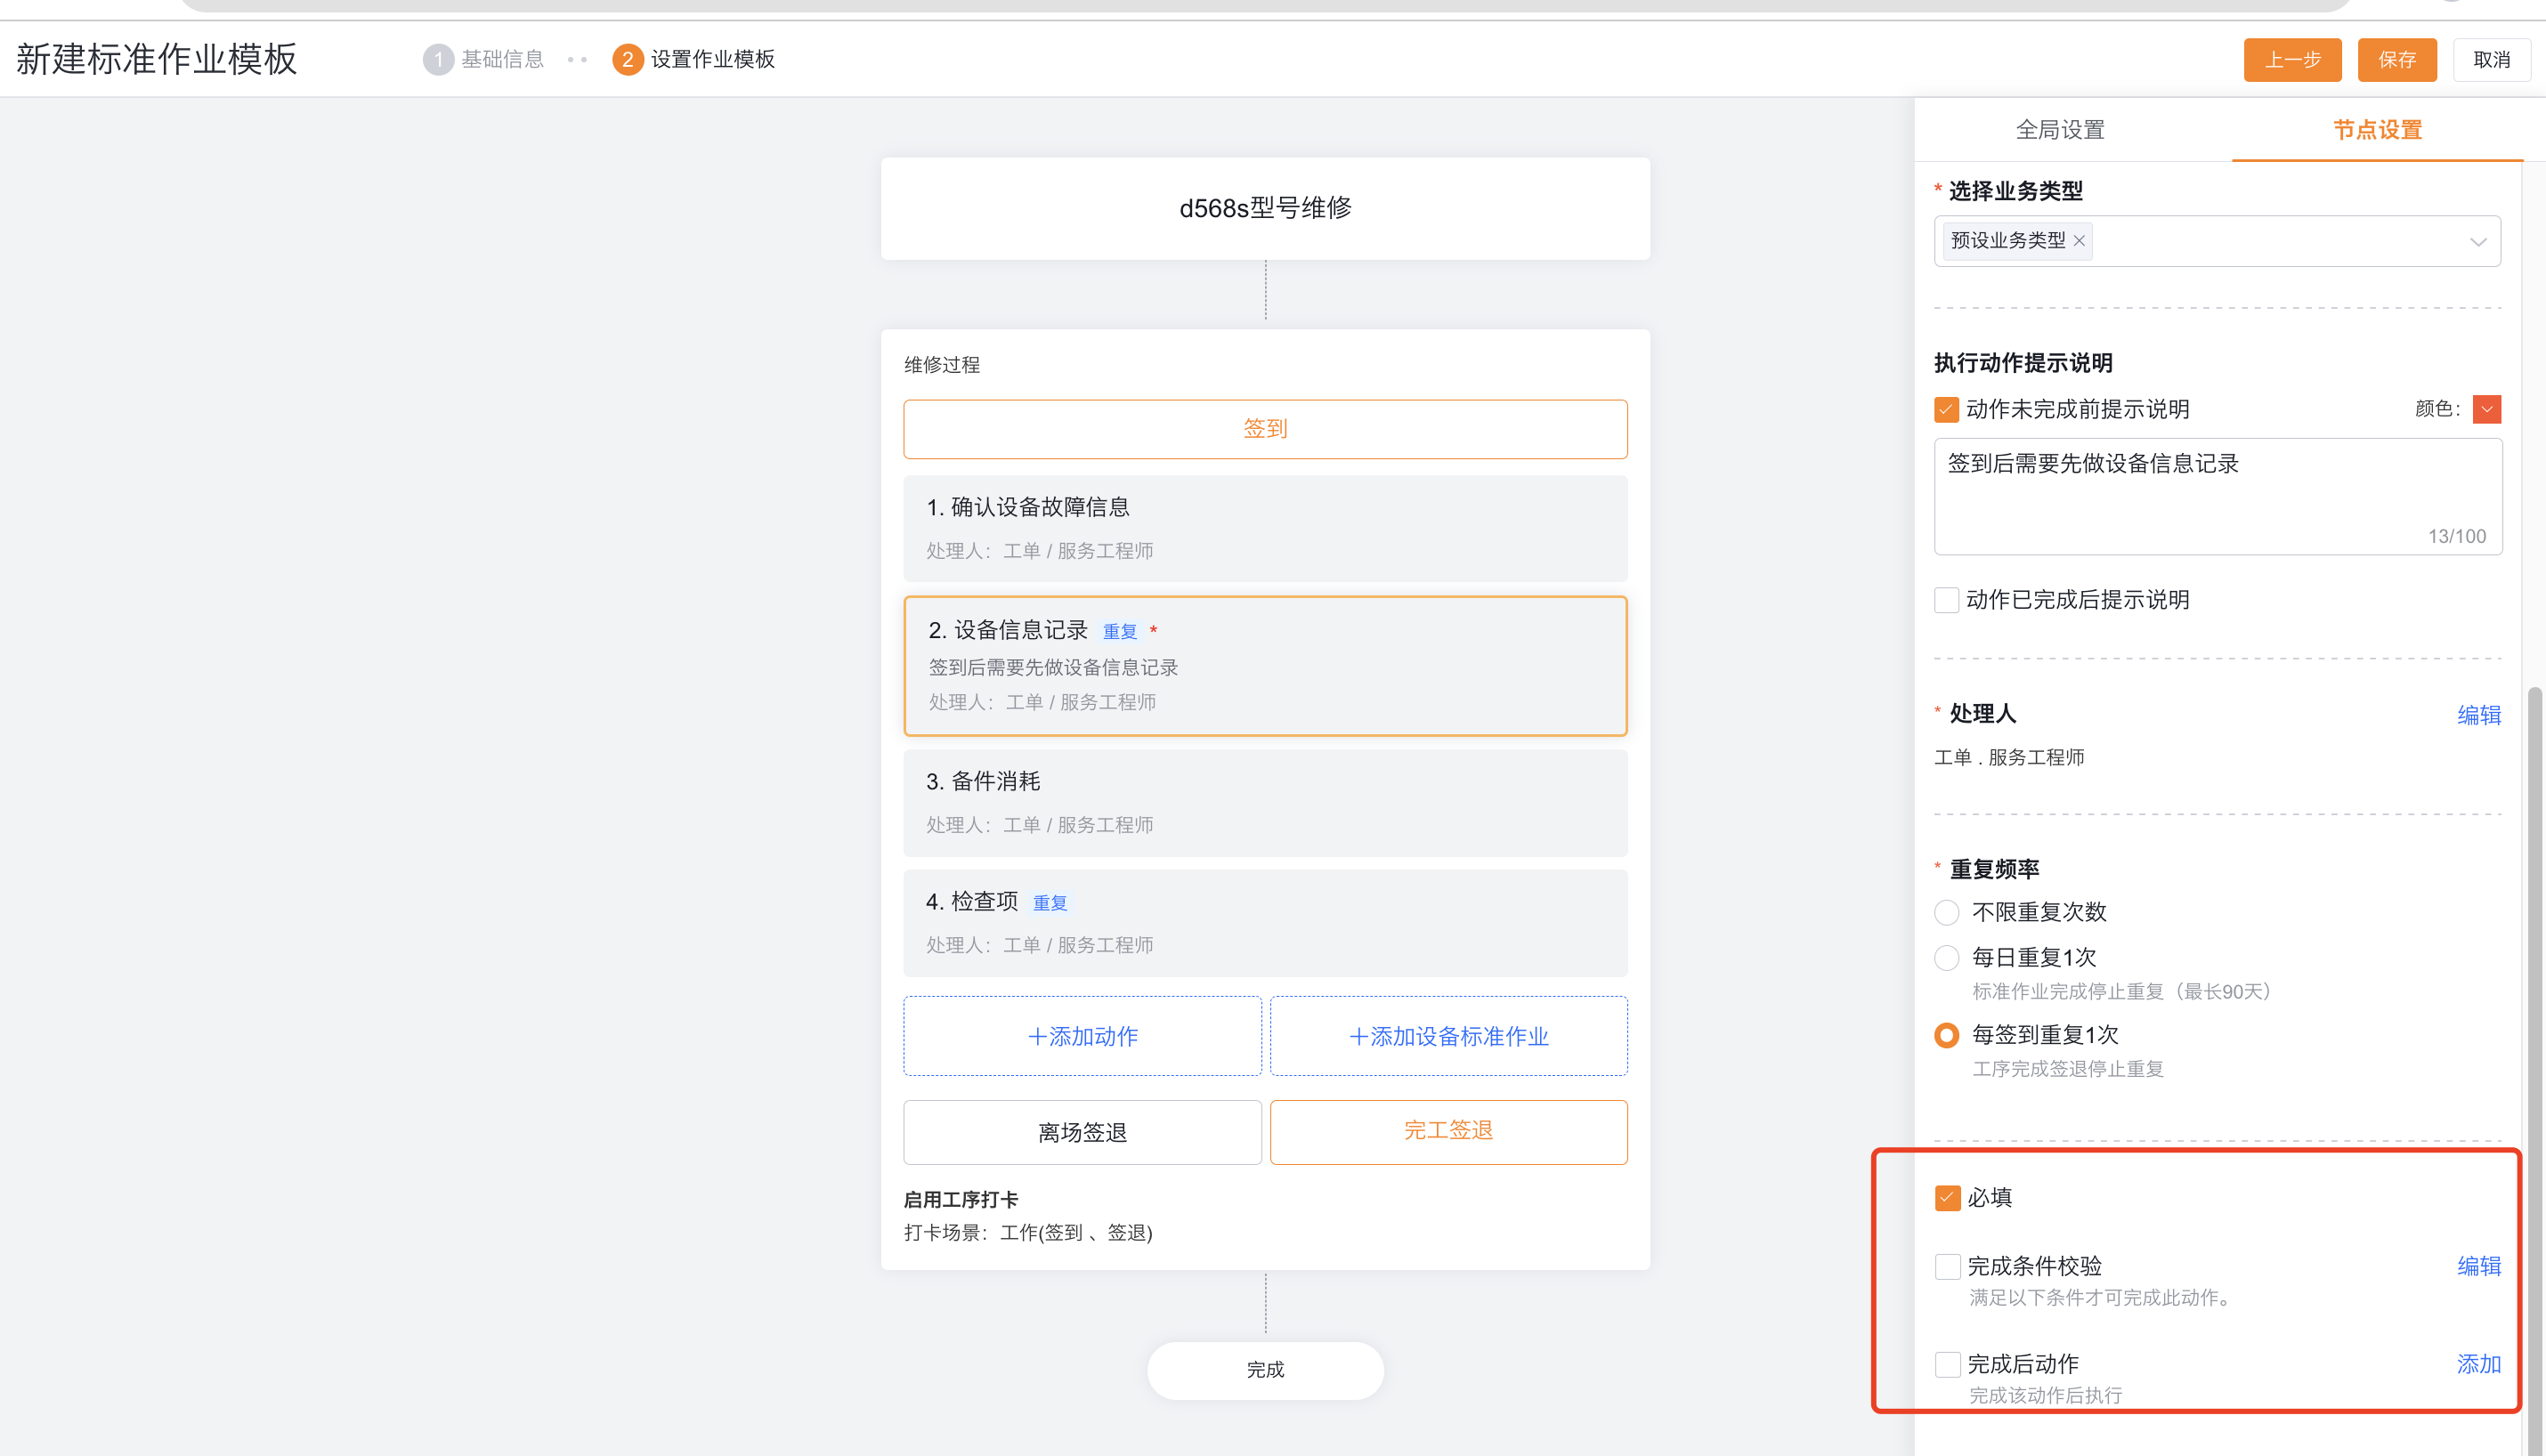
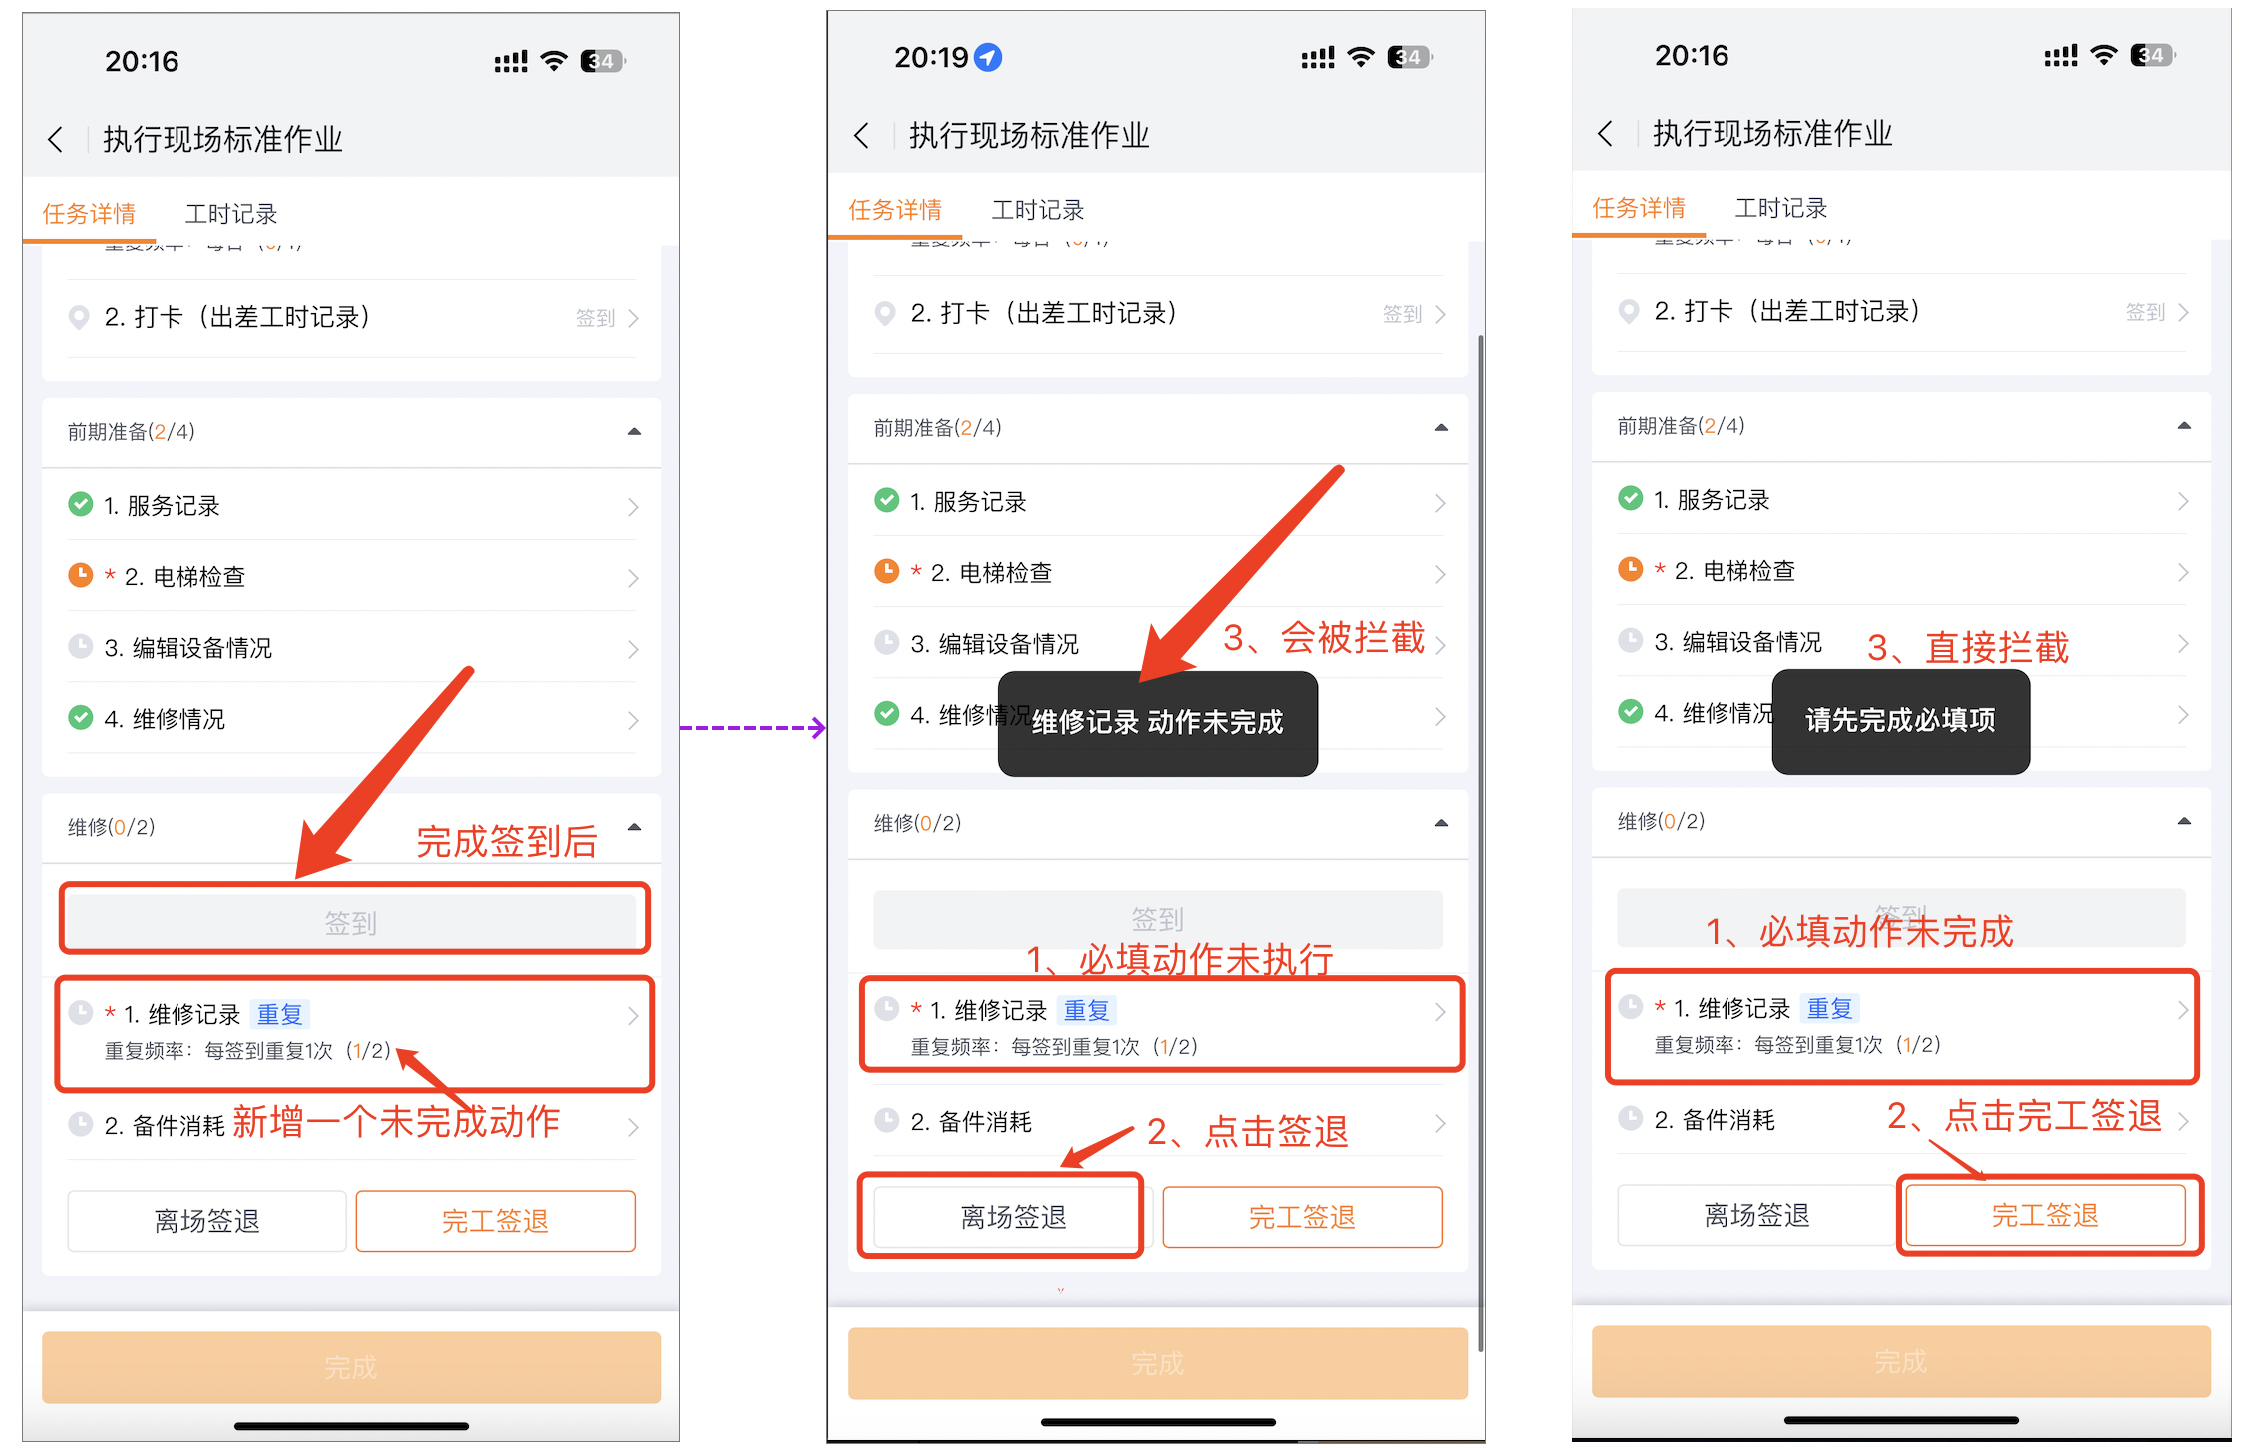
Configure global repeated actions and check-ins
Enable recurring actions in Global Settings, which is suitable for services that span processes, last for multiple days, or have an unfixed sequence of actions.
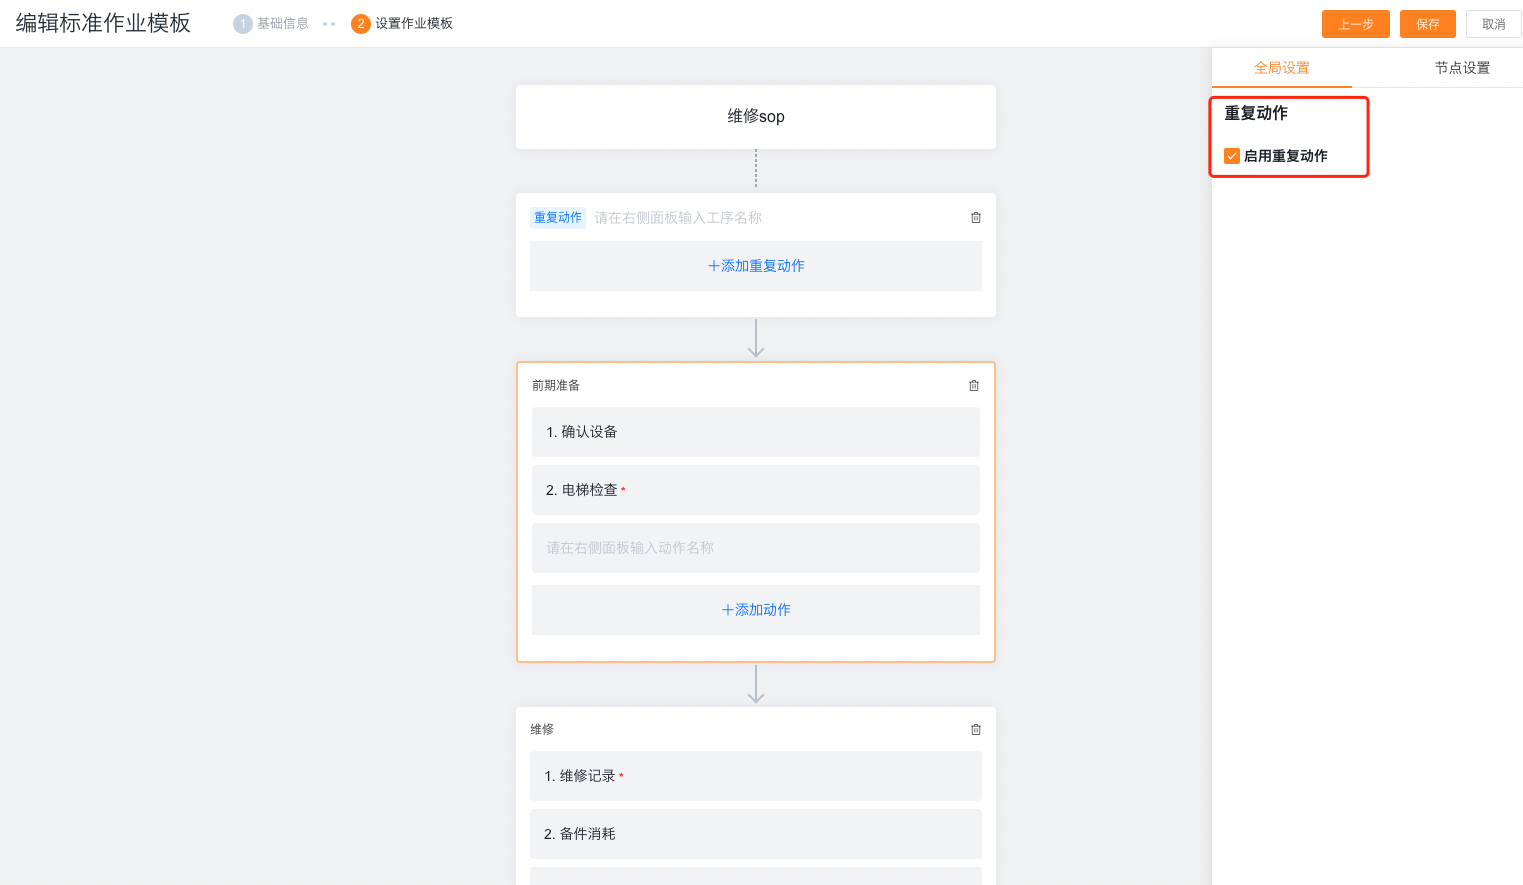
Global repeated actions
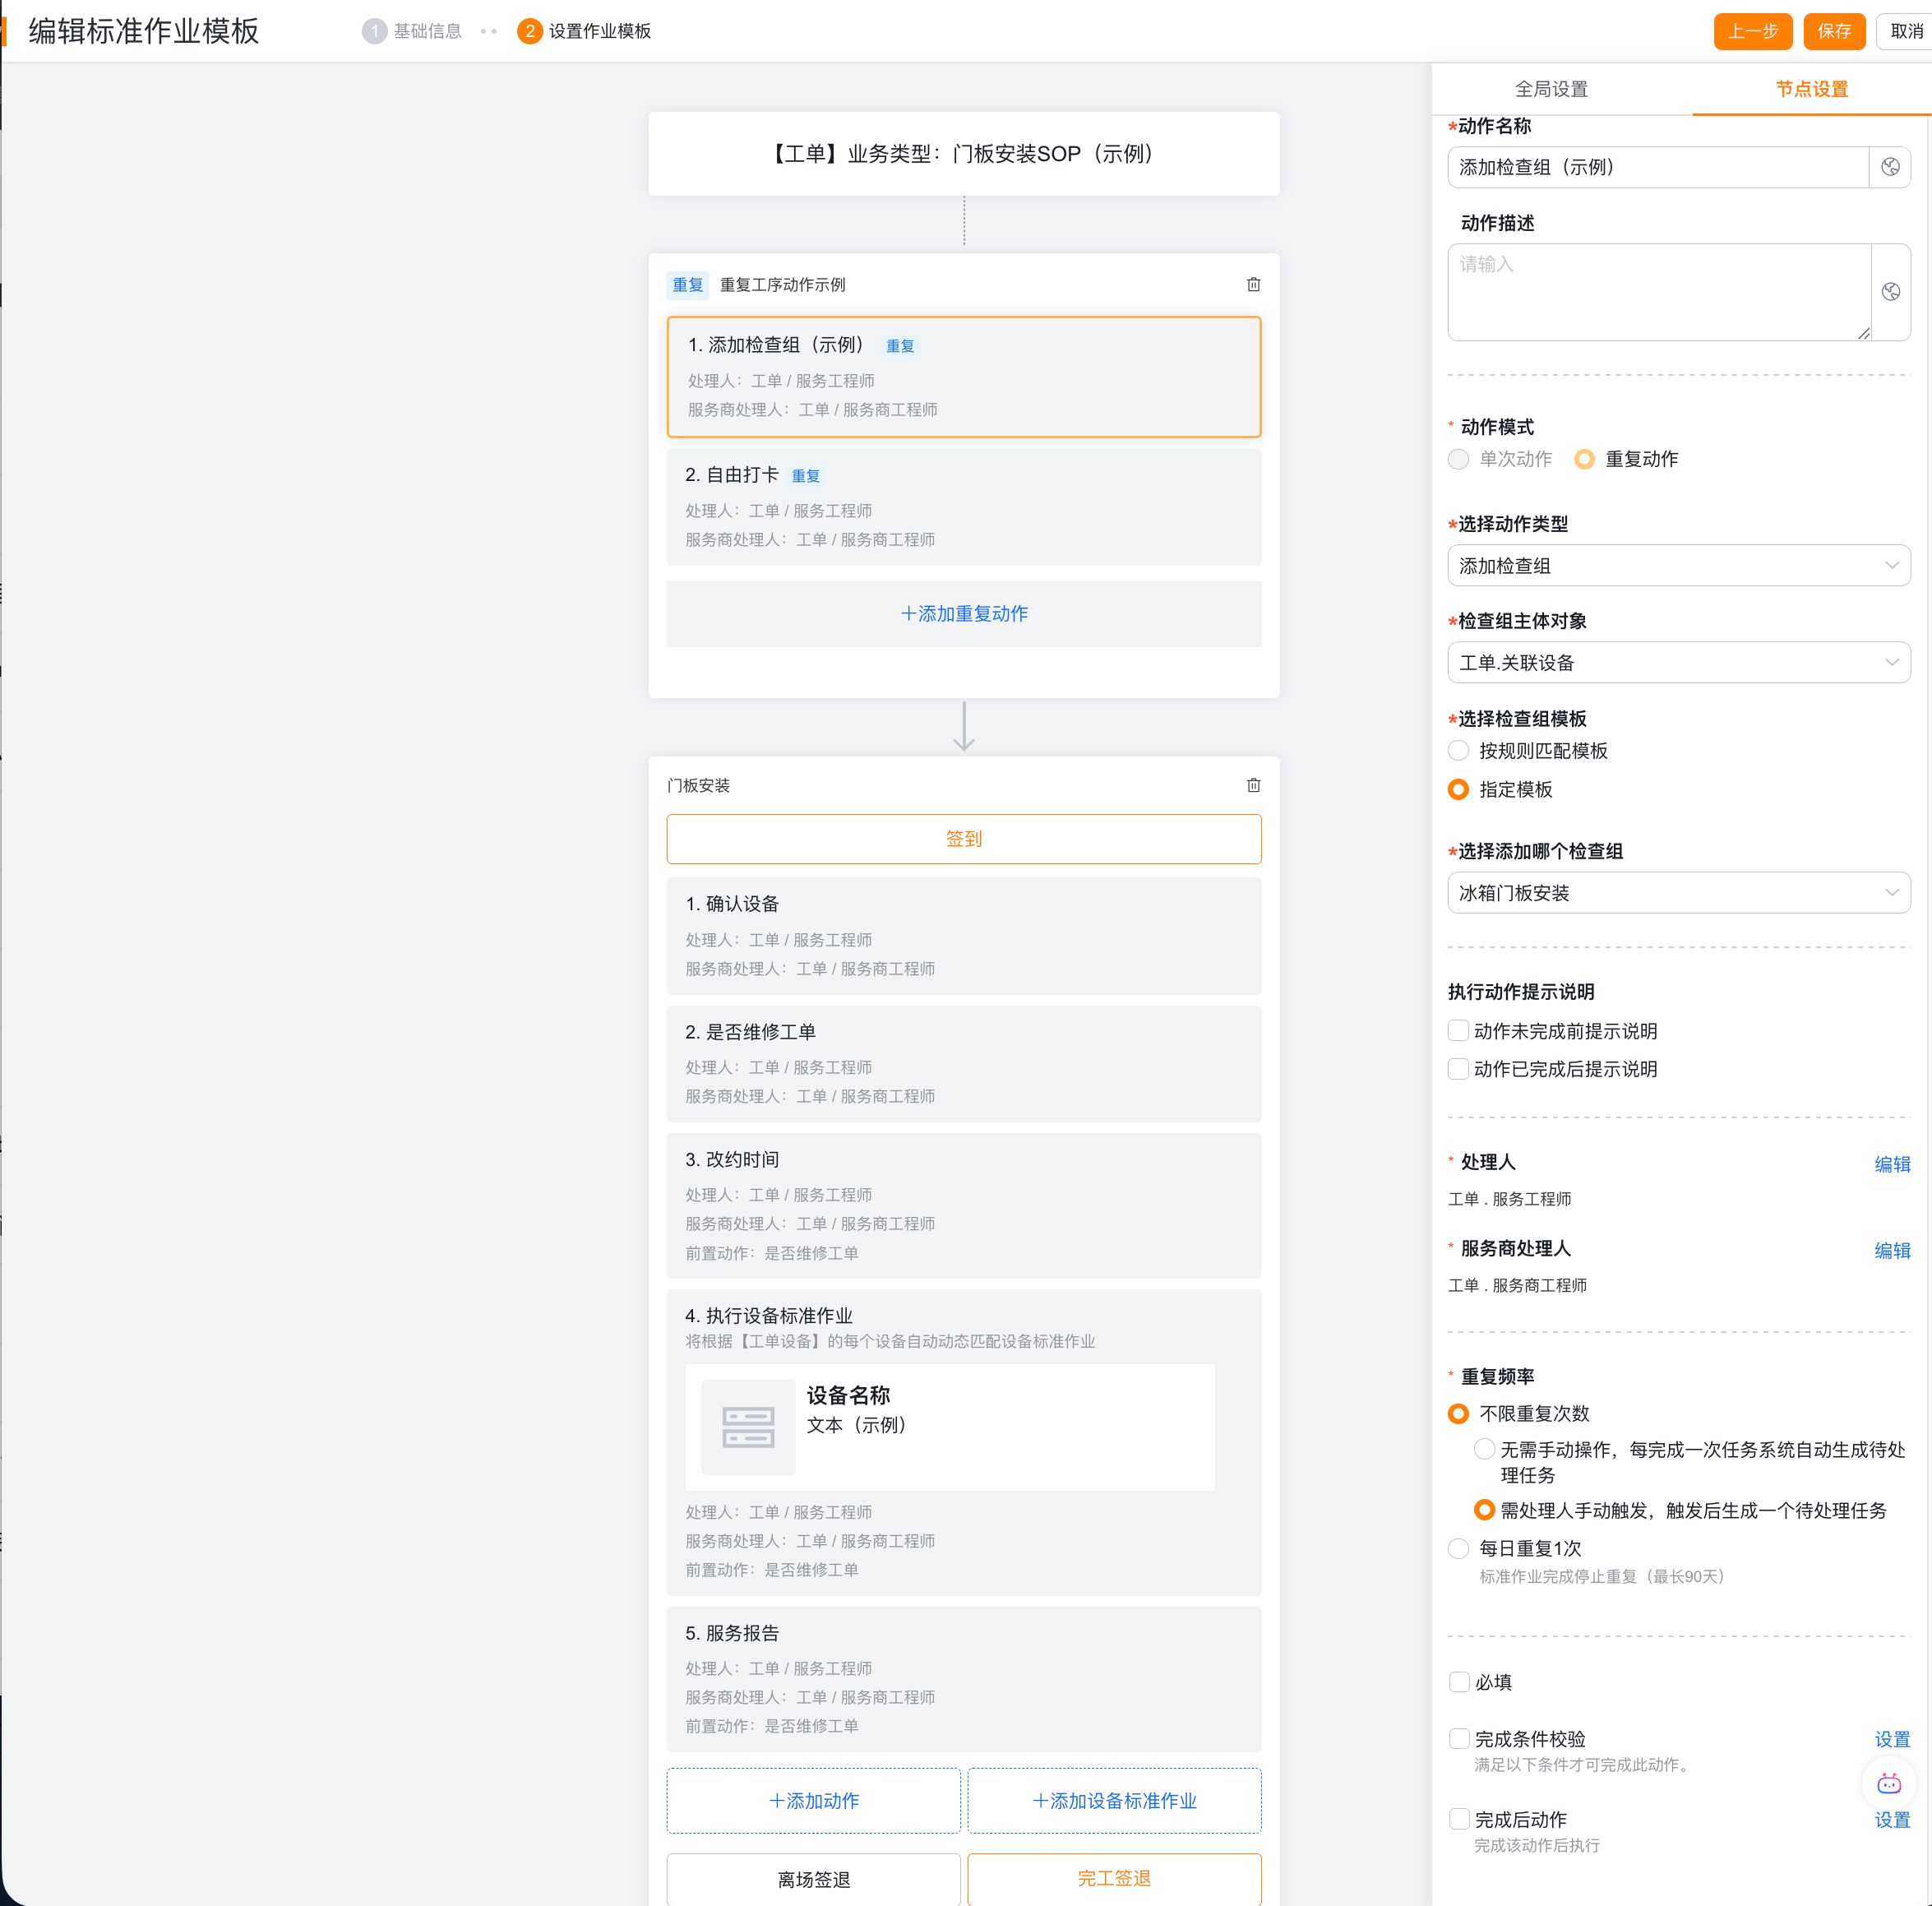
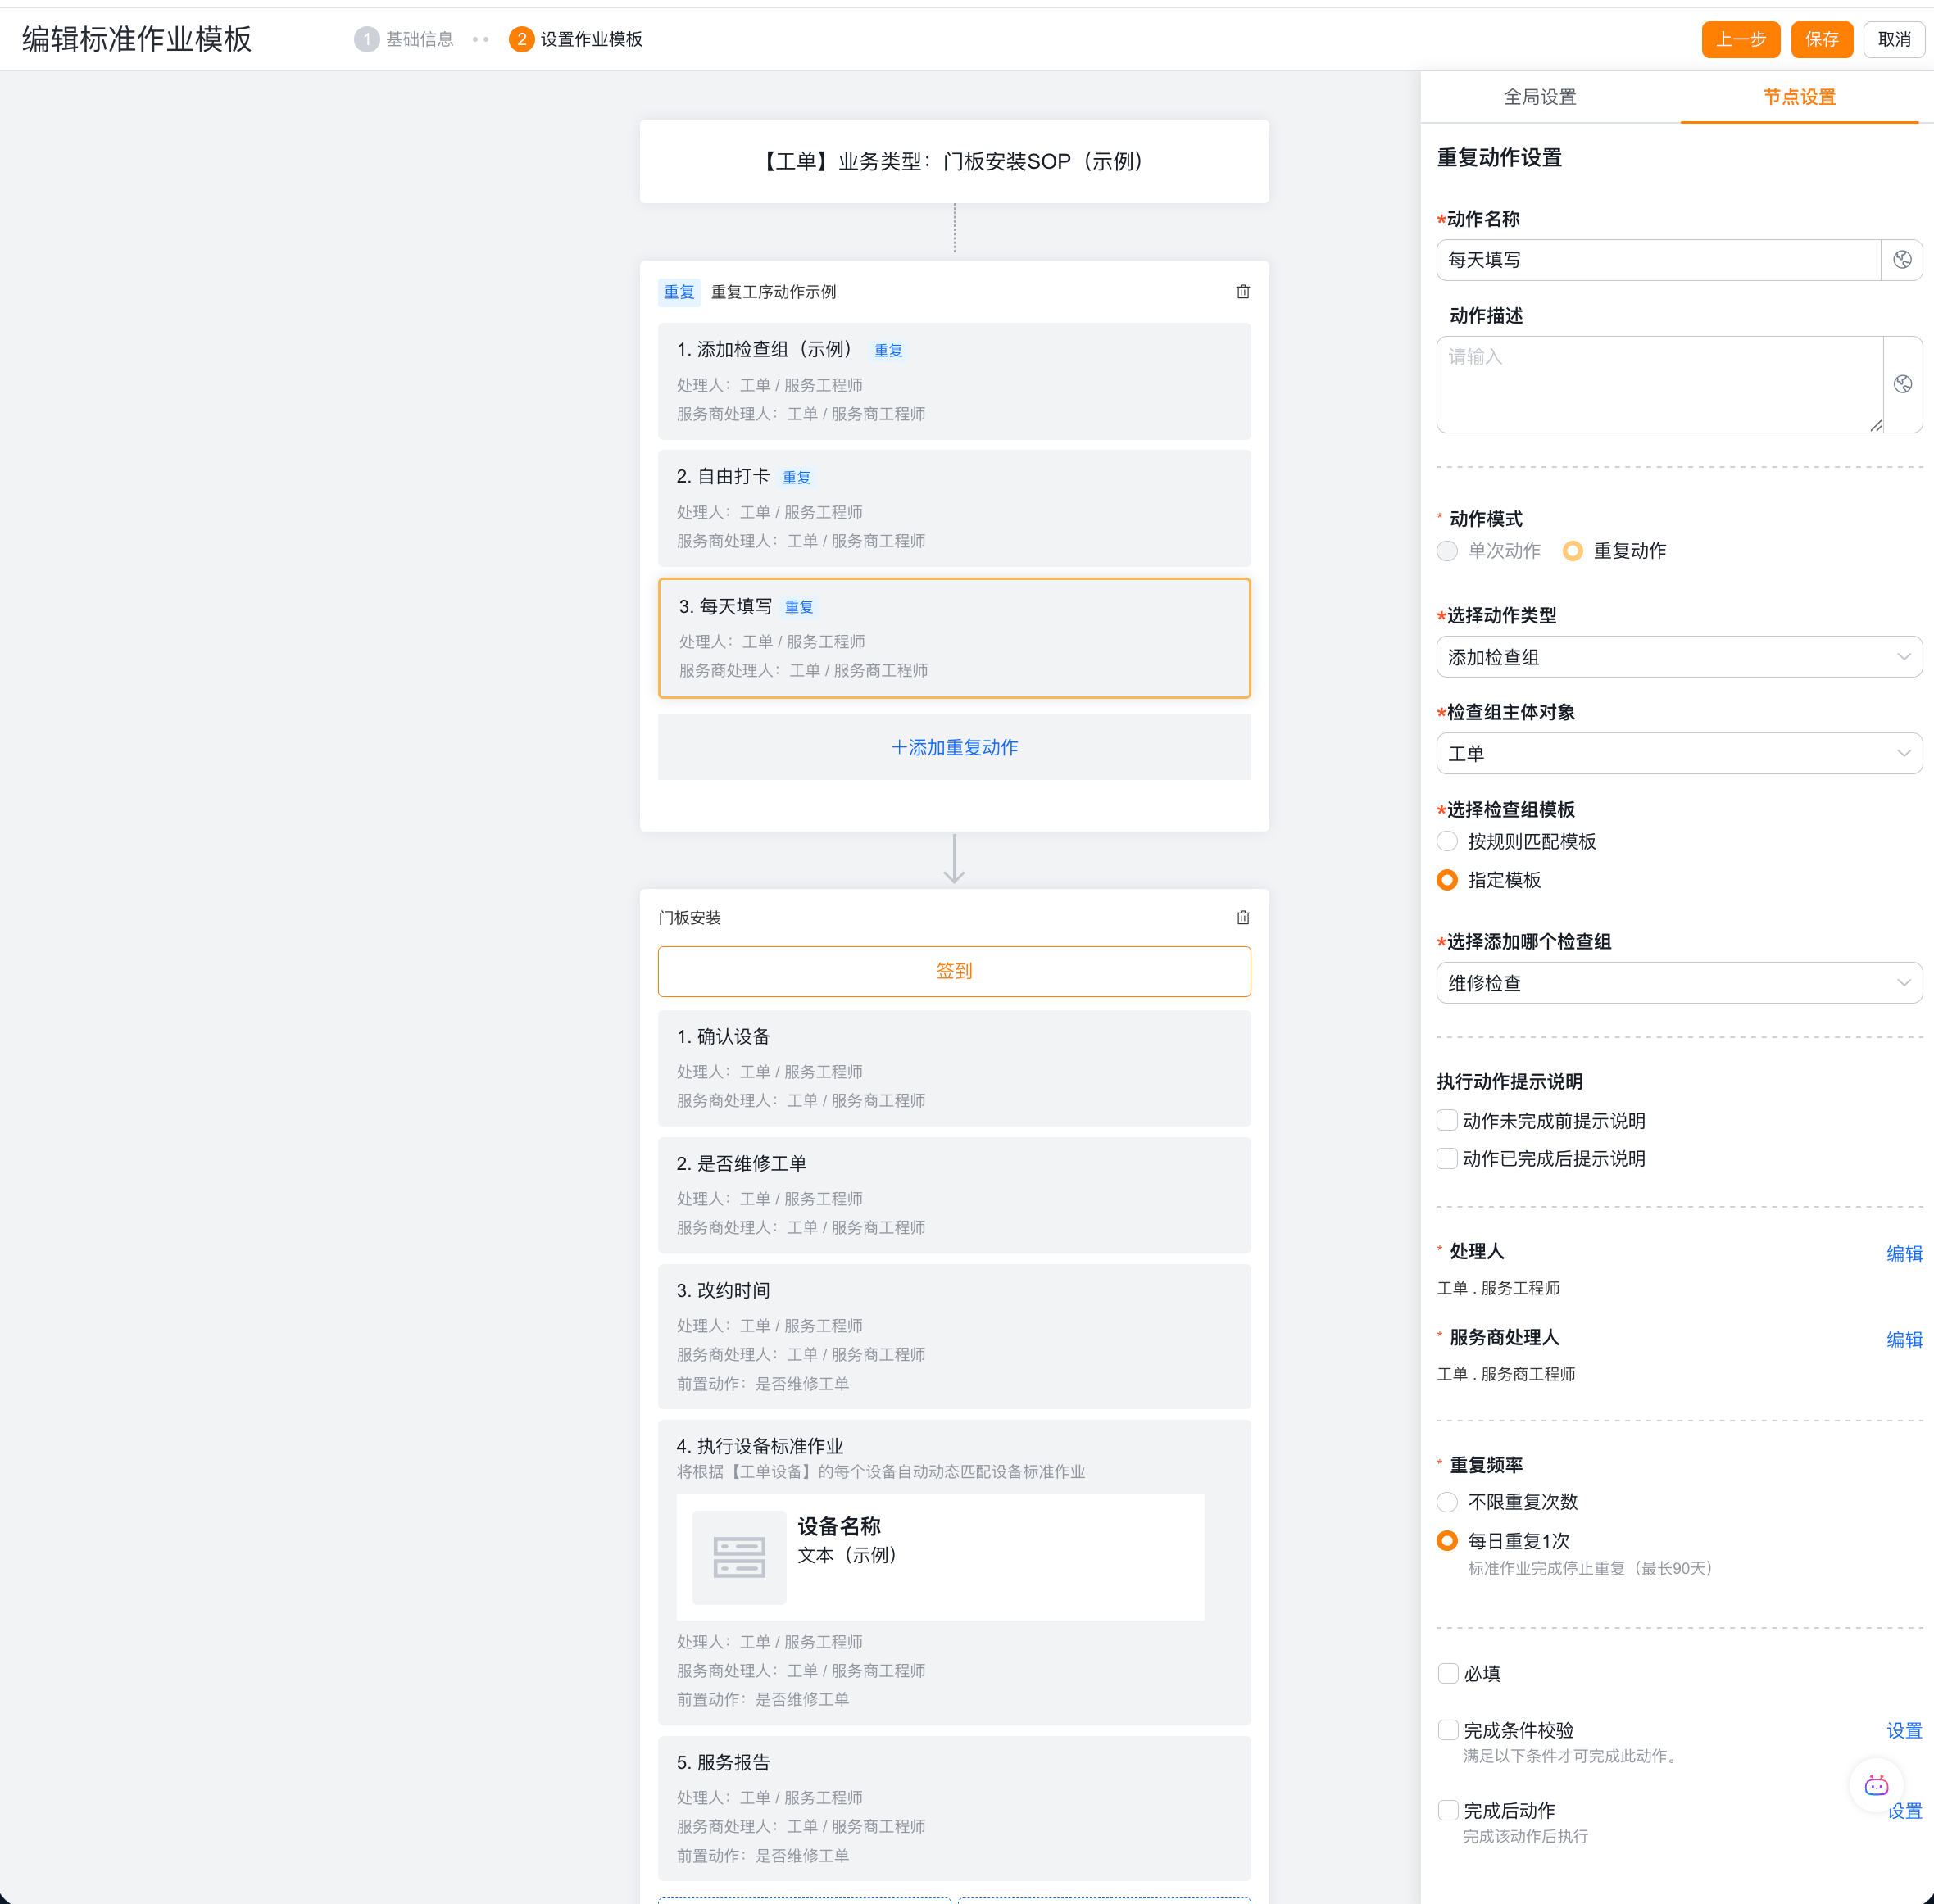
Global repeating actions are suitable for field operations that last for multiple days, but related records are only created when the business actually occurs.
- Enable repeating actions in Global Settings.
- Click Add Repeating Action, and then configure the action in Node Settings on the right.
- The action type can choose to create a new associated object or add an inspection group.
- The handler can be an engineer or a co-engineer.
- Select frequency:
- Unlimited: Generate the next action five minutes after completion, or let the assignee trigger it manually. This frequency cannot be required.
- Once a day: Generate an action when the SOP node starts and at 00:00 each day until completion. Required actions are checked when the SOP finishes.
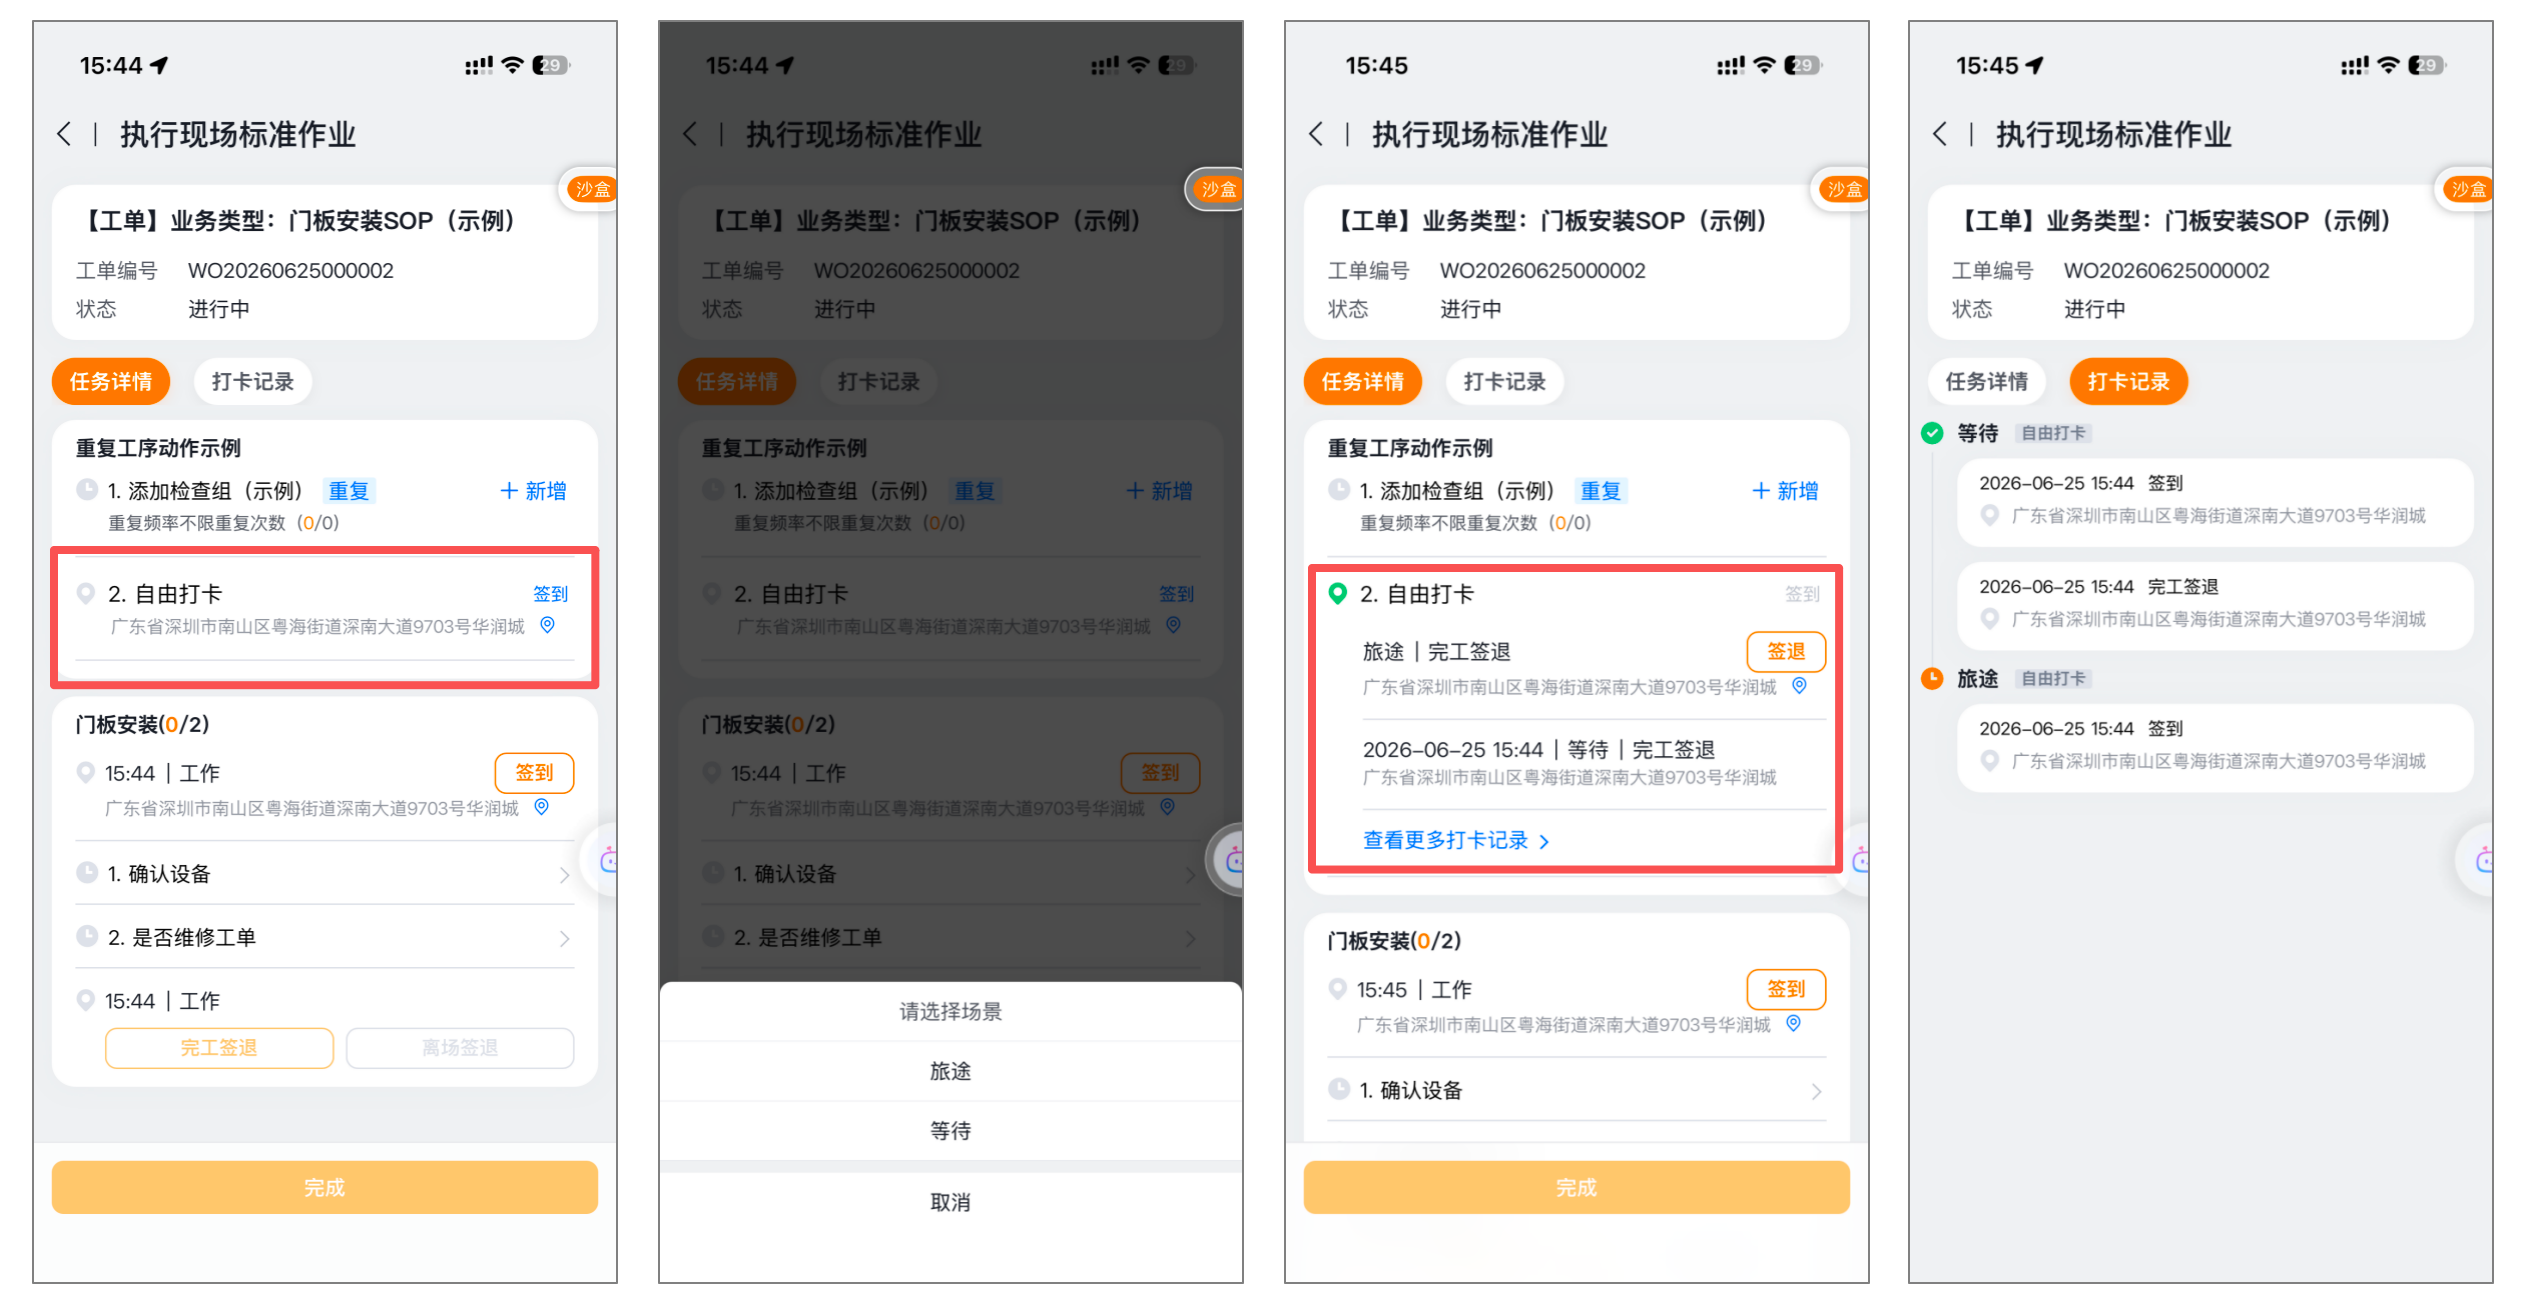
Global repeated check-in
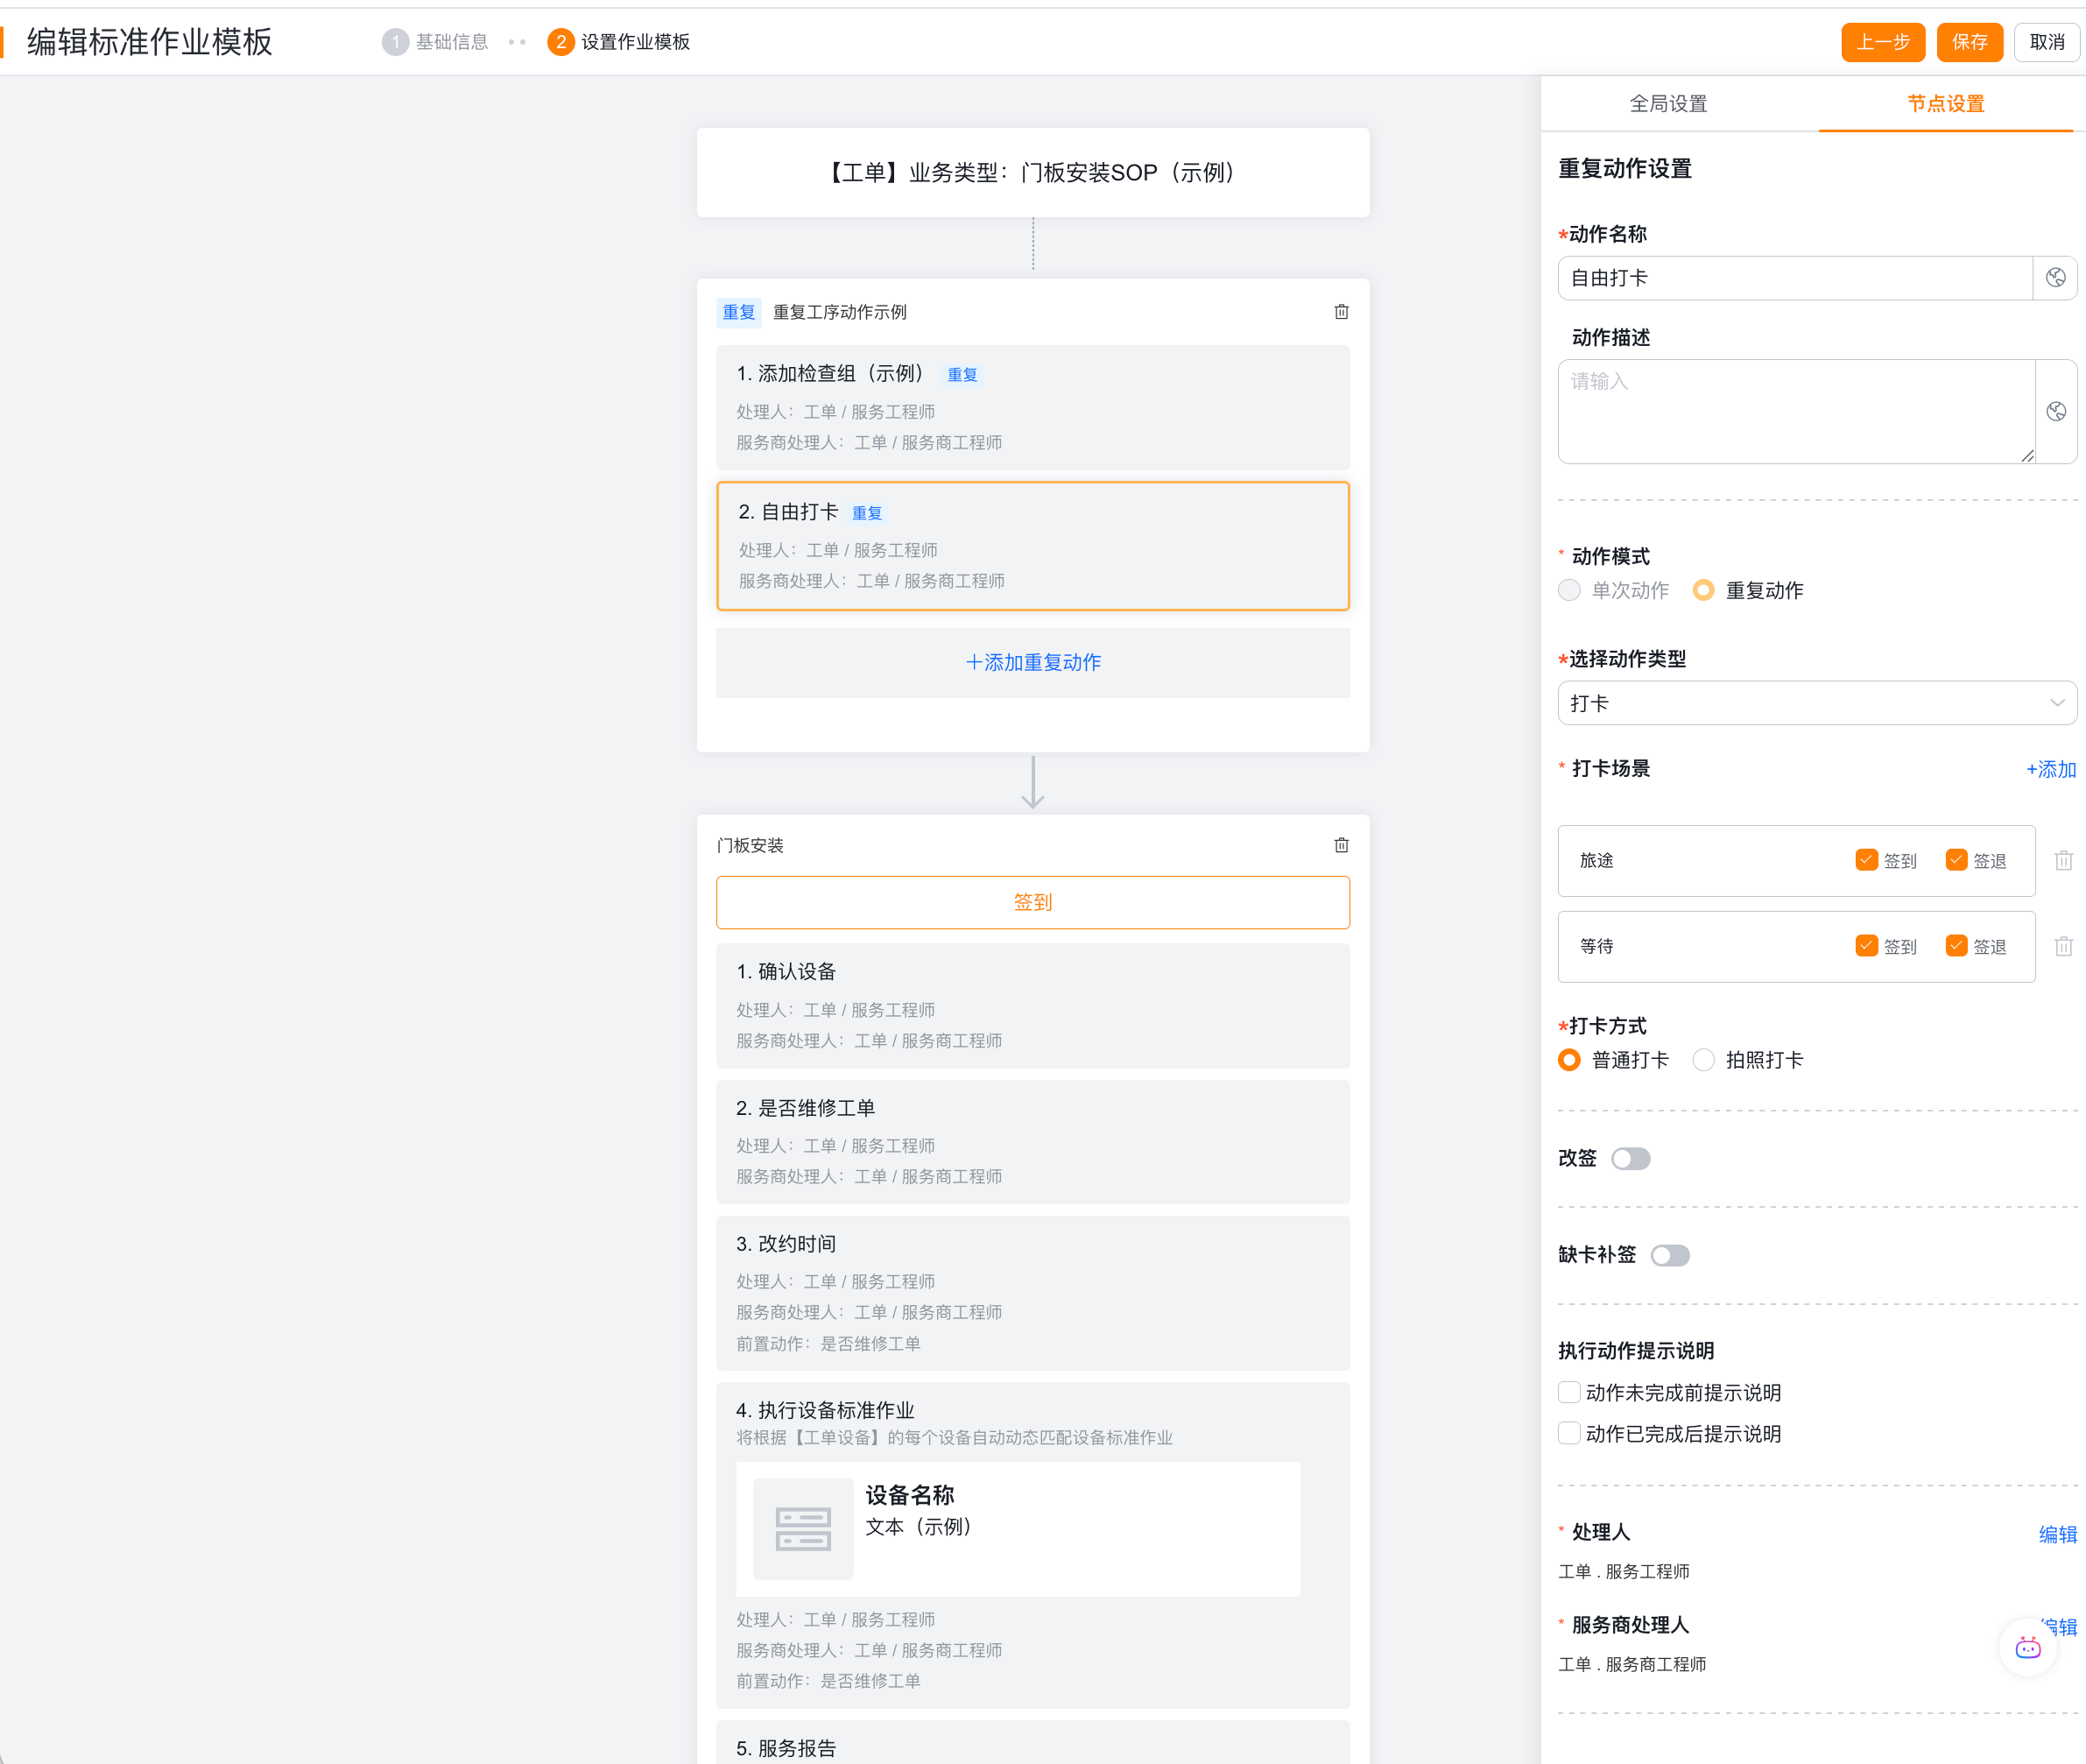
It is suitable for scenarios that need to last for many days and have disordered actions, but still need to record working hours and locations on a daily or temporary basis, such as temporarily recording the waiting time while waiting for spare parts.
- Click Add Repeating Action in Global Repeating Actions and open Node Settings.
- Set the action type to Punch in and select the punch in scene.
- Set up processors; source support engineers, collaborative engineers and service provider engineers.
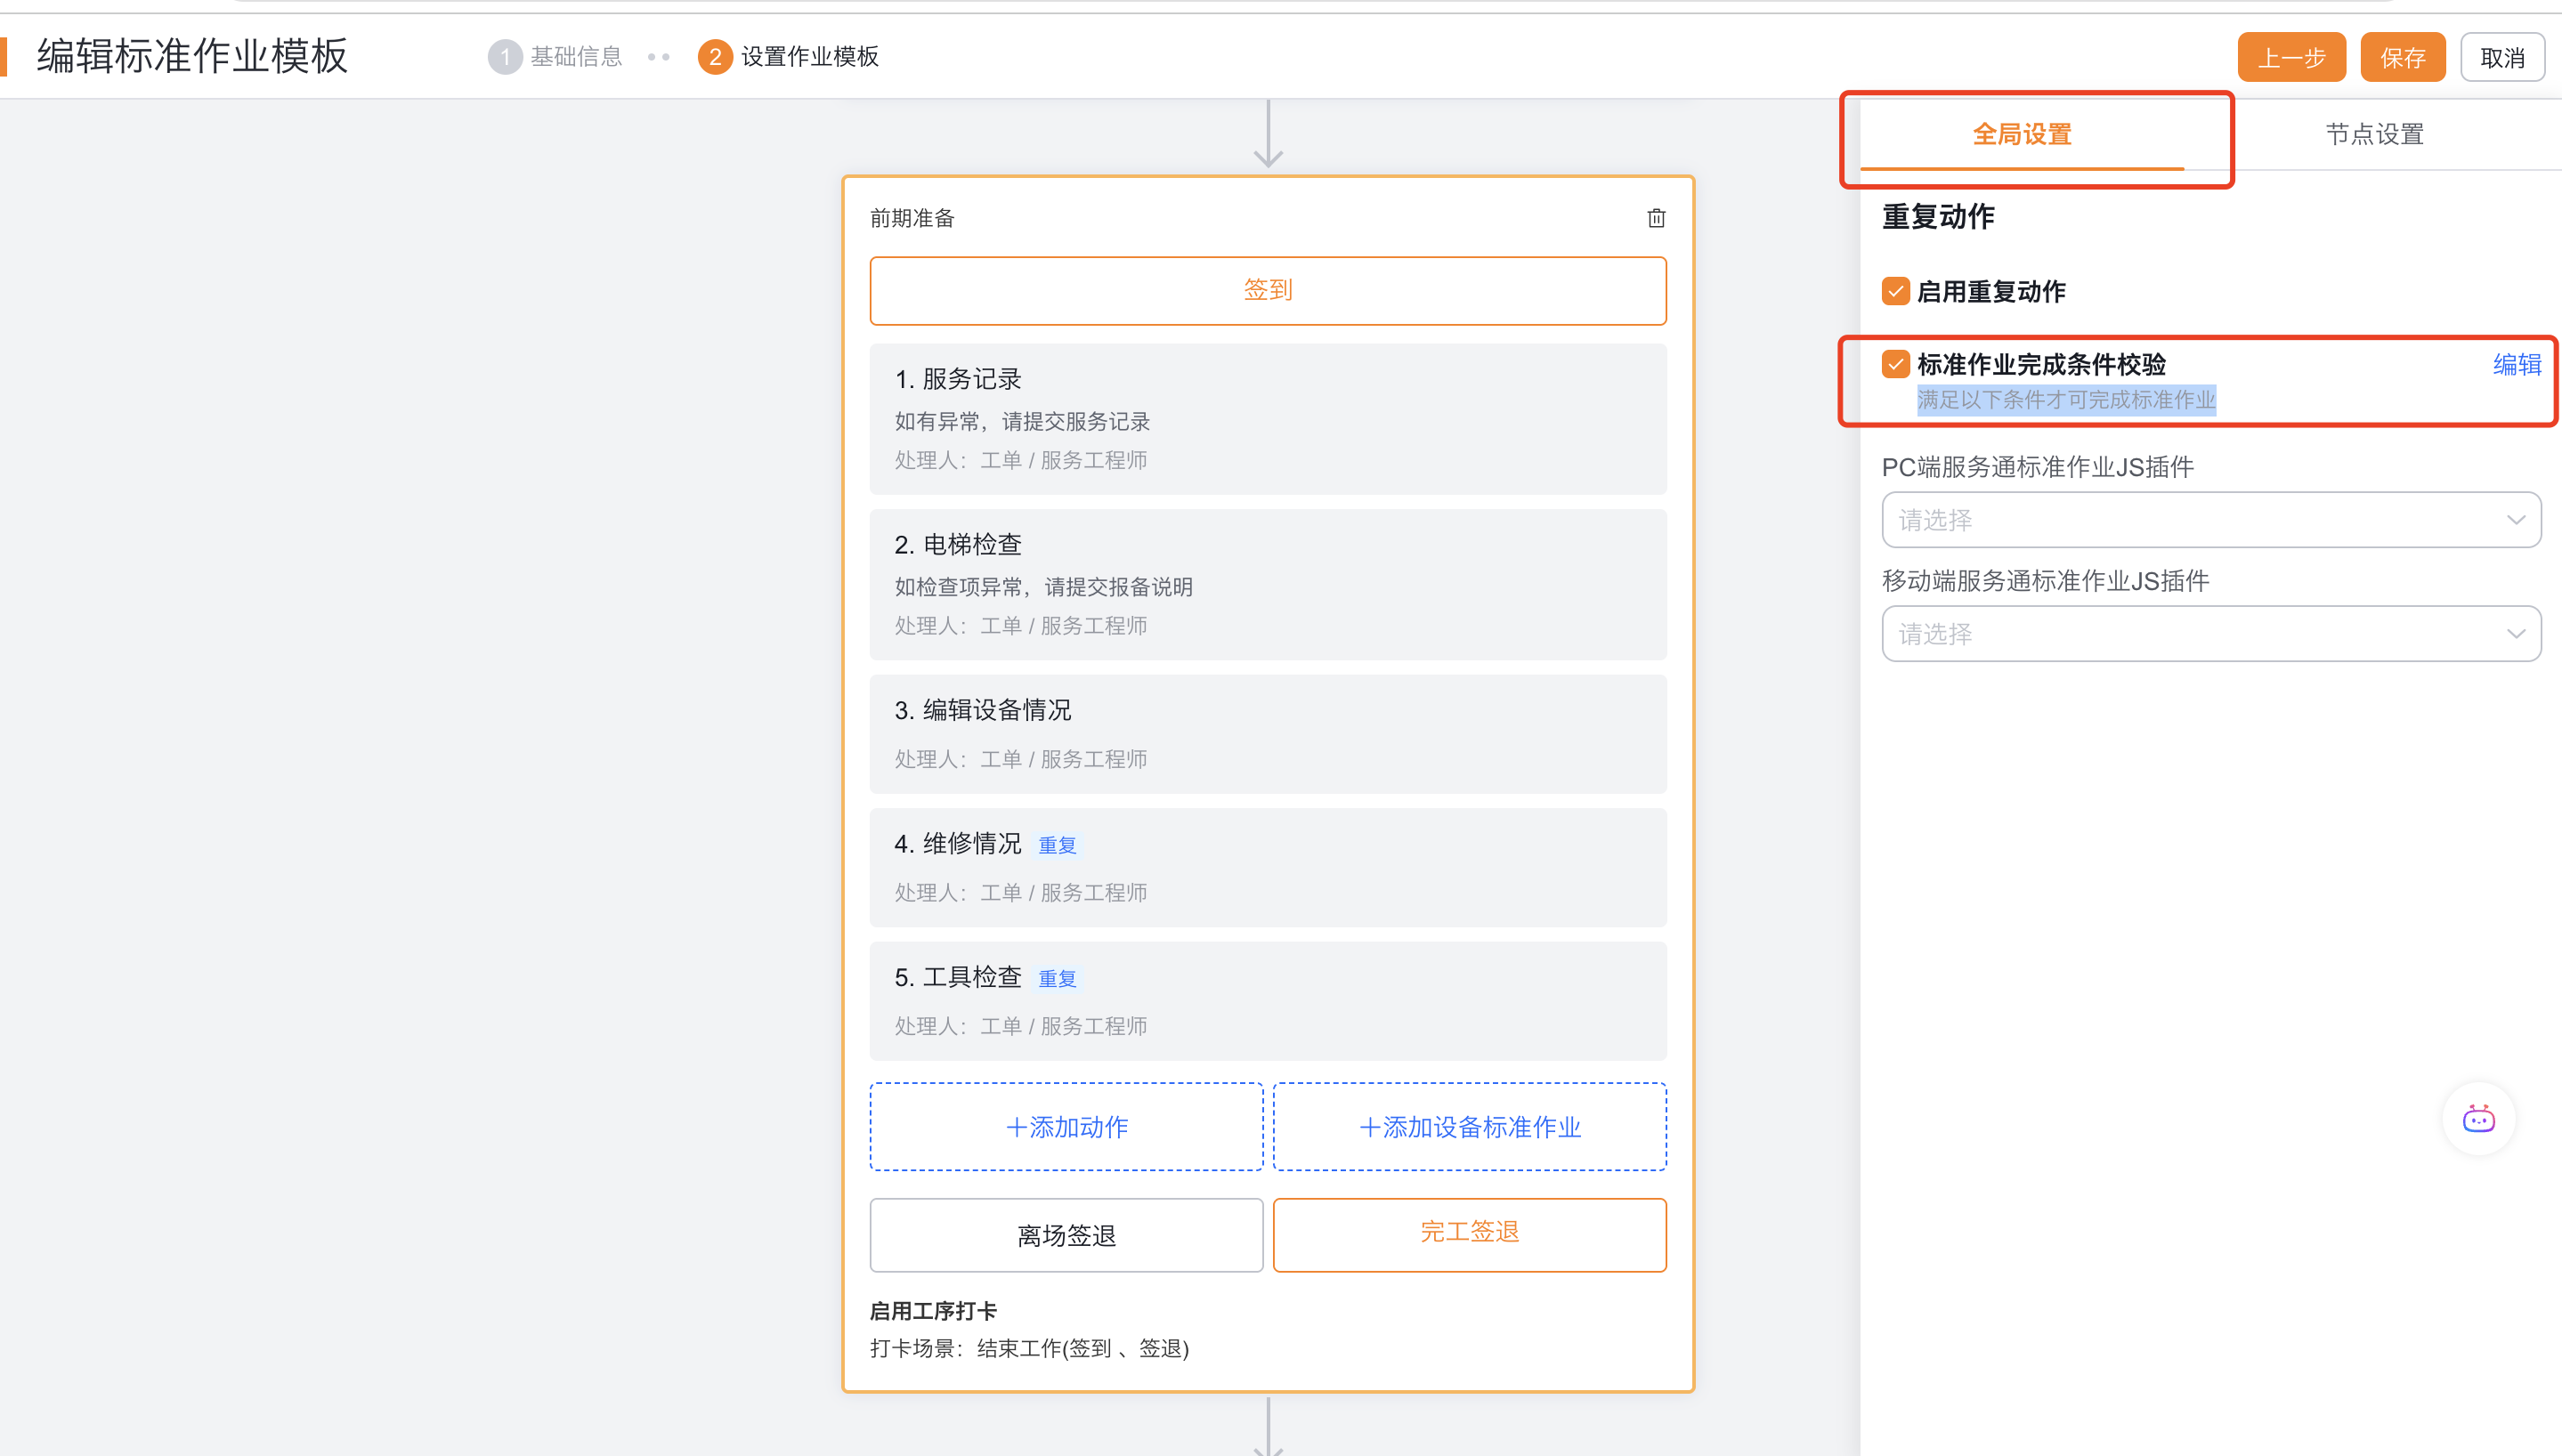
Configure completion verification of the entire SOP
Enable standard job completion condition checking and add functions in Global Settings. This check is performed when the user clicks the Finish button for the entire standard job. The after-completion action for the entire SOP should be configured in the after-completion action of the process node and not to be confused with the after-completion action for a single action.
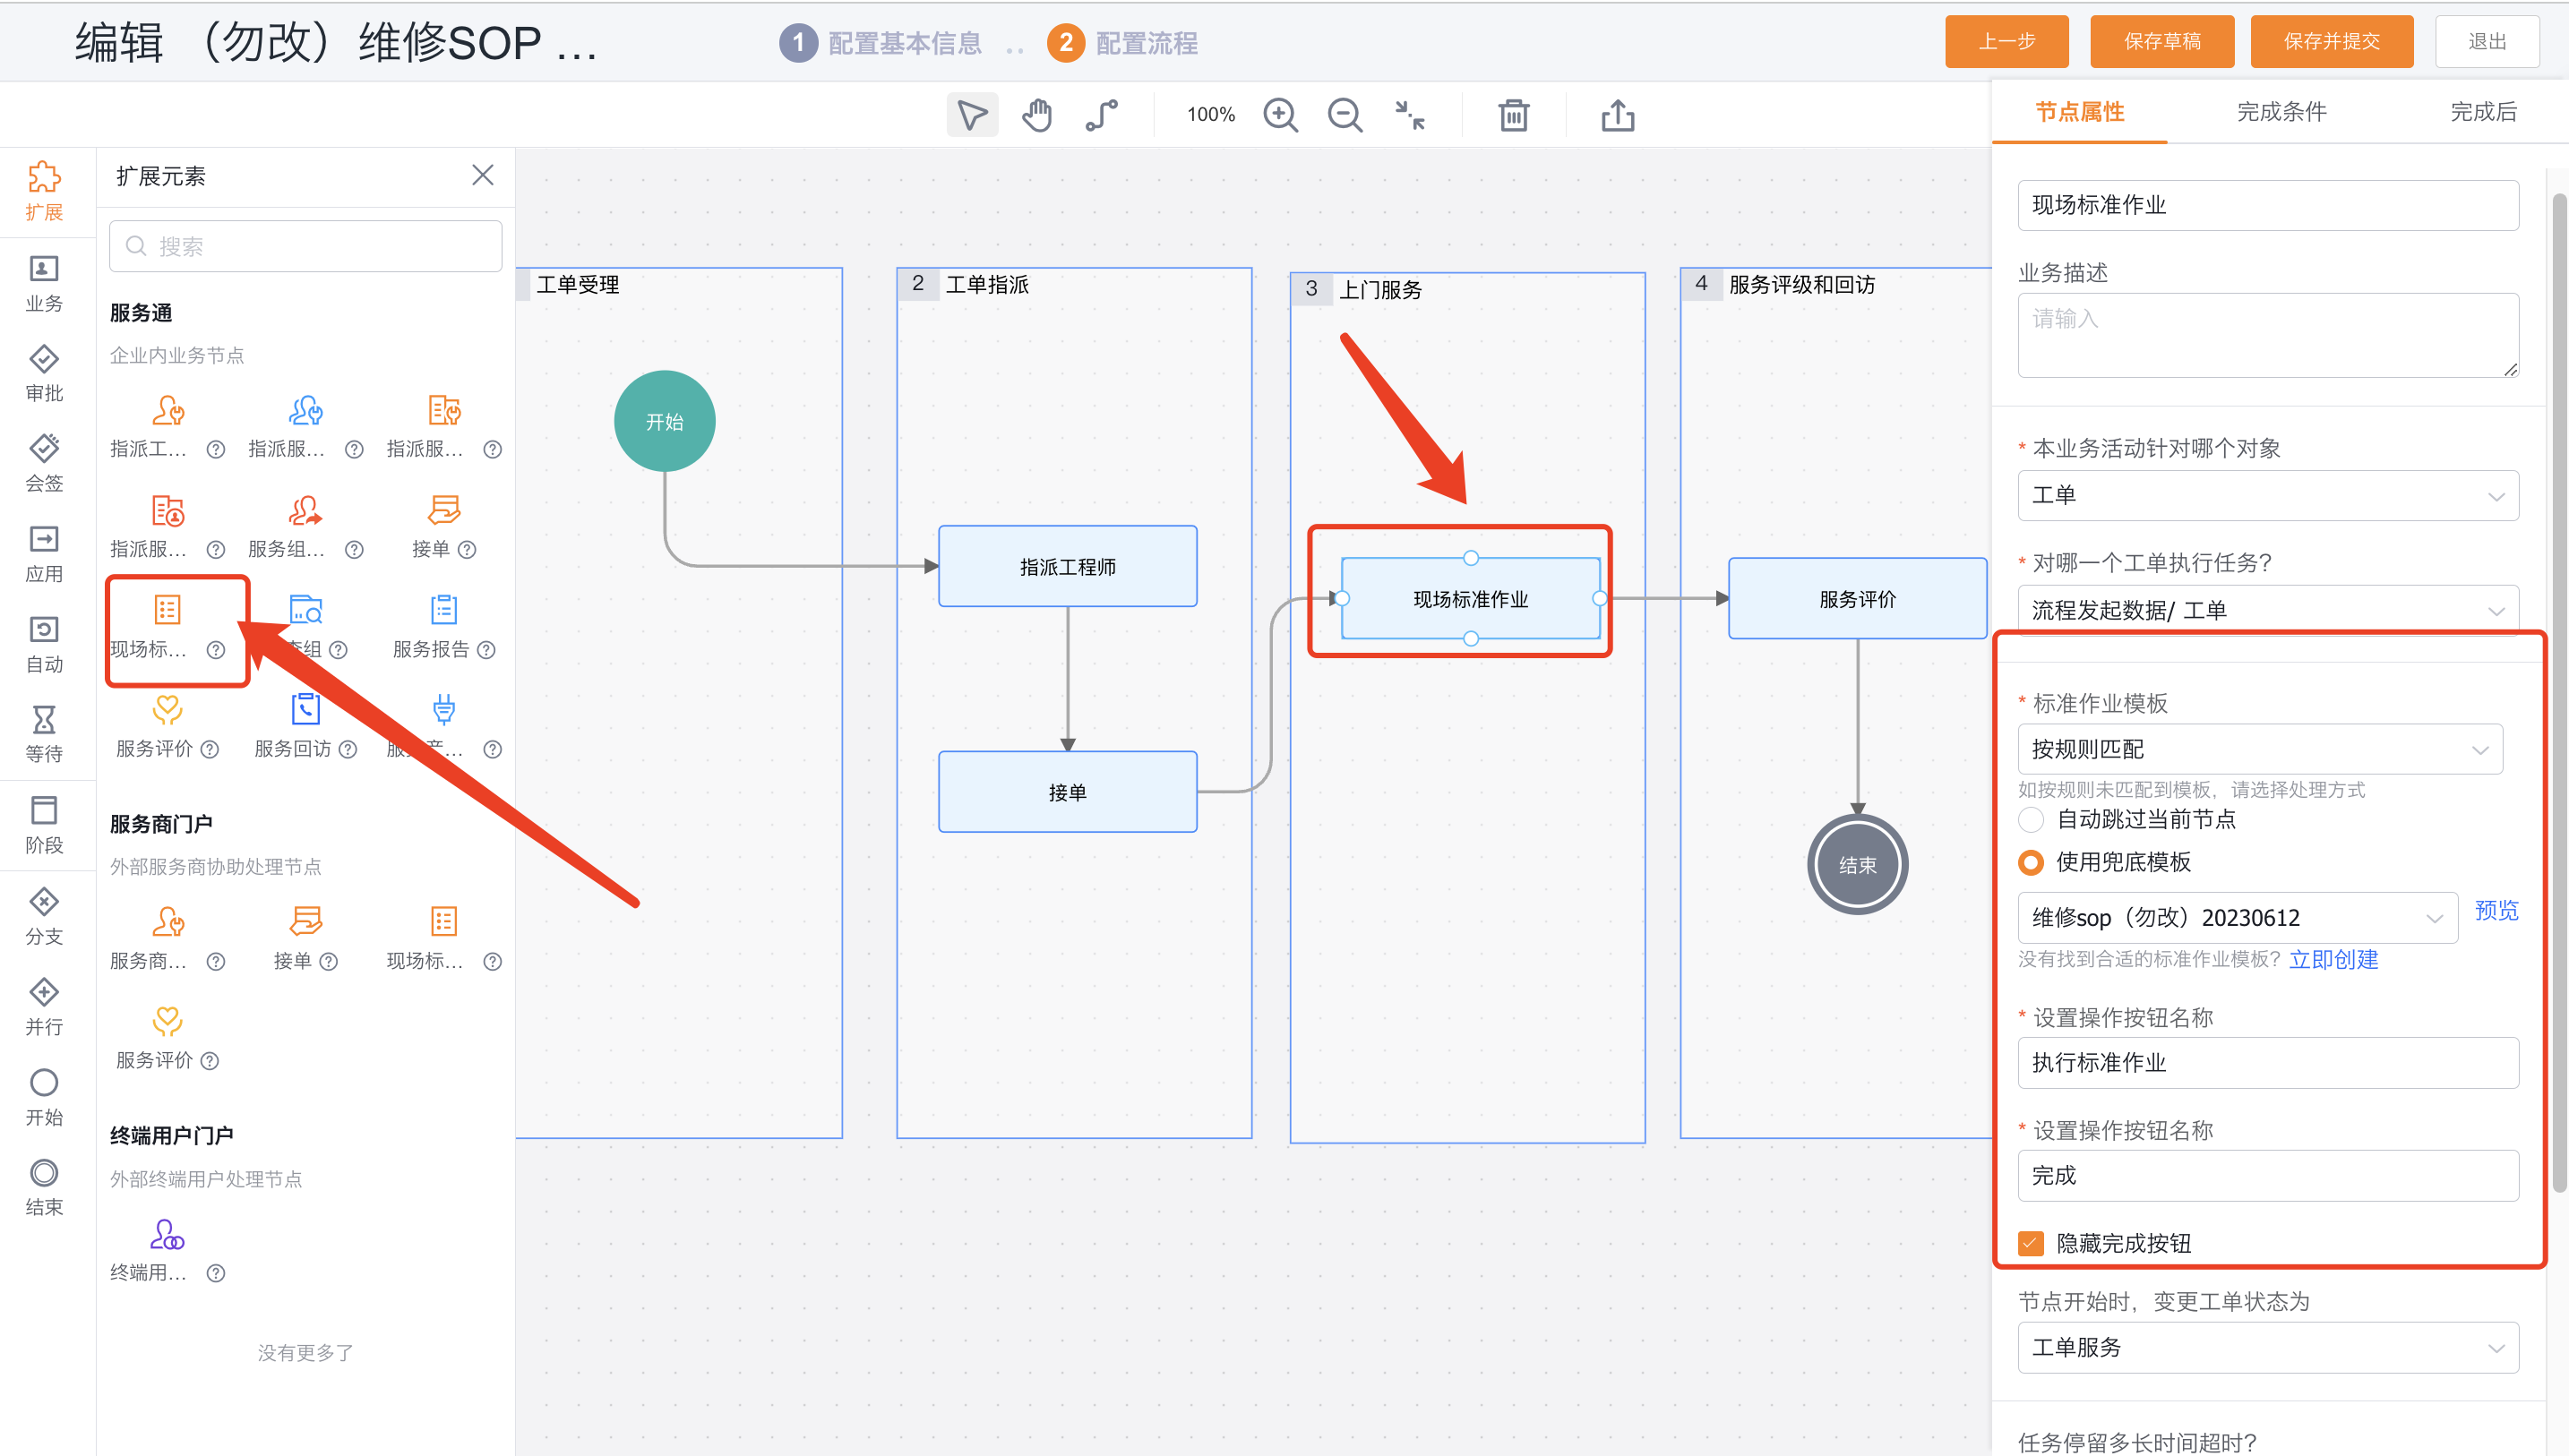
Configure on-site standard operation nodes in the work order process
- Add the Onsite Standard Operation node to the target work order process.
- Select a specified template, or match based on template application scope and priority.
- Configure nodes to be automatically completed when templates are not matched or to use redundancy rules.
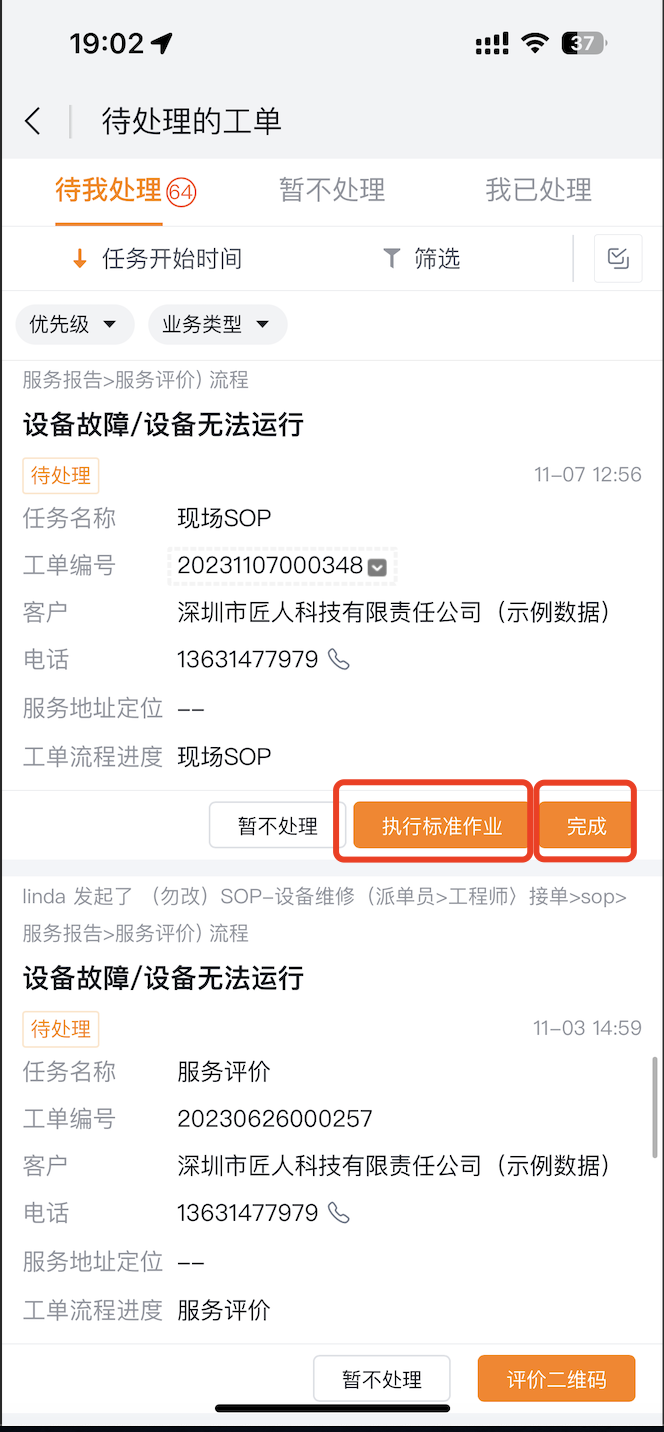
- Customize the name of the main action button as needed, and decide whether to hide the Done button in the to-do list.
A process node can only execute one set of standard jobs. The node handler is jointly determined by the handlers of all action items in the template.
Expected results and verification
- Use the test work order to enter the on-site standard operation node and confirm that it matches the expected template.
- Use the service engineer and collaborative engineer accounts to check the action processing scope.
- Verify direct triggering, conditional triggering, required, skip, completion conditions and post-completion actions.
- Verify the generation time, actual handler and required verification time for repeated actions.
- When check-in is enabled, distinguish Leave Site, Complete and Check Out, and overall SOP Complete results.
- Construct a work order that does not match the template and verify the automatic completion or cover-up rules.
Notes- Condition-triggered actions that do not meet the conditions will not be displayed, nor will they block the completion of the SOP.
- Unlimited repeated actions cannot be set as required.
- Automatically jumping to the next action is only supported by the App, and it cannot be inferred that the same interaction exists on the Web.
- The action of generating service report does not support completion conditions and post-completion actions; the action of evaluating QR code only supports fixed evaluation templates.
- When multiple people collaborate with engineers to handle repeated actions, instances are generated based on the frequency of the action, not the number of people.