Appearance
Configure service requests
Enable service requests and configure submission, intake, and work order conversion.
Overview
Administrators can configure customer service valet submission, end-user self-service submission, visitor submission, service request allocation, work transfer orders, and automatic generation of service requests by email. It is recommended to implement in the order of "enabling functions, configuring entrances and permissions, configuring acceptance processes, configuring subsequent conversions, and verification" to avoid only turning on function switches without available entrances or handlers.
Before you begin
- Use a service pass administrator account, or an account with system settings, online customer service channels, Internet roles and WeChat public account configuration permissions.
- Clarify the submission methods that need to be opened this time: customer service submission, self-service submission by registered users, visitor submission or automatic email generation.
- Customer service personnel and customer service groups have been prepared; when it is necessary to transfer a work order, the mapping relationship between service request fields and work order fields has been clarified.
- Self-service submission requires a connected WeChat official account. The automatic generation of emails requires a bound and normal system mailbox.
- Prepare internal customer service, registered end users, tourists and customer service acceptance test accounts, and select according to the actual activation range.
Configuration sequence
| Sequence | Configuration items | Problems solved |
|---|---|---|
| 1 | Enable service request | Make the service request object and subsequent configuration available |
| 2 | Configure assignees | Determine who can perform service request assignments |
| 3 | Configure valet or self-service entrance | Determine where service requests are created from |
| 4 | Configure permissions and guest identities | Determine which external users can submit |
| 5 | Configure intake agent groups, assignment rules, and processes | Determine who handles self-service requests and which process applies |
| 6 | Configure work order transfer | Determine how to generate a work order when on-site service is required |
| 7 | Configure email rules (optional) | Automatically generate business records from emails that meet the conditions |
Enable service request
Service request is a functional module shared by online customer service and service channels and needs to be enabled manually. The source material provides two product entrances:
- Online Customer Service > Service Request Settings: Click the Enable button.
- Service Pass > System Settings > Value-added Plug-ins: Find Service Request and enable it.
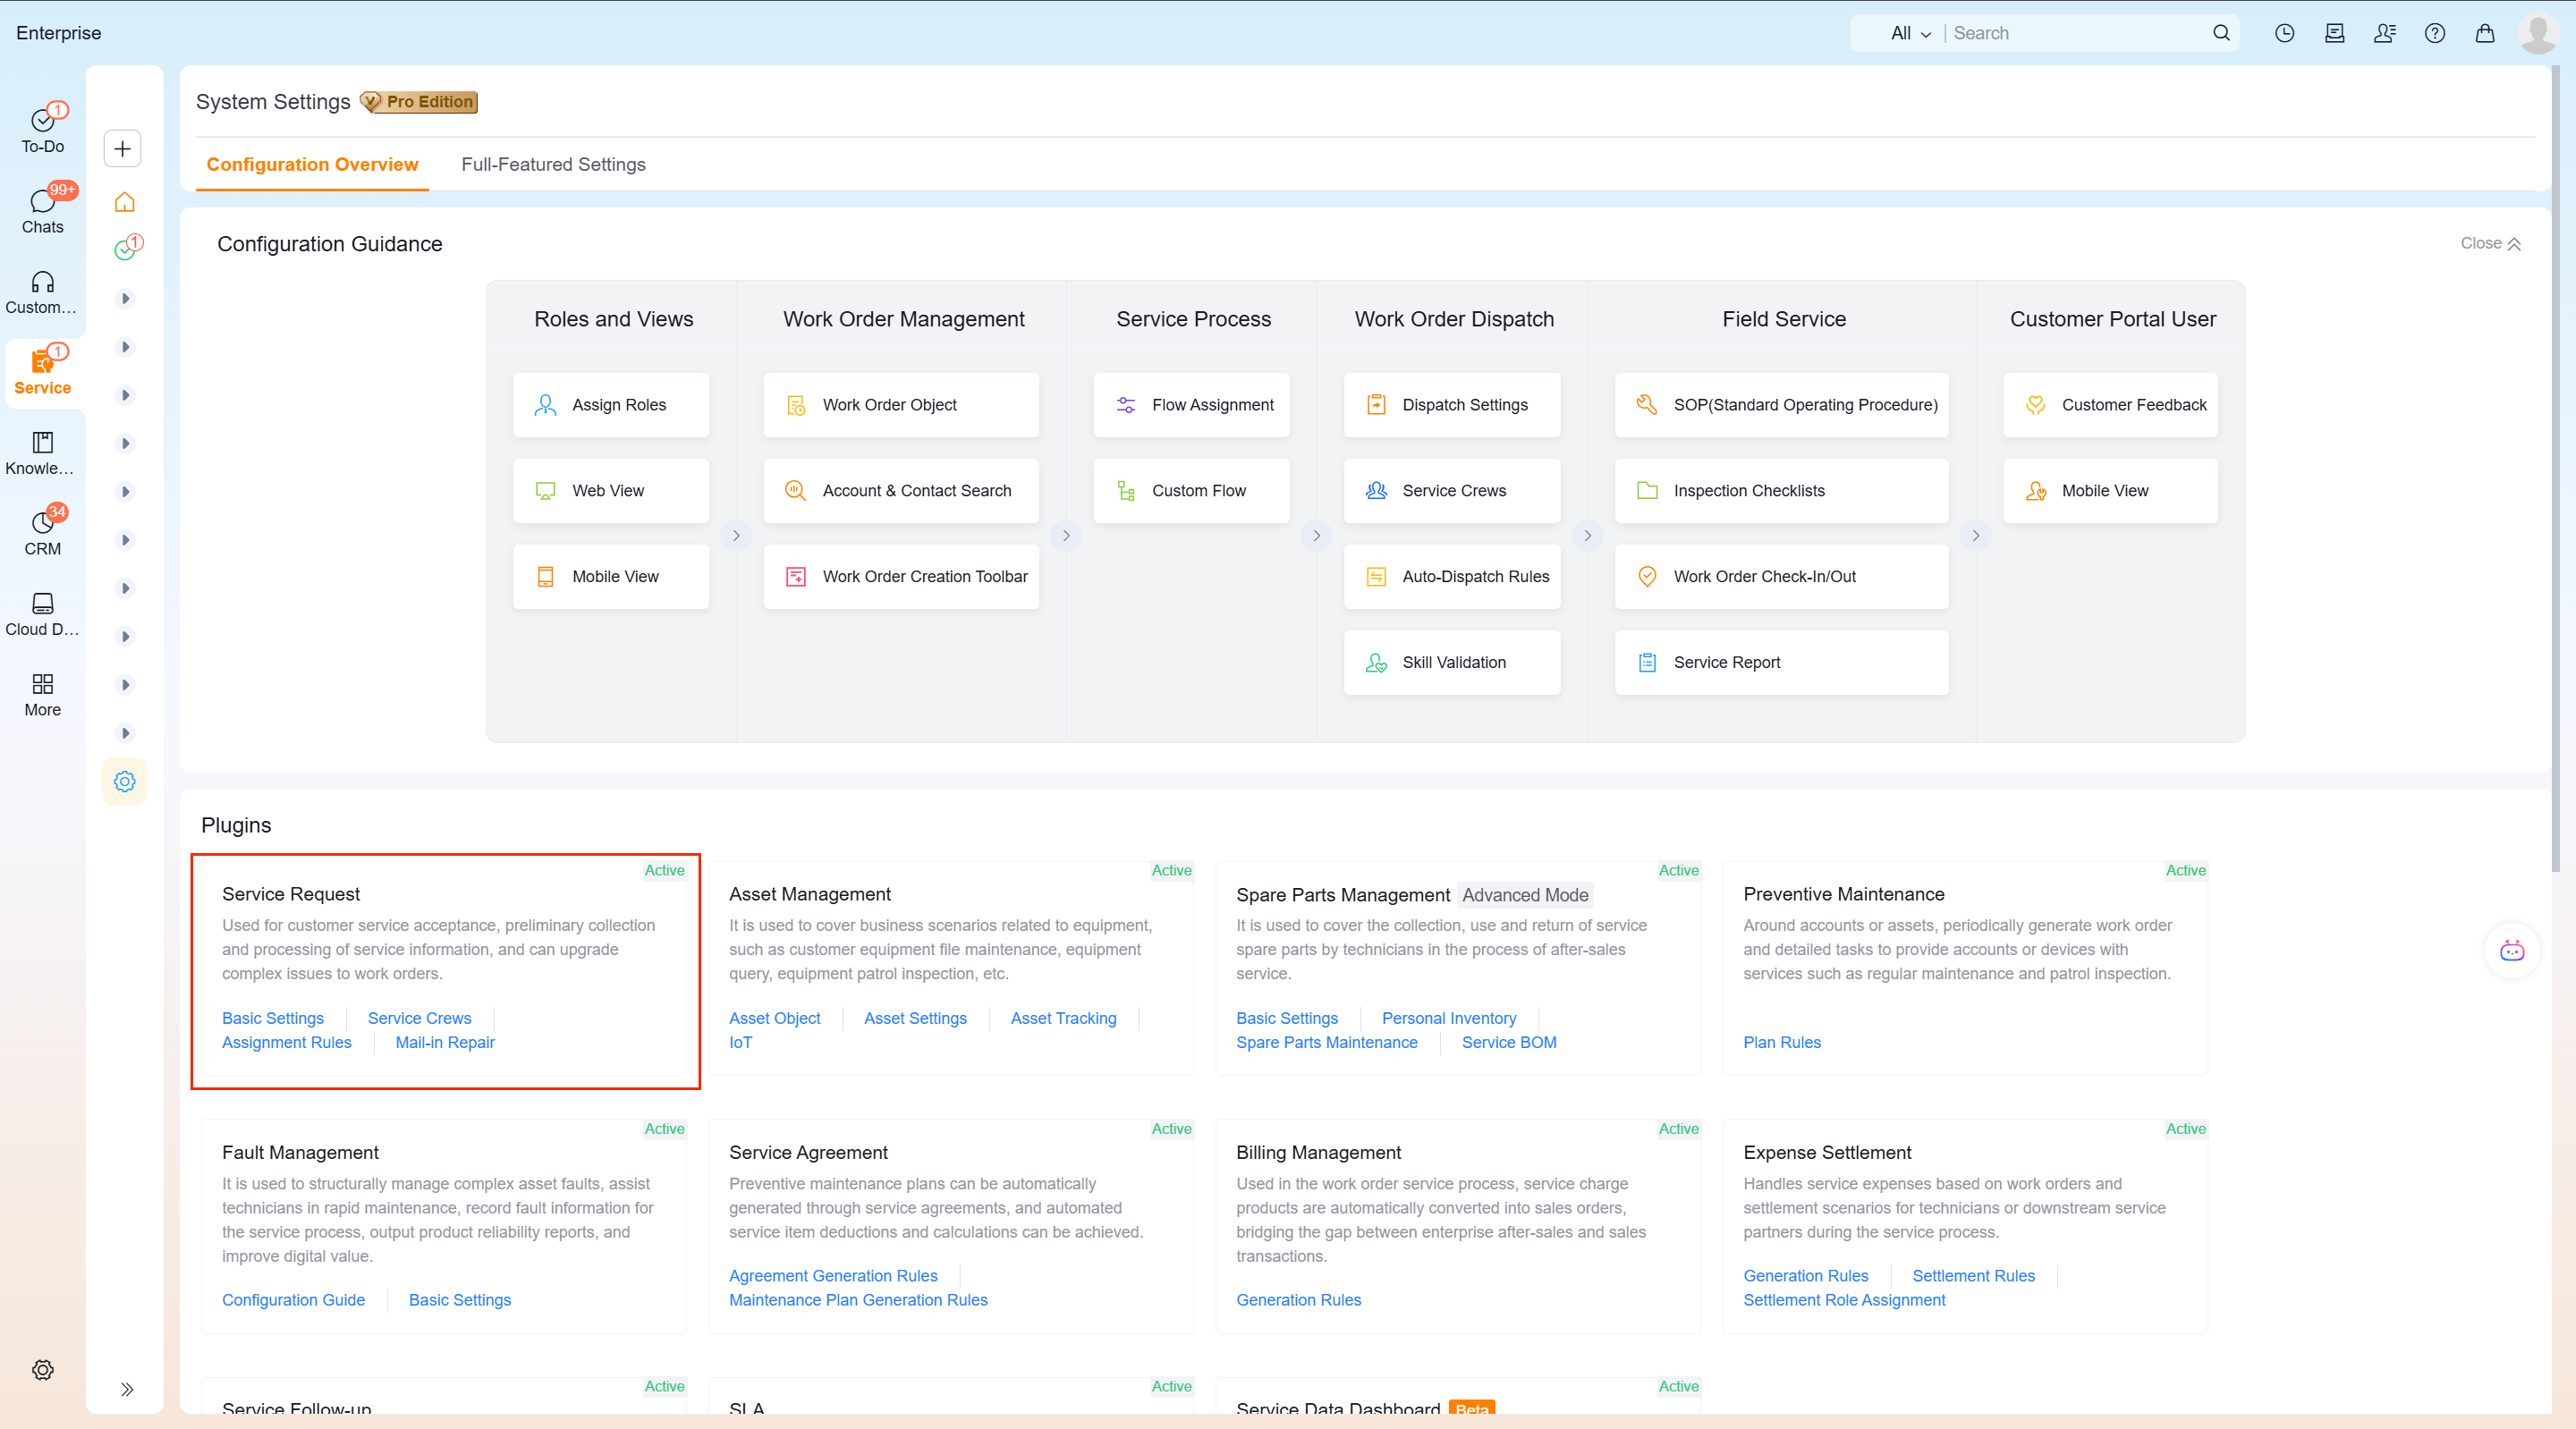
After enabling it, enter the Basic Settings of the service request and continue to configure assignees, end-user submissions, service request assignments, and service request transfer orders.
Configure assigned personnel
- In the Basic Settings of the service request, find Assignees.
- Click Settings to add employees responsible for service request assignments.
- After saving, use one of the accounts to verify whether the service request assignment can be performed.
NOTE
Assigned personnel are used to perform service request assignments and are not equivalent to accepting customer service groups. Which customer service group will accept requests submitted by self-service? You also need to continue to configure service request distribution.
Configure customer service workbench to submit on behalf of customers
When customer service personnel communicate with customers through web pages or WeChat channels, they can create service requests directly in the sidebar of the customer service workbench.
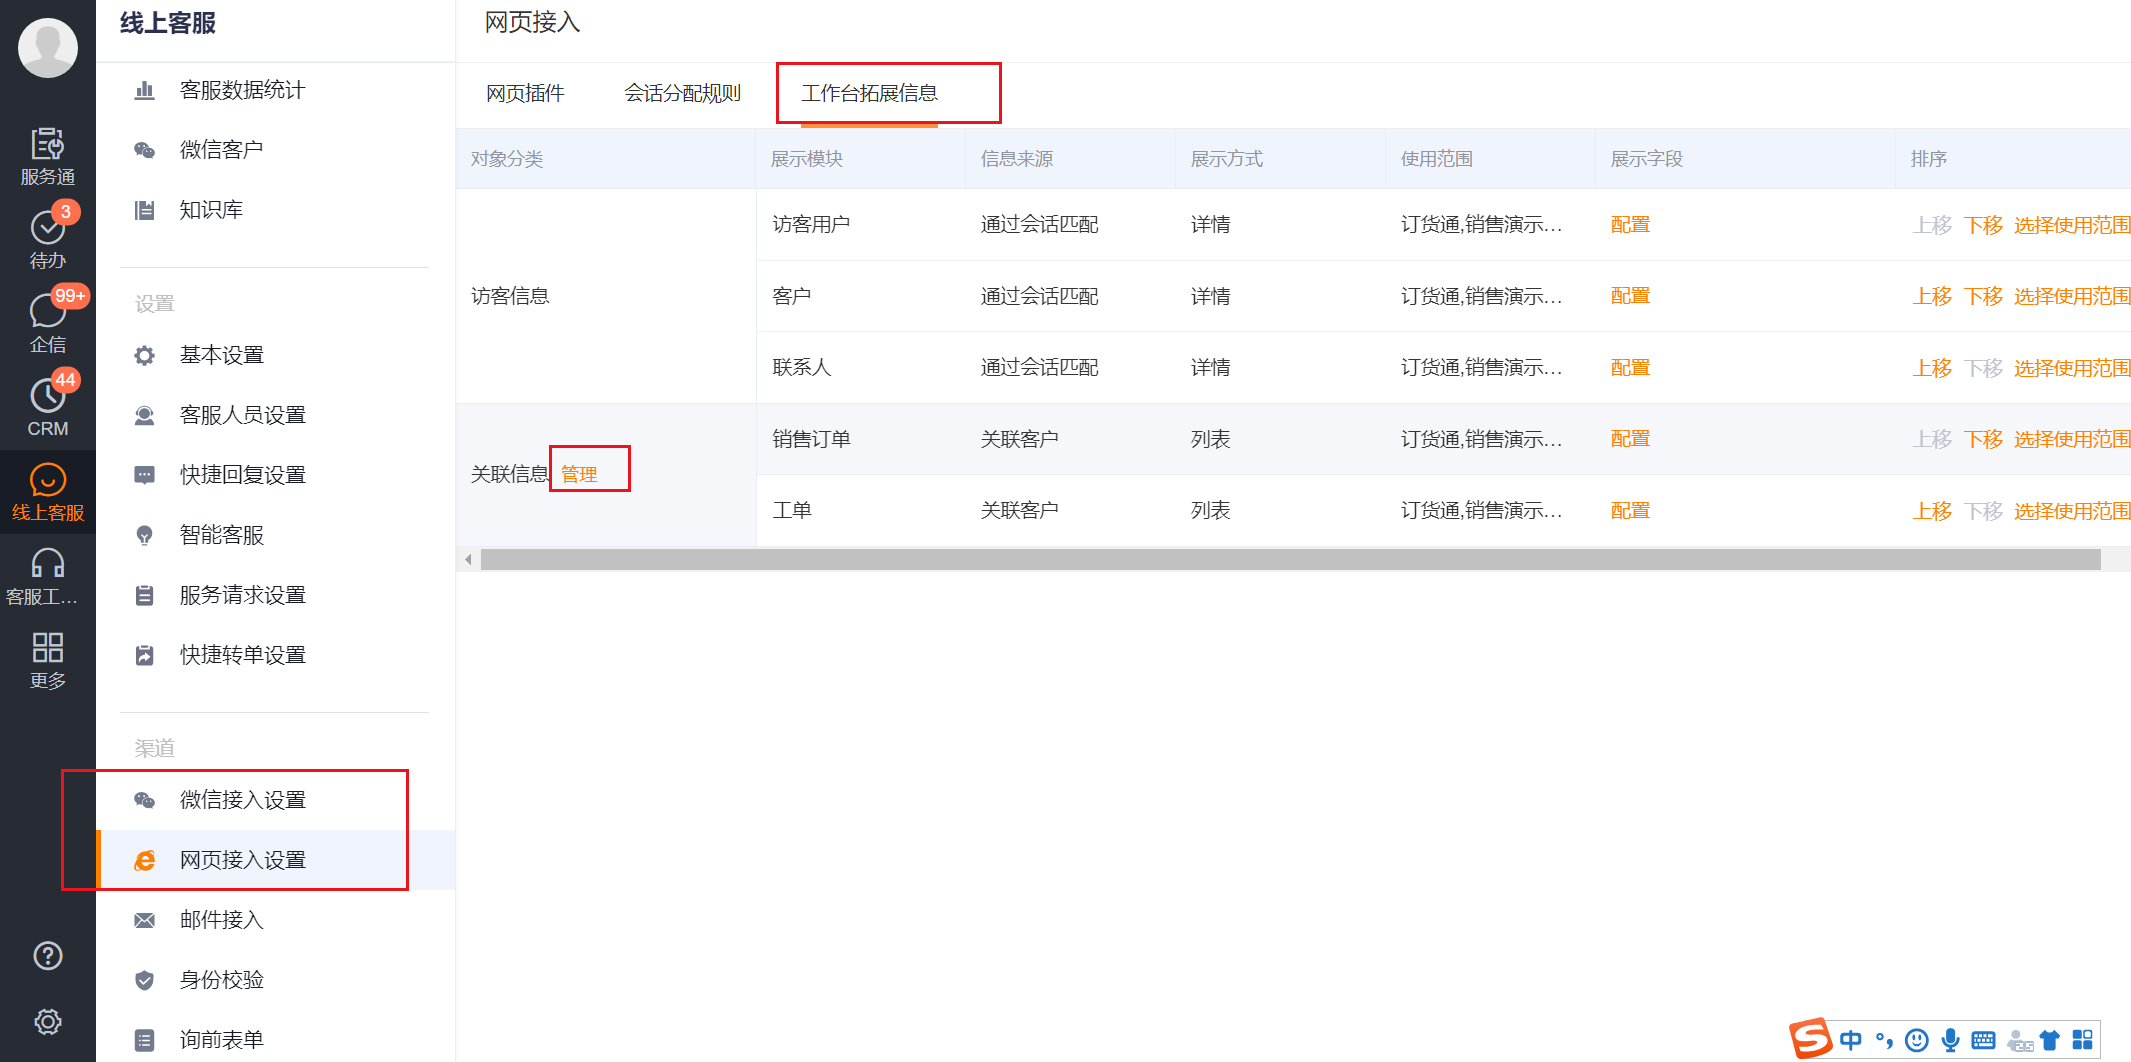
Go to Online Customer Service > Web/WeChat Access Settings and select the target channel.
Open Workbench Extension Information > Related Information and click Manage.
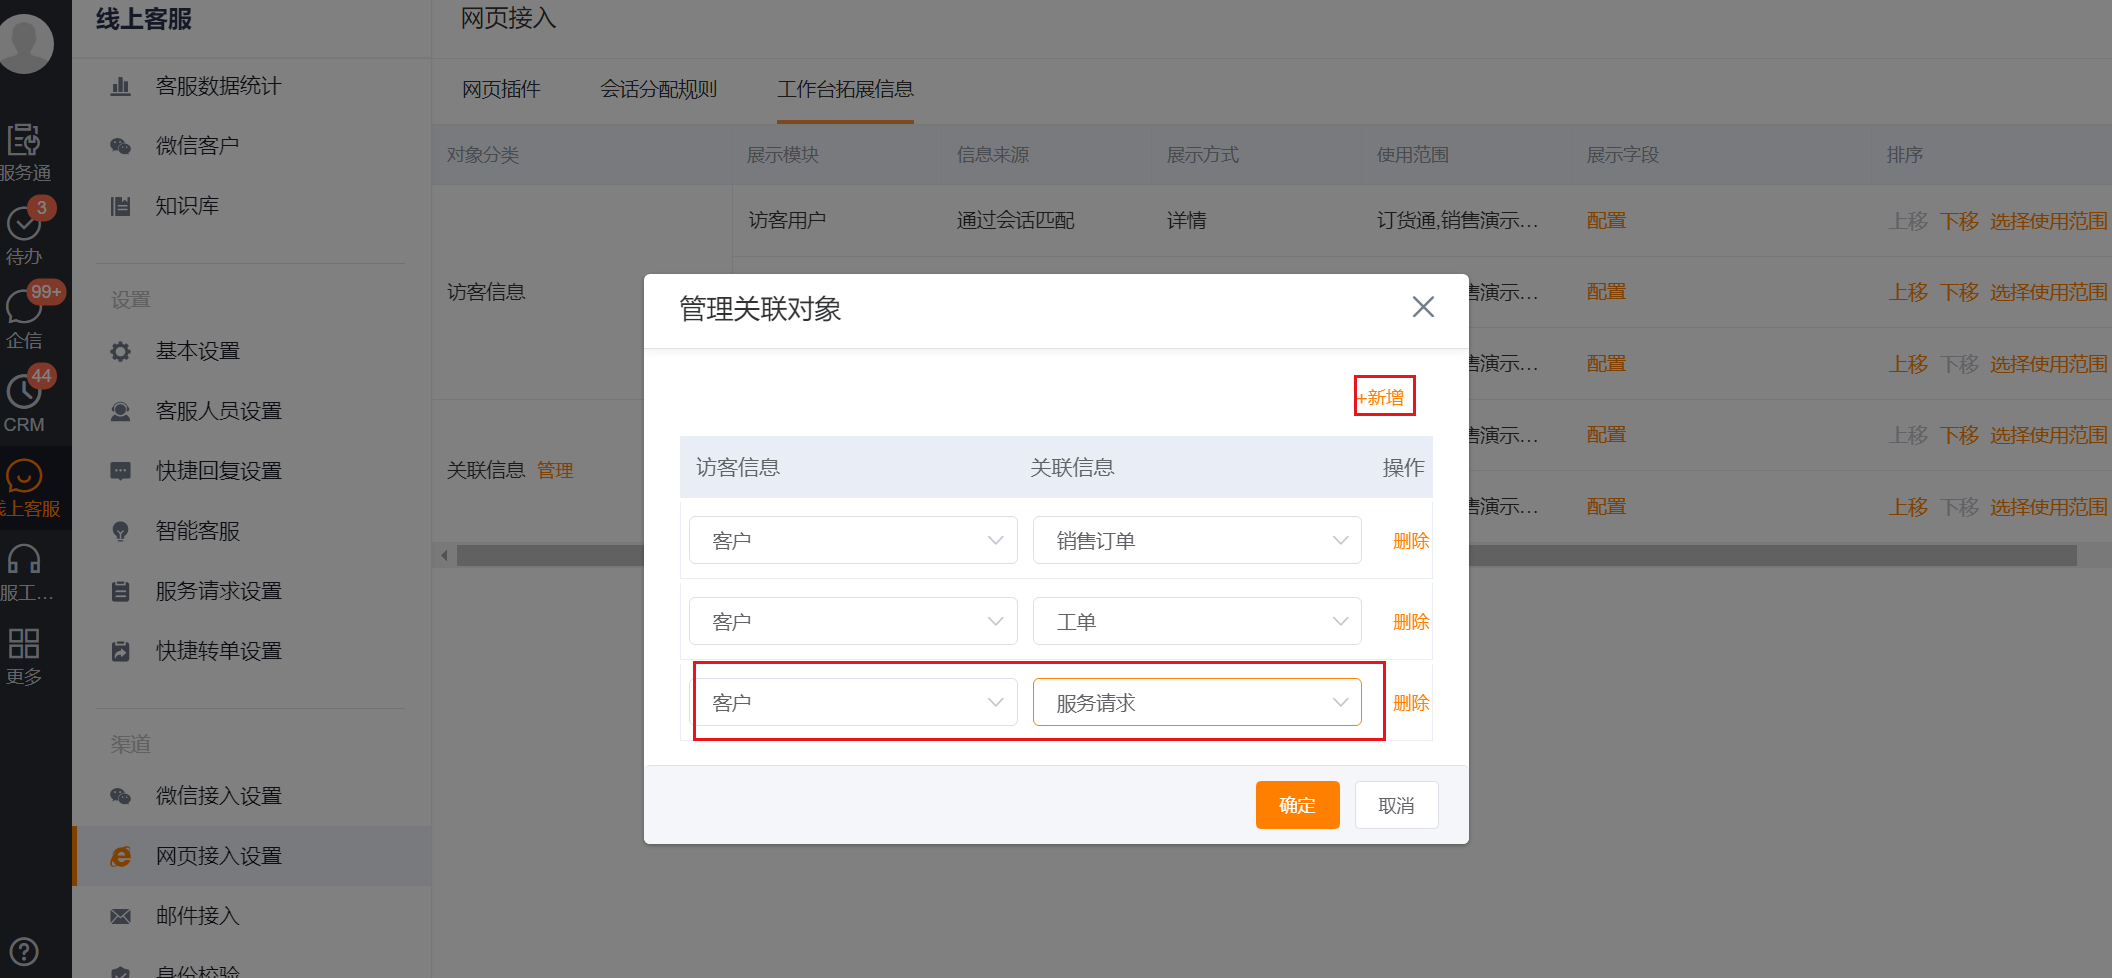
Add Service Request to the associated object and confirm to save.
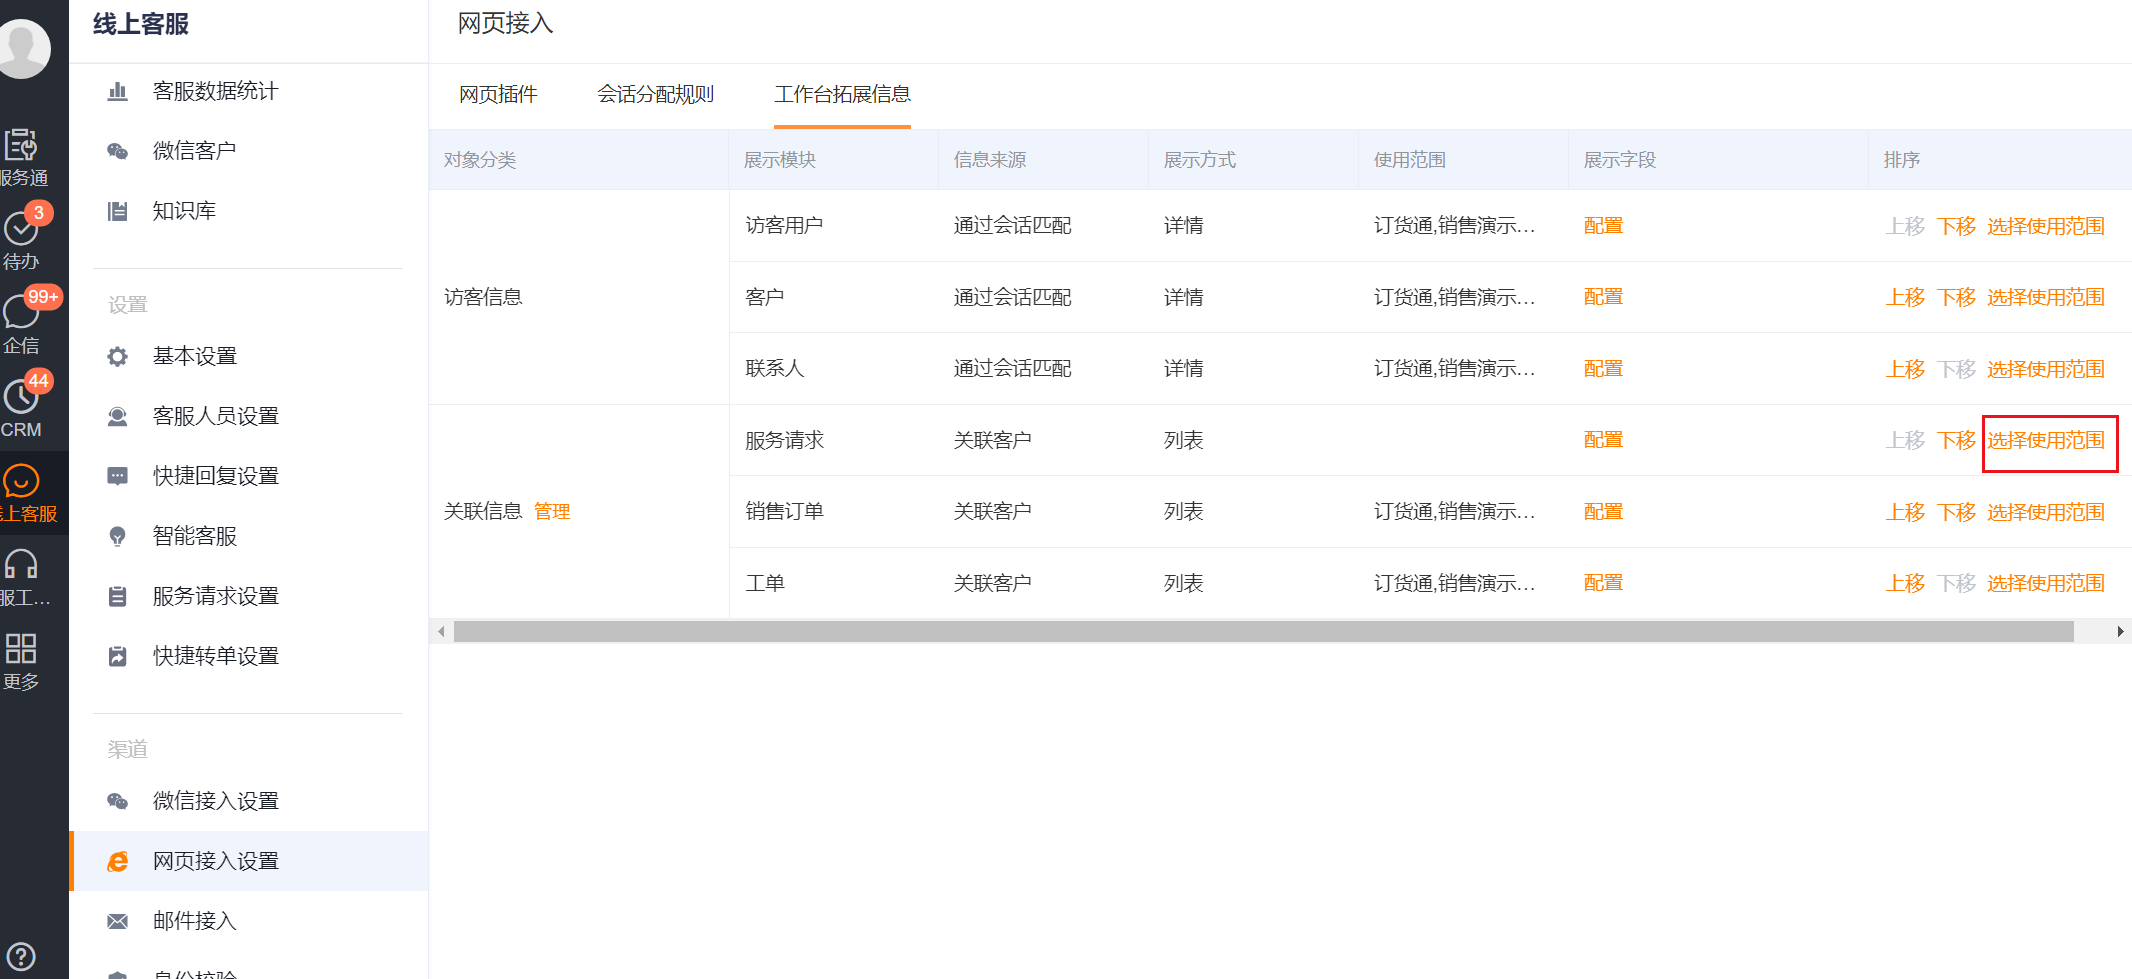
Click Select usage scope in the service request line, and check the web page or WeChat access channel where the portal needs to be displayed.
Use the customer service account of the target channel to enter the customer service workbench and confirm that Service Request and the new entry are displayed in the related information area.
Configure end-user self-service submission
Enable end-user submission
- Enter the Basic Settings of the service request.
- Enable End User Submission.
- If only registered Internet users are allowed to submit, guest status will not be enabled for the time being.
This switch only allows end users to submit, and will not automatically complete the public account menu and external role permission configuration.
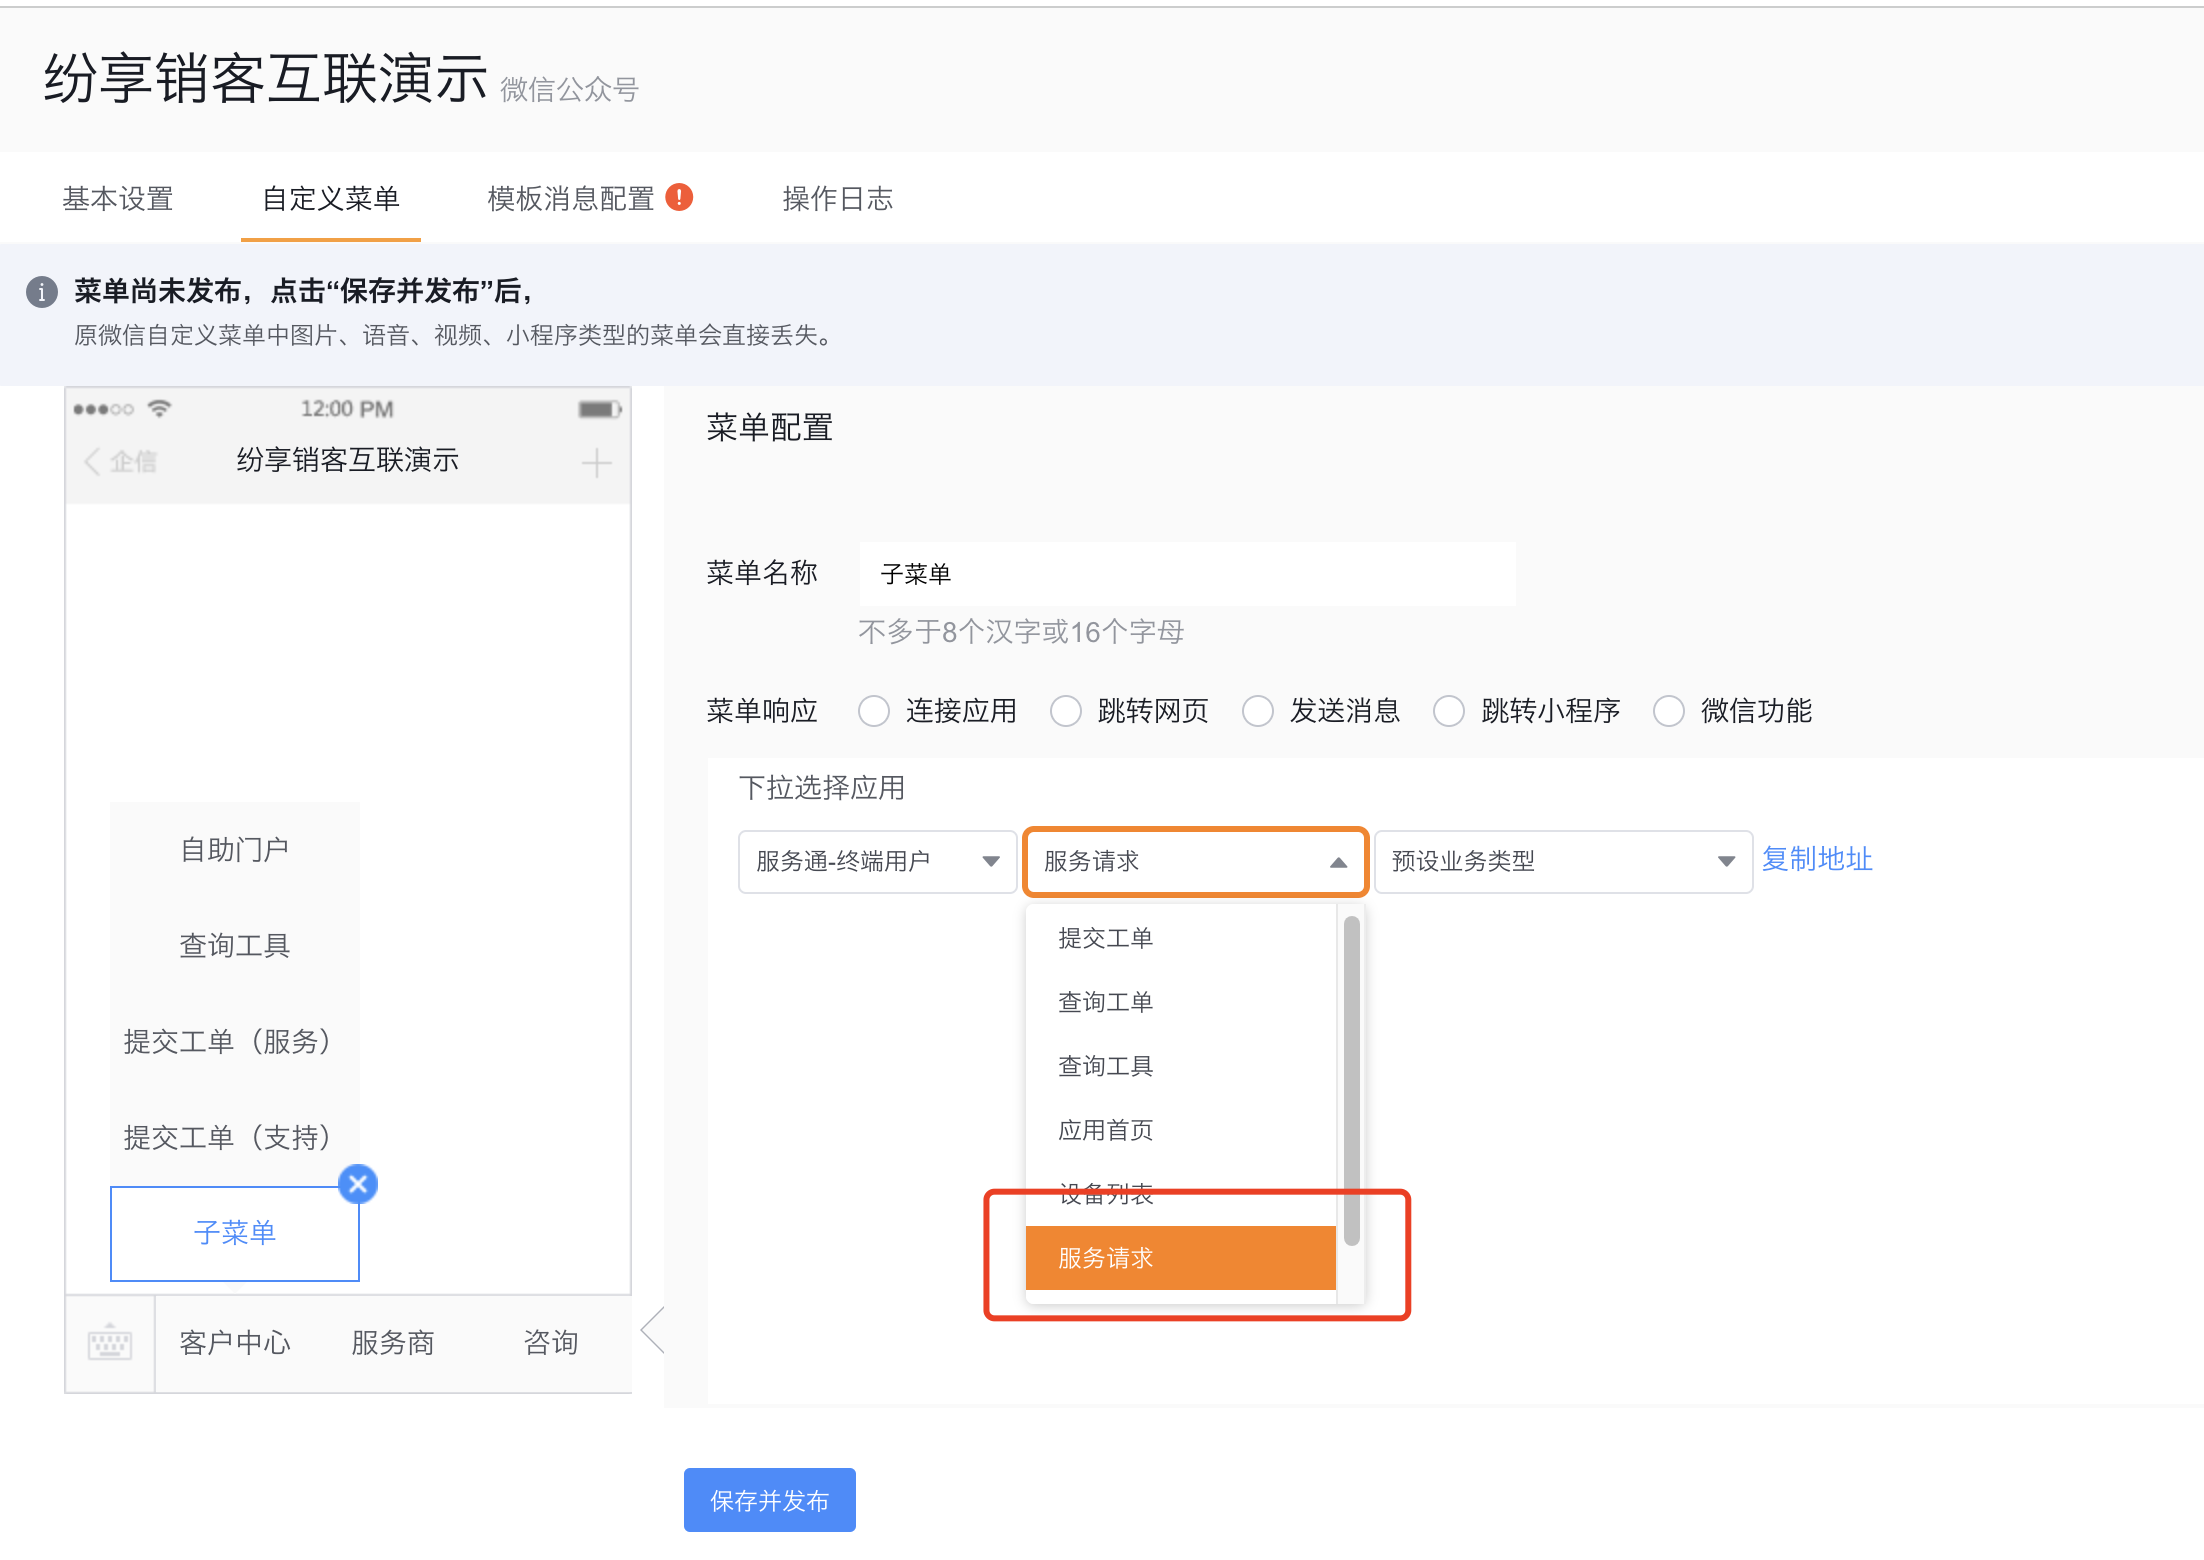
Configure WeChat public account menu
- Confirm that the enterprise has accessed the WeChat official account.
- Enter the custom menu configuration of the WeChat official account.
- Add or edit the menu, and select Service Request in Service Pass - End User.
- Click Save and Publish to make the menu available to end users.
Configure external user permissions
- Enter Admin Backstage > Internet Role > Personal User > Permission Settings.
- Grant at least the View List, View Details and New permissions required by the business under the Service Request object.
- Continue to configure field permissions and data sharing permissions based on the enterprise's data boundaries. Do not infer that users can view all requests based on object permissions alone.
- After saving, use the personal user test account to create a new service request from the official account entrance.
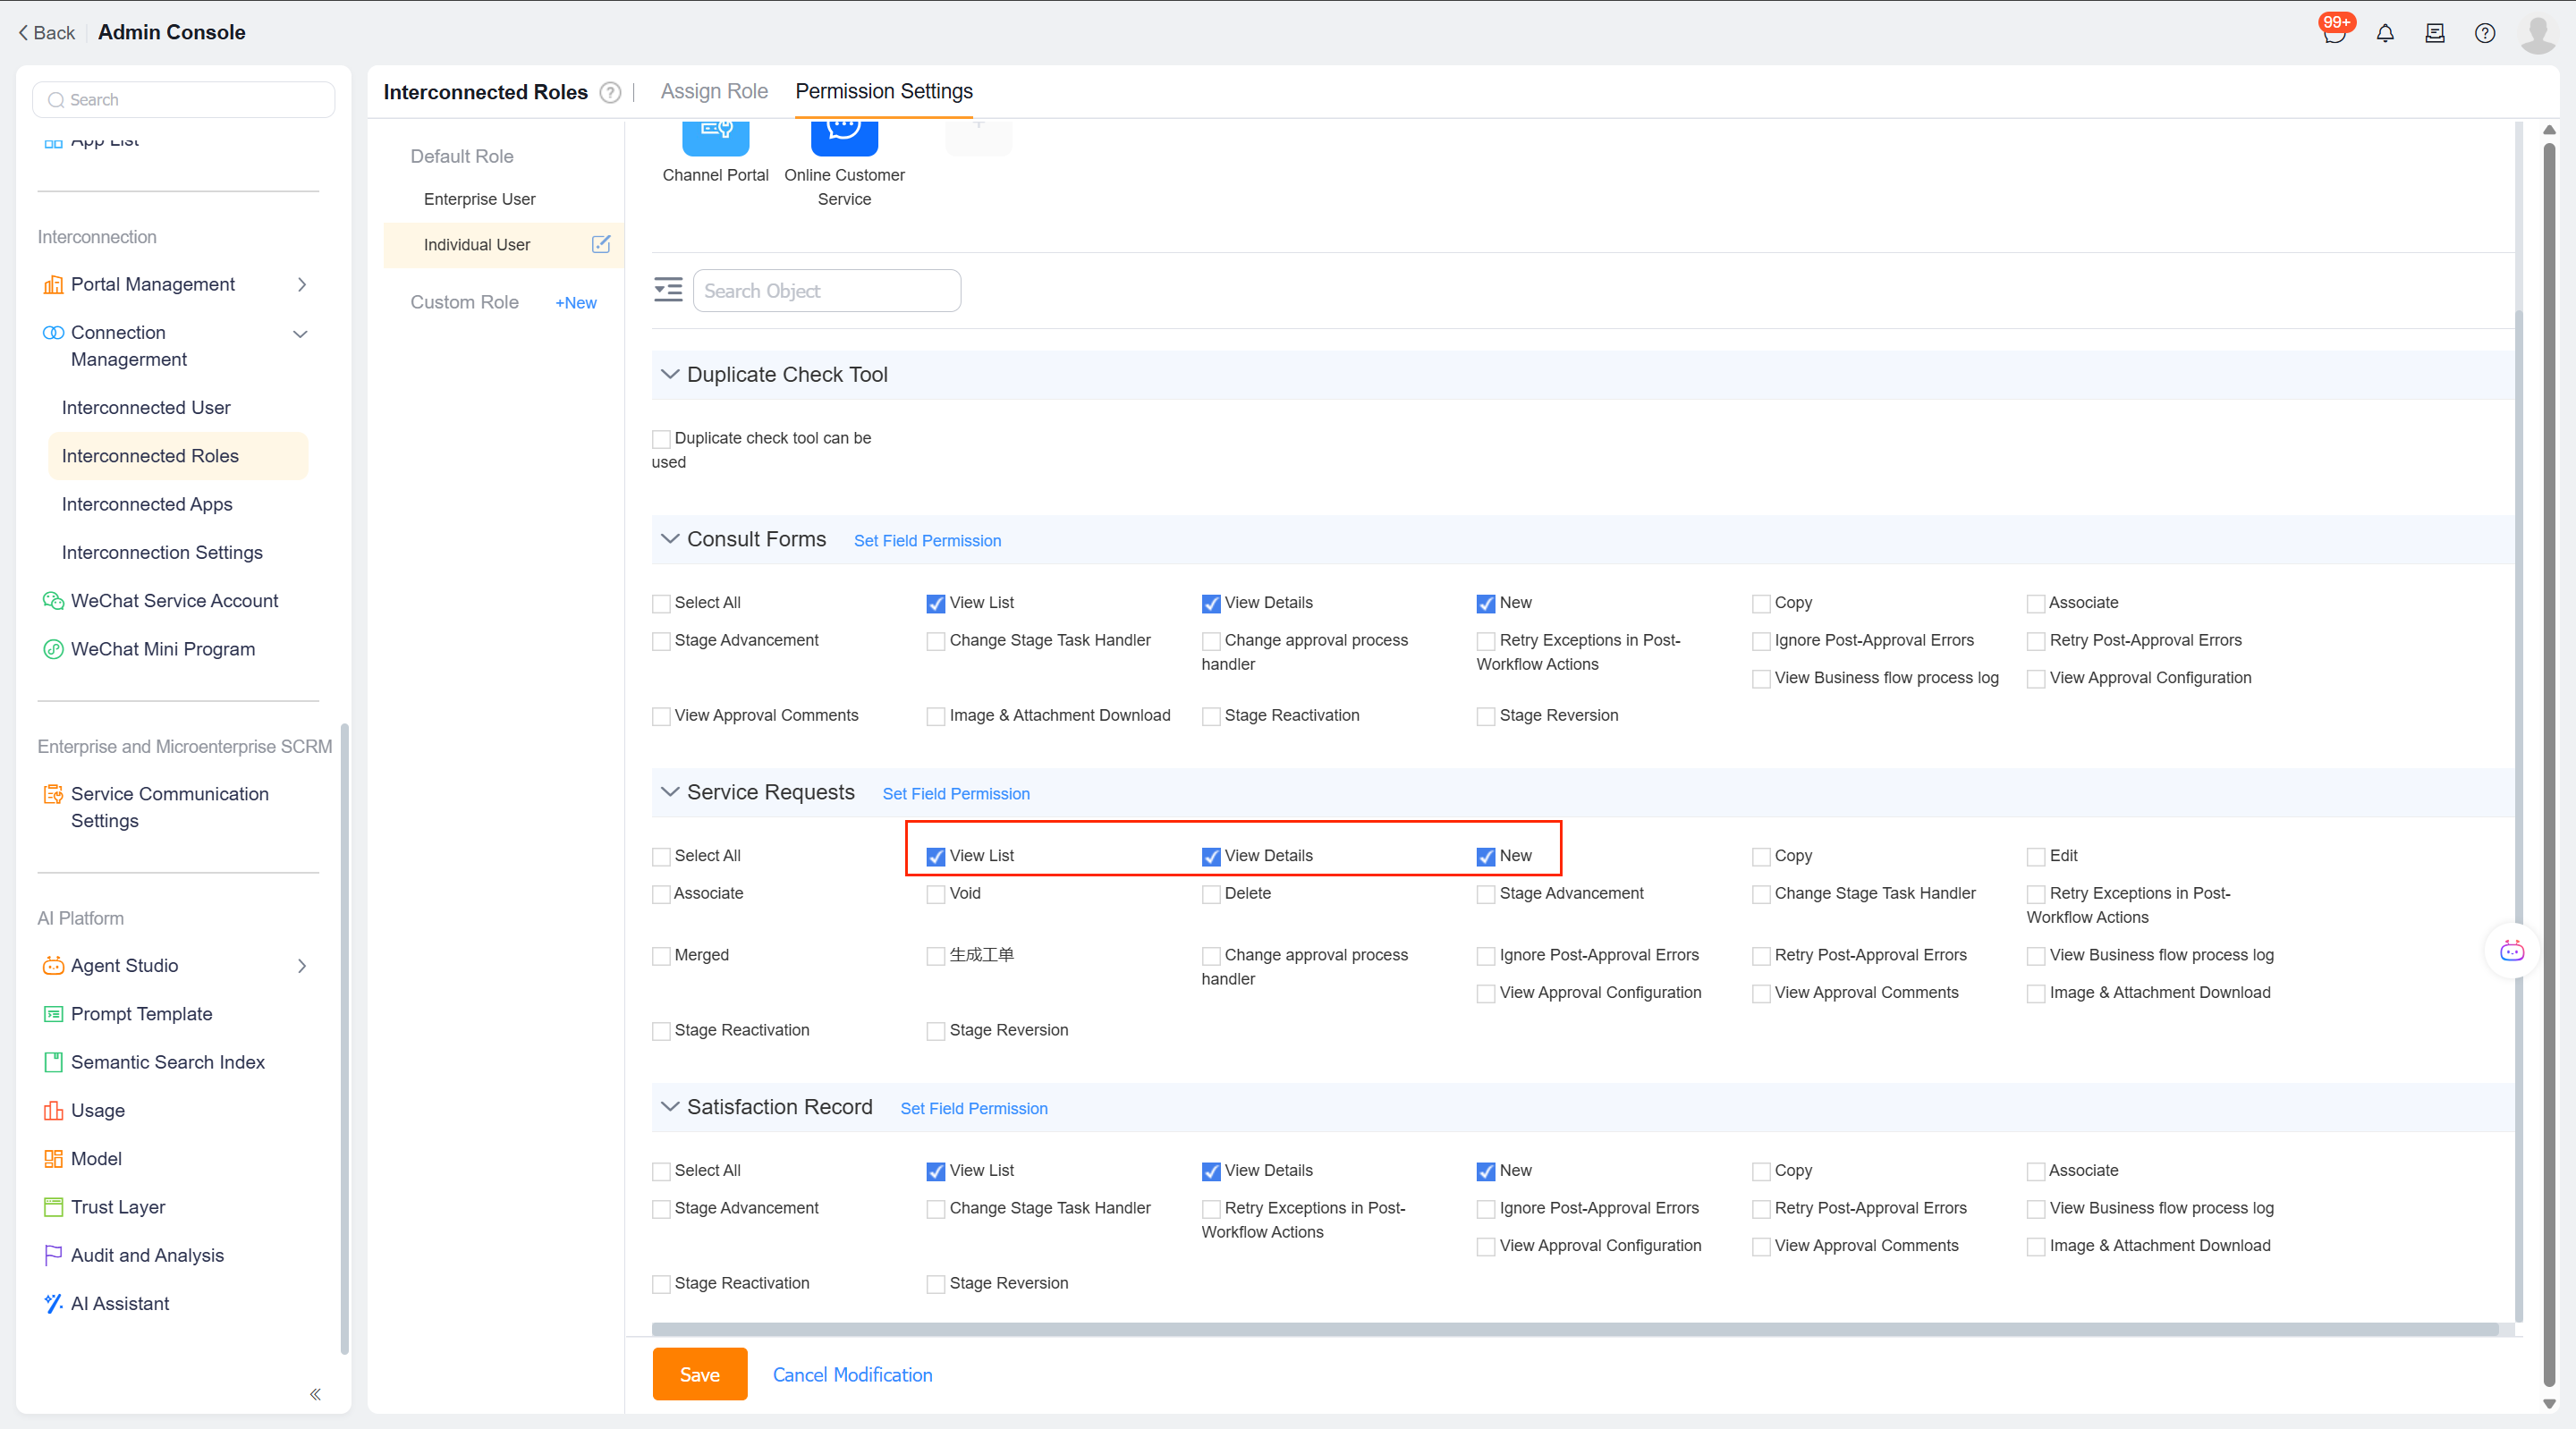
The fields and layout of the service request form can be adapted to the needs of the business. After the required fields are added, the submission should be re-verified using the end user account.
Configure guest submission
Guest status is only enabled if the enterprise allows submissions from unregistered users. Registered Internet users can submit, but it does not mean that visitors can also submit.
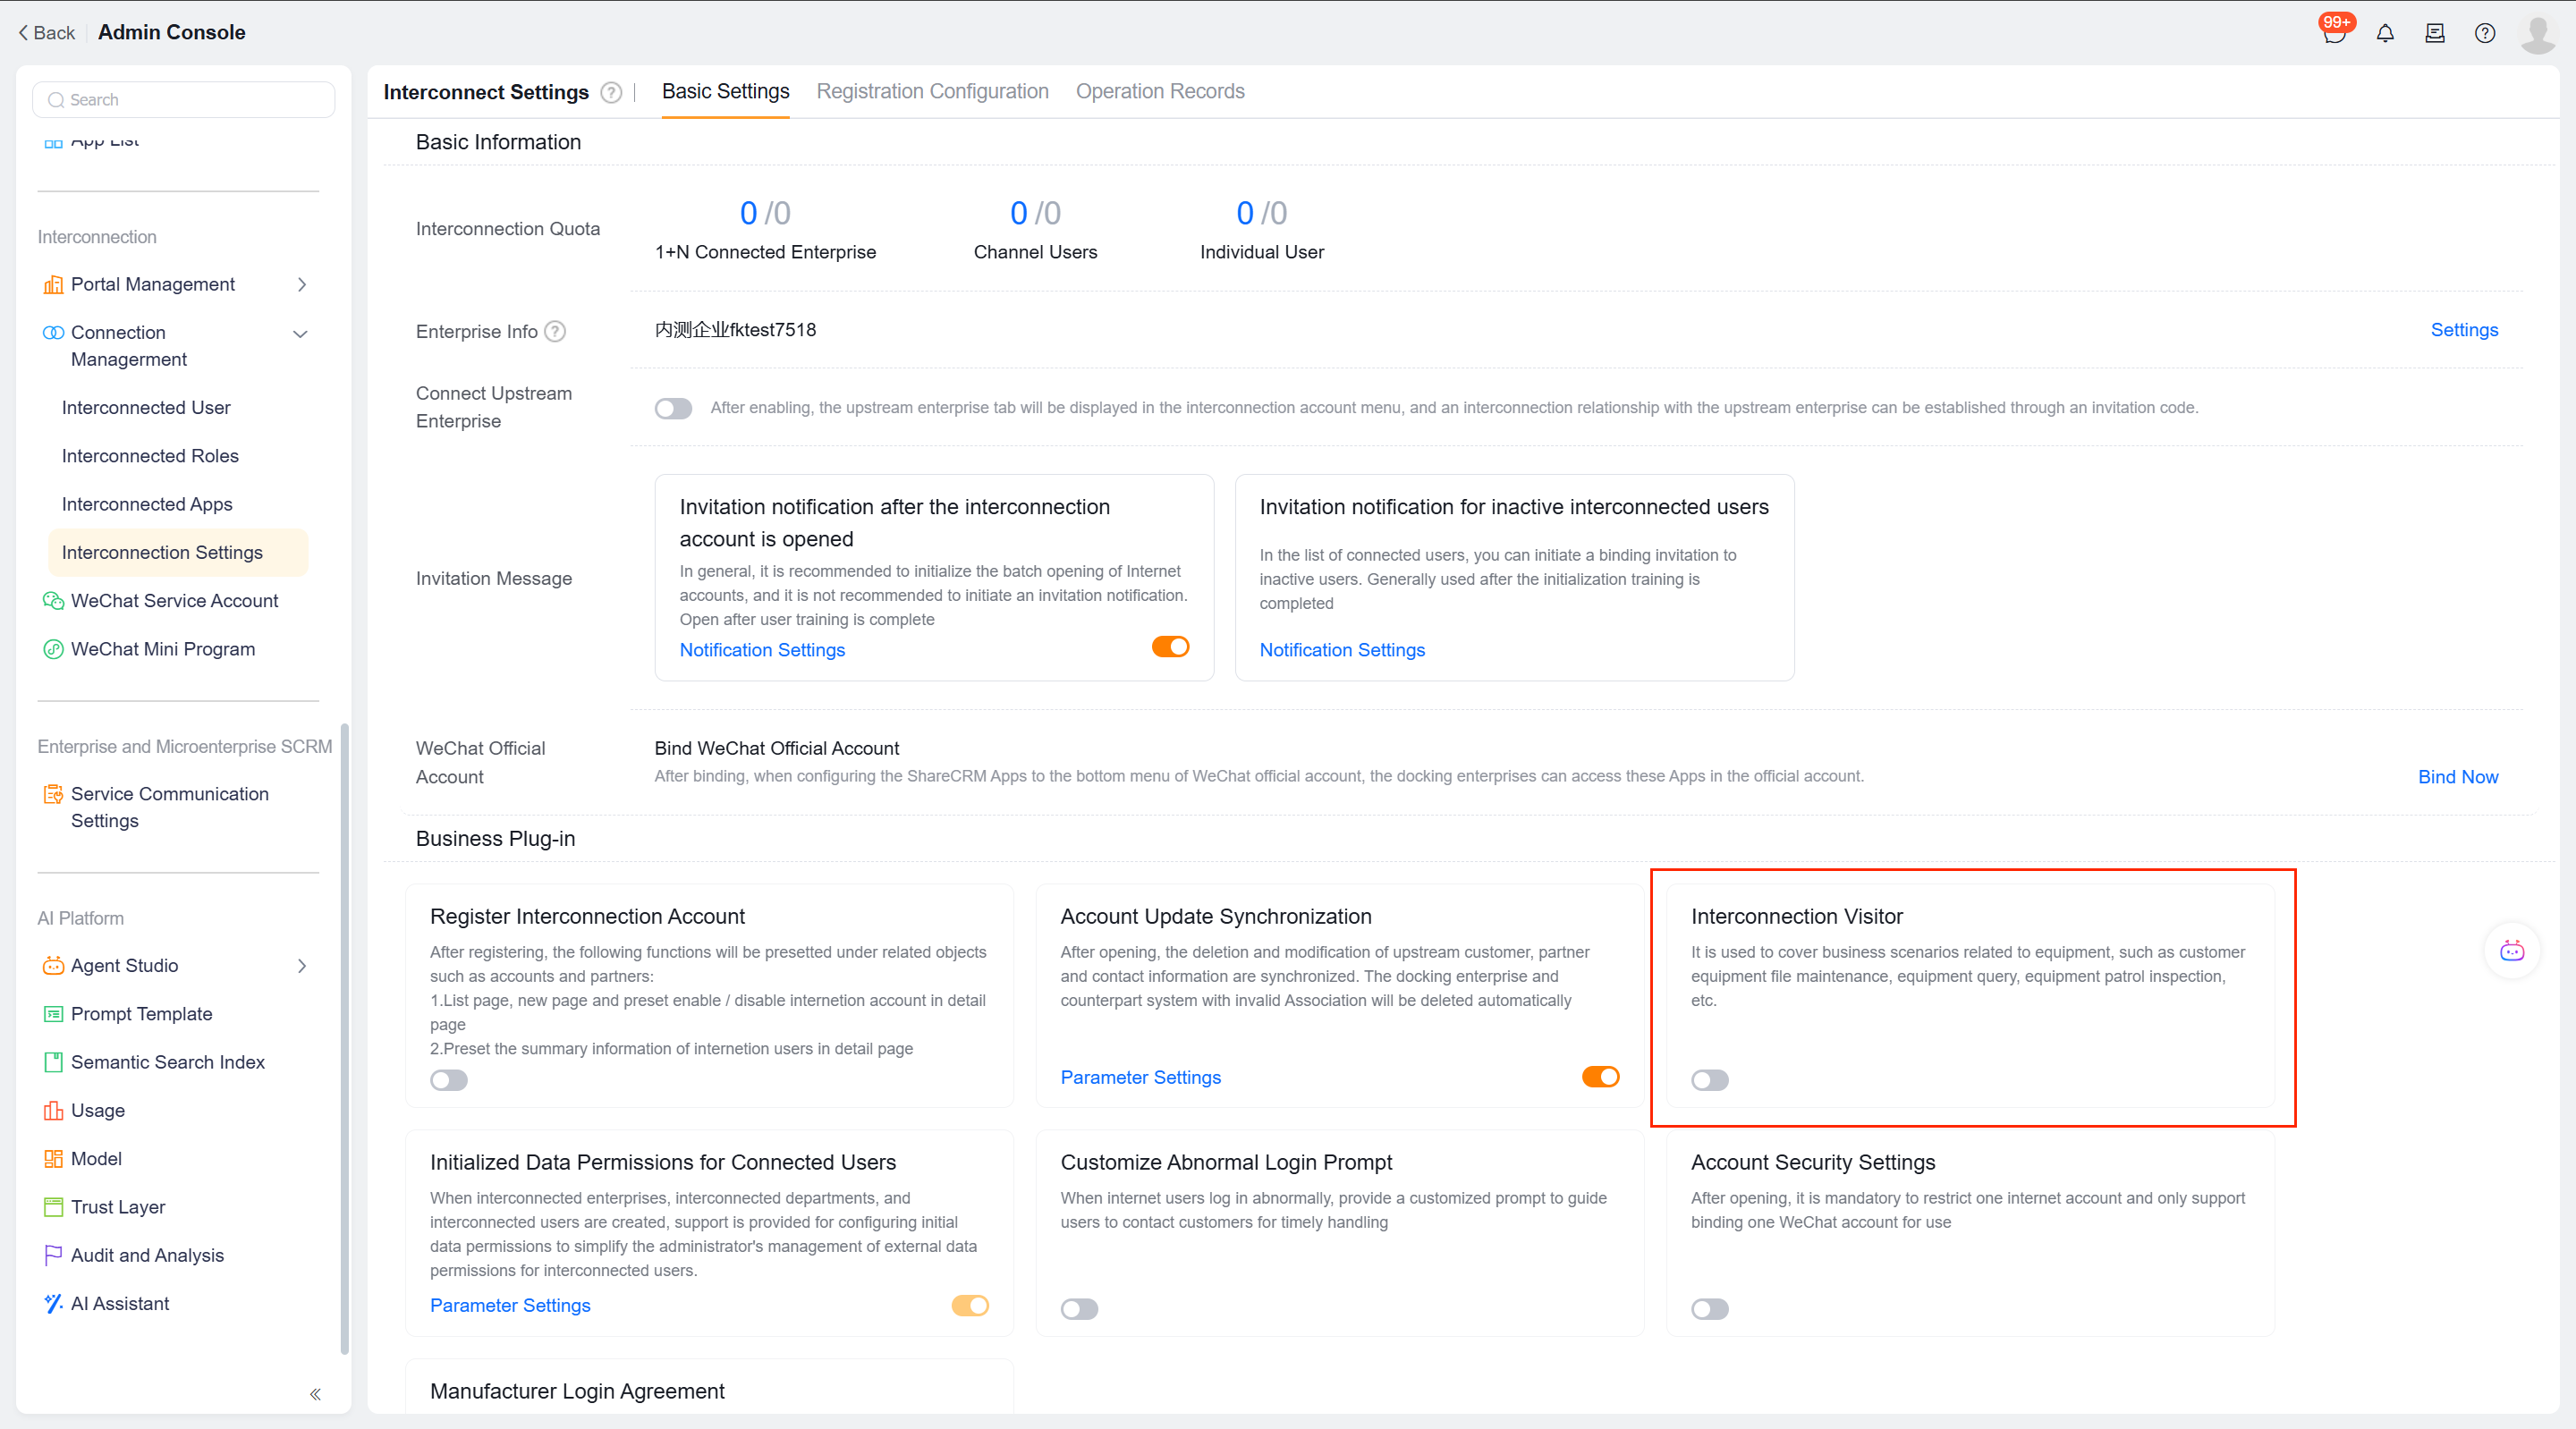
Enter Admin Backstage > Internet Management > Internet Settings > Basic Settings.
Find Connected Guest Identity and enable it.
Open the parameter setting of the visitor identity, select the associated customer according to the page requirements and save it.
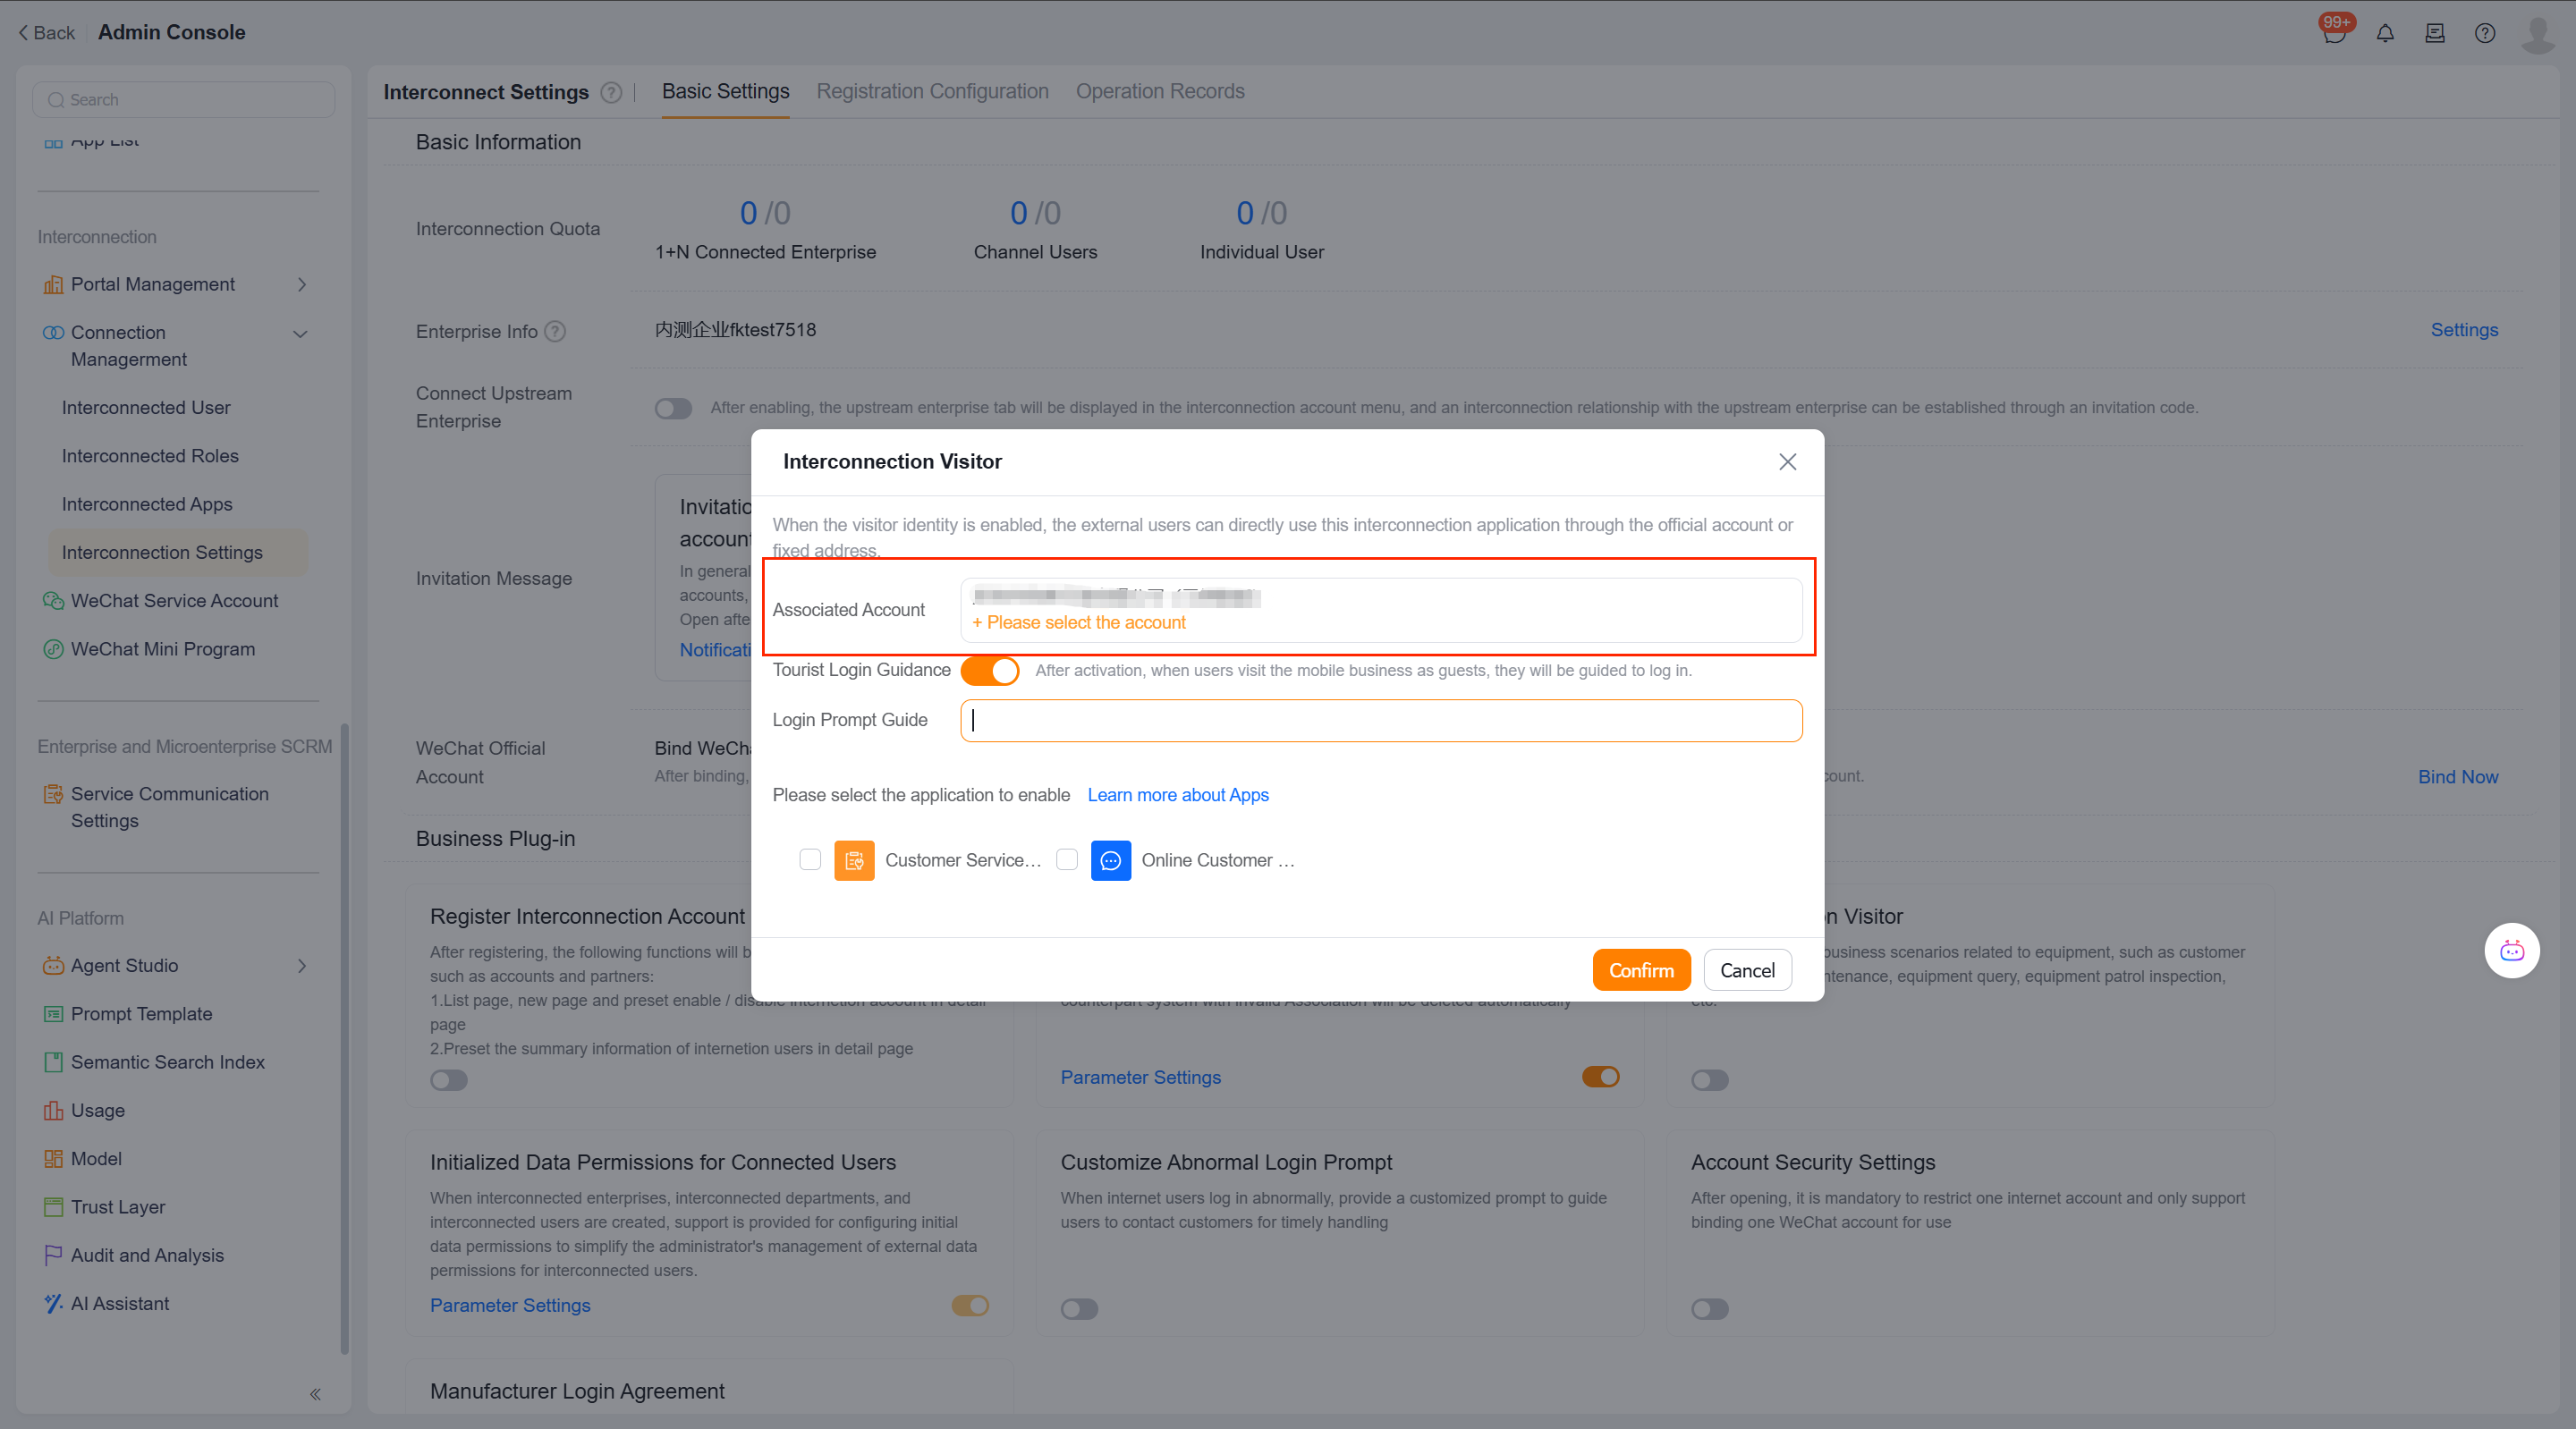
Confirm that the Internet Visitor Identity switch is enabled.
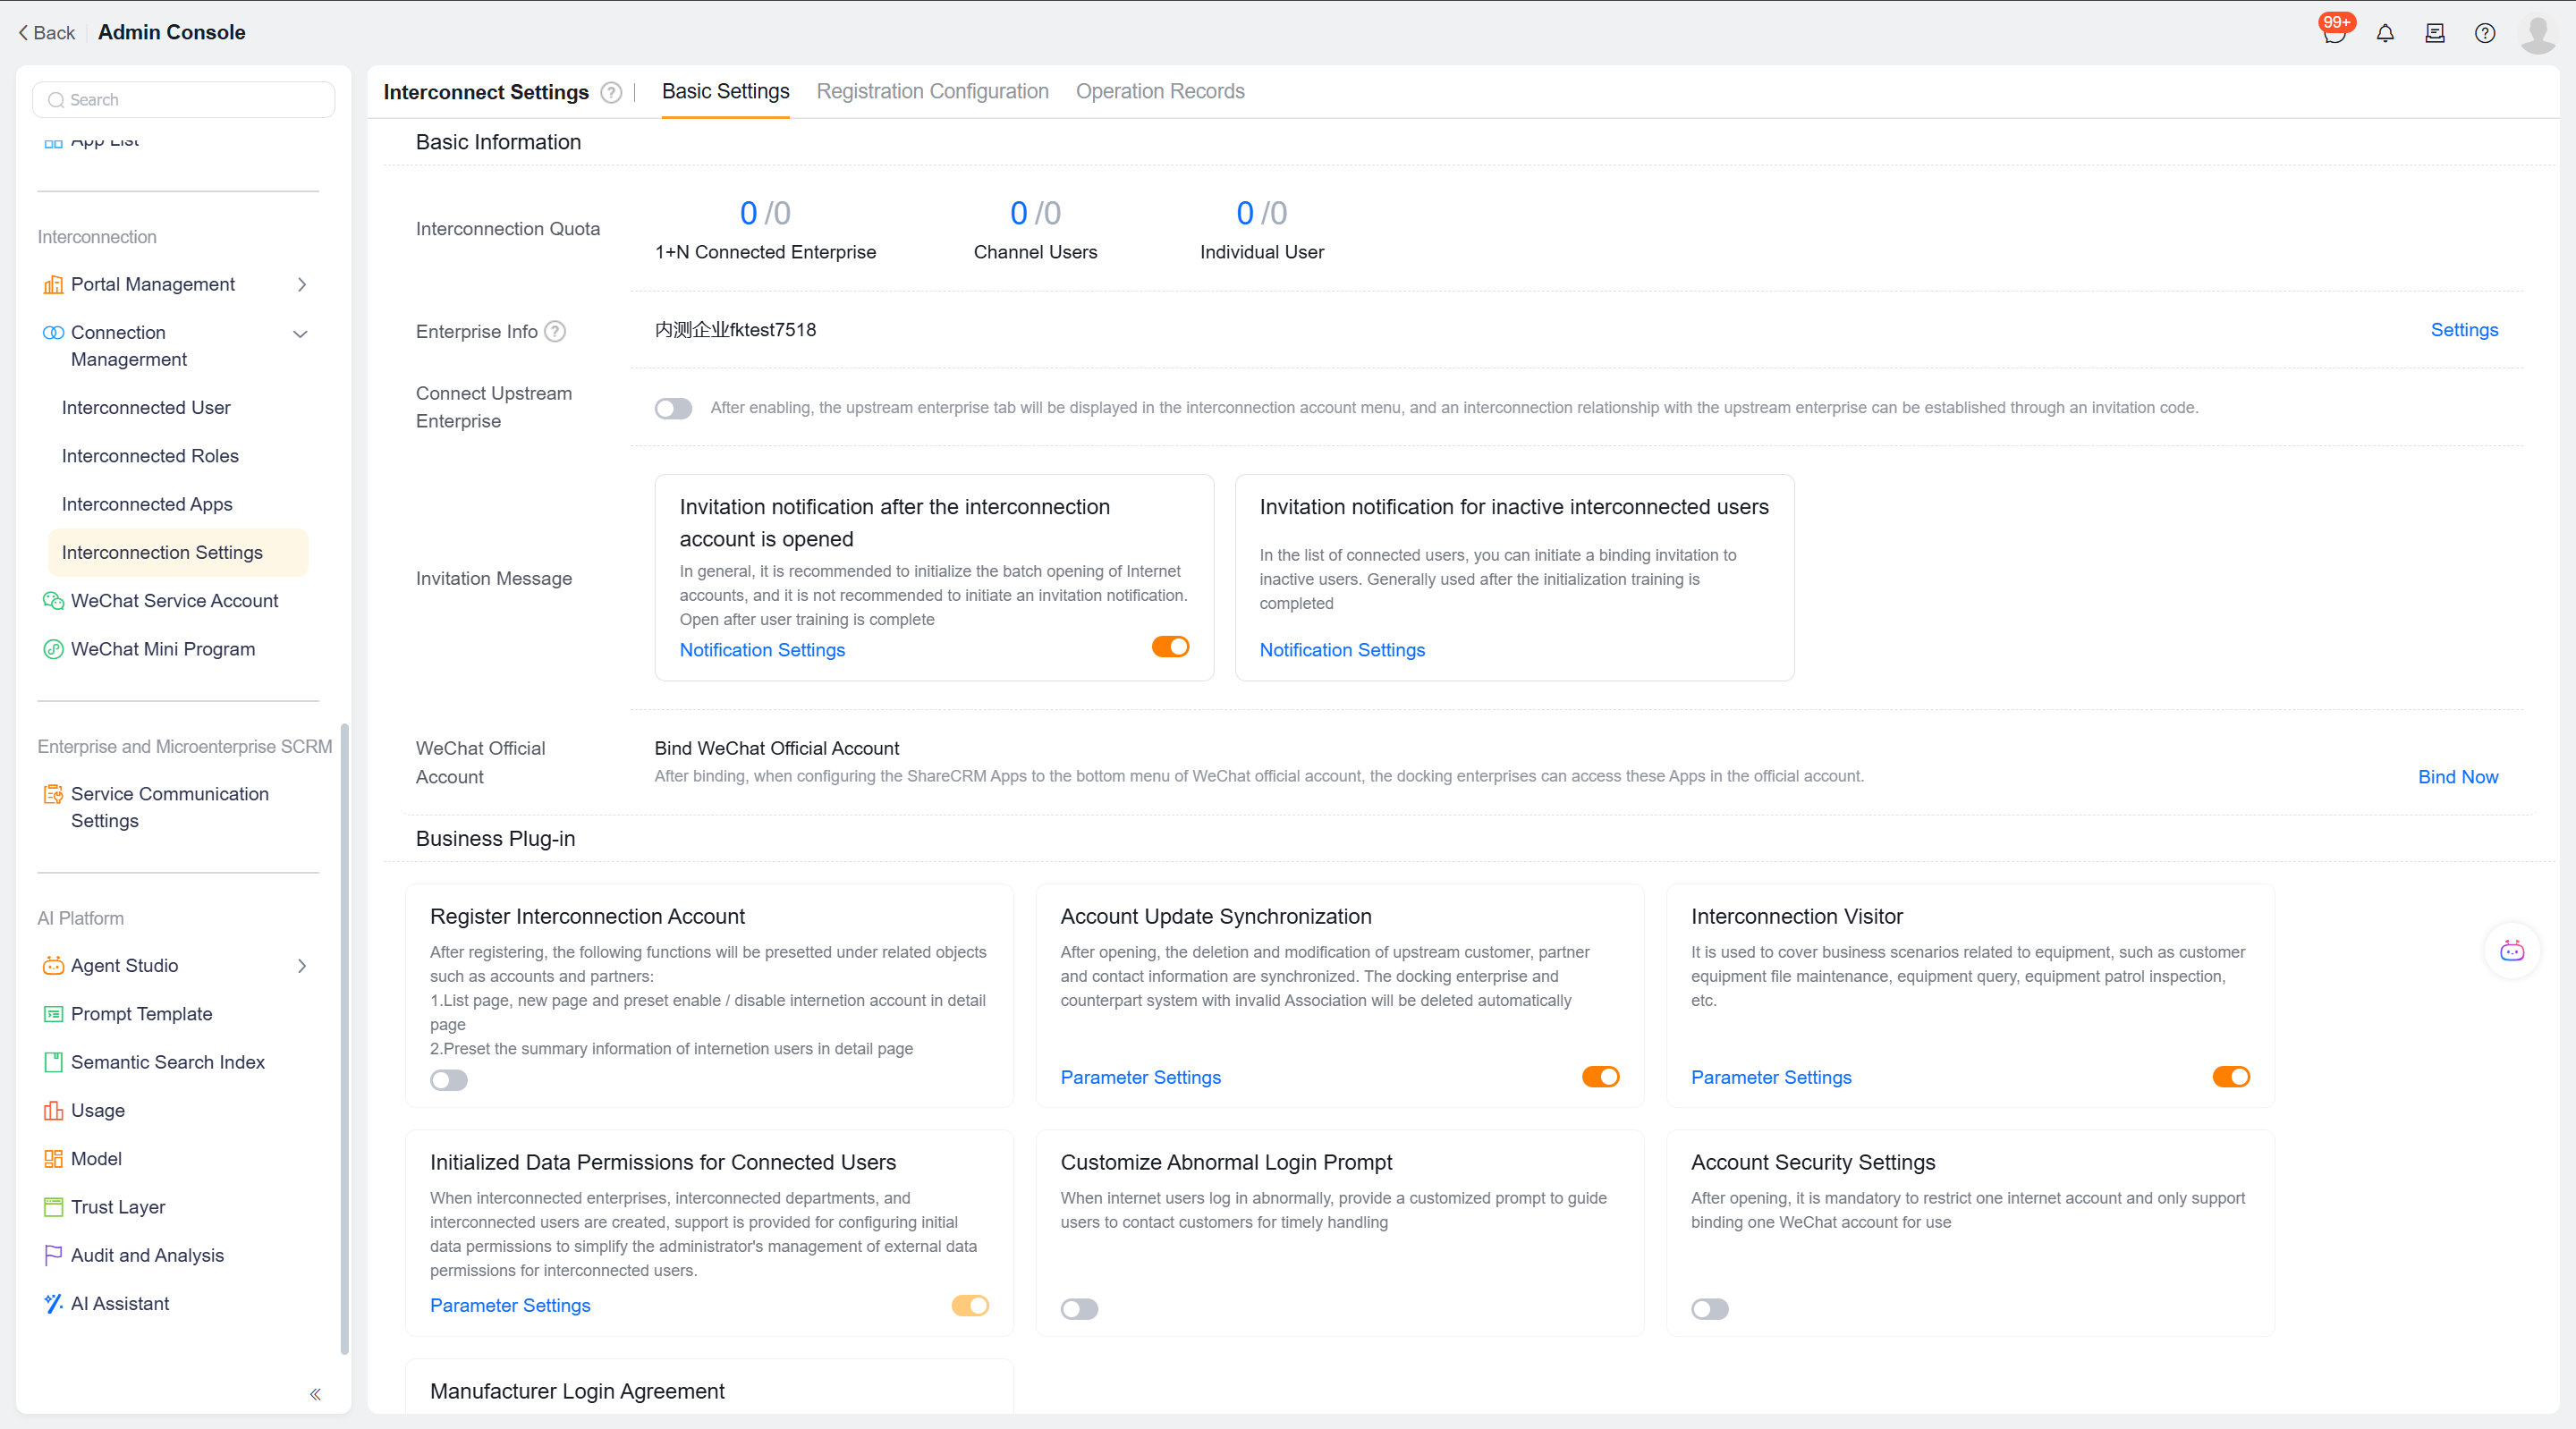
Use a non-login or non-registered environment to access the service request portal and verify whether the form can be opened and submitted.
WARNING
The visitor entrance will expand the scope of submissions. Before going online, you should check whether the public form contains customers, contacts, or internal fields that should not be exposed, and verify that the required information is sufficient for customer service to contact the submitter.
Configure service request distribution
Requests submitted by end users themselves need to enter the acceptance process. The administrator needs to confirm the customer service group, assignment rules and process assignment at the same time.
Configure the intake agent group
- Open the Acceptance Customer Service Group in the service request settings.
- Add the customer service group and members responsible for accepting service requests.
- After saving, check whether the test account in the group has the customer service role and to-do access rights.
Configure automatic allocation and assignment rules
- Enable Automatic allocation of service requests in Basic Settings.
- Click to set or open the Assignment Rules tab.
- Create an assignment rule. Set its service request scope, assignment method, priority, and activation status.
- Adjust the priorities of rules that may hit at the same time, and verify them separately using test requests with different conditions.
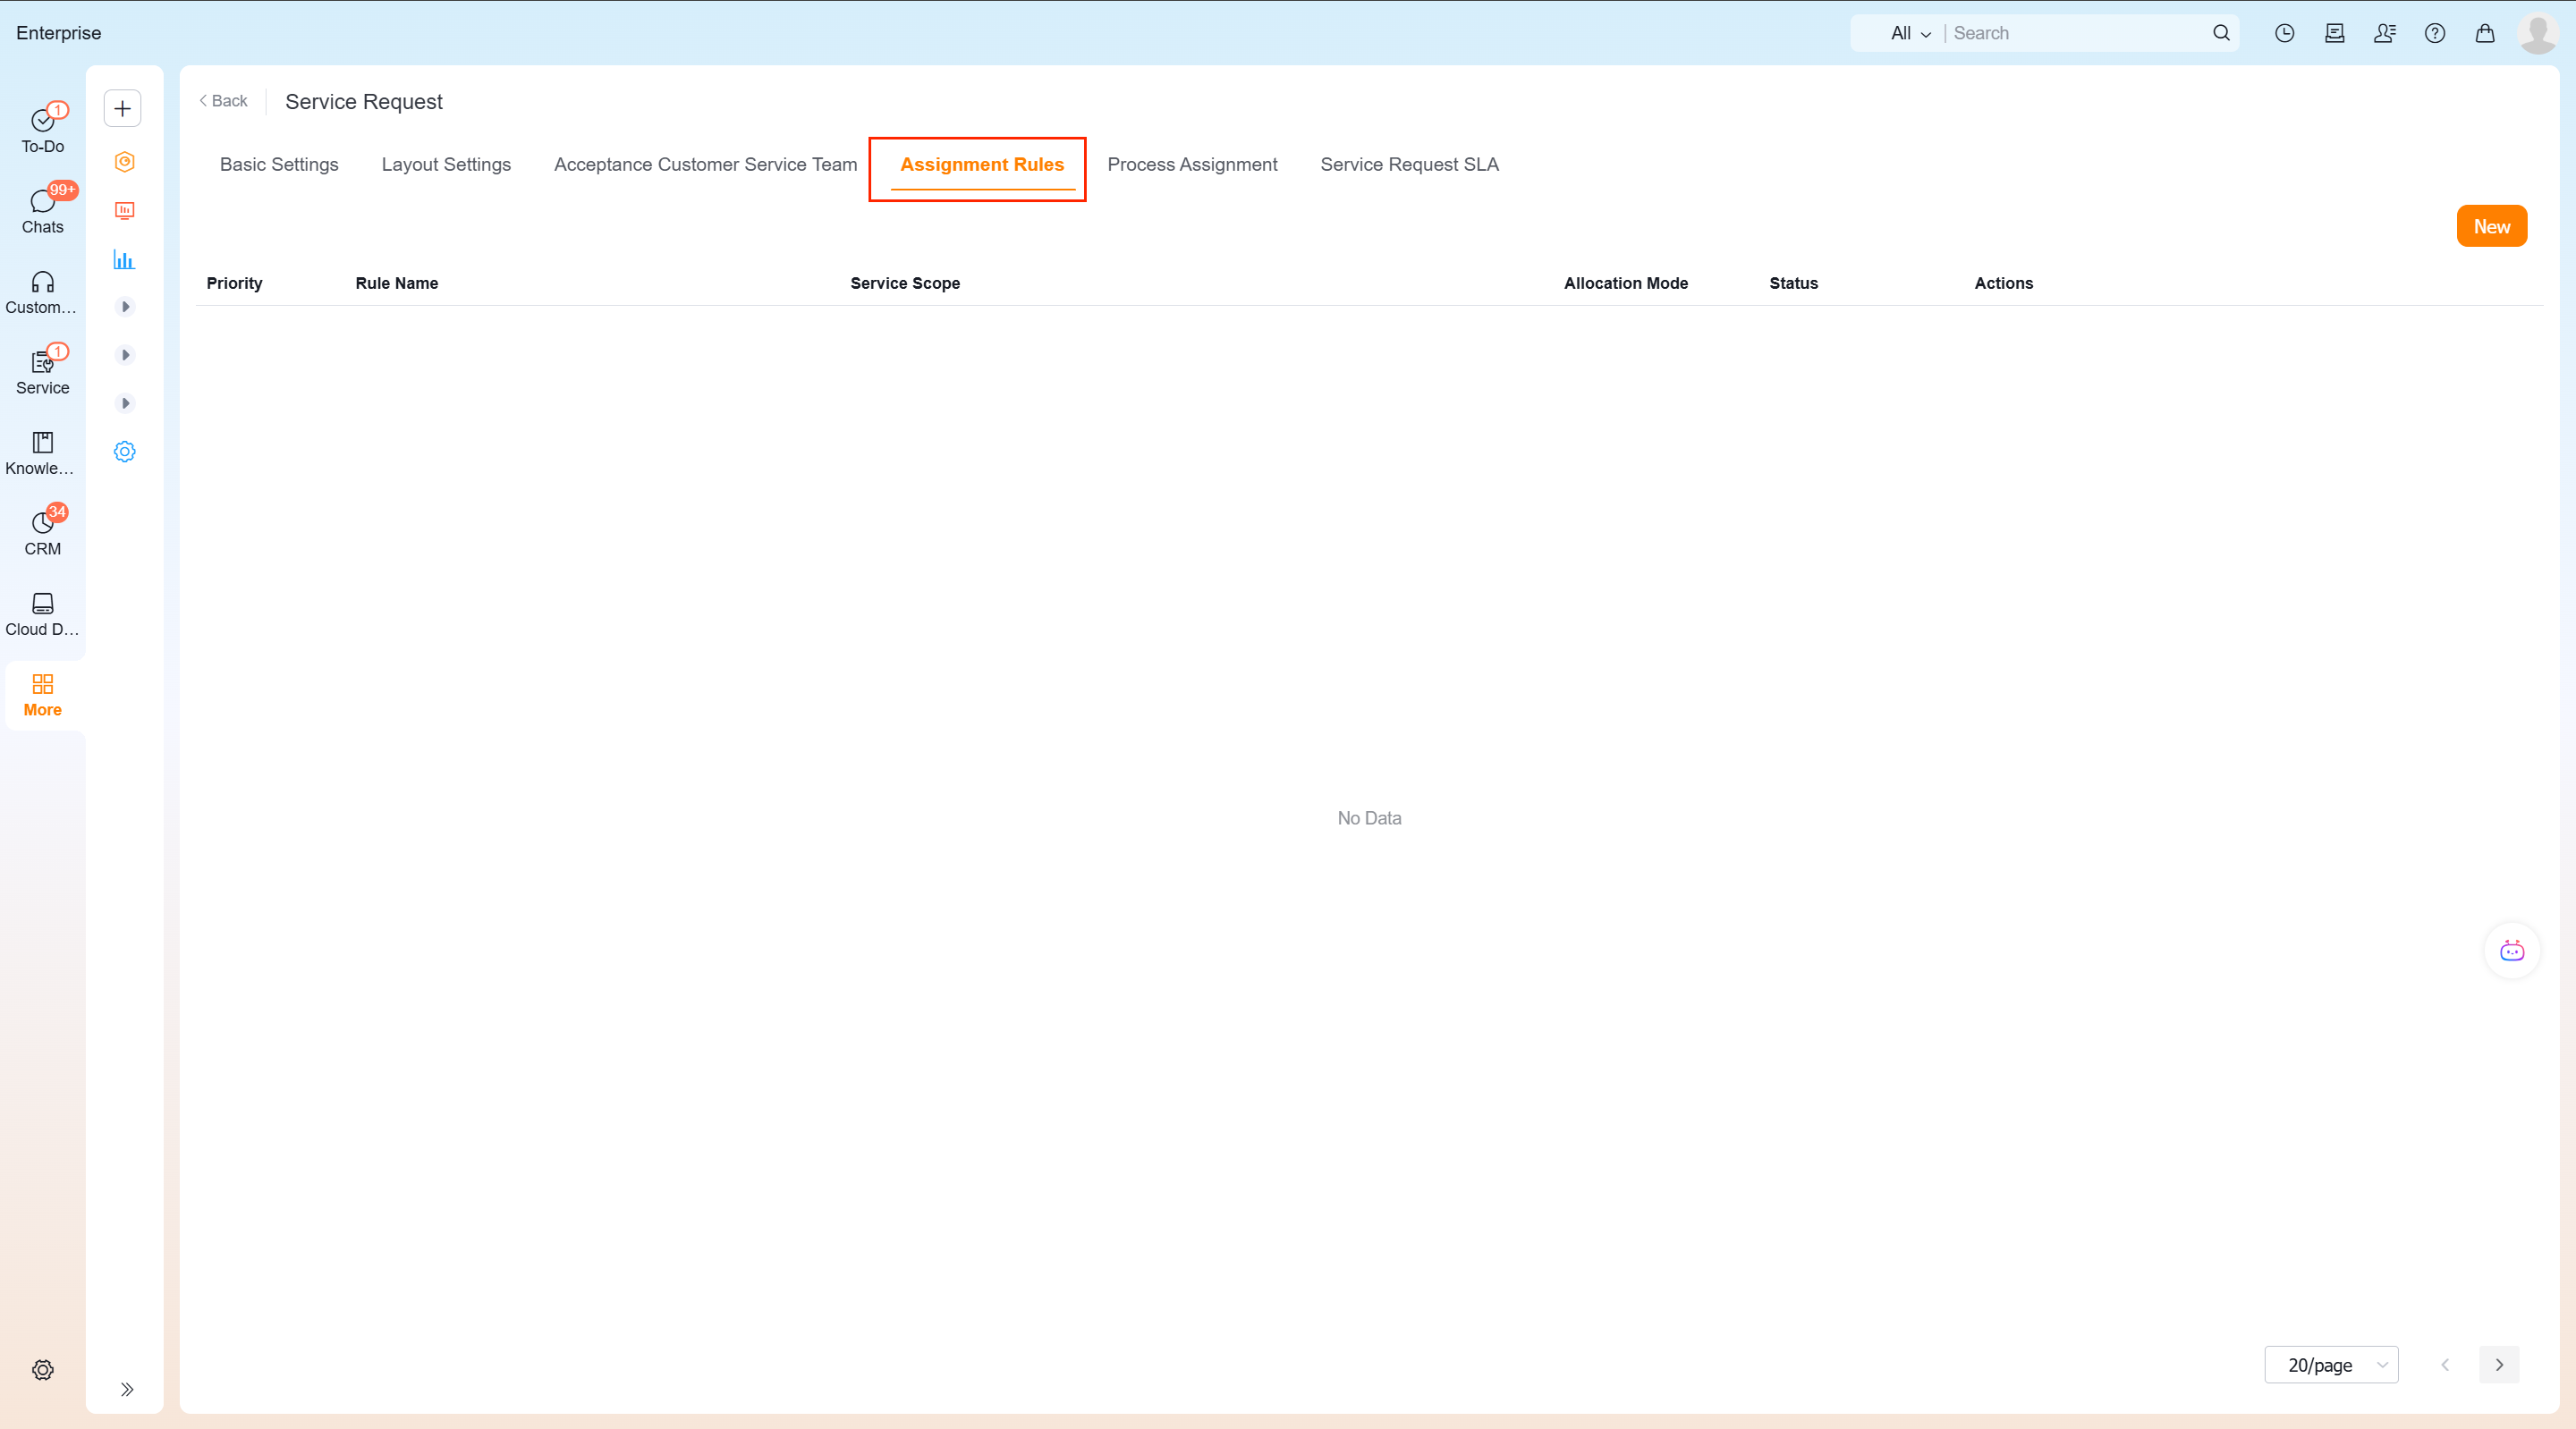
The source information states that service requests submitted by self-service can be assigned to the customer service group based on assignment rules. When a rule condition is not hit or automatic assignment is not enabled, it should not be assumed that the request will go to the intended agent group.
Configure service request process
- Open the Process Assignment tab.
- Select an existing service process for each service request business type, or create a new service process according to the page entry.
- Confirm that a business type only corresponds to the expected service process, save and then test the business type.
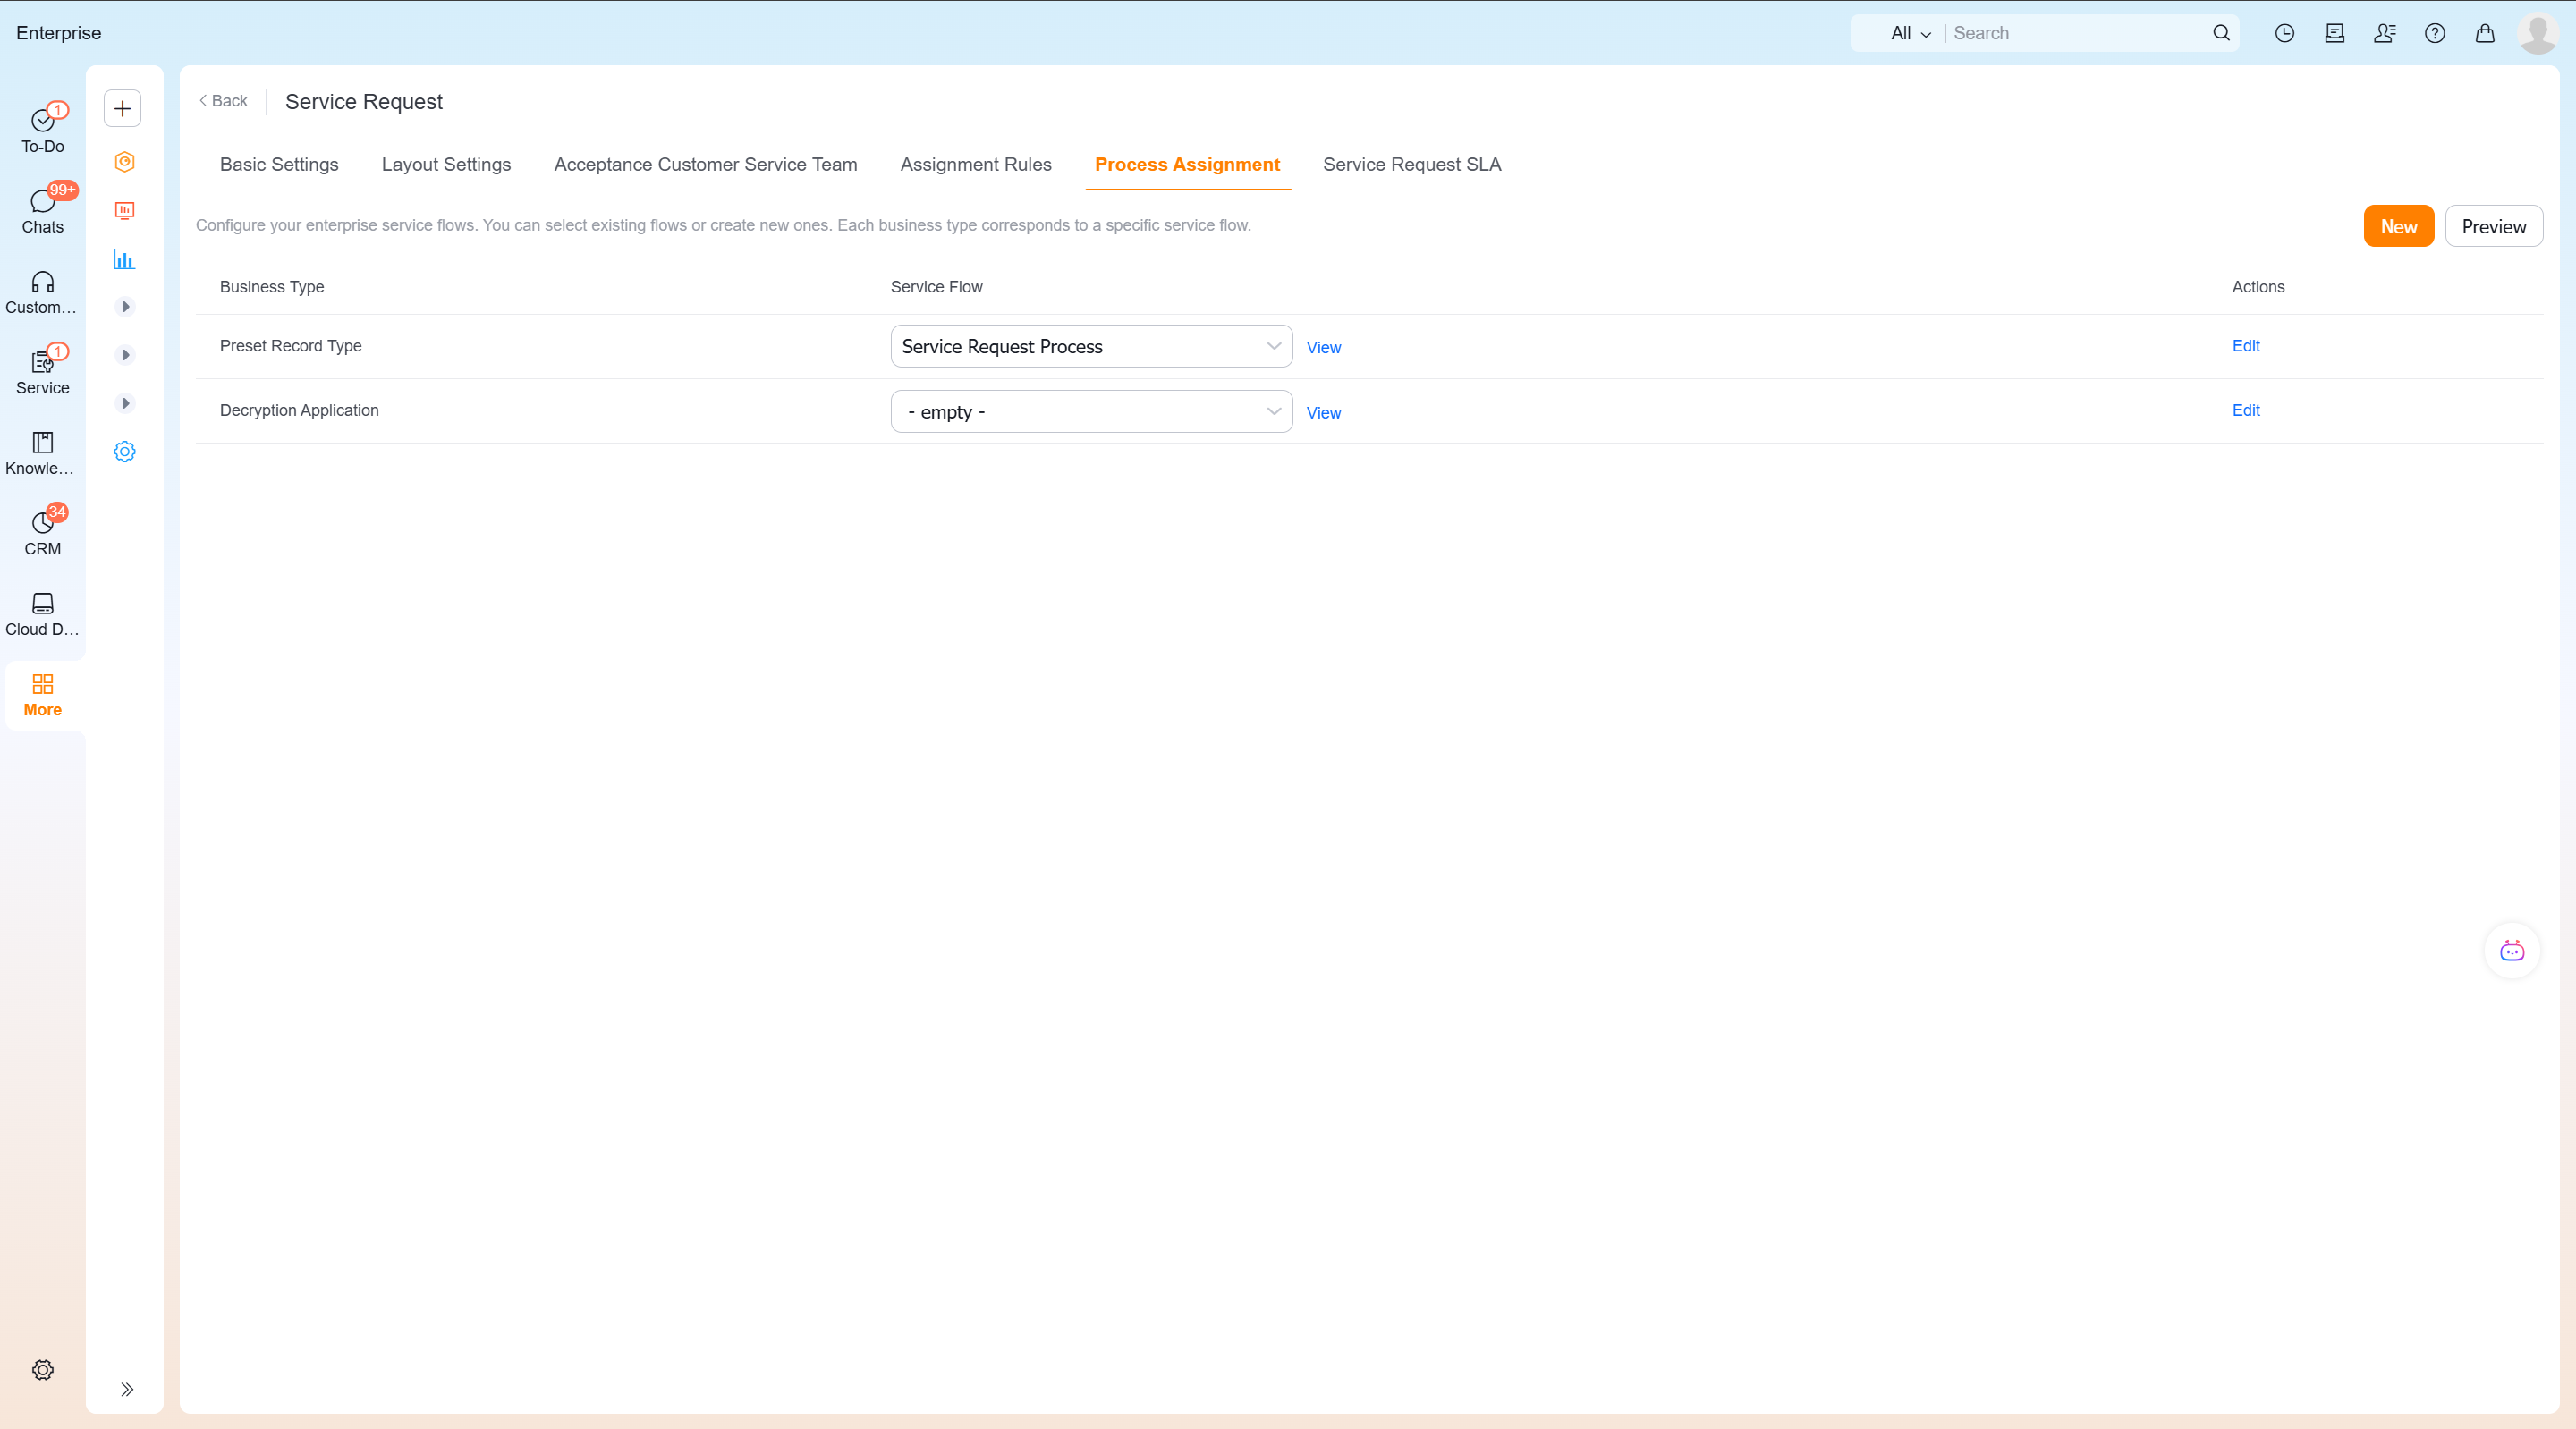
Configure service request transfer to work order
- Enable Service Request to Work Order in the Basic Settings of the service request.
- Open the object field mapping rules of the service request to work order.
- Check the system's preset mapping and supplement the mapping of service request fields to work order fields according to business needs.
- Confirm that mapping, fixed values, or later manual input supplies every required work order field.
- Use a test service request and click Generate work order to check the new work order and the relationship between the two.
After enabling, the system presets work order transfer operations and field mapping rules.Work orders are generated only when the work order conversion operation is executed; enabling the switch itself will not batch convert existing service requests into work orders.
Configure emails to automatically generate service requests
Prepare system mailbox
- Enter the Admin Backstage > Mailbox Management and bind the system mailbox used to receive customer emails.
- Confirm that the mailbox status is normal and enable the precipitation of incoming emails. The source information also requires not to close the incoming/outgoing mail precipitation of this mailbox.
- Use test emails to verify that the system can receive and deposit emails normally.
Create a new email conversion rule
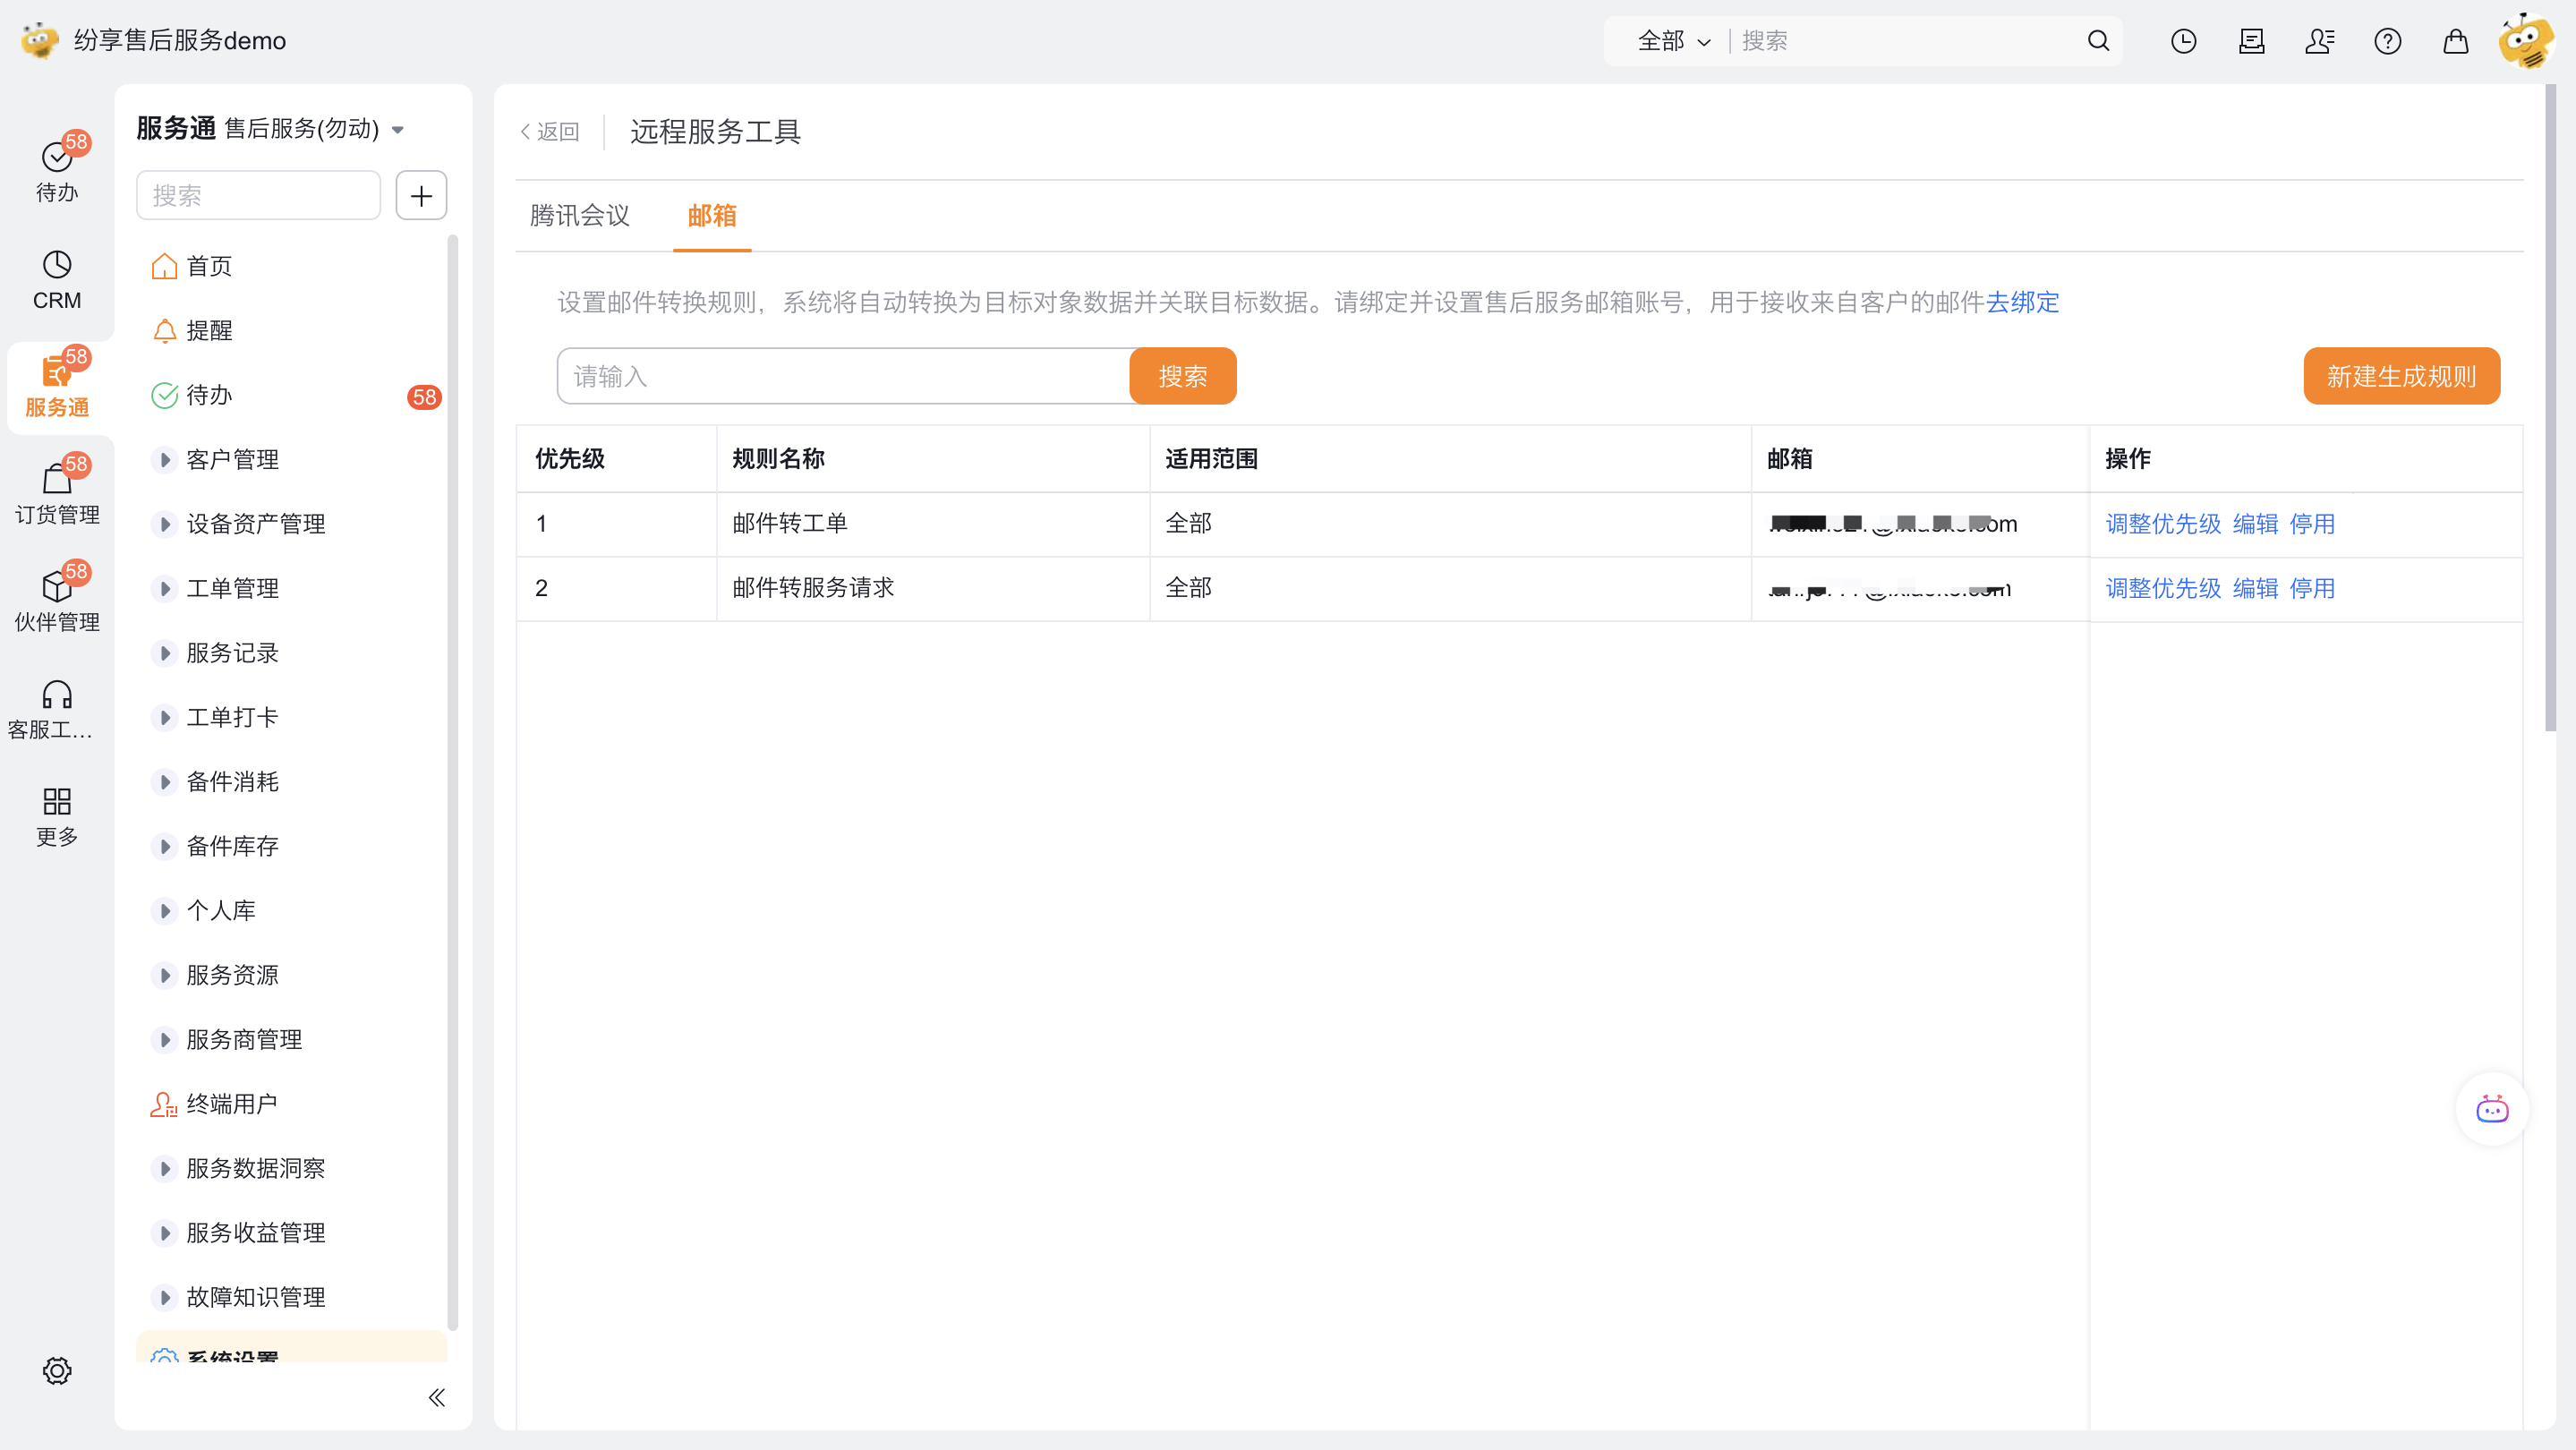
Enter Service>System Settings>Full Function Configuration>Business Plug-in>Remote Service Tool>Mailbox.
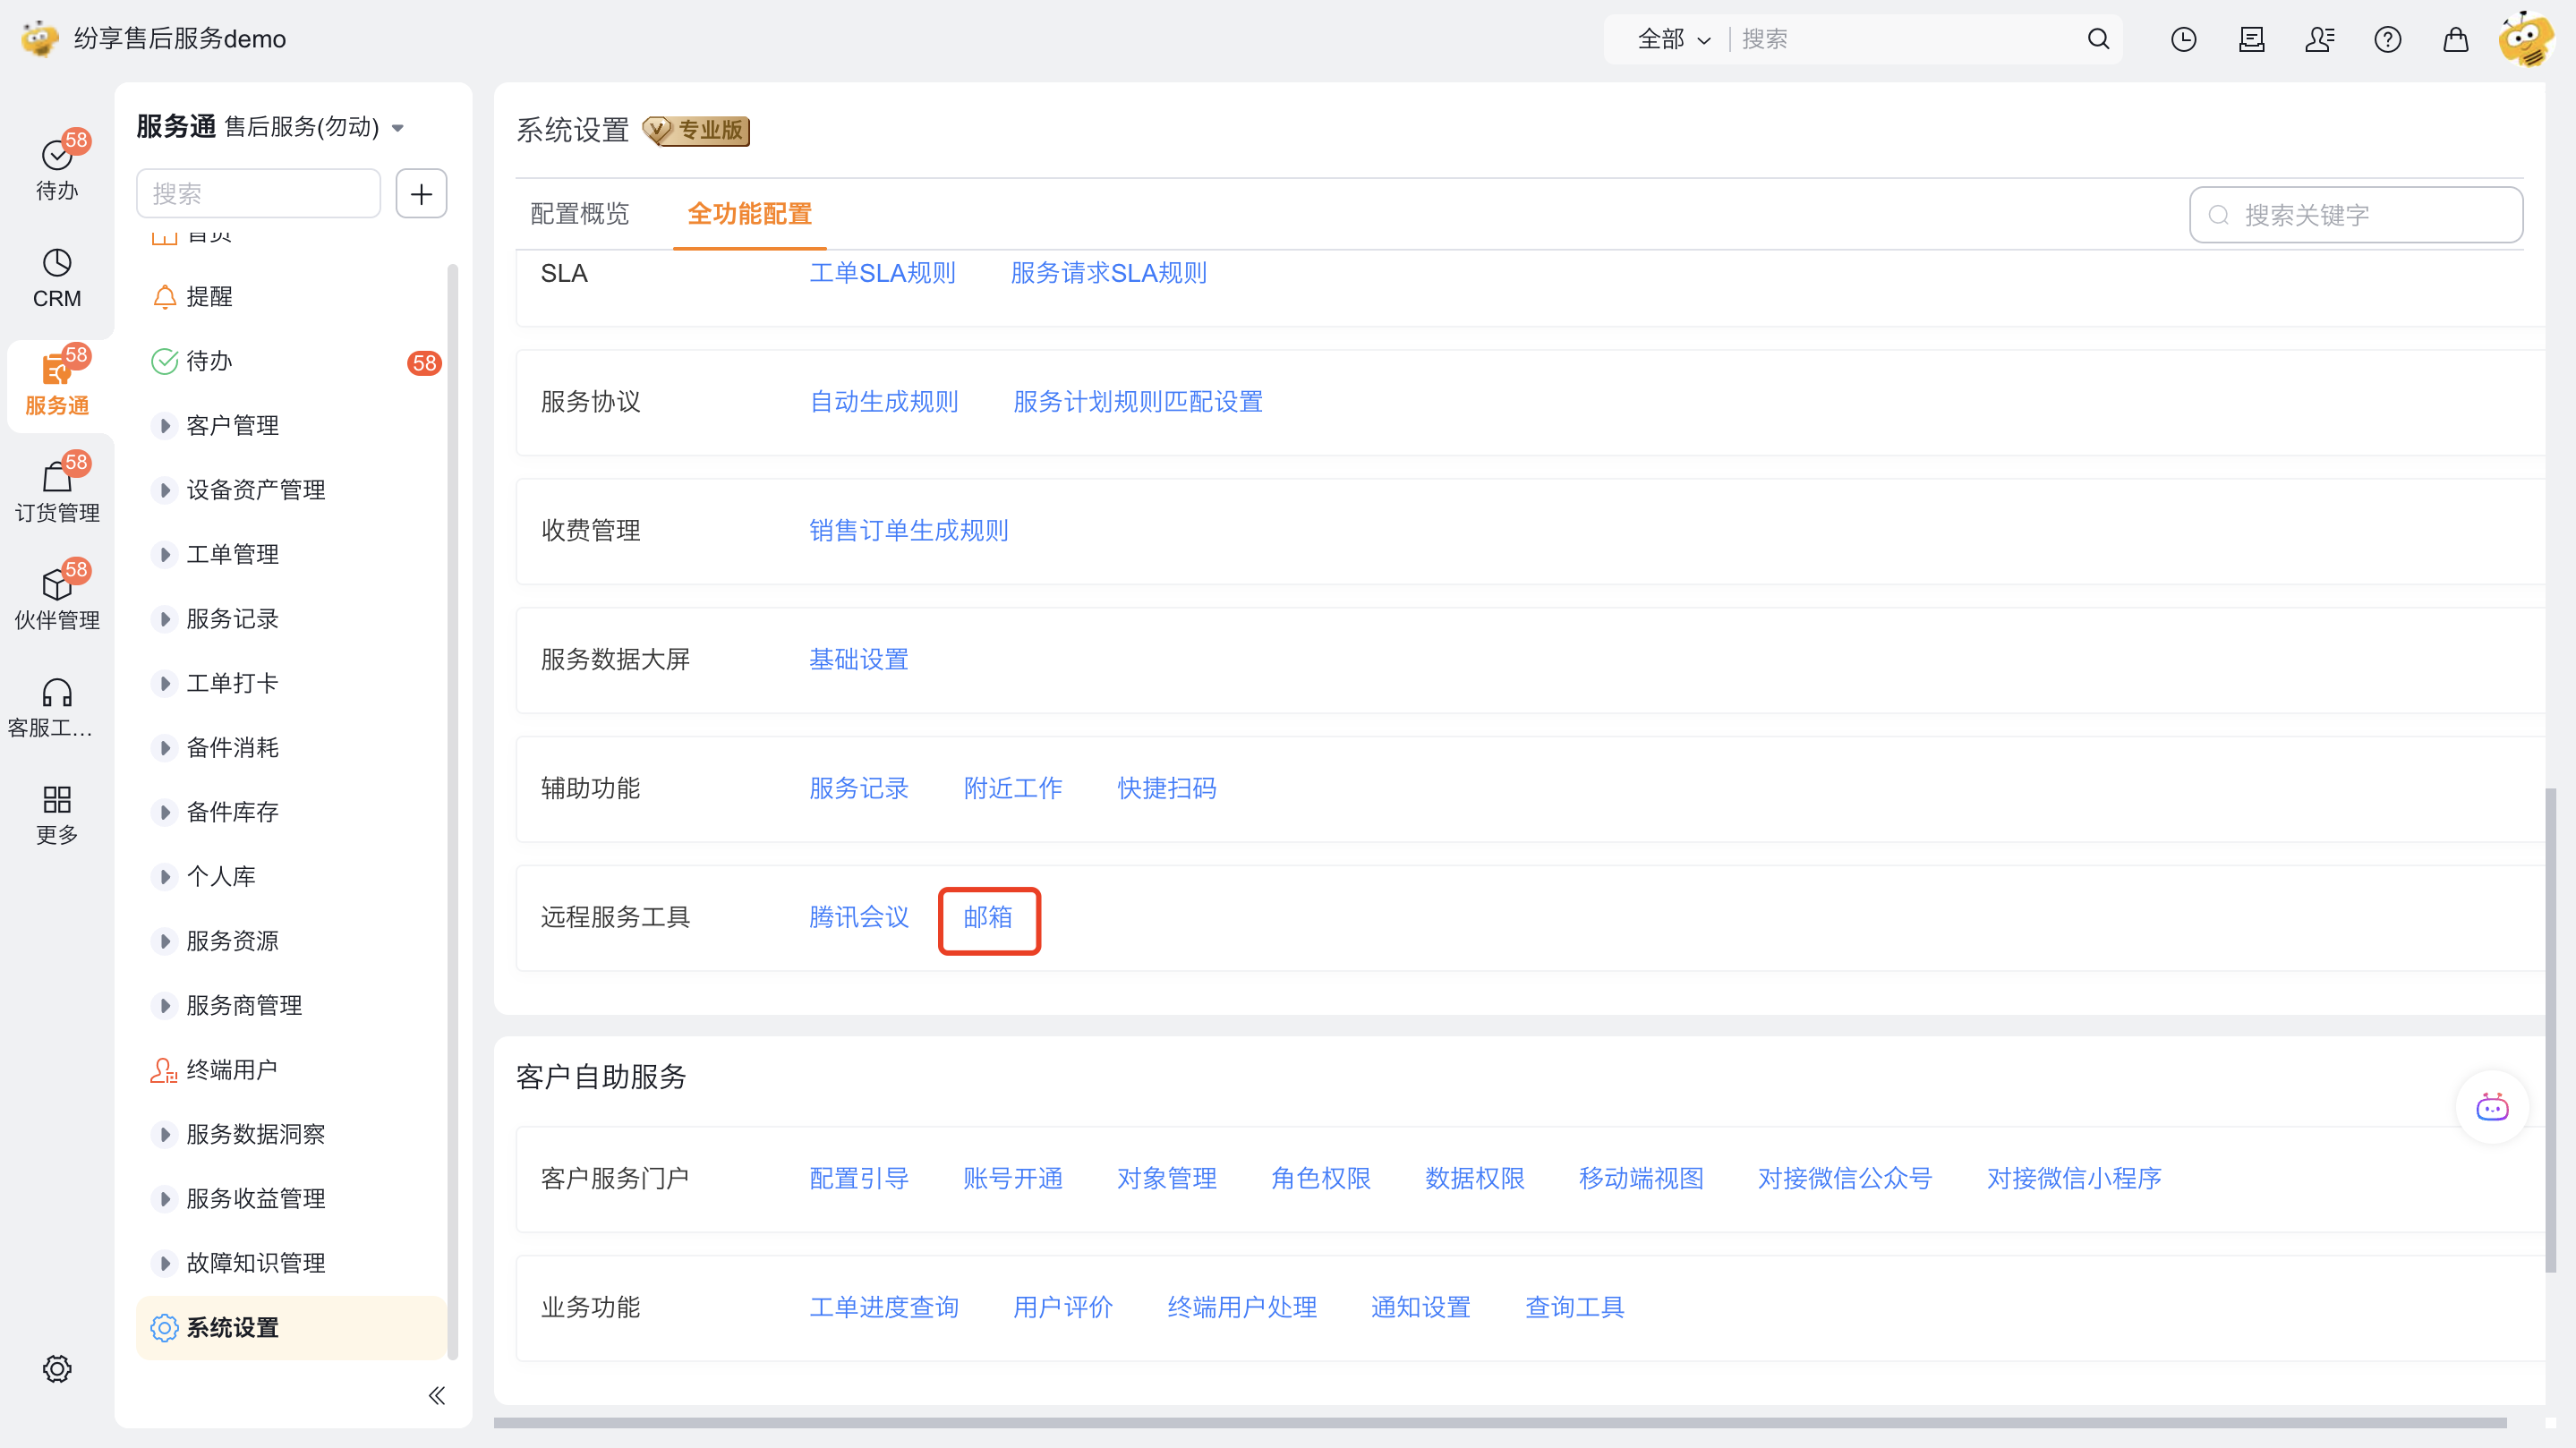
Click New Generation Rule.
Configure the rules and save:
Configuration items Configuration instructions Limits or checkpoints Rule name Use a recognizable business name Avoid having the same name or duplicate meaning with other rules Mailbox Select the system mailbox to receive customer emails You can only select the bound system mailbox; do not turn off mail precipitation Applicable scope Select which emails can be converted An overly broad scope can convert unrelated email into business records Automatically generated target object Select Service Request The target object can be only Work Order or Service Request Field mapping configuration Keep system default mappings and add mappings as needed Missing values for target required fields may cause creation failure Exception notification Send a CRM notification to Service Pass administrators when conversion fails Enable for production use 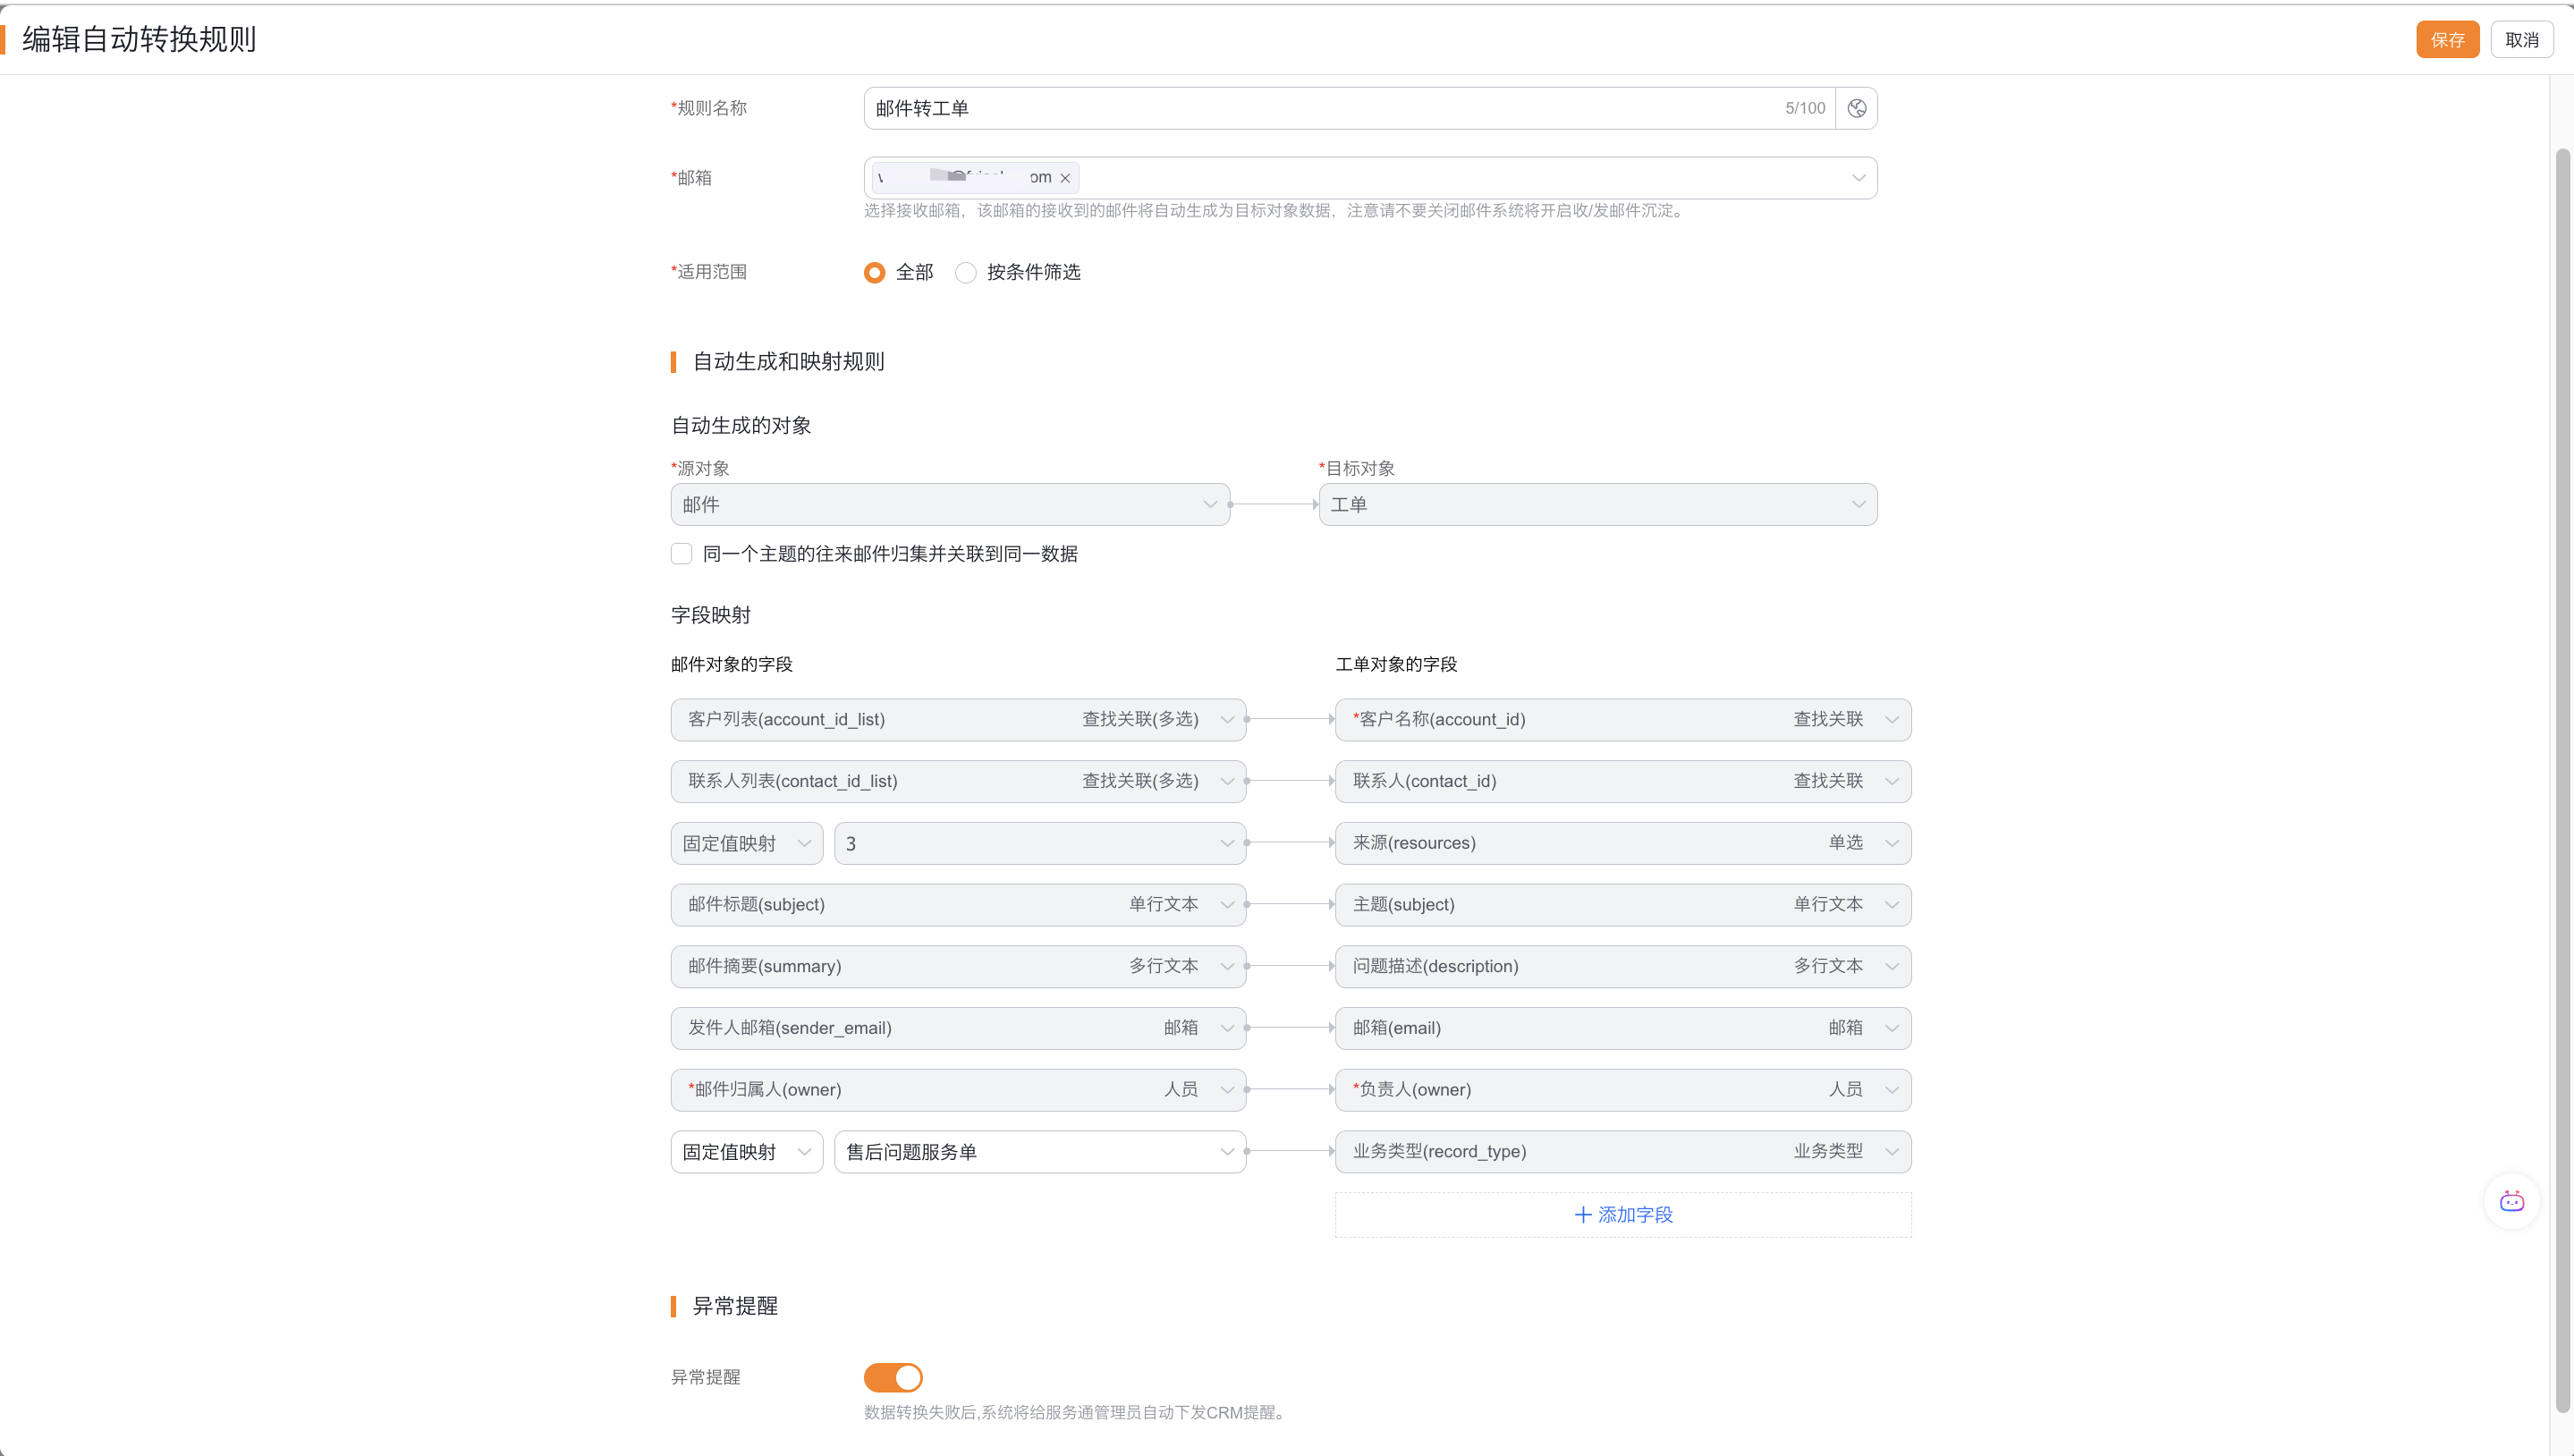
Adjust the rule priority. The smaller the number, the higher the priority; when an email hits multiple rules, the system converts it according to the highest priority rule.
Enable the rule and send a test email that meets the criteria.
Verify email conversion
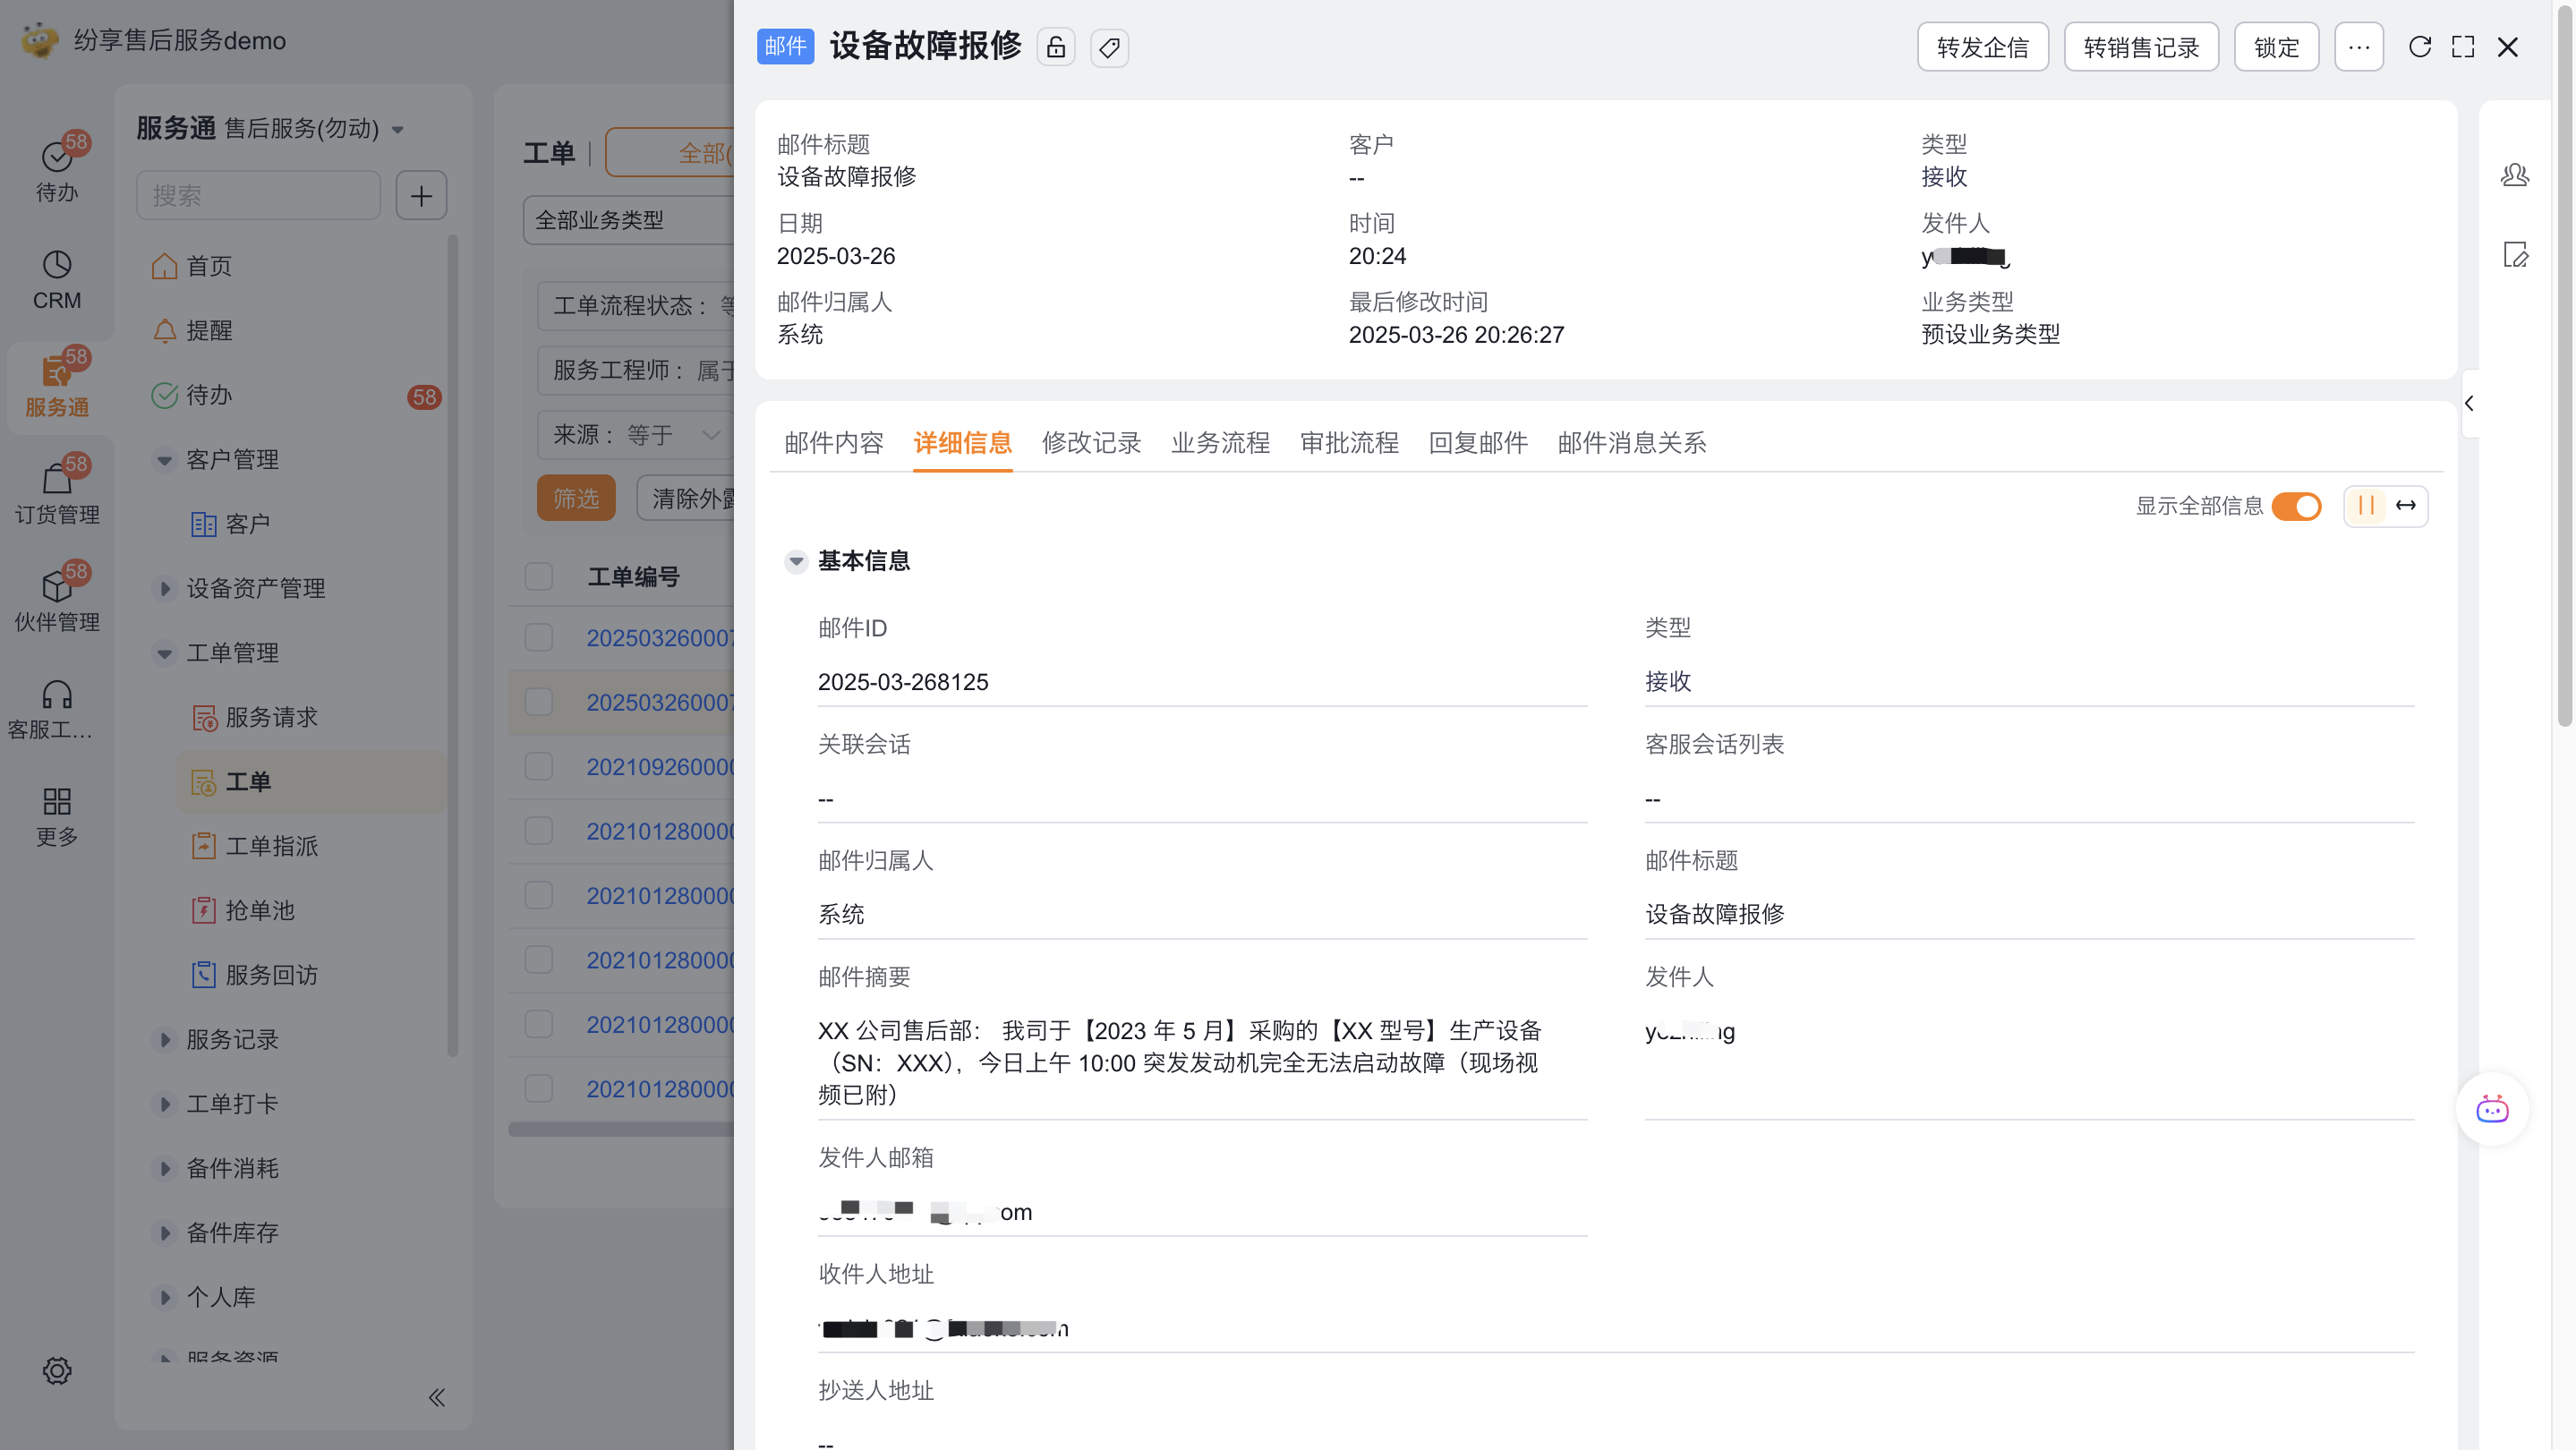
- Open the precipitated test email in the system and confirm that the mapping information such as title, summary, sender, etc. is complete.
- Find the automatically generated record in the service request list.
- Check the configured fields such as service request source, subject, problem description, customer, contact, and person in charge.
- Send another email that does not meet the applicable scope to confirm that a service request is not generated by mistake.
- Construct a test email that lacks the required fields of the target to confirm that the administrator can receive CRM alerts when exception alerts are enabled.
Expected results and verification
- The customer service workbench only displays the new entry for service requests in the configured access channel.
- Registered end users can submit requests from the WeChat Official Account menu. Users cannot perform actions beyond their role permissions.
- Unregistered users can submit as guest only after guest status is enabled.
- Requests submitted by self-service will be entered into the expected customer service group according to the assignment rules, and the service process of the corresponding business type will be used.
- After clicking Generate Work Order, the new work order is associated with the source service request, and the mapping fields comply with the configuration.
- Emails that comply with email rules will generate service requests, and emails that do not meet the applicable scope will not generate records.
Adjust or disable
- Before deactivating a certain portal, first confirm whether there are still customers using the official account menu, customer service channel or email.
- After modifying assignment rules or process assignments, use new request verification; do not assume that the modification will recalculate all existing requests.
- Before deactivating work transfer orders, confirm that the customer service team has an alternative handling method.
- When deactivating email rules, the system mailbox and mail deposits will be retained unless the mailbox will no longer be responsible for other services.
Notes
- Object permissions, official account menu and end user submission switch are different configurations and cannot replace each other.
- Assigned personnel, customer service group and Internet individual users are different role scopes and should be configured and verified separately.
- Automatic allocation, assignment rules and process allocation jointly determine the processing path of self-service requests. The lack of any link may cause the to-do to not meet expectations.
- Email rules only process valid emails that meet the applicable scope; the required fields of the target object are still subject to the object configuration.
- Original screenshots contain the interface at different stages. The text is based on the configuration meaning that can be confirmed from the source data, and it is not inferred that the Web, App or all enterprise portals are completely consistent.