Appearance
Configure send-in repair
Overview
Enable send-in repair, configure service centers, publish an end-user entry point, and configure logistics, the repair process, and service progress. End users can then submit requests, and service centers can receive and return items through the process.
Before you begin
Please confirm the following conditions:
- Use a Service Pass administrator account, or an account with system settings, service request and process configuration permissions.
- Service request business plug-in enabled. Send for repair is an extended business capability in service requests.
- The address, contact person, contact information, applicable product range and customer address range of each service center have been determined.
- The roles responsible for the receipt of repair parts, the return of repair parts and the customer's signature in the repair process have been determined.
- If you need to place an order with one click, the company's logistics cooperation method and required docking information have been confirmed. This capability requires a combination of logistics cooperation and system docking.
IMPORTANT
Service center recommendations rely on customer address and product information. Before the terminal entrance is officially opened, different product and customer address combinations should be used for verification, especially if multiple centers match at the same time or no center matches.
1. Enable sending for repair
On the web, go to Service Pass > System Settings.
Find Service Request in the Business Plugin area and enter Send for Repair.
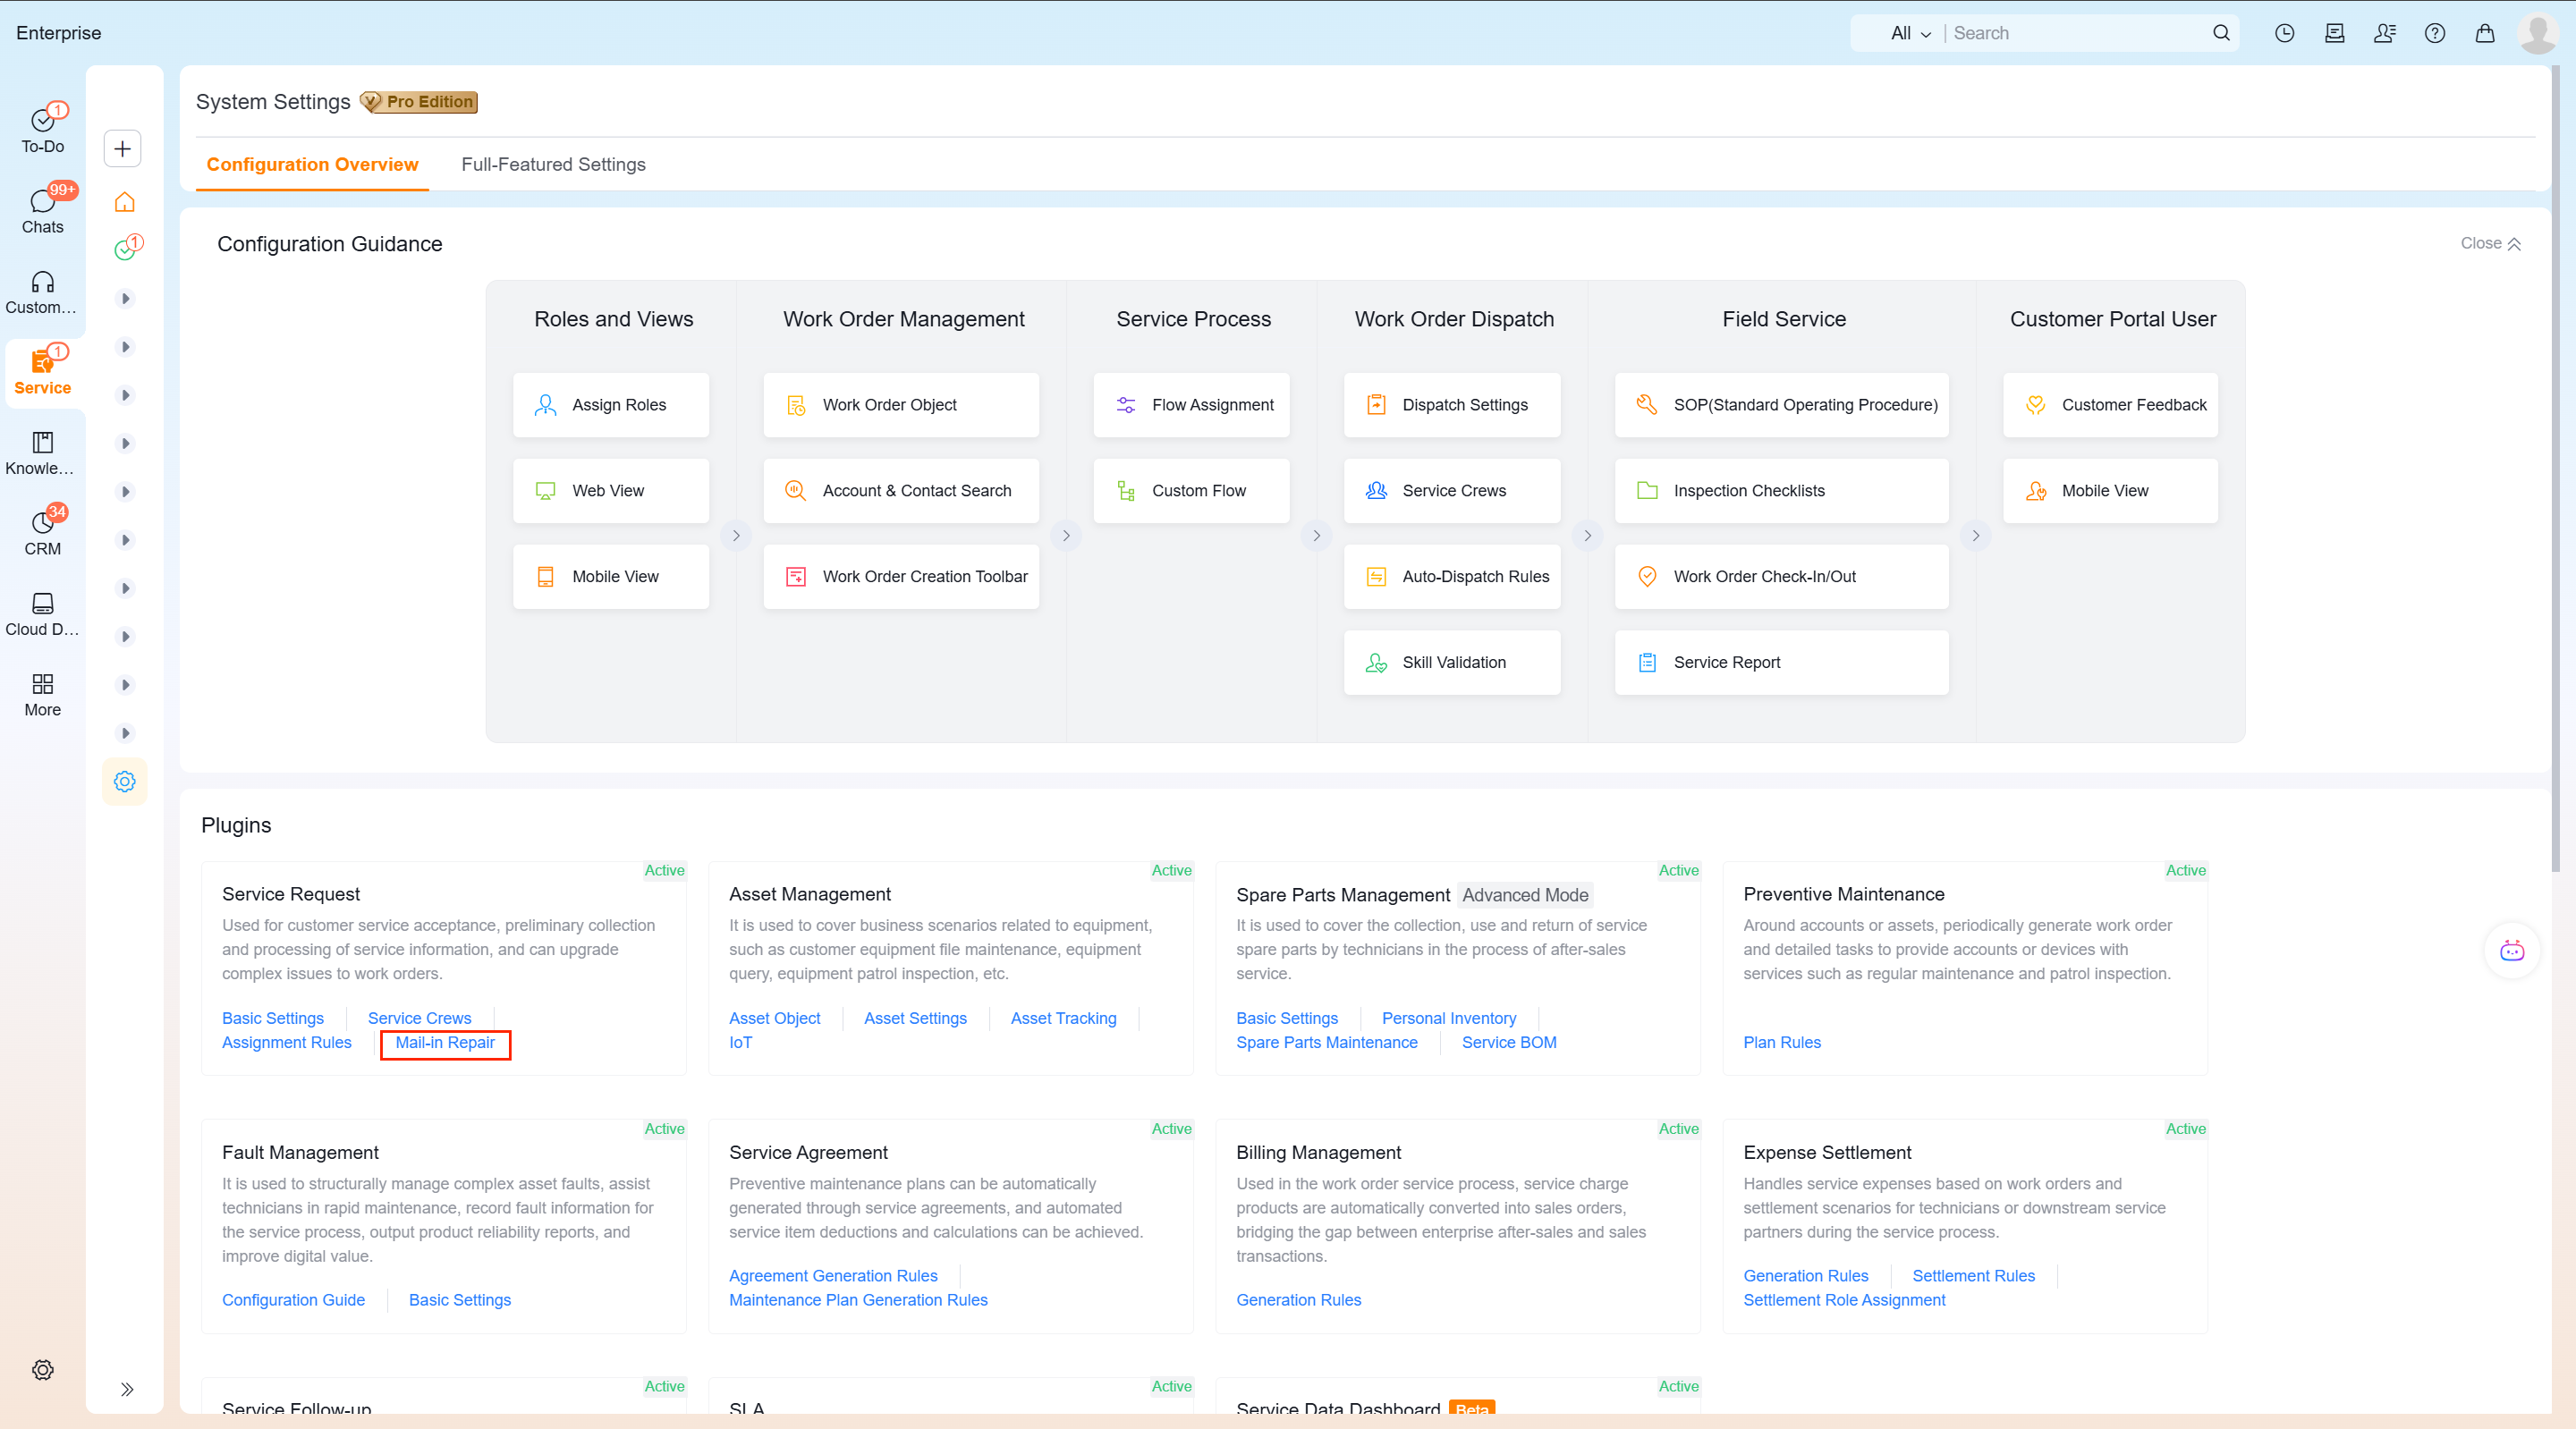
Enter the Send for Repair tab of the service request and confirm that the Send for Repair function is enabled.
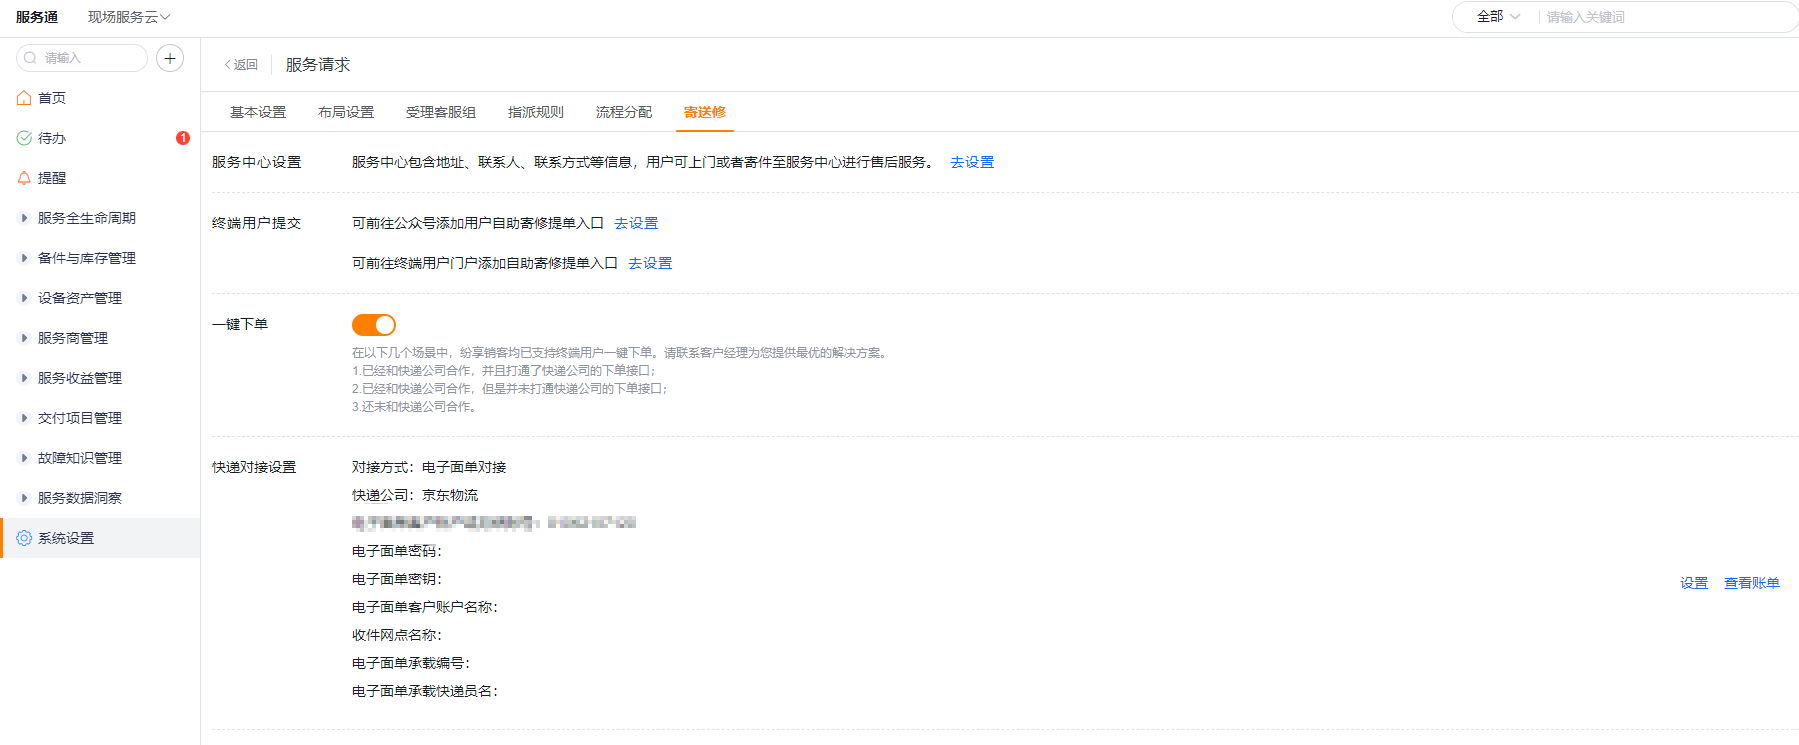
After enabling Send Repair, the service center, terminal entrance or process configuration will not be automatically completed, and subsequent steps need to be continued.
2. Configure service center
- In the Service Center Settings area of the Send for Repair tab, click Go to Settings.
- Create a new service center and maintain the service center address, contacts and contact information.
- Set Product Range: You can select all products, or filter applicable products according to conditions.
- Set Customer address range: You can select all addresses, or filter the applicable areas according to conditions.
- Supplement the recipient, responsible person, belonging department, regional positioning and other information as required on the page, and then submit.
- Repeat the configuration for each service center and check for conflicts or omissions between scopes.
The system will recommend the service center to return the product based on the customer address and product information in the repair application. The source material does not state the system priority for the following cases, so it must be confirmed by testing:
- Multiple service centers catering to both product range and customer address range.
- No service center covers both categories.
- Incomplete customer address or product information.
NOTE
The original "New Service Center" screenshot contains the names of the personnel and will not be quoted in this version. The page fields are subject to the actual configuration of the current tenant.
3. Configure the end-user entry point
Configure send-in repair in a WeChat Official Account or Mini Program. Use the channel enabled for your end users.
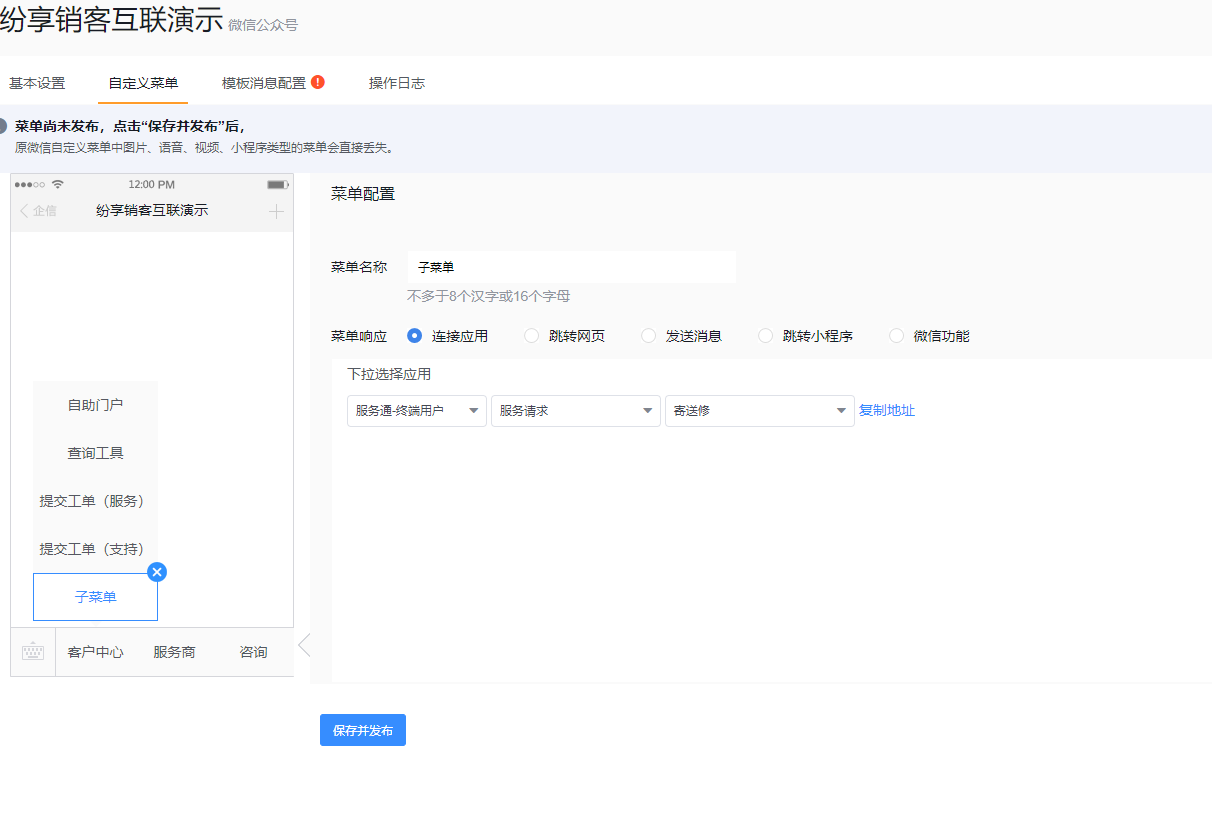
Configure a WeChat Official Account
Enter the custom menu configuration of the WeChat official account.
Add a new menu and set the menu response to Connect Application.
Select End User Application, Service Request, and Send Repair.
Save and publish the menu.
Configure the end-user portal or Mini Program
Enter the editing page corresponding to the mobile application view.
Add a shipping repair portal and a service progress portal in the self-service area.
Save and publish the view.
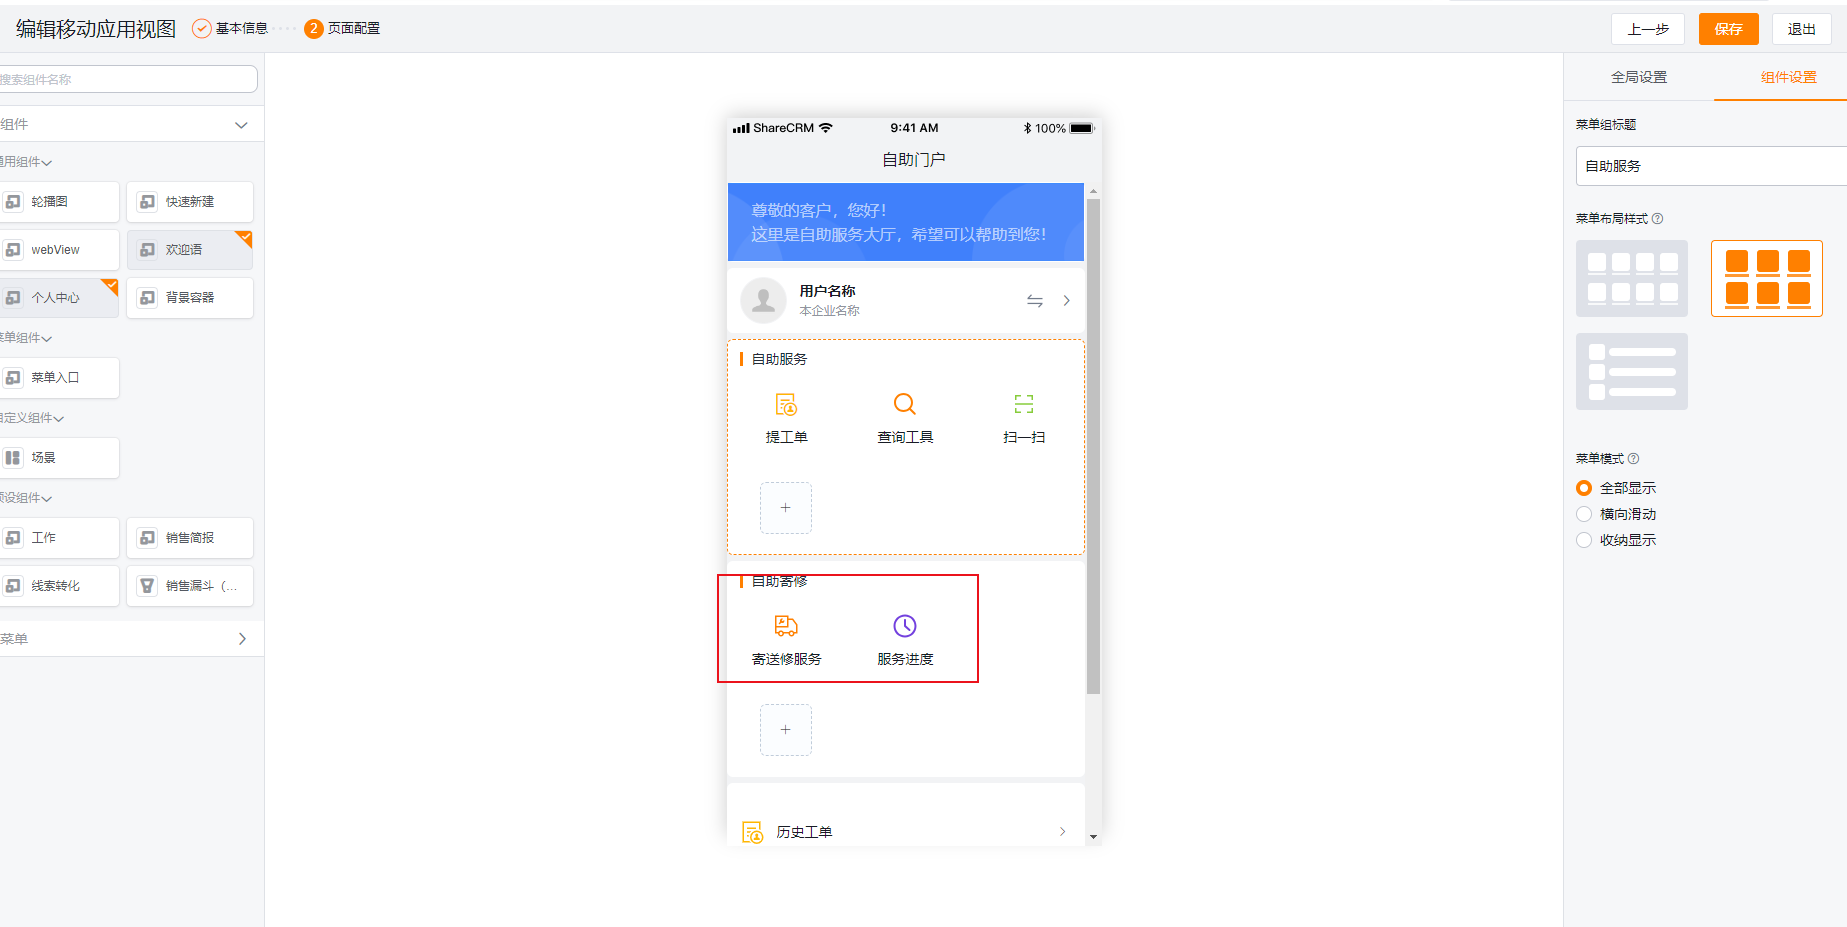
After publishing, use the end user account to check whether the entrance is visible, and verify the submission of the repair application and check the service progress respectively.
4. Configure one-click ordering and logistics docking
One-click ordering is an optional capability. The cooperation and interface opening methods between enterprises and logistics companies are different, and the docking plans may also be different; you should first contact the account manager to confirm the applicable plan.
The original configuration page lists 3 types of one-click ordering scenarios that can be consulted:
- We have cooperated with the express company and have opened the order interface of the express company.
- We have cooperated with the express company, but the order interface of the express company has not yet been opened.
- Not working with courier companies yet.
Each scenario requires a different implementation. Enabling the switch alone is not sufficient. Confirm your organization's scenario, logistics provider, electronic waybill integration, and required credentials.
Find One-Click Order on the Send for Repair tab, and press the confirmed plan to enable the switch.
Click Settings in the Express docking settings area.
Maintain courier company and electronic bill information according to logistics docking requirements. The docking information displayed on the original configuration page includes the electronic bill account number, password, key, customer account name, recipient outlet name, carrier number, carrier name, etc. The actual required fields are subject to the selected logistics plan.
After saving, check the logistics order record through View Bill or the verification method agreed by the enterprise.
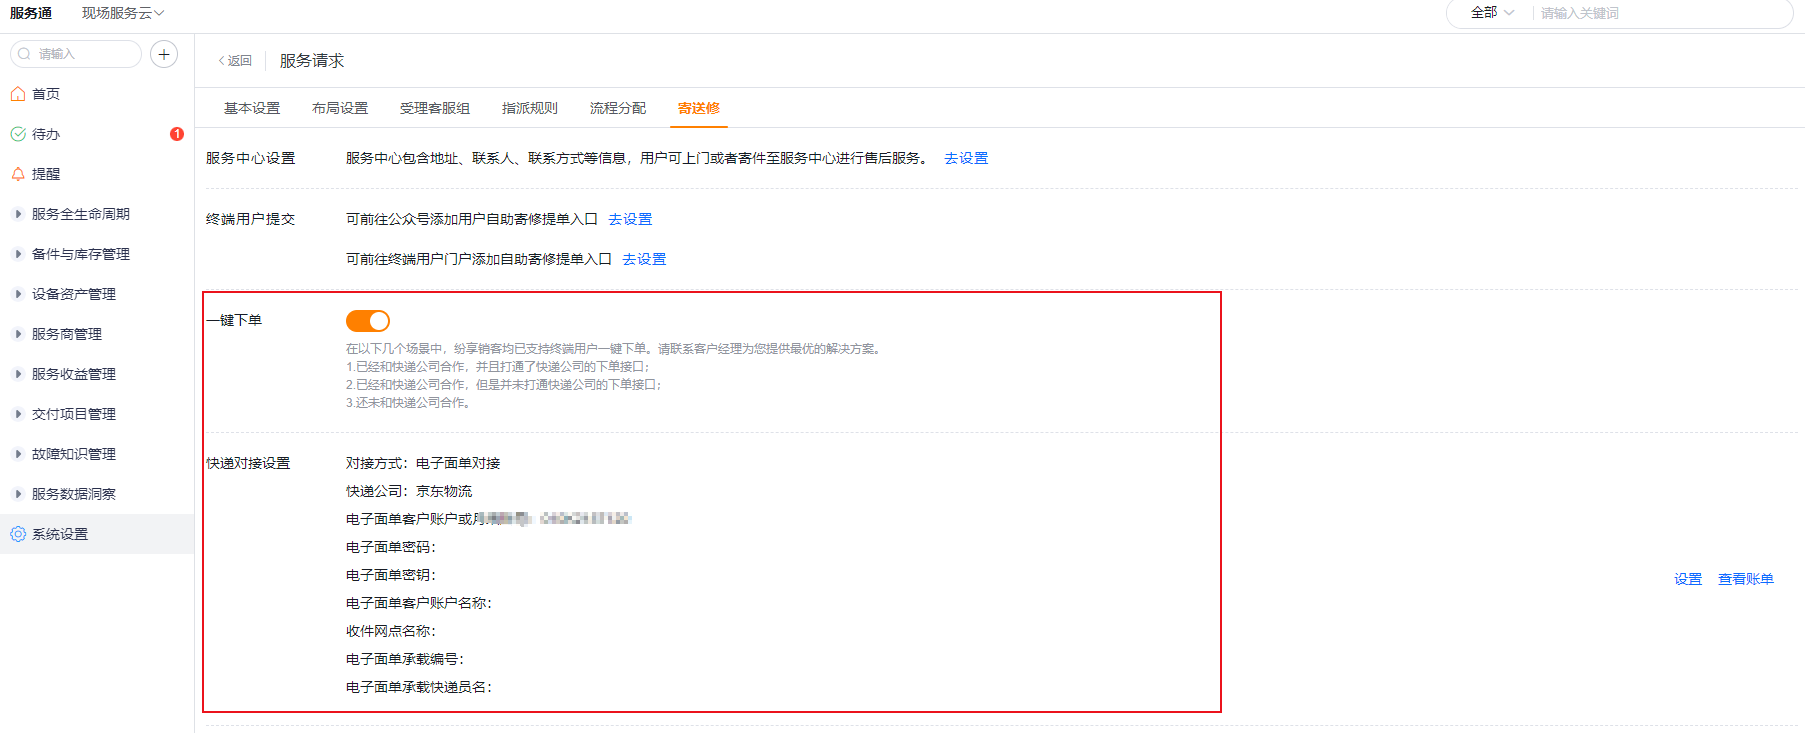
After completing the docking, the end user can complete the logistics order when submitting a service request. Only turning on the switch but not completing the available logistics docking cannot be used as a basis for judging that the configuration is completed.
5. Configure the sending repair process node
Enter the process configuration page for sending repair orders.
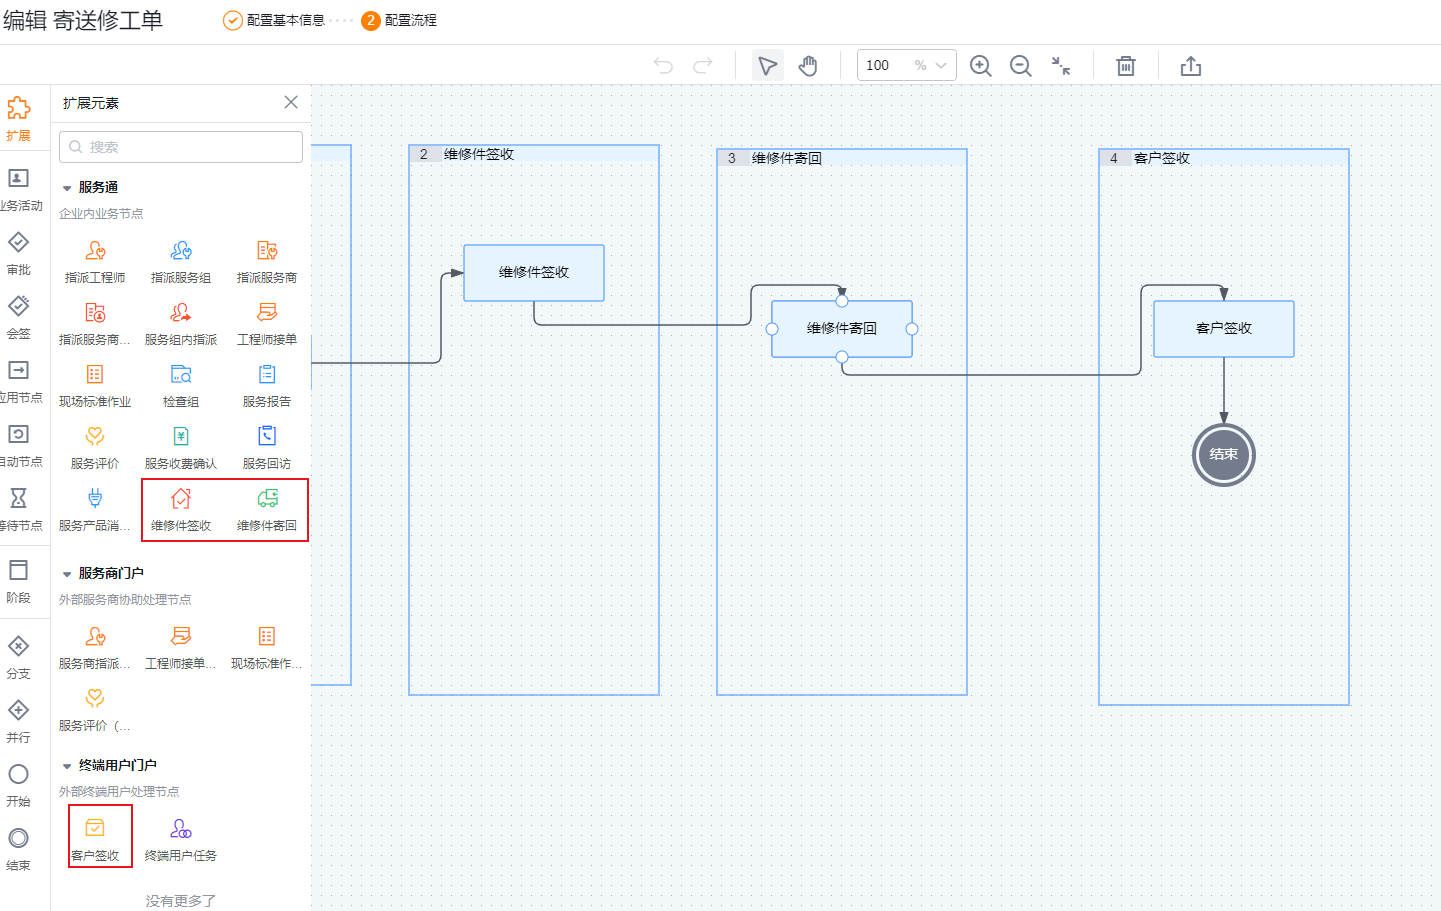
Add the system’s default delivery and repair application nodes according to the business sequence:
- Signature for repair parts: After the repair parts arrive at the service center, they will be signed by engineers or other roles configured in the process; they can also be signed automatically based on changes in logistics status.
- Repair Parts Return: After the repair is completed, the engineer or other role configured in the process will fill in the return logistics information and place the order through the logistics order interface.
- Customer Receipt: The customer confirms receipt, or the system confirms it based on logistics status.
Configure the role, entry conditions, and next action for each node.
If the enterprise also needs testing, quotation, approval or other business links, add corresponding process nodes between the three preset nodes.
Save and publish the process.
CAUTION
"Engineer or other role" means that the handler is determined by the process configuration, and it should not be assumed that all engineers can handle it. Automatic signature also relies on the available logistics status and corresponding conditions. If the logistics status cannot be obtained, the manual processing path should be retained.
6. Configure service progress
Go to Service Request Object > Send Repair Layout.
Add the Service Progress component to the layout.
Set the state that the component needs to be shown and hidden, and then save the layout.
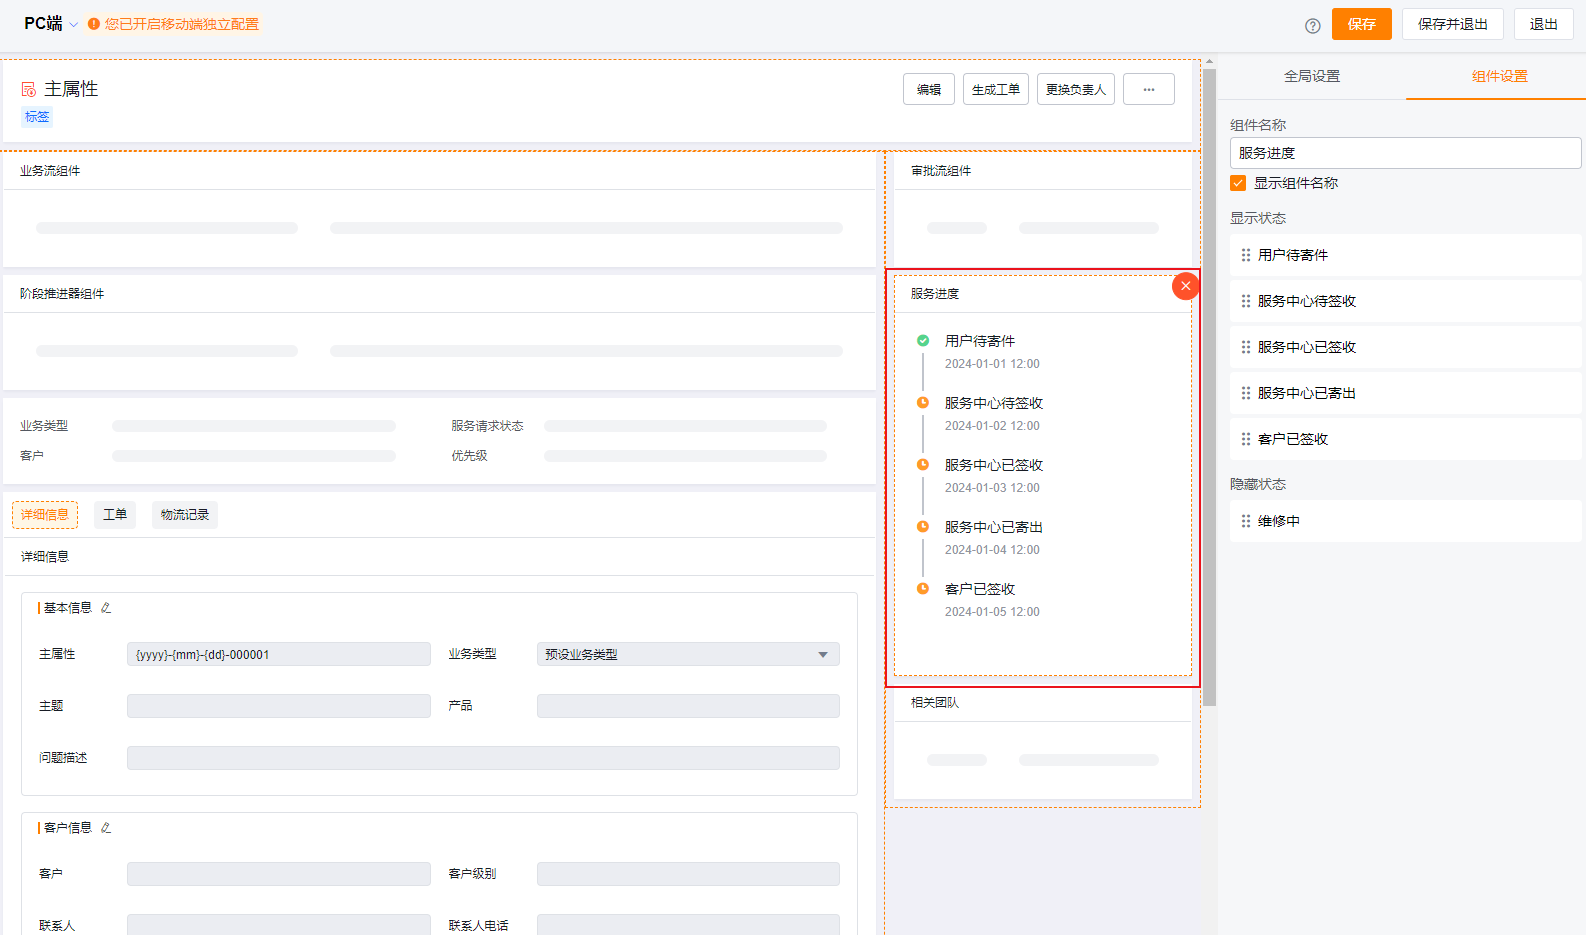
The component reads Service Progress (API name: service_progress) and supports custom options. Screenshot values are examples, not required statuses. After adding an option, confirm that the applicable process node updates service_progress. Adding an option does not bind it to a node automatically.
Expected results and verification
Create at least one test repair request and verify it in the following order:
- Use the end user account to open the repair application from the published service account or mini program entrance.
- Select different products and customer addresses respectively, and confirm that the service center recommended by the system meets the product range and customer address range.
- When one-click ordering is enabled, shipping logistics can be created and corresponding logistics records can be queried when confirming the submission request.
- Promote the testing process and verify the processing roles and flow directions of maintenance parts receipt, maintenance part return and customer receipt nodes.
- When automatic sign-off is configured, verify whether changes in logistics status can trigger corresponding sign-off; at the same time, verify that the manual processing path can still be executed according to enterprise rules.
- Check whether the service progress seen by the end user is consistent with the
service_progressfield and the current process stage.
FAQ and Troubleshooting
The end user cannot see the shipping repair entrance.
Confirm that the portal has been added to the service account or mini program and released, and check whether the current end user can access the corresponding channel. Enabling the mail repair plug-in will not automatically publish the terminal entry.
The service center recommended by the system does not meet expectations.
Check the product and customer address in the repair application, as well as the product range and customer address range of each service center. The original data does not provide priority rules for multi-center matching, and the range should be adjusted based on test results to avoid crossover or omission.
One-click shipment creation is unavailable
Confirm that the one-click switch and logistics integration are complete. This capability depends on your logistics agreement and interface integration.
The logistics has changed but the node does not sign for it automatically.
Check whether the logistics docking can return the status, and check whether automatic signing according to the logistics status is configured in the process. Automatic sign-off is not the only processing method for repair parts sign-off or customer sign-off nodes. Manual sign-off can be retained according to enterprise processes.
Service progress is not updated along with the process
Confirm that the service progress component in the layout reads the service_progress field, and check whether the process node has updated the corresponding field value. The custom status option by itself does not prove that the process has completed binding.