Appearance
Configure SLA rules
Overview
Administrators can configure SLA rules for work orders or service requests, monitor the processing time between process nodes or object fields, and set pre-expiry warnings, timeout processing, and task countdowns. It is recommended to use test records to verify the rules before activating them in the official business scope.
Before you begin
- Use an administrator account that can access the Service Pass > System Settings and SLA configuration pages.
- Confirm that the SLA plugin is enabled or ready to be enabled, and confirm whether the target object is a work order or a service request.
- When controlling based on process nodes, prepare the service process, start node and end node to be monitored.
- When controlling based on object fields, prepare start conditions, end field change conditions and corresponding field values.
- Clarify the scope of application, standard processing time, reminder time, notification channels and reminder personnel.
- Prepare a test work order or service request that meets the applicable scope.
Operation steps
1. Enable the SLA plug-in and enter the rules page
- Go to Service Pass > System Settings > Configuration Overview.
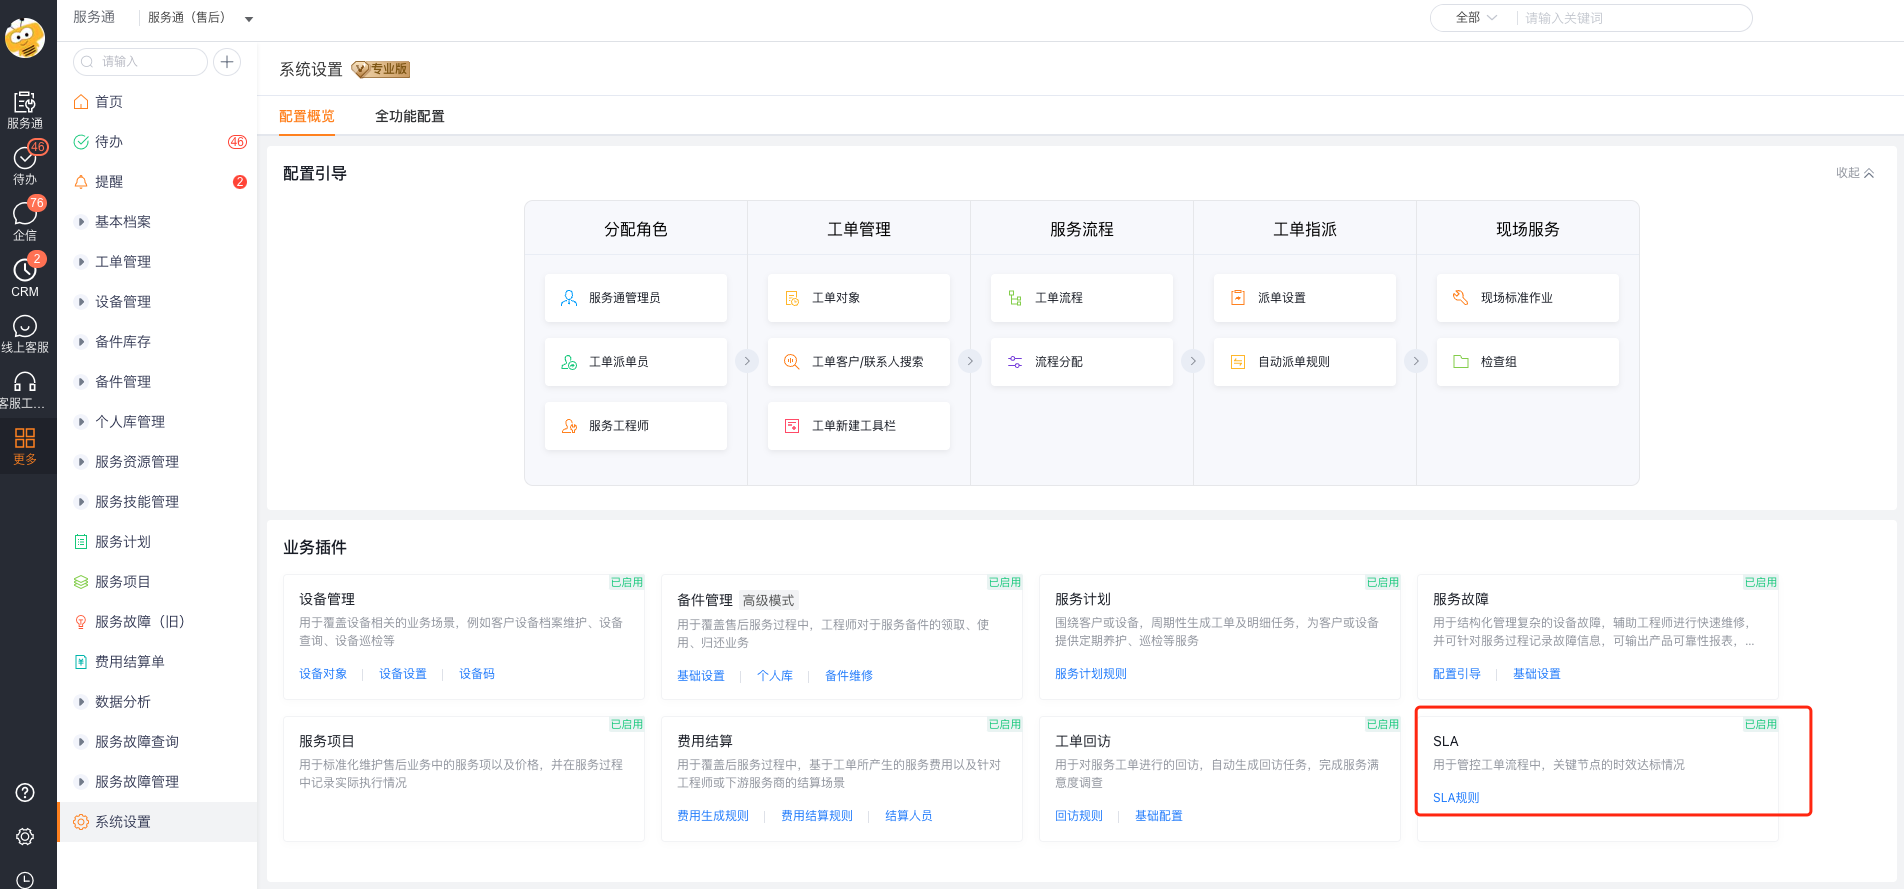
- Find SLA in the business plug-in area and click SLA Rules.
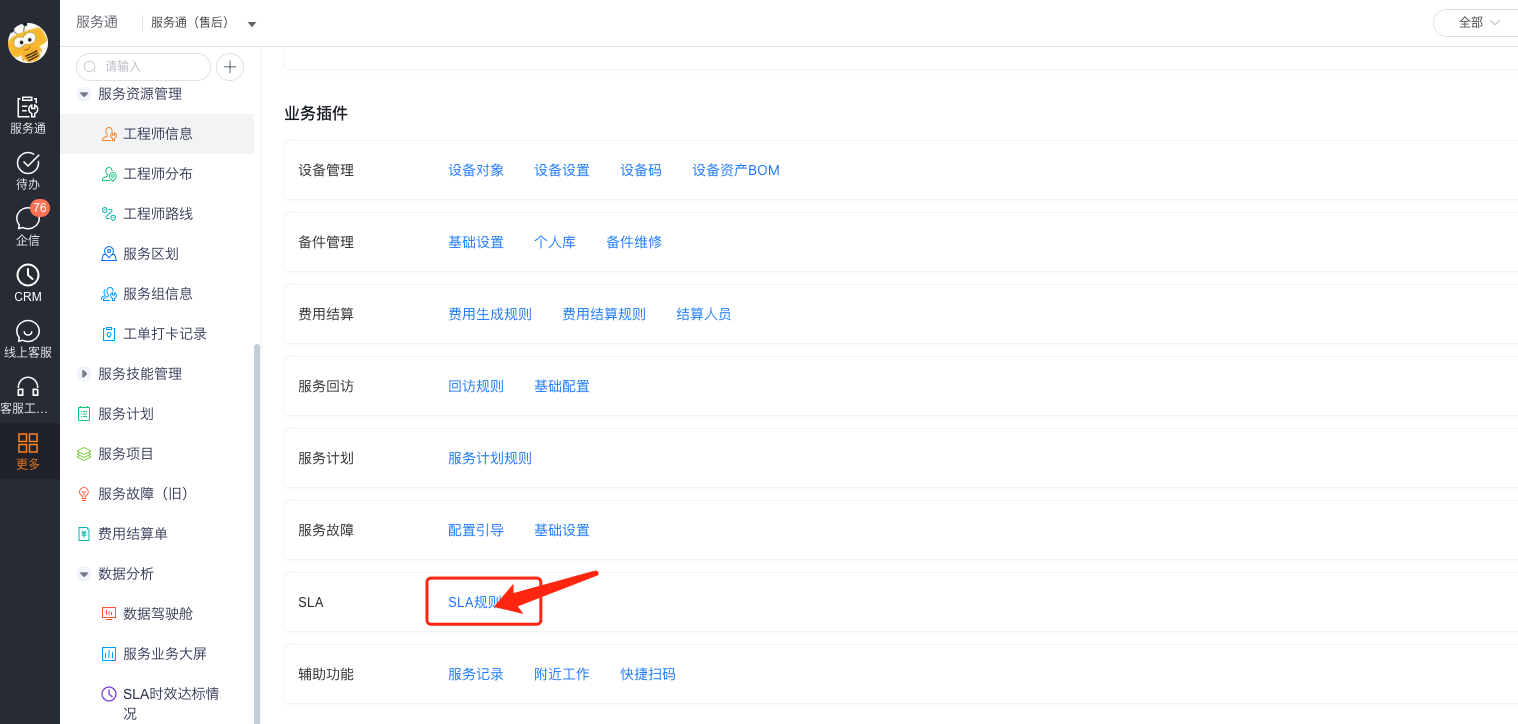
- On the SLA page, select Work Order SLA Rule or Service Request SLA Rule according to the target object, and click New.
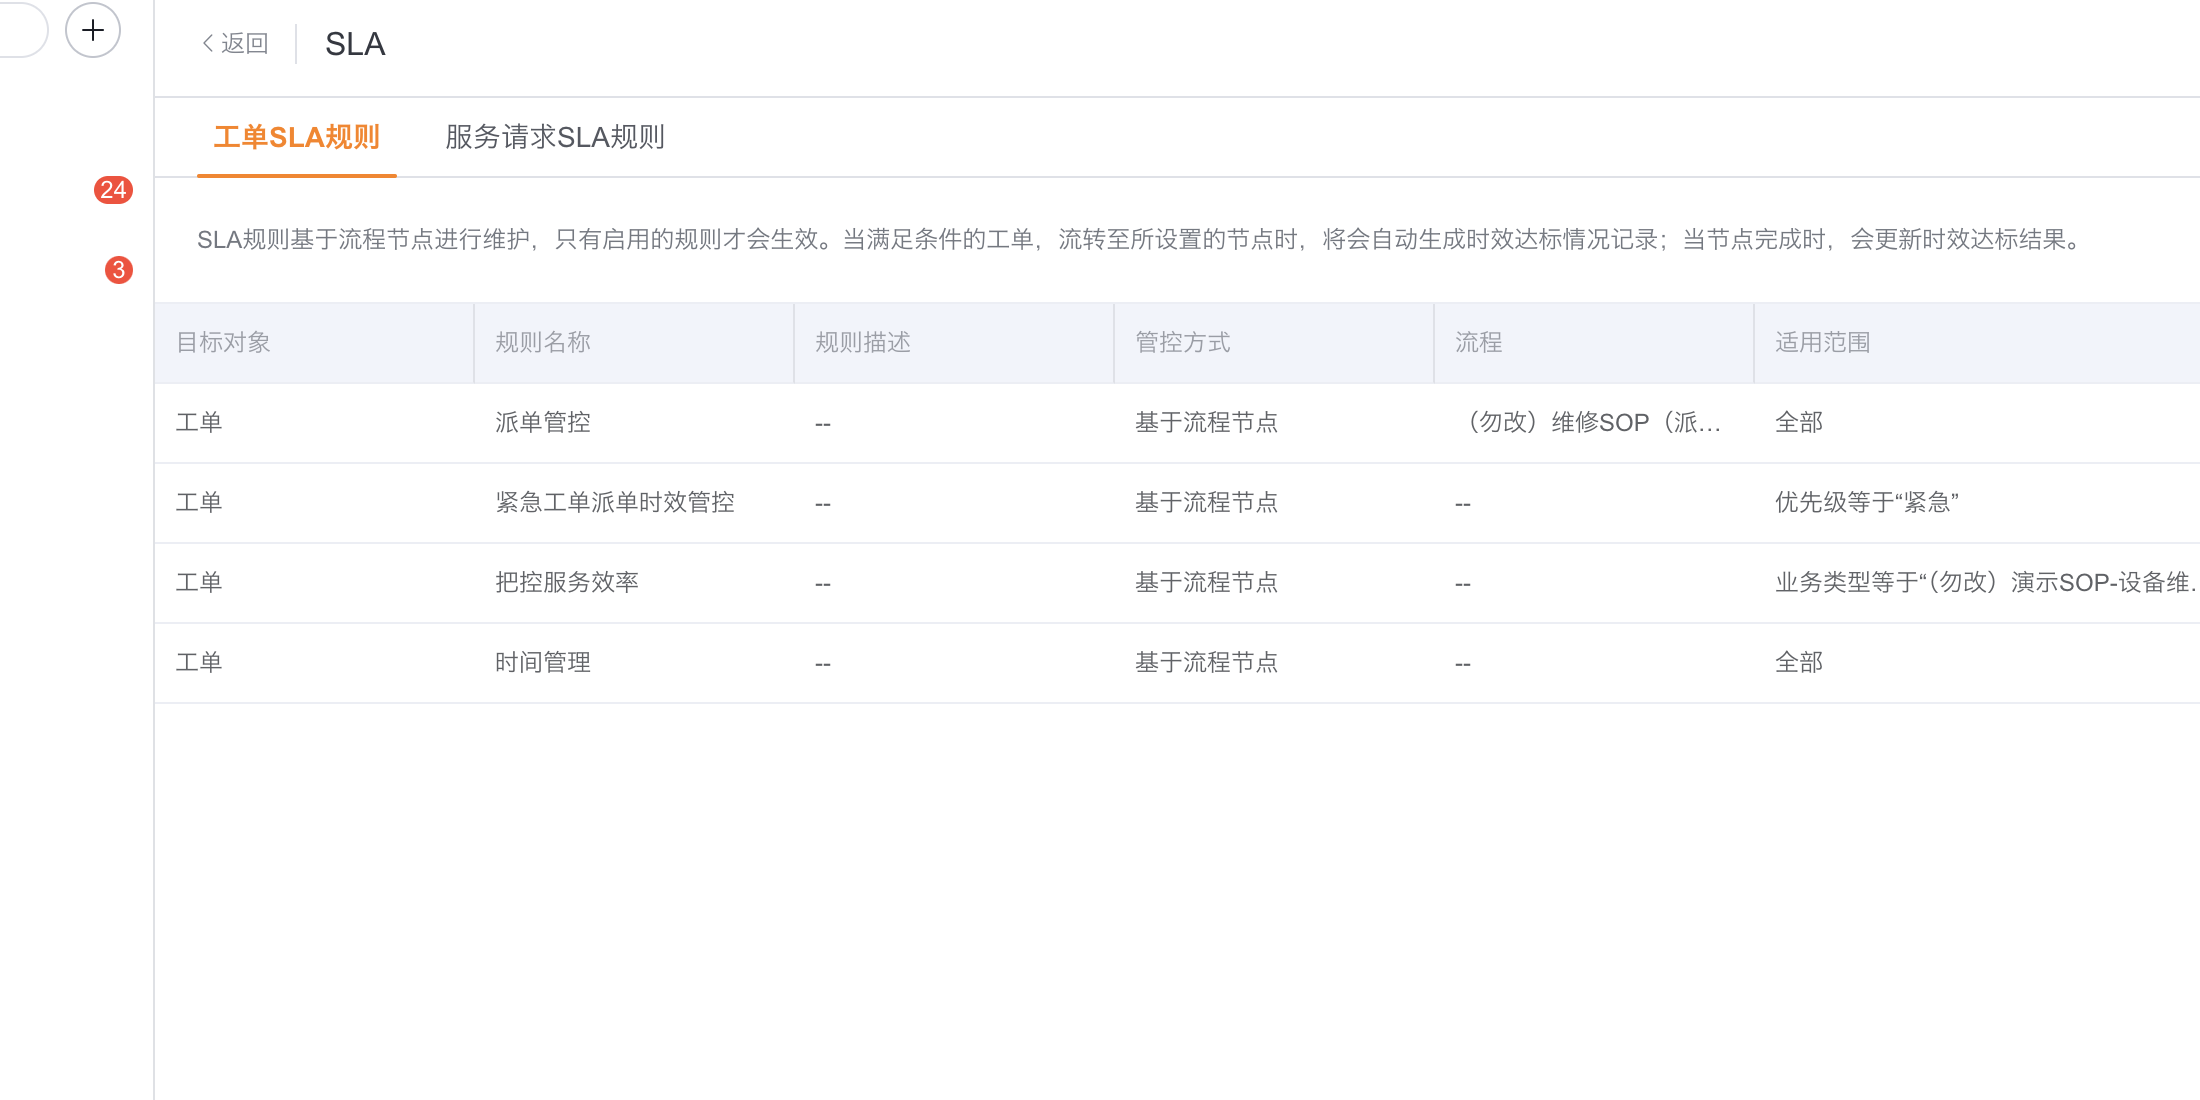
Only enabled rules will take effect for new records that meet the criteria or for subsequent changes in conditions.
2. Configure basic information and scope
- Fill in the rule name and rule description in Basic Information.
- Confirm the usage work order or service request in Target.
- Select All in Applicable Scope, or select Filter by Conditions and set business type, priority and other conditions.
- Select Based on Process Node or Based on Object Field in Control Method.
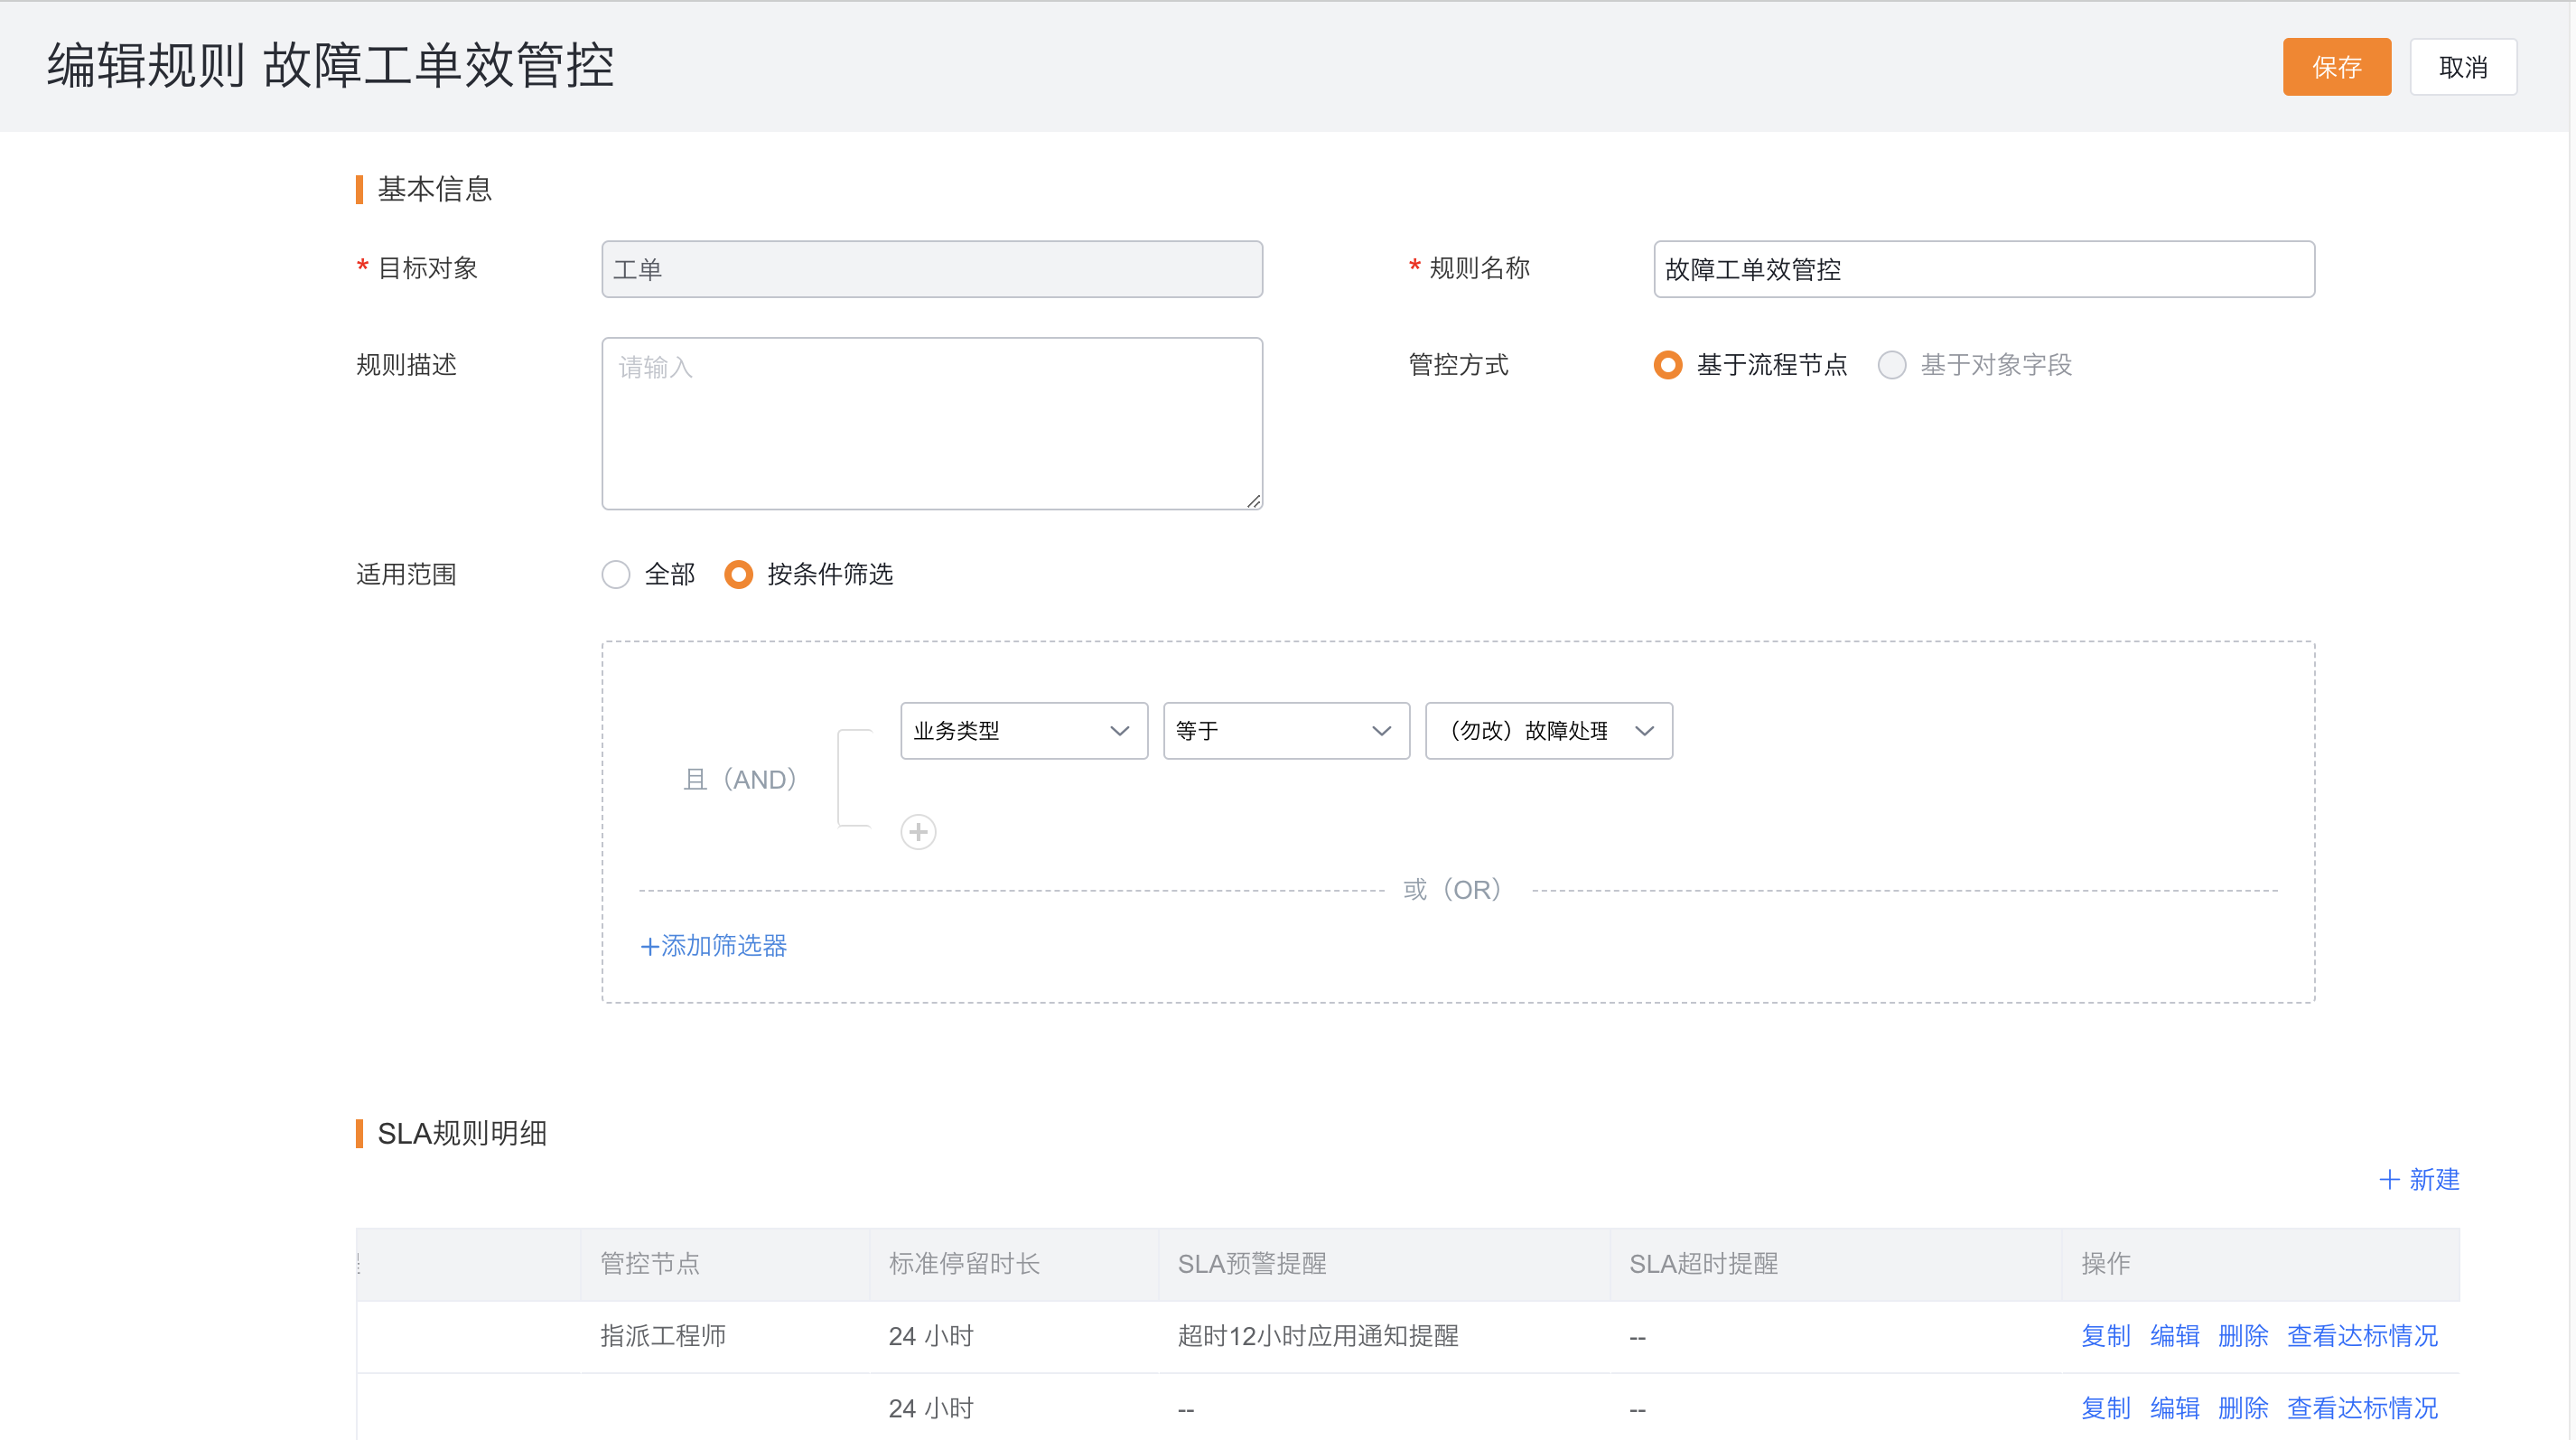
The scope of application determines which records will enter this rule; when setting filter conditions, avoid including records that do not require timing into the rule.
3. Configure SLA based on process nodes
After selecting Based on process node, follow the steps below to configure the rule details:
- Click New, fill in the Rule Details Name, and select the Process that needs to be supervised.
- Select in Type:
- Single node management and control: Monitor the start to completion of the same node, such as the start of on-site standard operations and the completion of on-site standard operations.
- Cross-node management and control: Monitor the handover between different nodes, such as the start of assignment to the completion of orders by engineers.
- Select the start node, start timing, end node and end timing in Timing Rules.
- Fill in the Standard processing time, and select whether to display countdown on the task as needed.
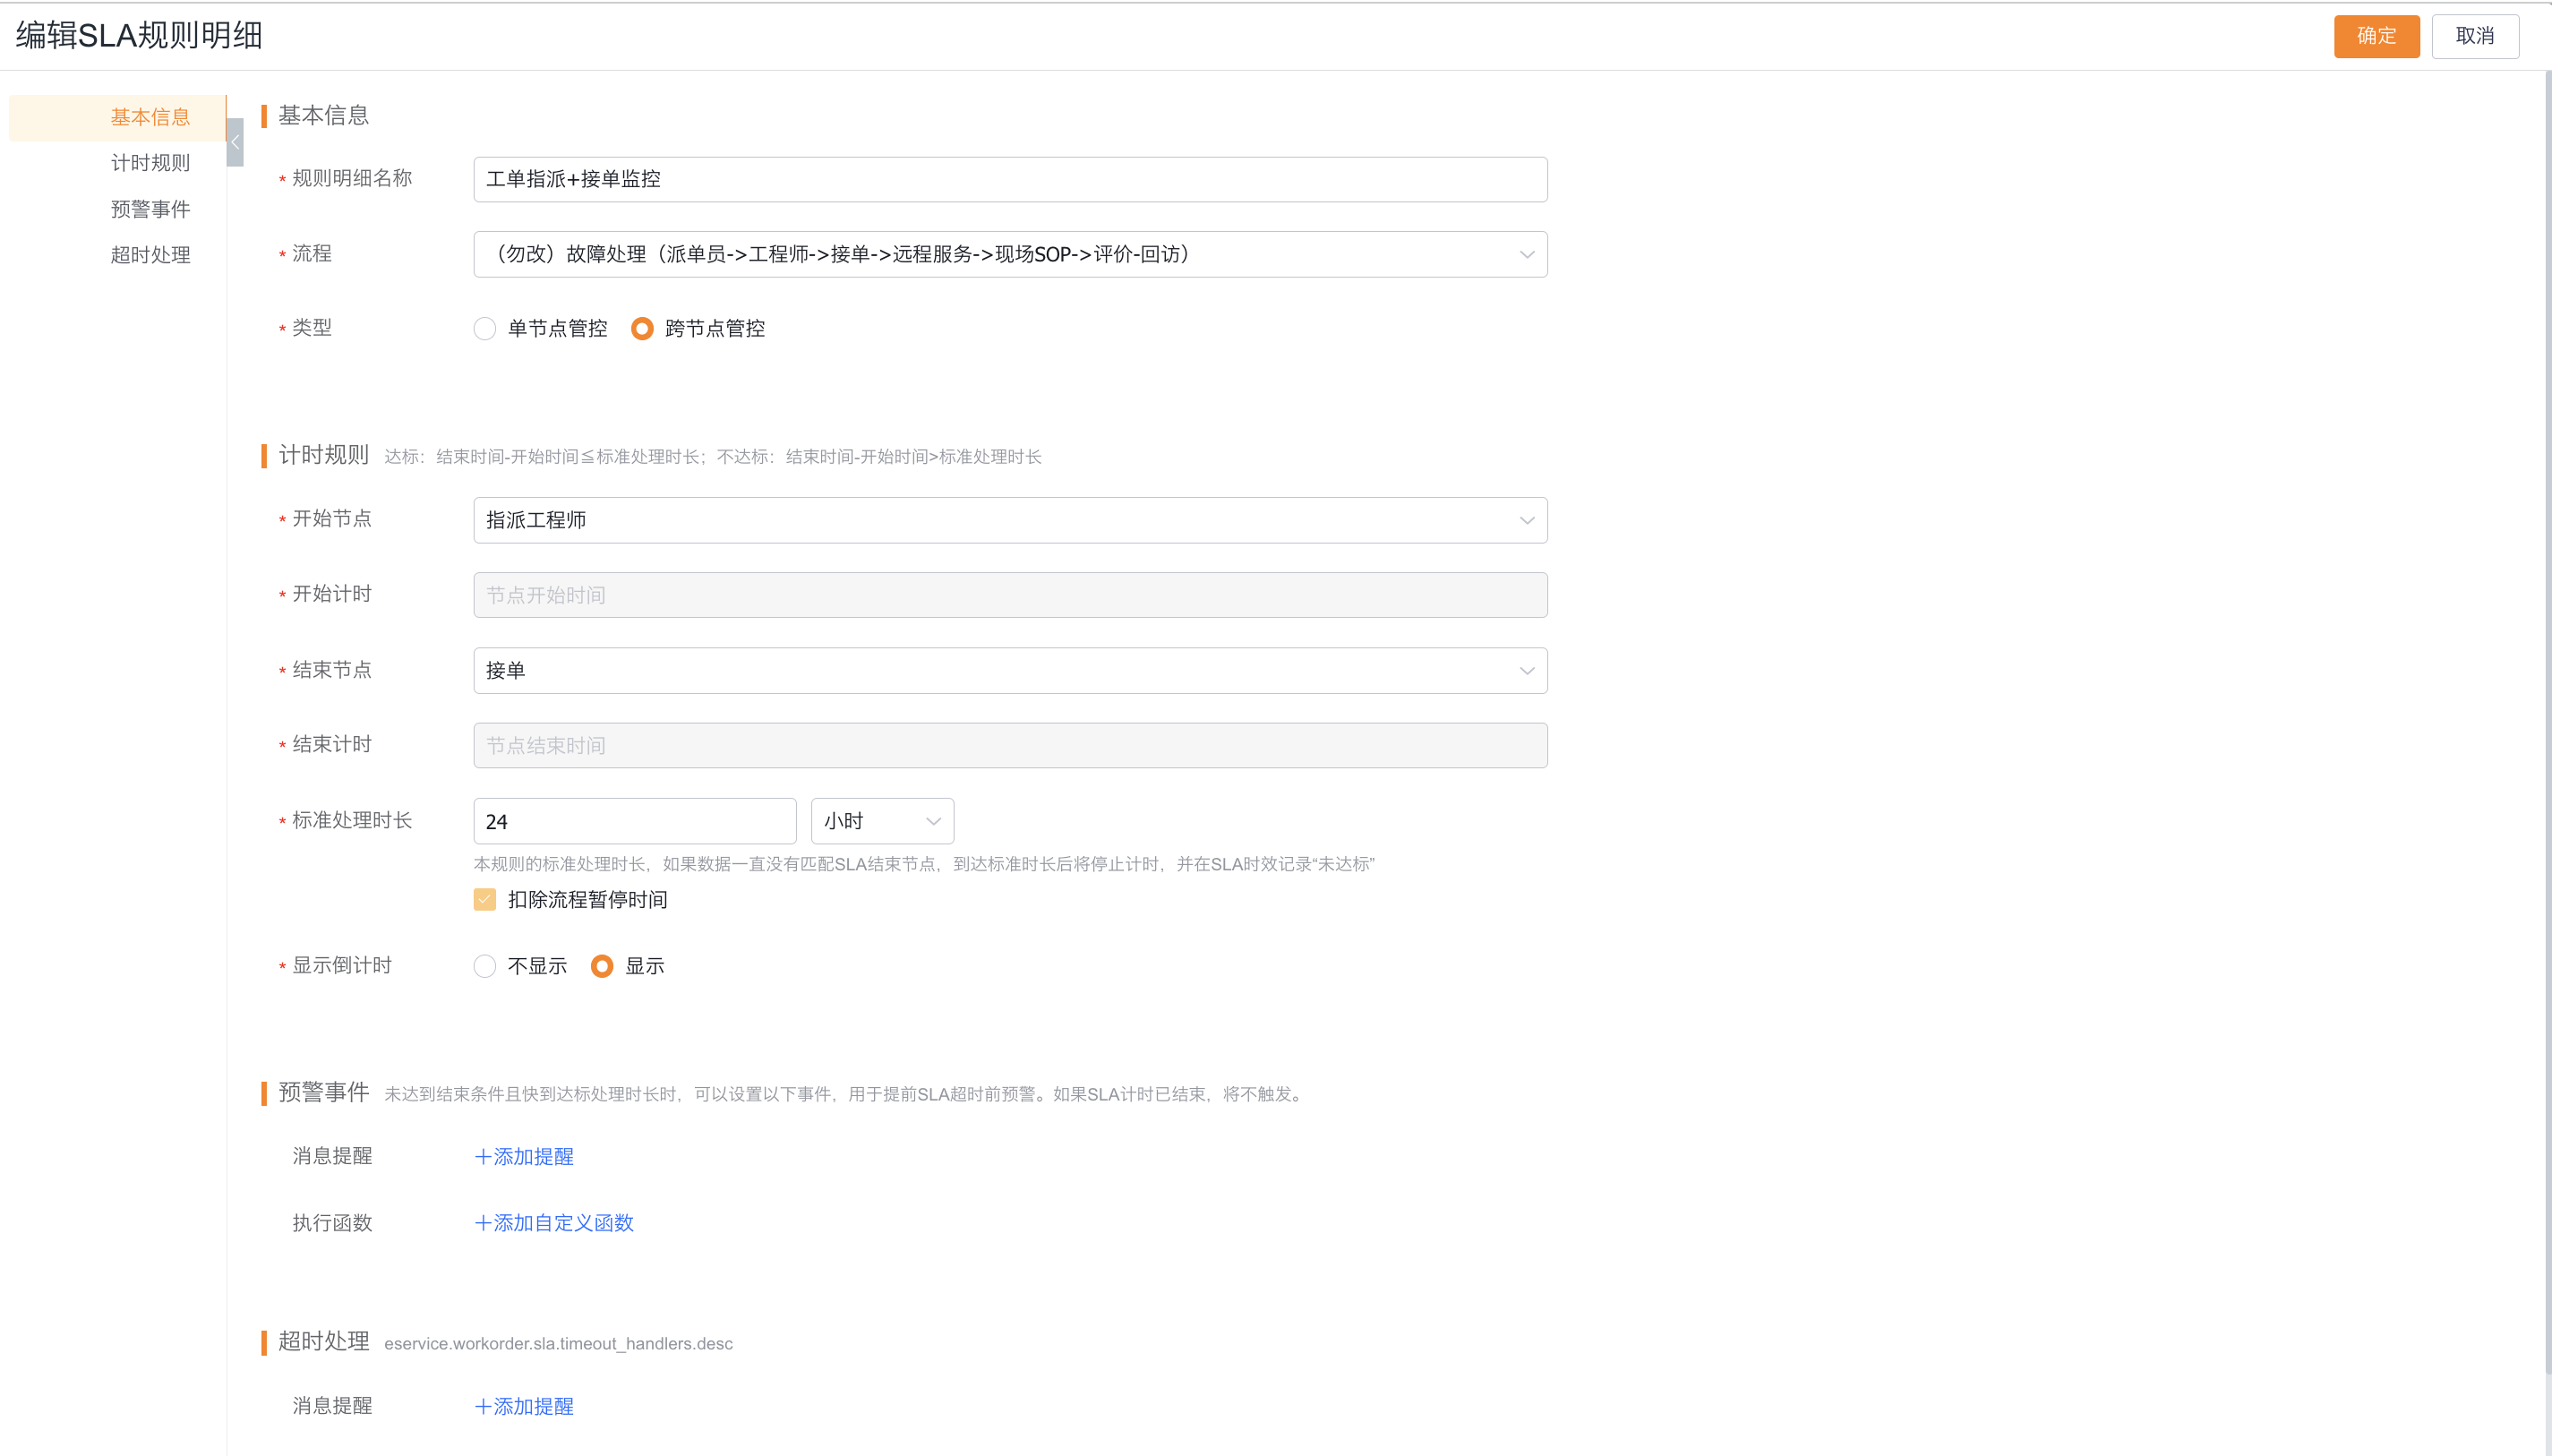
The standard is judged as "end time - start time ≤ standard processing time"; when the standard processing time is exceeded, it is recorded as failure to meet the standard.
4. Configure warning and timeout events
Configure warning events
- Open Alert Event.
- Set the reminder after how much time has passed since the start of timing. For example, the standard processing time is 72 hours, and the reminder can be after 48 hours.
- Select the notification method, such as CRM notification, application notification or SMS notification.
- Select the person to be reminded and the content to be reminded; if automated processing is required, an execution function can be added.
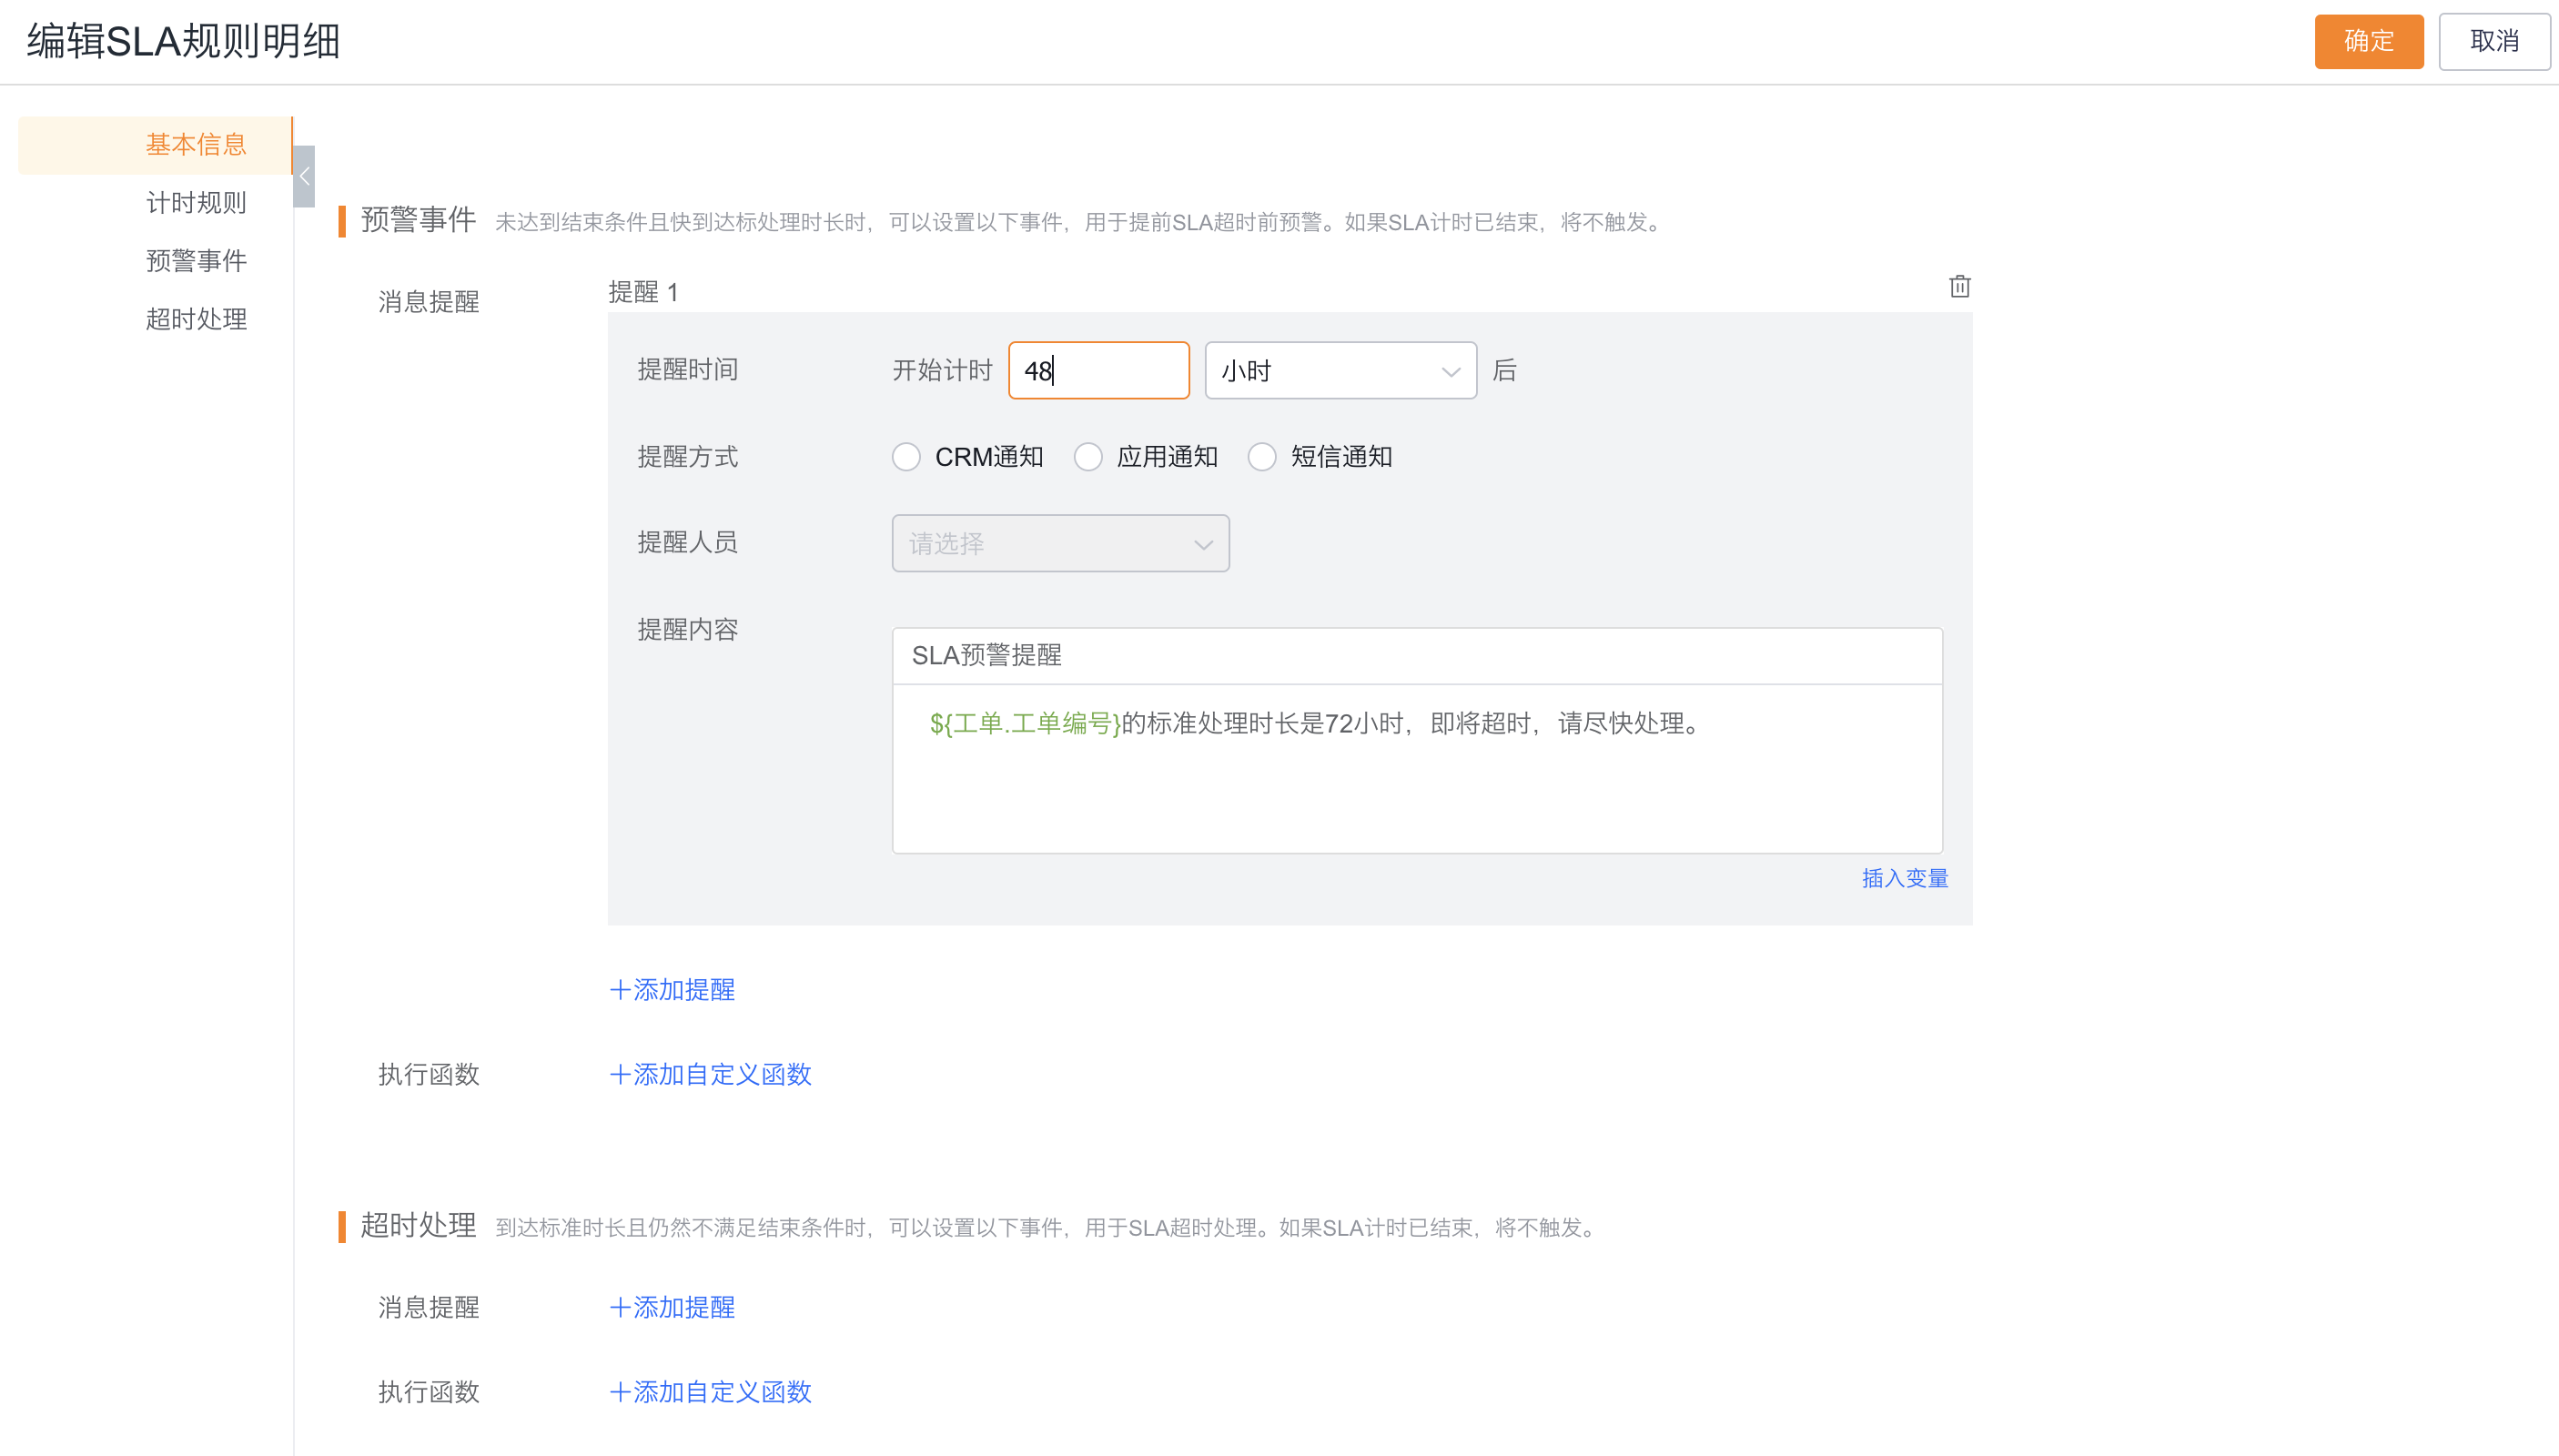
The alert is only triggered when the end condition has not occurred and the SLA timer has not expired.
Configure timeout event
- Turn on Timeout Handling.
- Set how much time has passed since the start of timing for post-processing. For example, the standard processing time is 72 hours, and a timeout reminder can be sent after 78 hours.
- Select the notification method, reminder personnel and reminder content; when automated processing is required, you can add execution functions.
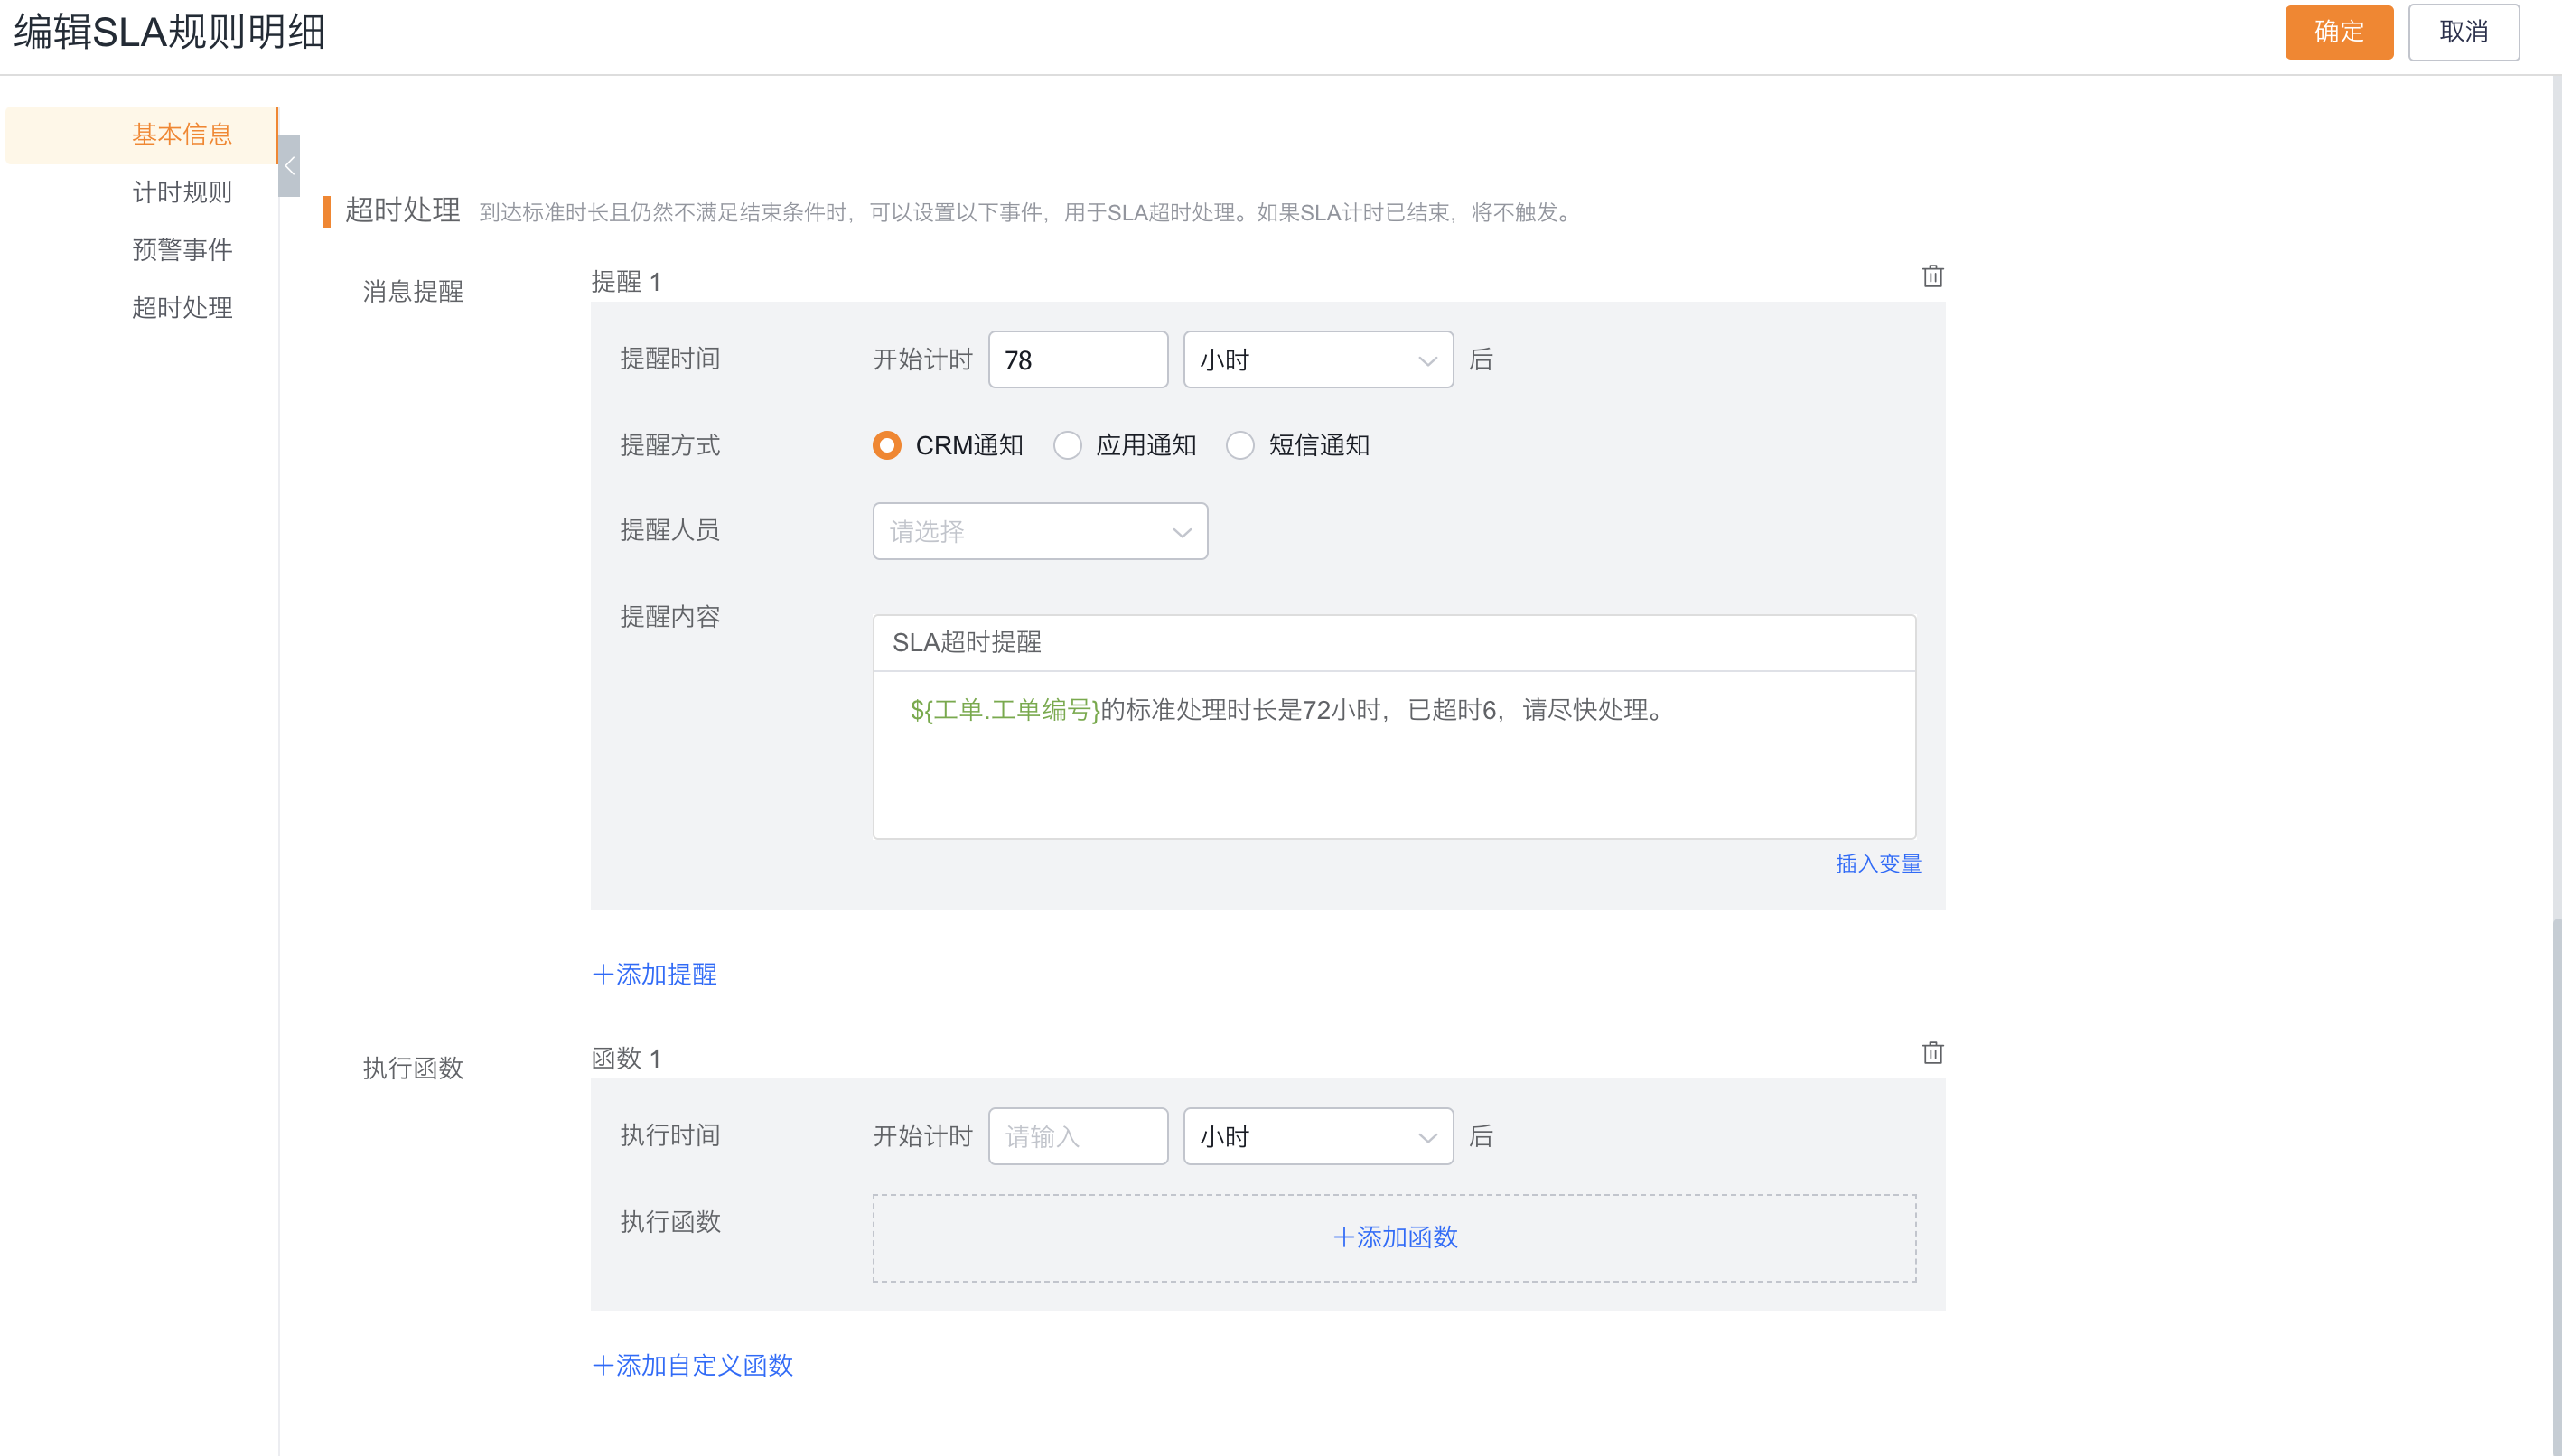
The timeout event is only triggered when the set time is reached and the end condition has not yet occurred; it will not be triggered when the SLA timing has expired.

5. Configure SLA based on object fields
After selecting Based on Object Field:
- Fill in the rule details name.
- Select Start condition: new object or field change.
- Select the Start Timing field.
- Select the field change in End Condition and set the target value after the field change.
- Fill in the standard processing time.
For example, select Work Order Creation Time as the start timing and select Work Order Status Change to Work Order Service as the end condition to monitor the time between when the work order is created and when the engineer receives the order.
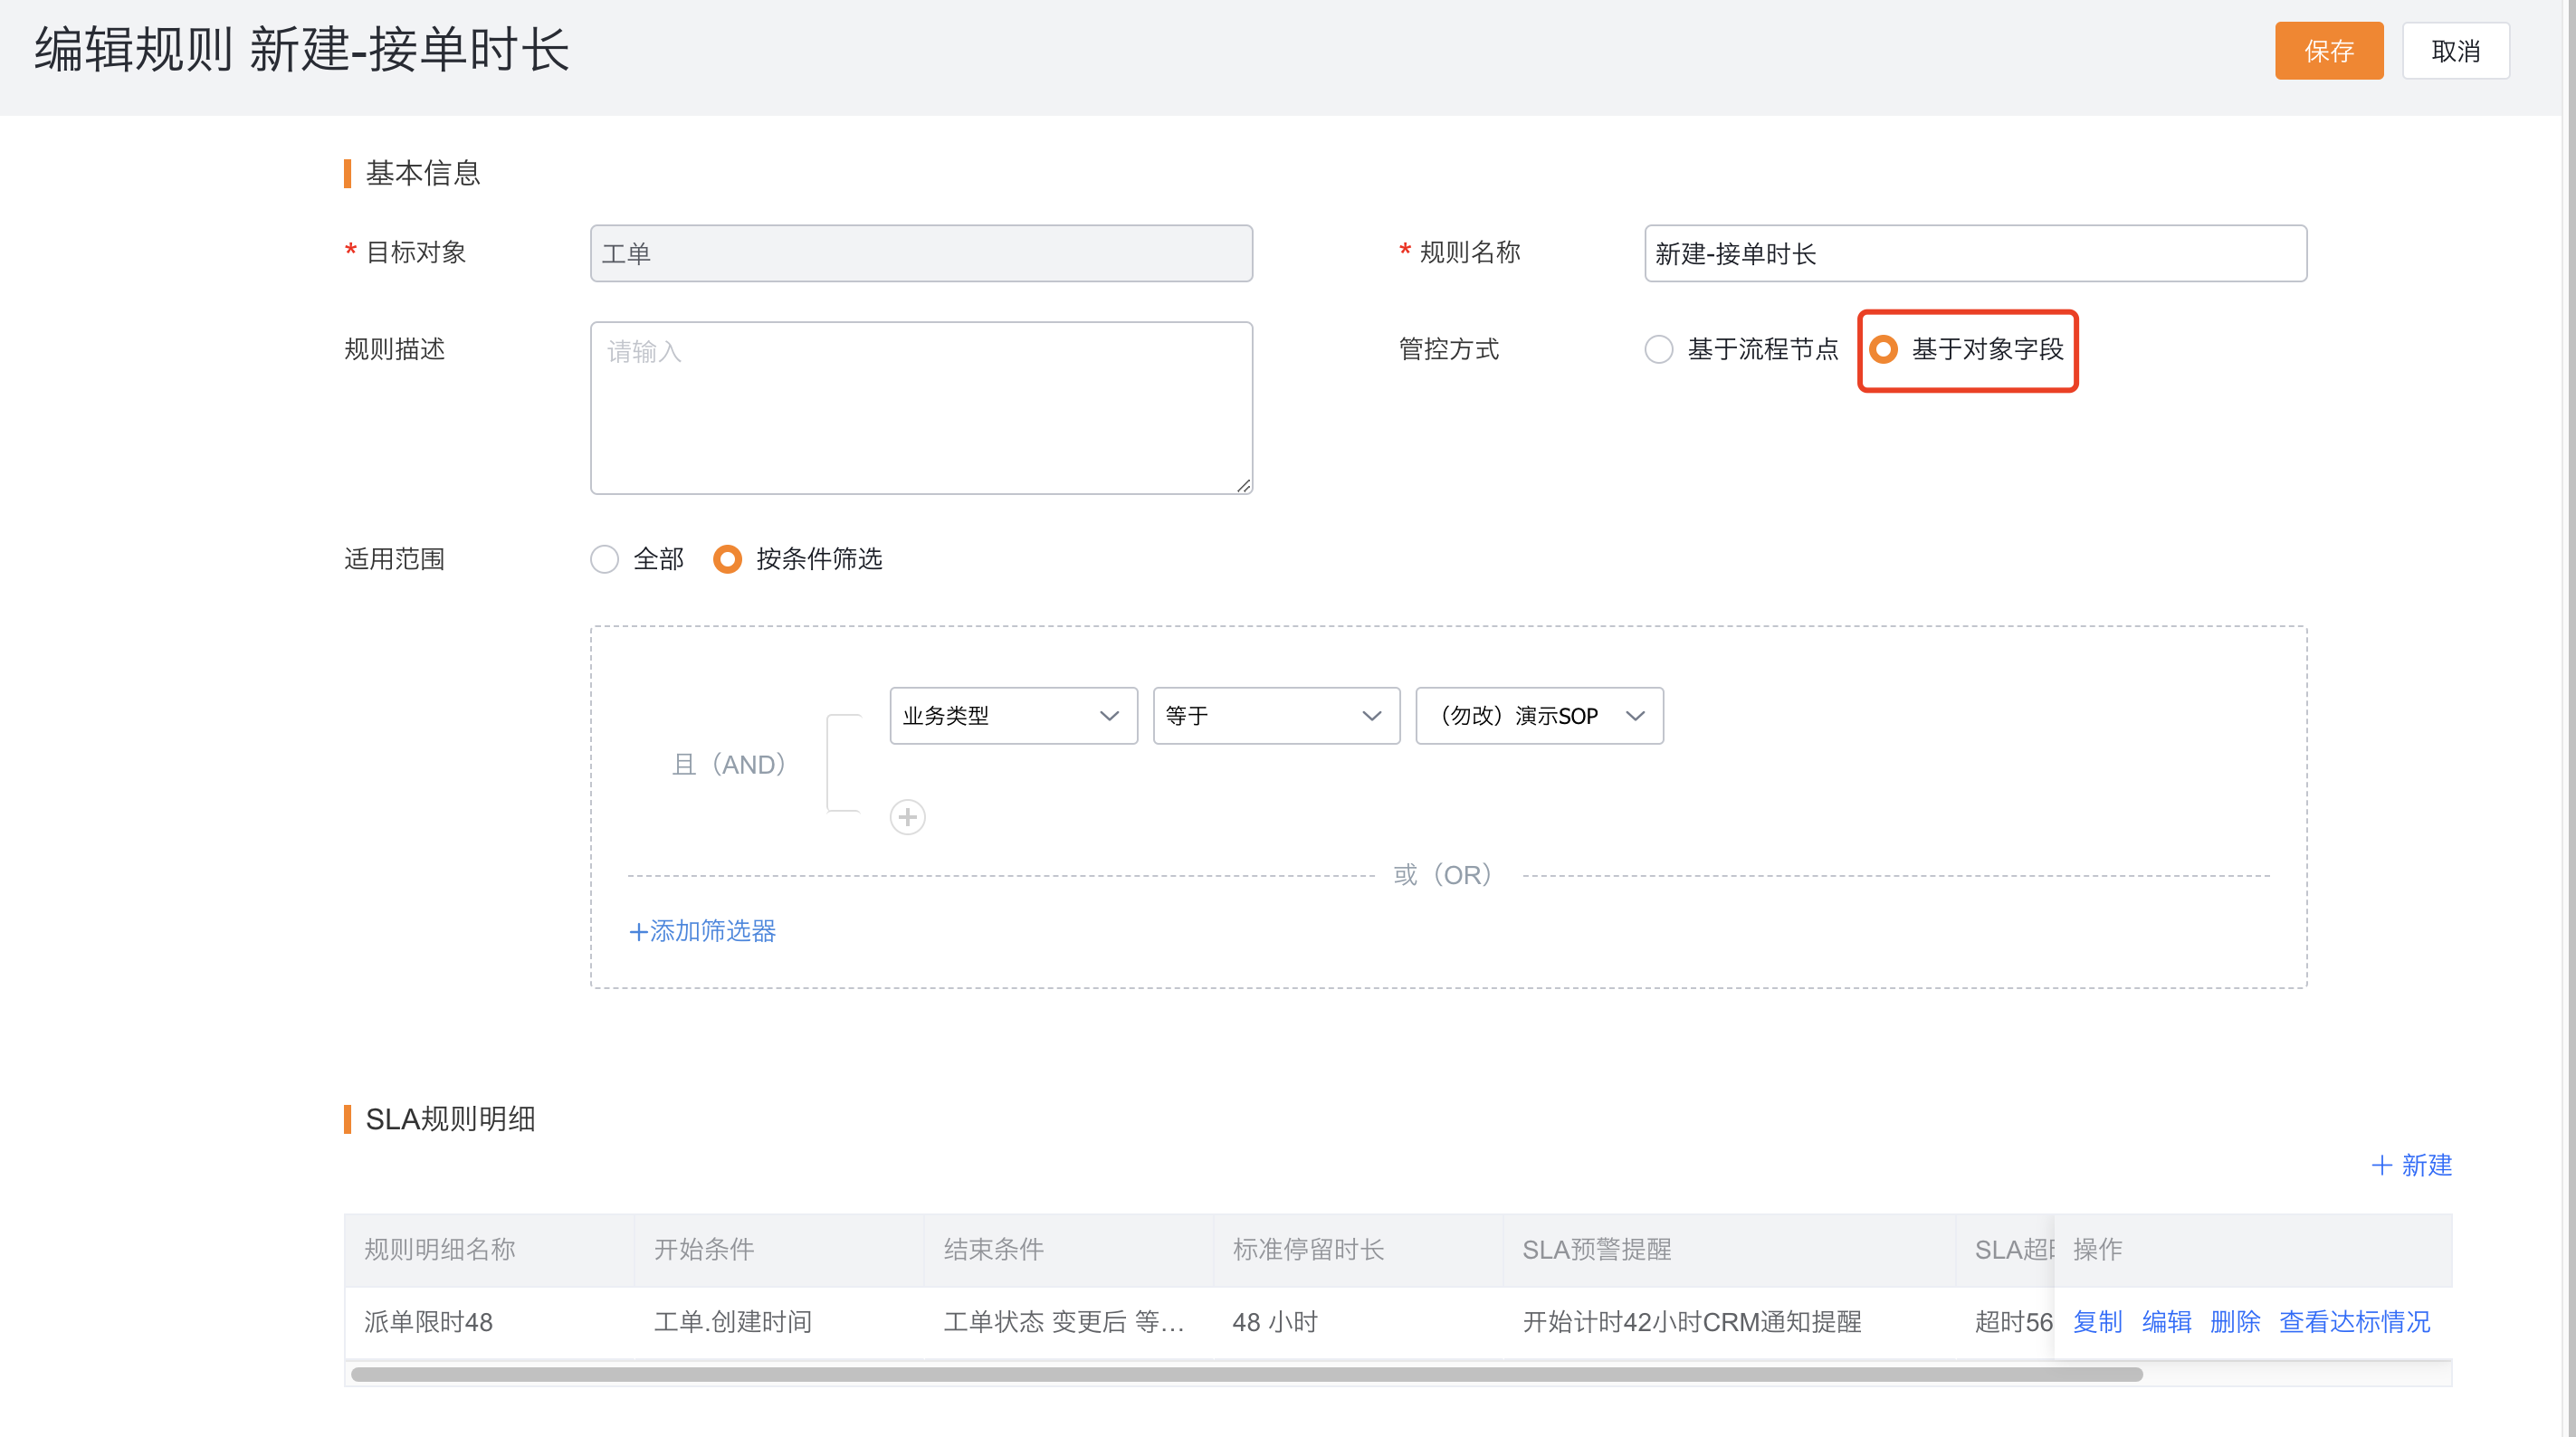
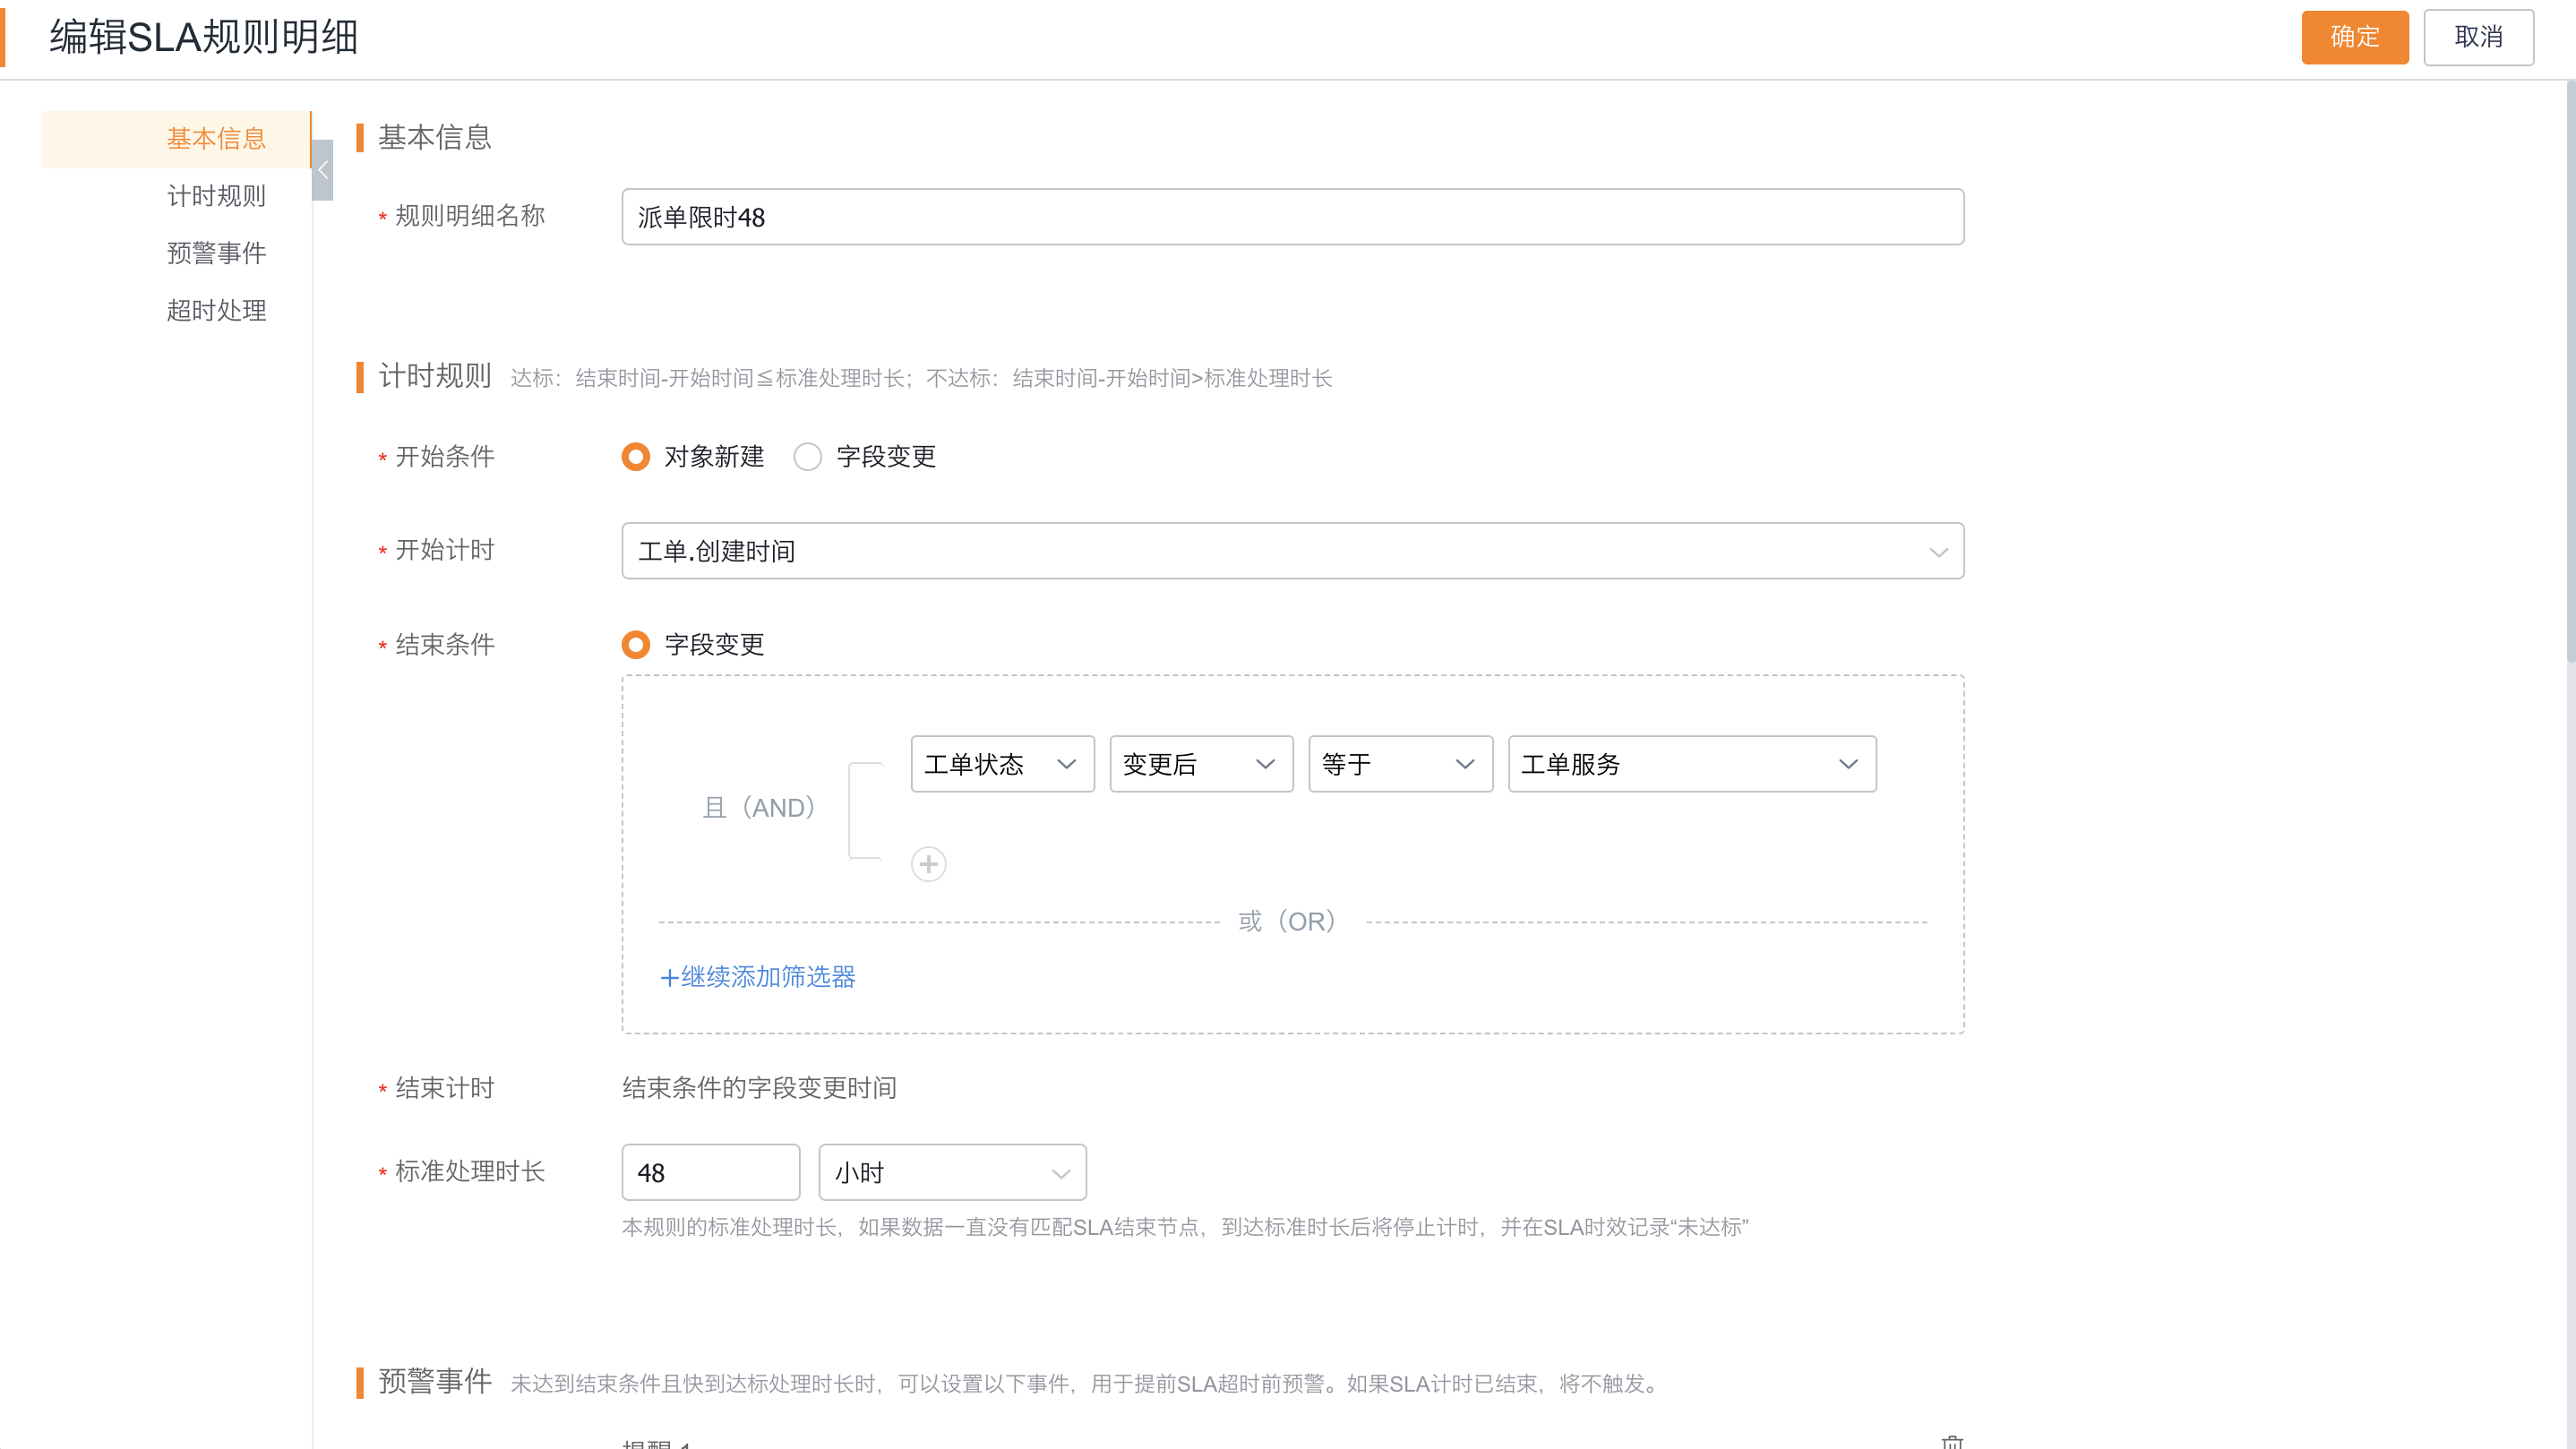
The end condition based on the object field can only use field changes; when the end field condition does not occur, the timing will not end normally.
6. Configure alerts and timeouts for field changes
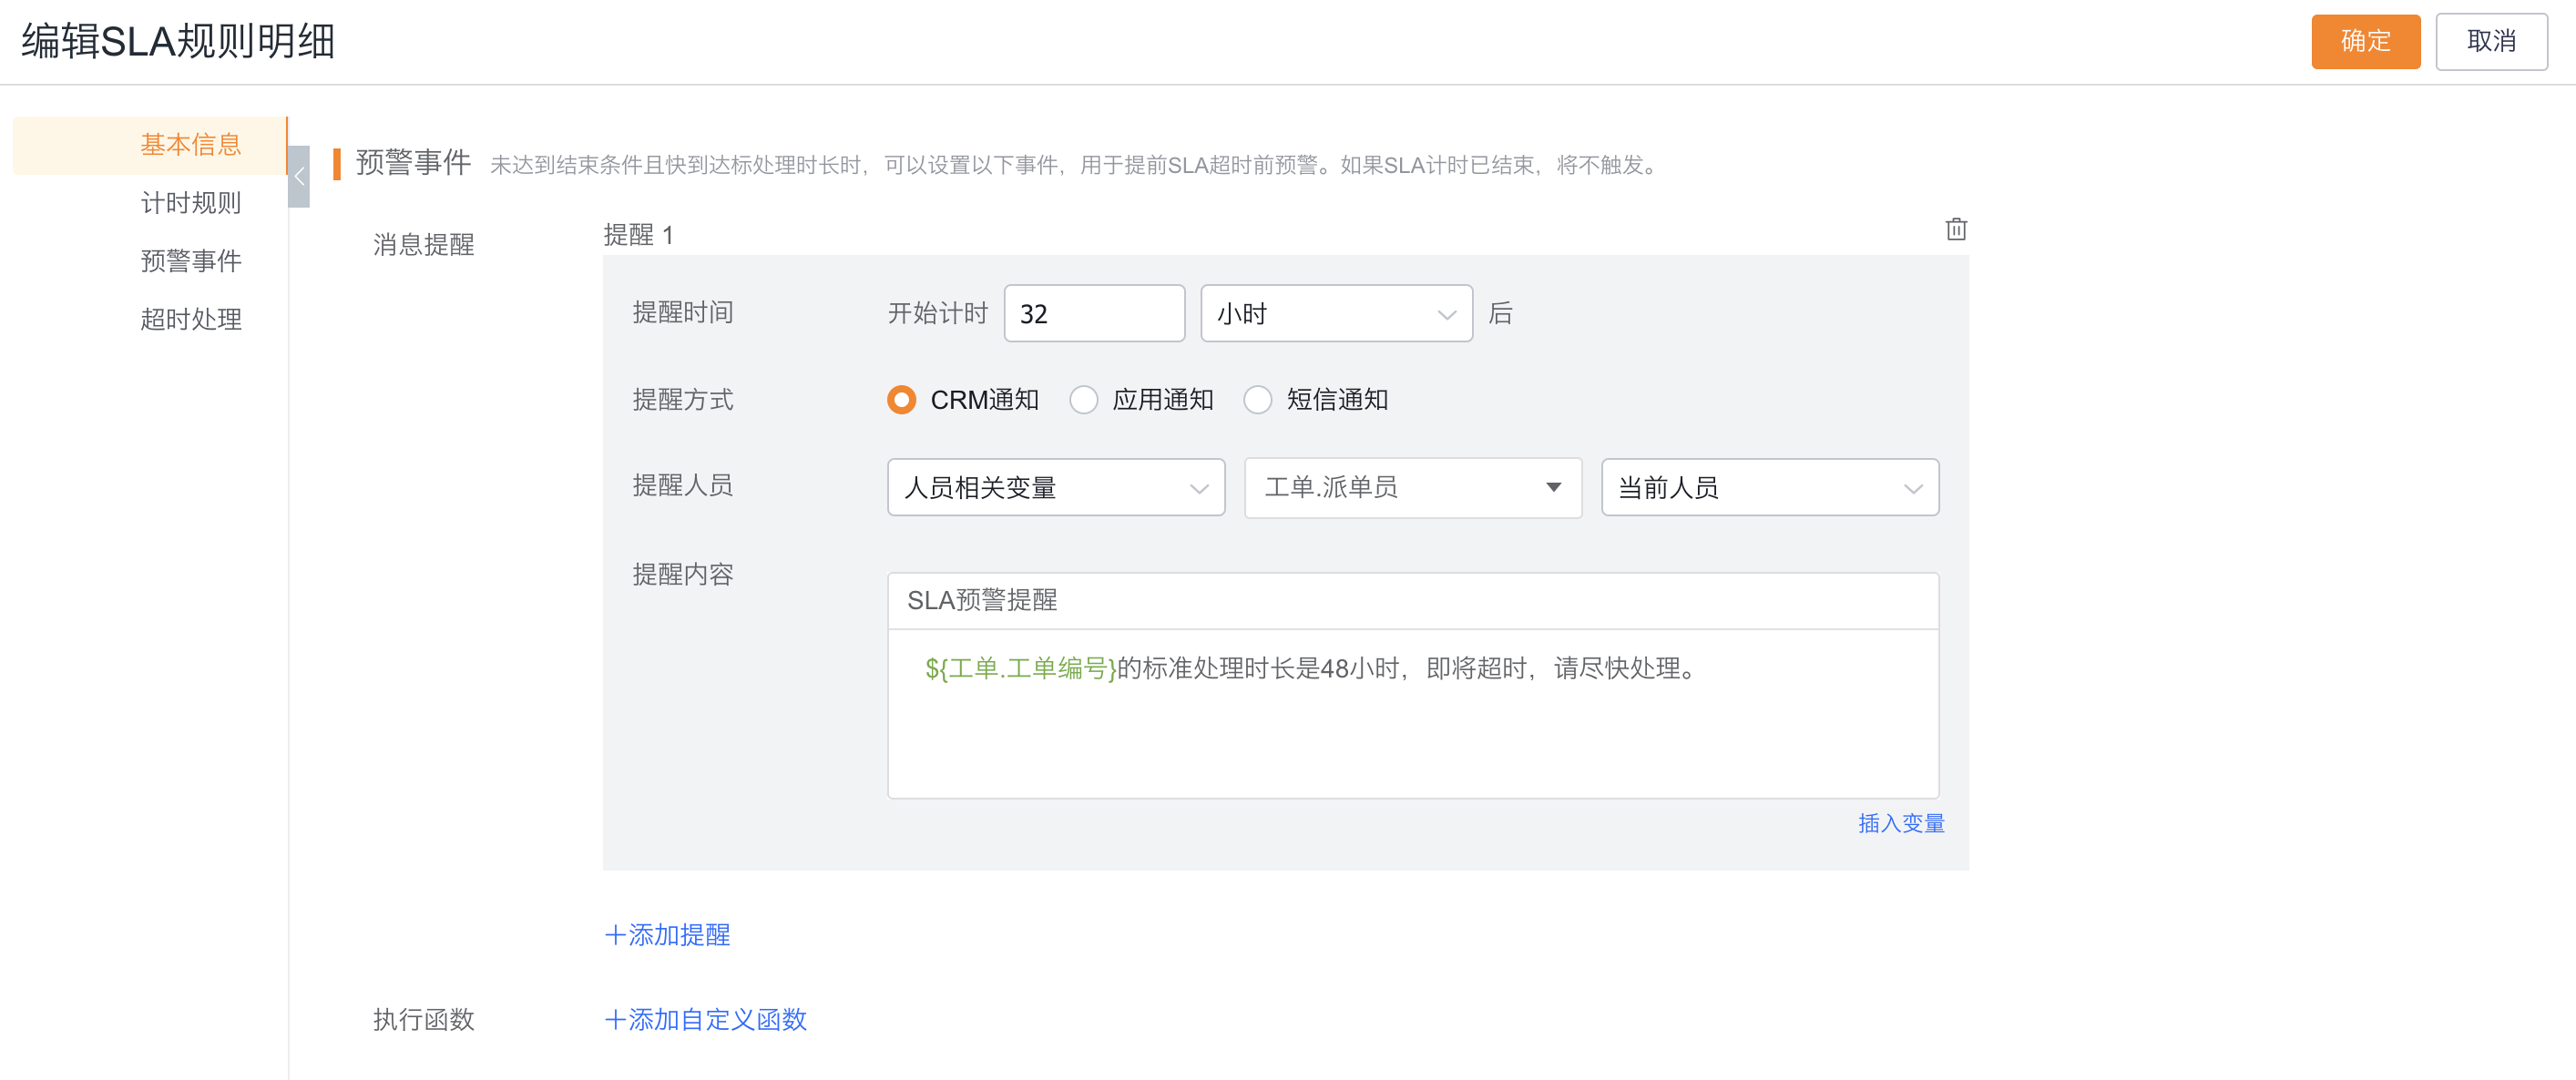
- Set the reminder time in Alert event, for example, the standard processing time is 48 hours, and the reminder can be after 32 hours.
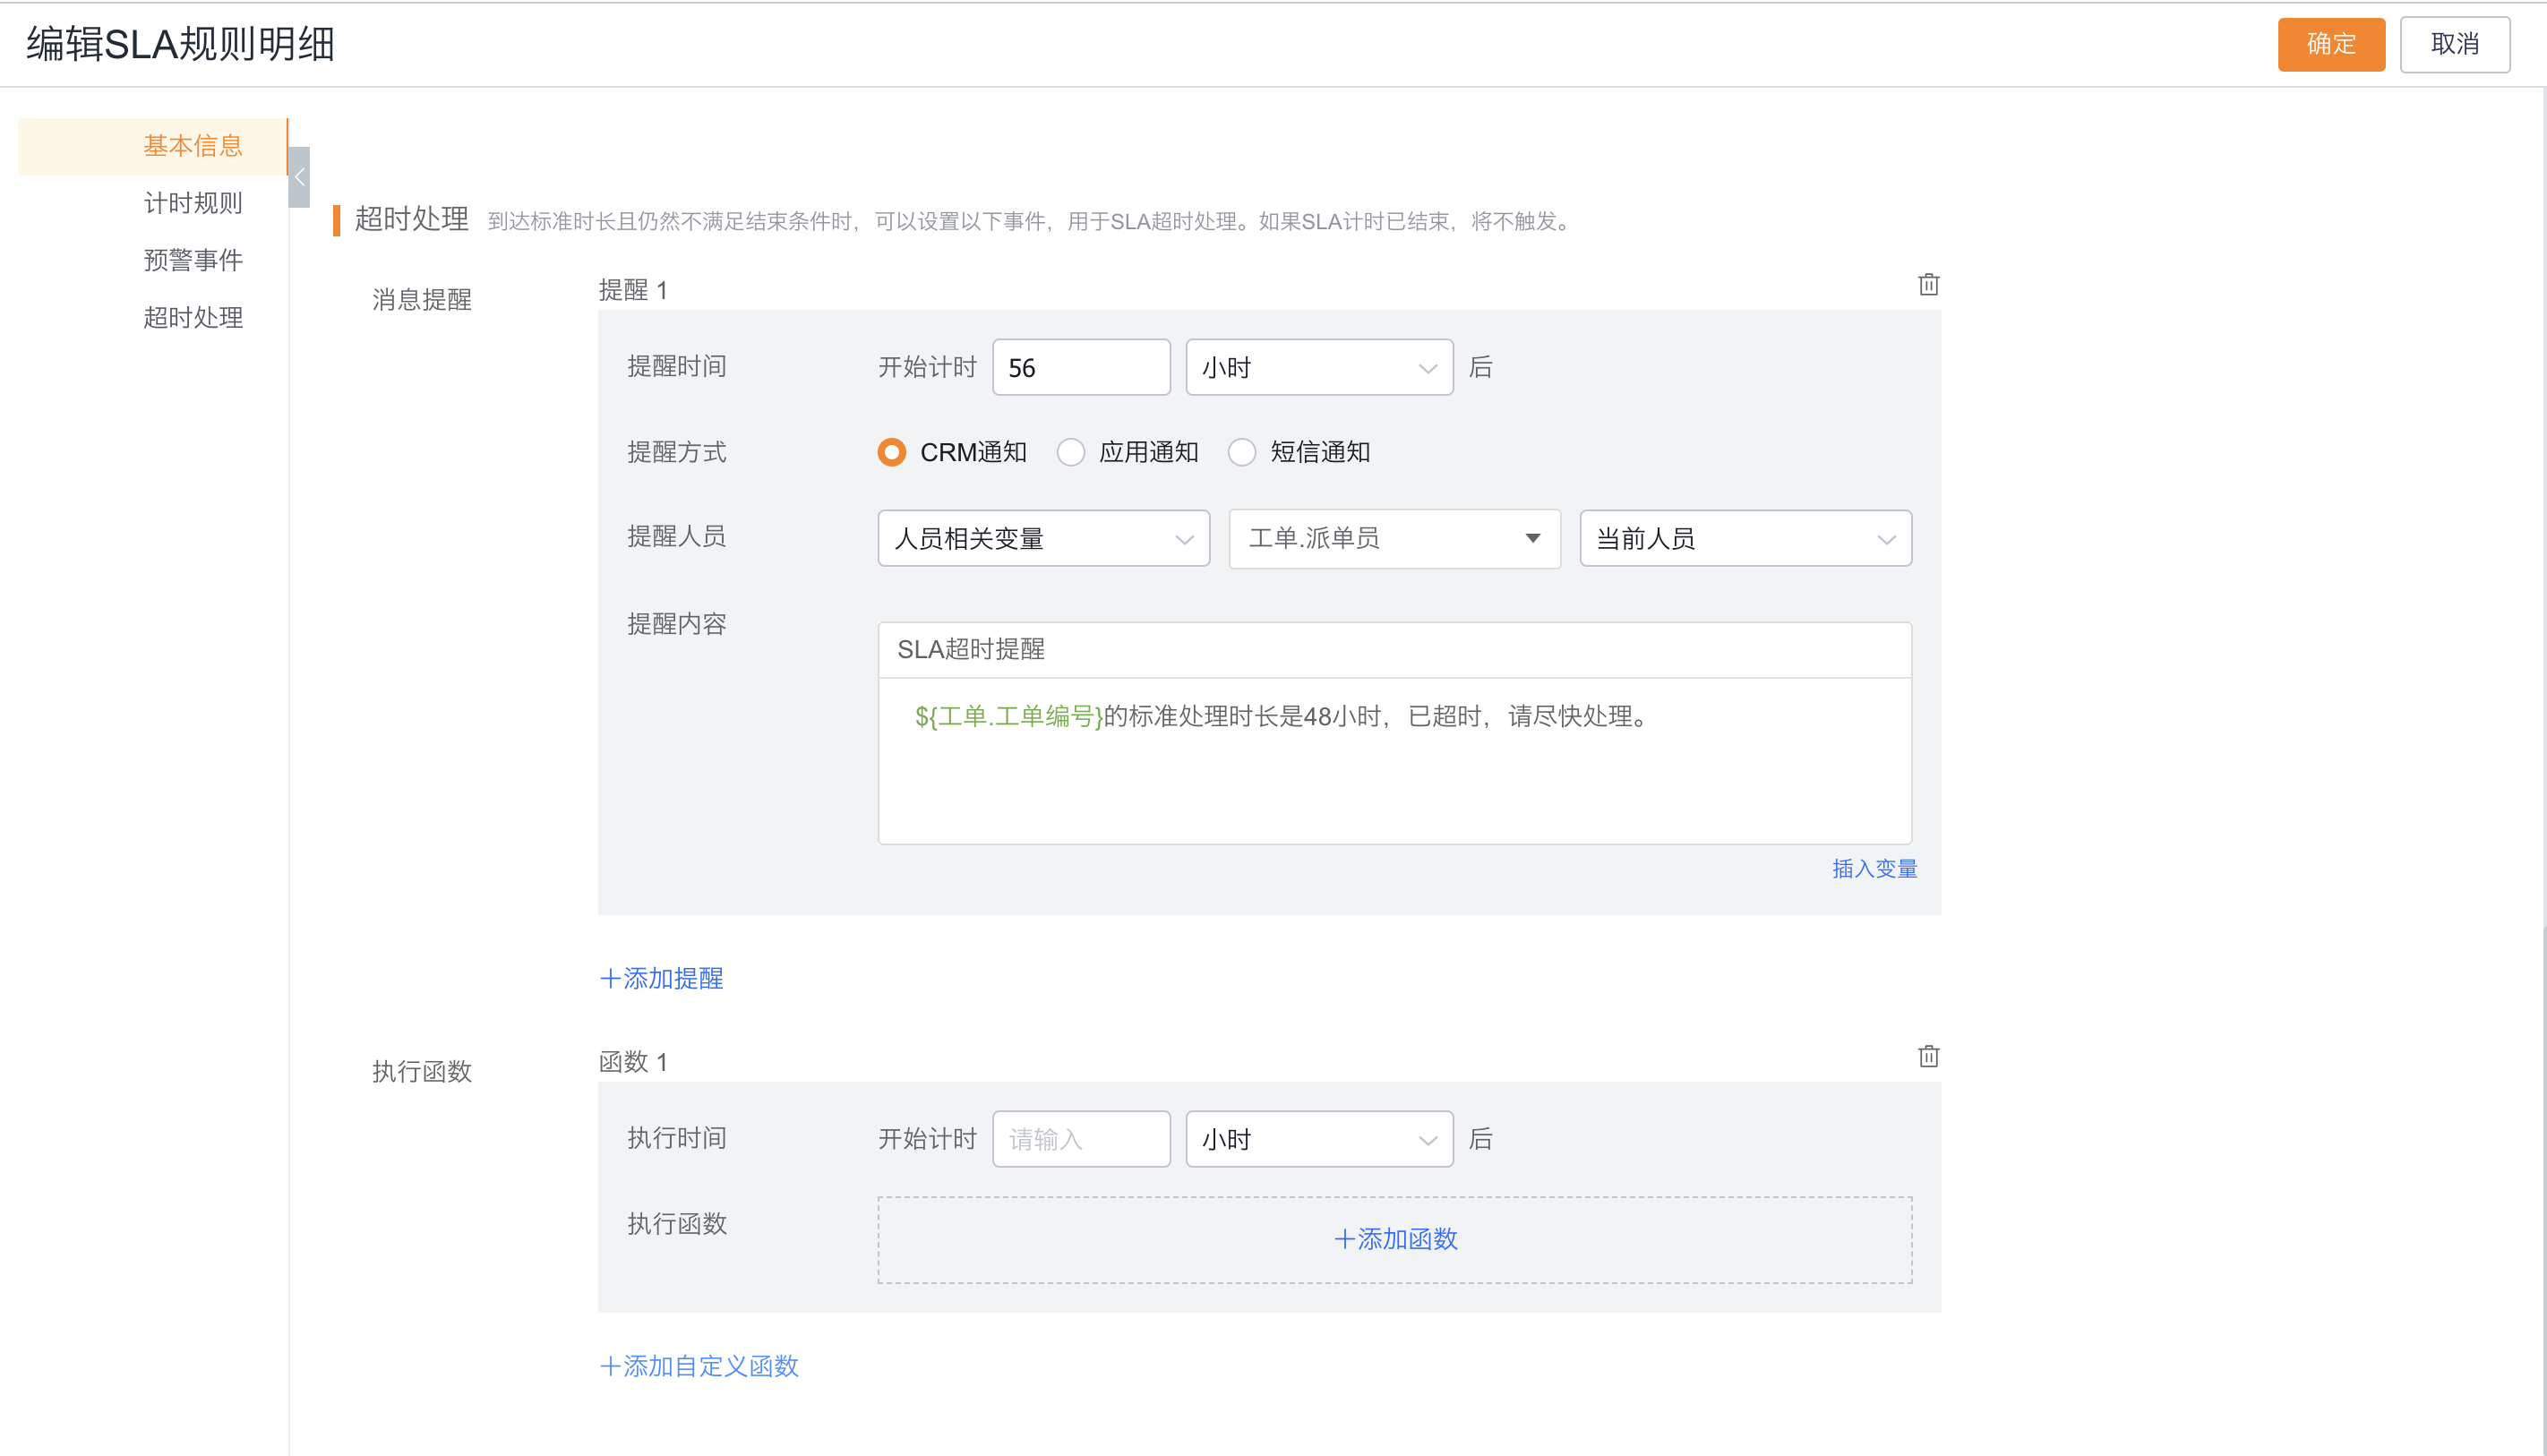
- Set the timeout processing time in Timeout processing, for example, remind after 56 hours.
- Select the notification method, reminder person, reminder content or execution function respectively.
7. Save, enable and verify
- Check the target object, scope of application, start/end conditions, standard processing time and event time.
- Click Save or OK to save the rule details, and then save the rule.
- Confirm that the rule is enabled.
- Use a test work order or service request that meets the applicable scope to trigger the start condition and end condition according to the configured path.
- Check the task countdown, warning/timeout notification, and the start time, end time and compliance status in SLA Timeliness Compliance Status.
Expected results and verification
- The Rules list shows saved and enabled SLA rules.
- Records that meet the applicable scope start timing after the start condition occurs.
- After the end condition occurs, generate or update the SLA compliance record, and determine whether the SLA has reached the standard or not according to the duration.
- Tasks with countdown turned on will display the remaining duration; if the task exceeds the standard duration, the timeout duration will be displayed.
- The system sends warning or timeout notifications when their conditions are met. A completed SLA does not trigger another event.
Troubleshooting
| Phenomenon | Priority check items | Description |
|---|---|---|
| The rule is not effective | Rule activation status, target object, scope of application | Records that are not enabled or do not meet the filtering conditions will not enter the timing |
| No start timing | Whether the start node occurs and whether the start field changes | Valid timing will not be generated when the start condition does not occur |
| It never ends | Whether the end node is completed and whether the end field is changed | The end condition of field control can only be field change |
| No early warning or timeout notification | Event time, notification method, reminder personnel and end conditions | Not triggered when SLA has ended or end conditions have occurred |
| No achievement record is visible on the details page | Whether to configure the common associated component (what) and the correct associated object | The existence of the target object does not mean that the detail layout has been displayed |
The original information does not describe the complete rules for working time calendar, failure retry, batch recalculation and pause timing. When encountering these situations, the current page configuration and actual test results should prevail.